
User Guide
Page 1
Rev A - 08/10 UltraKey Lite Keyboard controller for VideoBloX and MAXPRO-Net Matrix Systems HJC5000 Installation and User Guide Document 800-07422 -
Rev A - 08/10 UltraKey Lite Keyboard controller for VideoBloX and MAXPRO-Net Matrix Systems HJC5000 Installation and User Guide Document 800-07422 -

User Guide
Page 4
... 3: Configure Address, Baud Rate or IP for an Ethernet Connection; corrected IP address p. 59; Step 4: Configure the Controller for VideoBloX Mode; added Step 5: Setting the Keyboard Address While Powering Up;
... 3: Configure Address, Baud Rate or IP for an Ethernet Connection; corrected IP address p. 59; Step 4: Configure the Controller for VideoBloX Mode; added Step 5: Setting the Keyboard Address While Powering Up;

User Guide
Page 11
... 4-13 Figure 4-14 Figure 4-15 Figure 4-16 Figure 4-17 Figure 5-1 UltraKey Lite Port Connections 19 Terminal Box Front and Back Ports 20 UltraKey Lite Controller Keyboard Layout 22 The UltraKey Navigation Controls 23 LCD and LCD Navigation Keys 32 VideoBloX LCD Configuration Menu Tree 32 AC Power Adapter with CEE 7/16...
... 4-13 Figure 4-14 Figure 4-15 Figure 4-16 Figure 4-17 Figure 5-1 UltraKey Lite Port Connections 19 Terminal Box Front and Back Ports 20 UltraKey Lite Controller Keyboard Layout 22 The UltraKey Navigation Controls 23 LCD and LCD Navigation Keys 32 VideoBloX LCD Configuration Menu Tree 32 AC Power Adapter with CEE 7/16...

User Guide
Page 13
... Up 23 VideoBloX Key Functions 24 MAXPRO Key Functions 27 Serial Port COM1 and COM2 Pin Assignments 33 RJ45 Ethernet Pin Assignments 37 Setting the Keyboard Address 41 Serial Port COM1 and COM2 Pin Assignments 49 Terminal Box COM1 and COM2 Pin Assignments 52 RJ45 Ethernet Pin Assignments 56 Setting the...
... Up 23 VideoBloX Key Functions 24 MAXPRO Key Functions 27 Serial Port COM1 and COM2 Pin Assignments 33 RJ45 Ethernet Pin Assignments 37 Setting the Keyboard Address 41 Serial Port COM1 and COM2 Pin Assignments 49 Terminal Box COM1 and COM2 Pin Assignments 52 RJ45 Ethernet Pin Assignments 56 Setting the...

User Guide
Page 16
... Exit to external source. Lucida Values of editable fields that are part of an arrow between keys or tabs indicates 1. Text strings displayed on the keyboard. Syntax. Refer to the System Administrator Guide. About this Document and the UltraKey Lite Finding More Information Refer to the online literature library to access...
... Exit to external source. Lucida Values of editable fields that are part of an arrow between keys or tabs indicates 1. Text strings displayed on the keyboard. Syntax. Refer to the System Administrator Guide. About this Document and the UltraKey Lite Finding More Information Refer to the online literature library to access...
User Guide
Page 17
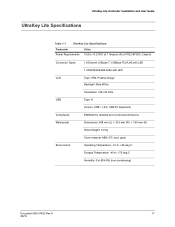
... 1×RS232/422/485 RJ45 with LED Type: STN, Positive Image Backlight: Blue-White Characters: 122×32 Dots Type: A Version: USB1.1 (For USB PC Keyboard) EN55022 for radiated and conducted emissions Dimensions: 408 mm (L) × 215 mm (W) × 105 mm (H) Gross Weight: 3.2 kg Cover material: ABS+PC (cool gray) Operating...
... 1×RS232/422/485 RJ45 with LED Type: STN, Positive Image Backlight: Blue-White Characters: 122×32 Dots Type: A Version: USB1.1 (For USB PC Keyboard) EN55022 for radiated and conducted emissions Dimensions: 408 mm (L) × 215 mm (W) × 105 mm (H) Gross Weight: 3.2 kg Cover material: ABS+PC (cool gray) Operating...

User Guide
Page 18
... Lite can be connected to the UltraKey Lite. 1 Function key overlay For use with ... Power adapter with VideoBloX and VideoBloX Lite CPU installations. Ultrakey Lite keyboard controller All installations. Australian 10 A/240V). 1 Connector adapter, RJ45 to DB9 male, for RS422 2 Connector adapter, RJ45 to DB9 female, for RS232 Backwards compatibility with...
... Lite can be connected to the UltraKey Lite. 1 Function key overlay For use with ... Power adapter with VideoBloX and VideoBloX Lite CPU installations. Ultrakey Lite keyboard controller All installations. Australian 10 A/240V). 1 Connector adapter, RJ45 to DB9 male, for RS422 2 Connector adapter, RJ45 to DB9 female, for RS232 Backwards compatibility with...

User Guide
Page 21
Connect the keyboard with a power adapter (12V (±10%) DC/1 A included) or a network cable with the Standalone Mode (for PTZ/DVR functions) are in future releases. To configure ...
Connect the keyboard with a power adapter (12V (±10%) DC/1 A included) or a network cable with the Standalone Mode (for PTZ/DVR functions) are in future releases. To configure ...
User Guide
Page 22
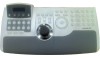
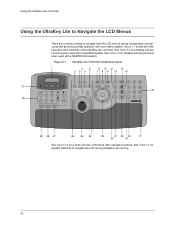
... 25 24 23 21 20 18 17 22 19 See Figure 2-2 for UltraKey Lite key functions when used with a VideoBloX system. Figure 2-1 UltraKey Lite Controller Keyboard Layout 1 4 6 8 10 12 14 23 5 7 9 11 13 15 12:00 4/6/09 Menu Setup Down View 123 31 Alarm Seq Set Review Search Tour 456 F1...
... 25 24 23 21 20 18 17 22 19 See Figure 2-2 for UltraKey Lite key functions when used with a VideoBloX system. Figure 2-1 UltraKey Lite Controller Keyboard Layout 1 4 6 8 10 12 14 23 5 7 9 11 13 15 12:00 4/6/09 Menu Setup Down View 123 31 Alarm Seq Set Review Search Tour 456 F1...

User Guide
Page 24
... + Iris O Frame > 5 Set Store a preset (preshot) Store Stop 6 Recycle (Undo) Undo previous camera selection Iris close - Contact Honeywell Technical Support or refer to locate each key as labeled in the ID column. Table 2-2 VideoBloX Key Functions ID Key Description Function in Table ...PCK (Device Mode) 2 Alarm Acknowledge Alarms Alarm Ack Alarm Ack 3 Seq Selects Sequence mode SEQ SEQ 4 Iris - Note The keyboard supports dynamic key configuration. Using the UltraKey Lite Controller Table 2-1 LCD Menu Navigation During Set Up (cont'd) Task Options To move back...
... + Iris O Frame > 5 Set Store a preset (preshot) Store Stop 6 Recycle (Undo) Undo previous camera selection Iris close - Contact Honeywell Technical Support or refer to locate each key as labeled in the ID column. Table 2-2 VideoBloX Key Functions ID Key Description Function in Table ...PCK (Device Mode) 2 Alarm Acknowledge Alarms Alarm Ack Alarm Ack 3 Seq Selects Sequence mode SEQ SEQ 4 Iris - Note The keyboard supports dynamic key configuration. Using the UltraKey Lite Controller Table 2-1 LCD Menu Navigation During Set Up (cont'd) Task Options To move back...

User Guide
Page 25
... Camera Mode PCK (Cam Mode) PCK (Device Mode) 7 Pause Play Rev Selects previous camera Prev Stop 8 Review Puts keyboard in Device mode NA Pause 9 Record Store a preset (preshot) Store Rec 10 Search Puts keyboard in Device mode NA Index - 11 Pause Play Fwd Selects next camera Next Play 12 Tour Tour 1 Runs...
... Camera Mode PCK (Cam Mode) PCK (Device Mode) 7 Pause Play Rev Selects previous camera Prev Stop 8 Review Puts keyboard in Device mode NA Pause 9 Record Store a preset (preshot) Store Rec 10 Search Puts keyboard in Device mode NA Index - 11 Pause Play Fwd Selects next camera Next Play 12 Tour Tour 1 Runs...

User Guide
Page 36
... for port connections and pin assignments see Step 3: Set and Configure for an Ethernet Connection on page 19. The UltraKey Lite Controller runs TCP/IP keyboard protocol. Installing UltraKey Lite with newer model VideoBloX NetCPU systems. 36 IP Address 159.099.251.230 Step 4: Configure VideoBloX Mode Default Settings While Powering...
... for port connections and pin assignments see Step 3: Set and Configure for an Ethernet Connection on page 19. The UltraKey Lite Controller runs TCP/IP keyboard protocol. Installing UltraKey Lite with newer model VideoBloX NetCPU systems. 36 IP Address 159.099.251.230 Step 4: Configure VideoBloX Mode Default Settings While Powering...

User Guide
Page 39
... menu Document 800-07422 Rev A 39 08/10 The structure is used by devices (DHCP clients) to the Network: DHCP menu. 2. Press Ent and the keyboard's network will be configured automatically. • If the network configuration is a computer networking protocol used to configure the network automatically. message displays. Network: Manual Setting...
... menu Document 800-07422 Rev A 39 08/10 The structure is used by devices (DHCP clients) to the Network: DHCP menu. 2. Press Ent and the keyboard's network will be configured automatically. • If the network configuration is a computer networking protocol used to configure the network automatically. message displays. Network: Manual Setting...
User Guide
Page 41
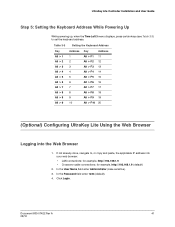
... Time Left 3 menu displays, press certain keys (see Table 3-3) to , or copy and paste, the applicable IP address into the Web Browser 1. Table 3-3 Setting the Keyboard Address Key Alt > 1 Alt > 2 Alt > 3 Alt > 4 Alt > 5 Alt > 6 Alt > 7 Alt > 8 Alt > 9 Alt > 0 Address 1 2 3 4 5 6 7 8 9 10 Key Address Alt > F1 11 Alt > F2 12 Alt > F3 13... (default). 4. In the User Name field enter Administrator (case sensitive). 3. Document 800-07422 Rev A 41 08/10 If not already done, navigate to set the keyboard address. Click Login.
... Time Left 3 menu displays, press certain keys (see Table 3-3) to , or copy and paste, the applicable IP address into the Web Browser 1. Table 3-3 Setting the Keyboard Address Key Alt > 1 Alt > 2 Alt > 3 Alt > 4 Alt > 5 Alt > 6 Alt > 7 Alt > 8 Alt > 9 Alt > 0 Address 1 2 3 4 5 6 7 8 9 10 Key Address Alt > F1 11 Alt > F2 12 Alt > F3 13... (default). 4. In the User Name field enter Administrator (case sensitive). 3. Document 800-07422 Rev A 41 08/10 If not already done, navigate to set the keyboard address. Click Login.
User Guide
Page 42
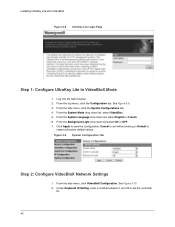
... English or French. 6. See Figure 3-10. 2. From the side menu, click the System Configurations tab. 4. Figure 3-9 System Configuration Tab Step 2: Configure VideoBloX Network Settings 1. Under Keyboard ID Setting, enter a number between 1 and 32 to VideoBloX Mode 1. Log into the web browser. 2. See Figure 3-9. 3. Installing UltraKey Lite with VideoBloX Figure 3-8 UltraKey Lite...
... English or French. 6. See Figure 3-10. 2. From the side menu, click the System Configurations tab. 4. Figure 3-9 System Configuration Tab Step 2: Configure VideoBloX Network Settings 1. Under Keyboard ID Setting, enter a number between 1 and 32 to VideoBloX Mode 1. Log into the web browser. 2. See Figure 3-9. 3. Installing UltraKey Lite with VideoBloX Figure 3-8 UltraKey Lite...

User Guide
Page 48
...LCD Menu Tree Mode Selection: MAXPRO Connection By Serial Port By Ethernet RS232 directly RS422 indirectly Configuration Maxpro offline keyboard 1 Fixed Camera Camera 1 Maxpro Setting Maxpro Key Code Keyboard ID 1 to 32 Baud Rate Joystick Speed Server IP 9600 / 19200 bps Normal / High _59/099.251...Mode RS232 / RS485 From the MAXPRO settings menu, you set the following based on either a Serial or Ethernet connection: • Keyboard ID (address) - Ethernet connections only • Serial port mode - Serial connections only • Joystick speed - Serial or Ethernet connections •...
...LCD Menu Tree Mode Selection: MAXPRO Connection By Serial Port By Ethernet RS232 directly RS422 indirectly Configuration Maxpro offline keyboard 1 Fixed Camera Camera 1 Maxpro Setting Maxpro Key Code Keyboard ID 1 to 32 Baud Rate Joystick Speed Server IP 9600 / 19200 bps Normal / High _59/099.251...Mode RS232 / RS485 From the MAXPRO settings menu, you set the following based on either a Serial or Ethernet connection: • Keyboard ID (address) - Ethernet connections only • Serial port mode - Serial connections only • Joystick speed - Serial or Ethernet connections •...
User Guide
Page 54
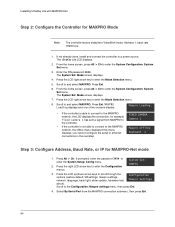
... Lite with MAXPRO-Net Step 2: Configure the Controller for MAXPRO Mode Note The controller factory defaults to and select MAXPRO. FIXED CAMERA Camera 1 Maxpro offline Keyboard 1 Step 3: Configure Address, Baud Rate, or IP for MAXPRO-Net mode 1.
... Lite with MAXPRO-Net Step 2: Configure the Controller for MAXPRO Mode Note The controller factory defaults to and select MAXPRO. FIXED CAMERA Camera 1 Maxpro offline Keyboard 1 Step 3: Configure Address, Baud Rate, or IP for MAXPRO-Net mode 1.

User Guide
Page 57
... for an Ethernet Connection 1. Step 3: Set and Configure for MAXPRO Mode on page 54. that is, the LCD displays that MAXPRO is established. Maxpro Settings Keyboard ID: 4. Press Ent and use the up /down arrow keys or the numeric keys to the MAXPRO network; Maxpro Settings Server IP: MaxproServer IP _59... the Controller for MAXPRO Mode Note The controller factory defaults to save. Press Ent to VideoBloX mode, Address 1, baud rate 19200 bps. The Maxpro Settings: Keyboard ID menu opens. 3.
... for an Ethernet Connection 1. Step 3: Set and Configure for MAXPRO Mode on page 54. that is, the LCD displays that MAXPRO is established. Maxpro Settings Keyboard ID: 4. Press Ent and use the up /down arrow keys or the numeric keys to the MAXPRO network; Maxpro Settings Server IP: MaxproServer IP _59... the Controller for MAXPRO Mode Note The controller factory defaults to save. Press Ent to VideoBloX mode, Address 1, baud rate 19200 bps. The Maxpro Settings: Keyboard ID menu opens. 3.
User Guide
Page 58
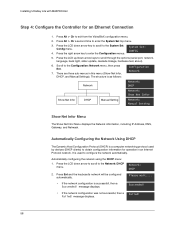
... VideoBloX configuration menu. 2. Failed! 58 Press Alt > Clr to the Configuration: Network menu, then press Ent. 7. It is successfull, then a Succeeded! Press Ent and the keyboard's network will be configured automatically. • If the network configuration is used by devices (DHCP clients) to scroll through the options (serial port, network, language...
... VideoBloX configuration menu. 2. Failed! 58 Press Alt > Clr to the Configuration: Network menu, then press Ent. 7. It is successfull, then a Succeeded! Press Ent and the keyboard's network will be configured automatically. • If the network configuration is used by devices (DHCP clients) to scroll through the options (serial port, network, language...
User Guide
Page 60
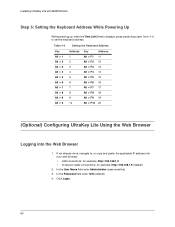
.... In the Password field enter 1234 (default). 4. In the User Name field enter Administrator (case sensitive). 3. Click Login. 60 Table 4-4 Setting the Keyboard Address Key Alt > 1 Alt > 2 Alt > 3 Alt > 4 Alt > 5 Alt > 6 Alt > 7 Alt > 8 Alt > 9 Alt > 0 Address 1 2 3 4 5 6 7 8 9 10 Key Address Alt....1.9 • Crossover cable connections: for example, http://192.168.1.9 (default) 2. Installing UltraKey Lite with MAXPRO-Net Step 5: Setting the Keyboard Address While Powering Up While powering up, when the Time Left 3 menu displays, press certain keys (see Table 4-4) to , or copy...
.... In the Password field enter 1234 (default). 4. In the User Name field enter Administrator (case sensitive). 3. Click Login. 60 Table 4-4 Setting the Keyboard Address Key Alt > 1 Alt > 2 Alt > 3 Alt > 4 Alt > 5 Alt > 6 Alt > 7 Alt > 8 Alt > 9 Alt > 0 Address 1 2 3 4 5 6 7 8 9 10 Key Address Alt....1.9 • Crossover cable connections: for example, http://192.168.1.9 (default) 2. Installing UltraKey Lite with MAXPRO-Net Step 5: Setting the Keyboard Address While Powering Up While powering up, when the Time Left 3 menu displays, press certain keys (see Table 4-4) to , or copy...

