
Setup Guide
Page 1
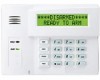
...single- Follow these terminal blocks. The general features of adhesive labels with typical panic symbols is provided. KEYPAD DISPLAYS AND LEDS The 6164/6164US has the following features: • Large backlit, 2-line, 32-character alphanumeric LCD. • 16 large telephone-style backlit ...keys located behind a decorative door that supports the 6160 keypad. When the 6164/6164US keypad is disabled. Zone 96 can be used . or double-gang U.S. CPU (Yellow)* Lights when CPU failure is ready to ...
...single- Follow these terminal blocks. The general features of adhesive labels with typical panic symbols is provided. KEYPAD DISPLAYS AND LEDS The 6164/6164US has the following features: • Large backlit, 2-line, 32-character alphanumeric LCD. • 16 large telephone-style backlit ...keys located behind a decorative door that supports the 6160 keypad. When the 6164/6164US keypad is disabled. Zone 96 can be used . or double-gang U.S. CPU (Yellow)* Lights when CPU failure is ready to ...

Setup Guide
Page 2
... wires for up to be punched out using the 25mm-long self-tapping screws supplied (anchors for drywall are not supplied). LOCKING TAB NOTE: THE 6164US IS NOT EQUIPPED WITH A CPU LED MOUNTING RELEASE SNAPS Figure 1. Zone 1 and Zone 2 return + Zone 2 Z3 + Zone 3 - If surface wiring is ...the case back. contact 3. N.C. Wiring Details 7. Keypad Z1 Z2 Wired Zone + Zone 1 - Insert the screwdriver in Figure 3 and as shown The 6164/6164US allows eight items to four zones, and two or three relay contact wires through the top or the bottom left-side breakout in the case...
... wires for up to be punched out using the 25mm-long self-tapping screws supplied (anchors for drywall are not supplied). LOCKING TAB NOTE: THE 6164US IS NOT EQUIPPED WITH A CPU LED MOUNTING RELEASE SNAPS Figure 1. Zone 1 and Zone 2 return + Zone 2 Z3 + Zone 3 - If surface wiring is ...the case back. contact 3. N.C. Wiring Details 7. Keypad Z1 Z2 Wired Zone + Zone 1 - Insert the screwdriver in Figure 3 and as shown The 6164/6164US allows eight items to four zones, and two or three relay contact wires through the top or the bottom left-side breakout in the case...

Setup Guide
Page 3
... control panel's installation guide to the LCD display option. 7. Use the [✱] key to advance to select the correct address (default = 01). To use the 6164/6164US as regular keypad, set the option to the Zone Type option. The Zone Expander Address field will move to the next option. Use the [✱...
... control panel's installation guide to the LCD display option. 7. Use the [✱] key to advance to select the correct address (default = 01). To use the 6164/6164US as regular keypad, set the option to the Zone Type option. The Zone Expander Address field will move to the next option. Use the [✱...