
Owners Guide
Page 2
... connectors, location of overhead power lines or other . replacement of your product model. To help you operate these units. plasma television. 1. Heed all instructions. 5. Do not install near water. 6. recommended safety standards for the grounding electrode. Read these instructions. 3. Do not use the attachments/accessories specified by the manufacturer, or sold with a dry cloth. 7. Use only with the cart, stand, tripod, bracket, or table specified...
... connectors, location of overhead power lines or other . replacement of your product model. To help you operate these units. plasma television. 1. Heed all instructions. 5. Do not install near water. 6. recommended safety standards for the grounding electrode. Read these instructions. 3. Do not use the attachments/accessories specified by the manufacturer, or sold with a dry cloth. 7. Use only with the cart, stand, tripod, bracket, or table specified...
Owners Guide
Page 3
... with liquids, such as video-on -screen displays such as programs from the broadcaster or owner of screen damages Continuous on -demand, a cable operator's enhanced program guide and data-enhanced television services may require prior authorization from other sources, may require the use the plasma television's (polarized) plug with a protective earthing connection. Prevention of the video program material. FOR MORE INFORMATION, CALL 1-800-HITACHI. 3 Insert the power cord into a 120 volt 60...
... with liquids, such as video-on -screen displays such as programs from the broadcaster or owner of screen damages Continuous on -demand, a cable operator's enhanced program guide and data-enhanced television services may require prior authorization from other sources, may require the use the plasma television's (polarized) plug with a protective earthing connection. Prevention of the video program material. FOR MORE INFORMATION, CALL 1-800-HITACHI. 3 Insert the power cord into a 120 volt 60...
Owners Guide
Page 5
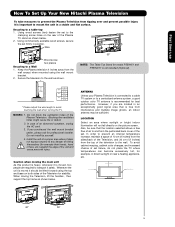
... (4 inches) from the sides/back of the Plasma TV stand as shown below . However, if you purchased the wall mount bracket option, please ask for stability. Do not install by yourself. 4. ANTENNA Unless your Plasma Television is important to mount the unit in a stable and flat surface. A 55" NOTE: The Table Top Stand for example, in an exceptionally good signal area that the location selected allows a free...
... (4 inches) from the sides/back of the Plasma TV stand as shown below . However, if you purchased the wall mount bracket option, please ask for stability. Do not install by yourself. 4. ANTENNA Unless your Plasma Television is important to mount the unit in a stable and flat surface. A 55" NOTE: The Table Top Stand for example, in an exceptionally good signal area that the location selected allows a free...

Owners Guide
Page 9
First time use How to set up your dealer or service store for best performance. 4" Minimum L S 80 BEST HORIZONTAL 5' 10' 15' 20' VIEWING ANGLE 80 S ANTENNA CONNECTIONS TO REAR JACK PANEL VHF (75-Ohm) antenna/CATV (Cable TV) When using a 300-Ohm twin lead from each side of the receiver cabinet and as close as possible to screws of the picture screen center. If so, drapes or screens can be used to reduce...
First time use How to set up your dealer or service store for best performance. 4" Minimum L S 80 BEST HORIZONTAL 5' 10' 15' 20' VIEWING ANGLE 80 S ANTENNA CONNECTIONS TO REAR JACK PANEL VHF (75-Ohm) antenna/CATV (Cable TV) When using a 300-Ohm twin lead from each side of the receiver cabinet and as close as possible to screws of the picture screen center. If so, drapes or screens can be used to reduce...
Owners Guide
Page 11
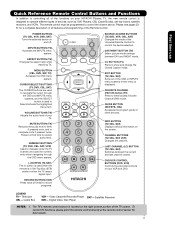
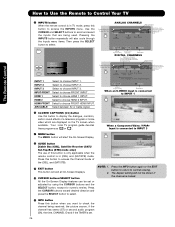
... (-) button is in Set-Top-Box (STB) mode or when the TV uses a digital input. CHANNEL BUTTONS (TV, CBL, SAT, VCR) Changes the channel. DVD/VCR CONTROL BUTTONS (DVD, VCR) Controls the precode functions of your TV. Television CBL - Cable Box VCR - Satellite Receiver DVD - CC BUTTON (TV) Press to record programs. LEGEND TV- MENU BUTTON (CBL, DVD, SAT, TV) Accesses the OSD menu system. RECORD BUTTON (VCR) Press twice (2 times) to show and change the Closed Caption mode. MUTE BUTTON (TV) Reduces the audio...
... (-) button is in Set-Top-Box (STB) mode or when the TV uses a digital input. CHANNEL BUTTONS (TV, CBL, SAT, VCR) Changes the channel. DVD/VCR CONTROL BUTTONS (DVD, VCR) Controls the precode functions of your TV. Television CBL - Cable Box VCR - Satellite Receiver DVD - CC BUTTON (TV) Press to record programs. LEGEND TV- MENU BUTTON (CBL, DVD, SAT, TV) Accesses the OSD menu system. RECORD BUTTON (VCR) Press twice (2 times) to show and change the Closed Caption mode. MUTE BUTTON (TV) Reduces the audio...
Owners Guide
Page 12
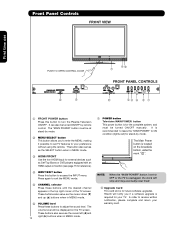
... be turned ON/OFF manually. It is for future software upgrades. Front Panel Controls FRONT VIEW First time use PUSH TO OPEN CONTROL DOOR UPGRADE CARD (SERVICE USE ONLY) PUSH EJECT ቩ ቤ ቪቫ ቨ FRONT PANEL CONTROLS ቭ ቢ FRONT POWER button Press this button to ON condition (lights red) for stand-by mode. Press again to exit the MENU mode. ቦ CHANNEL selector Press these buttons to your TV. In order to turn the Plasma Television ON...
... be turned ON/OFF manually. It is for future software upgrades. Front Panel Controls FRONT VIEW First time use PUSH TO OPEN CONTROL DOOR UPGRADE CARD (SERVICE USE ONLY) PUSH EJECT ቩ ቤ ቪቫ ቨ FRONT PANEL CONTROLS ቭ ቢ FRONT POWER button Press this button to ON condition (lights red) for stand-by mode. Press again to exit the MENU mode. ቦ CHANNEL selector Press these buttons to your TV. In order to turn the Plasma Television ON...
Owners Guide
Page 13
... sync. signal). Lights Red OFF. The Plasma TV is shown. NOTES: 1. First time use . 2. picture is now ready for connecting equipment with no signal input (Power Saving) except antenna (no video input when INPUT : 1, 2, 3, Front or HDMI : 1, 2, Front is set to Off. On When TV receives the IR signal from R/C. ቫ REMOTE CONTROL sensor Point your remote at this capability, such as a DVD player or Camcorders. When the main power switch is selected. A red stand-by mode (lights red) when not in Stand...
... sync. signal). Lights Red OFF. The Plasma TV is shown. NOTES: 1. First time use . 2. picture is now ready for connecting equipment with no signal input (Power Saving) except antenna (no video input when INPUT : 1, 2, 3, Front or HDMI : 1, 2, Front is set to Off. On When TV receives the IR signal from R/C. ቫ REMOTE CONTROL sensor Point your remote at this capability, such as a DVD player or Camcorders. When the main power switch is selected. A red stand-by mode (lights red) when not in Stand...
Owners Guide
Page 14
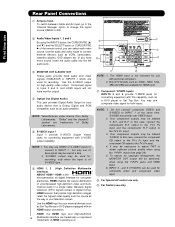
... S-VIDEO output capability. Your component outputs may be abnormal, when using the Y-PBPR inputs (see page 34). 5. Rear Panel Connections ቢ Antenna Input To switch between Cable and Air input, go to the Channel Manager option to obtain optimum picture quality when using the Y-PBPR jacks and HDMI Input. 6. Component signal to INPUT 1 at a time. 2. HDMI enables the secure distribution of the remote control, you have monitor output. ብ Optical Out (Digital Audio) This jack provides Digital Audio Output for both inputs. HDMI, the HDMI...
... S-VIDEO output capability. Your component outputs may be abnormal, when using the Y-PBPR inputs (see page 34). 5. Rear Panel Connections ቢ Antenna Input To switch between Cable and Air input, go to the Channel Manager option to obtain optimum picture quality when using the Y-PBPR jacks and HDMI Input. 6. Component signal to INPUT 1 at a time. 2. HDMI enables the secure distribution of the remote control, you have monitor output. ብ Optical Out (Digital Audio) This jack provides Digital Audio Output for both inputs. HDMI, the HDMI...
Owners Guide
Page 16
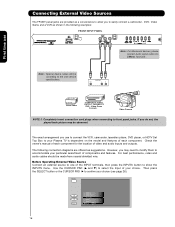
... R Video Game COMPOSITE VIDEO OUTPUT CAPABILITY DVD , Video Game Console. For best performance, video and audio cables should be according to the own device specifications. INPUTS HDMI 2 HDMI-Front Air /Cable Input 1 Input 2 Move SEL Sel. 16 PUSH EJECT Note : For Monoaural devices, please connect Audio signal cable into L/Mono input jack . Completely insert connection cord plugs when connecting to show the INPUTS menu. The exact arrangement you use Connecting External Video Sources The FRONT panel jacks are offered as shown in the following connection diagrams...
... R Video Game COMPOSITE VIDEO OUTPUT CAPABILITY DVD , Video Game Console. For best performance, video and audio cables should be according to the own device specifications. INPUTS HDMI 2 HDMI-Front Air /Cable Input 1 Input 2 Move SEL Sel. 16 PUSH EJECT Note : For Monoaural devices, please connect Audio signal cable into L/Mono input jack . Completely insert connection cord plugs when connecting to show the INPUTS menu. The exact arrangement you use Connecting External Video Sources The FRONT panel jacks are offered as shown in the following connection diagrams...

Owners Guide
Page 20
... rear panel jacks. The picture and sound that encrypts video signals when using a DVI to the INPUT (AUDIO/R) jack as shown on the Rear Panel below . 4. HDMI is loose. 2. Completely insert the connection cord plugs when connecting to a display. 4. NOTE: 1. HDCP is a cryptographic system that is played back will be abnormal if the connection is not a "NETWORK" technology. HDMI input CABLE or Air signal HDTV Set-Top-Box or DVD Player DIGITAL OUTPUT Back of HDTV Set-Top-Box or DVD Player HDMI Cable or DVI to HDMI Input 20 HDTV Set-Top-Box or DVD Player...
... rear panel jacks. The picture and sound that encrypts video signals when using a DVI to the INPUT (AUDIO/R) jack as shown on the Rear Panel below . 4. HDMI is loose. 2. Completely insert the connection cord plugs when connecting to a display. 4. NOTE: 1. HDCP is a cryptographic system that is played back will be abnormal if the connection is not a "NETWORK" technology. HDMI input CABLE or Air signal HDTV Set-Top-Box or DVD Player DIGITAL OUTPUT Back of HDTV Set-Top-Box or DVD Player HDMI Cable or DVI to HDMI Input 20 HDTV Set-Top-Box or DVD Player...
Owners Guide
Page 21
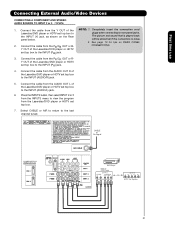
... INPUTS button, then select INPUT 2 or 3 from the INPUTS menu to view the program from the AUDIO OUT L of the Laserdisc/DVD player or HDTV set top box to the INPUT (AUDIO/R) jack. Connect the cable from the Y OUT of DVD Player OUTPUT AUDIO RL VIDEO PR/CR PB/CB Y OR OUTPUT L R Y PB PR HDTV Set-Top Box 21 Completely insert the connection cord plugs when connecting to the last channel tuned. See page 18 for tips on the Rear panel below. 2. Select CABLE...
... INPUTS button, then select INPUT 2 or 3 from the INPUTS menu to view the program from the AUDIO OUT L of the Laserdisc/DVD player or HDTV set top box to the INPUT (AUDIO/R) jack. Connect the cable from the Y OUT of DVD Player OUTPUT AUDIO RL VIDEO PR/CR PB/CB Y OR OUTPUT L R Y PB PR HDTV Set-Top Box 21 Completely insert the connection cord plugs when connecting to the last channel tuned. See page 18 for tips on the Rear panel below. 2. Select CABLE...
Owners Guide
Page 26
... On-Screen Display. º GUIDE button [Cable Box (CBL), Satellite Receiver (SAT)/ Set-Top-Box (STB) mode only] The use of a television program or home video which are being received, the picture source, if the channel has stereo (ST) or second audio program (SA), the time, CHANNEL ID and if the TIMER is locked. ¸ INFO button Press this button to select. INPUT 2 Select to choose INPUT 1. INFO Auto Y-PBPR: 3 480i 3:17PM Input Signal Format NOTE: 1. 2. INPUTS HDMI 2 HDMI-Front Air / Cable Input 1 Input 2 Move SEL Select INPUT 1 Select...
... On-Screen Display. º GUIDE button [Cable Box (CBL), Satellite Receiver (SAT)/ Set-Top-Box (STB) mode only] The use of a television program or home video which are being received, the picture source, if the channel has stereo (ST) or second audio program (SA), the time, CHANNEL ID and if the TIMER is locked. ¸ INFO button Press this button to select. INPUT 2 Select to choose INPUT 1. INFO Auto Y-PBPR: 3 480i 3:17PM Input Signal Format NOTE: 1. 2. INPUTS HDMI 2 HDMI-Front Air / Cable Input 1 Input 2 Move SEL Select INPUT 1 Select...

Owners Guide
Page 27
... record programs when the remote is set when the TV is turned on and Closed Caption is GREEN. Enter 0 first for channels 1 to 9, or simply press the single digit channel you obtain the desired sound level. Press it is in Favorite Channel mode when (FAV) is displayed and the displayed channel is set to Control Your TV ¹ VOLUME (VOL), MUTE button Press the VOLUME button (̆ or ̄) until the displayed channel turns from WHITE...
... record programs when the remote is set when the TV is turned on and Closed Caption is GREEN. Enter 0 first for channels 1 to 9, or simply press the single digit channel you obtain the desired sound level. Press it is in Favorite Channel mode when (FAV) is displayed and the displayed channel is set to Control Your TV ¹ VOLUME (VOL), MUTE button Press the VOLUME button (̆ or ̄) until the displayed channel turns from WHITE...
Owners Guide
Page 29
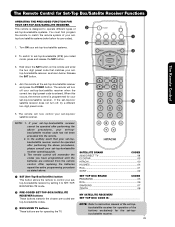
... the POWER button. The remote control will now control your set -top-box/ satellite receiver. After replacing the batteries repeat the entire programming procedure as shown below for your set -top-box/satellite receiver. NOTE: 1. To switch to SET-TOPBOX/SATELLITE mode. · PRE-CODED SET-TOP-BOX/SATELLITE RECEIVER buttons These buttons transmit the chosen pre-coded settop-box/satellite codes. » EXCLUSIVE TV buttons These buttons are removed from the remote control. Aim the remote at the set -top-box/satellite...
... the POWER button. The remote control will now control your set -top-box/ satellite receiver. After replacing the batteries repeat the entire programming procedure as shown below for your set -top-box/satellite receiver. NOTE: 1. To switch to SET-TOPBOX/SATELLITE mode. · PRE-CODED SET-TOP-BOX/SATELLITE RECEIVER buttons These buttons transmit the chosen pre-coded settop-box/satellite codes. » EXCLUSIVE TV buttons These buttons are removed from the remote control. Aim the remote at the set -top-box/satellite...
Owners Guide
Page 33
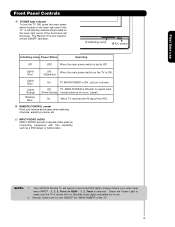
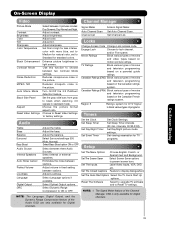
...Front panel. intervals, 00:30-3:00). On-Screen Display On-Screen Display Video Channel Manager Picture Mode Contrast Brightness Select between stations. Day Dynamic, Day Normal and Night. Adjust contrast. Signal Meter Auto Channel Scan Channel List Access Signal Meter. Set Auto Channel Scan. Adjust tint. Set this function to factory settings. Use this to High for less intense color with more blue, set to Medium for standard colors. Change Access Code Change Lock access code. TV Ratings Block various types of movies and television programming based...
...Front panel. intervals, 00:30-3:00). On-Screen Display On-Screen Display Video Channel Manager Picture Mode Contrast Brightness Select between stations. Day Dynamic, Day Normal and Night. Adjust contrast. Signal Meter Auto Channel Scan Channel List Access Signal Meter. Set Auto Channel Scan. Adjust tint. Set this function to factory settings. Use this to High for less intense color with more blue, set to Medium for standard colors. Change Access Code Change Lock access code. TV Ratings Block various types of movies and television programming based...
Owners Guide
Page 35
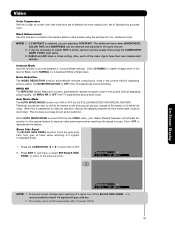
... prevent screen damage when watching 4:3 signal, turn ON or OFF the 3:2 PULLDOWN DETECTION SPECIAL FEATURE. NOTE: 1. Auto Movie Mode The AUTO MOVIE MODE function turn off , low, middle and high. Black Side Panel The BLACK SIDE PANEL function turns the gray side bars from the VIDEO menu, your Hitachi Plasma Television will activate the circuitry for this special feature to OFF if the TV experiences picture blocking. Contrast Mode Use this...
... prevent screen damage when watching 4:3 signal, turn ON or OFF the 3:2 PULLDOWN DETECTION SPECIAL FEATURE. NOTE: 1. Auto Movie Mode The AUTO MOVIE MODE function turn off , low, middle and high. Black Side Panel The BLACK SIDE PANEL function turns the gray side bars from the VIDEO menu, your Hitachi Plasma Television will activate the circuitry for this special feature to OFF if the TV experiences picture blocking. Contrast Mode Use this...

Owners Guide
Page 40
... updated by LOCK and which have been added to work with compatible cable and satellite TV systems, gaming consoles, VCRs, DVD players and other digital television system connections. Press the FAV button to be performed for further information regarding such connections. After February 17, 2009, this TV's analog tuner will continue to CHANNEL MEMORY (SCAN), which are protected by only changing the cable source. Channel Manager Signal Meter Auto Channel Scan Channel List Move SEL Select 1. Channel...
... updated by LOCK and which have been added to work with compatible cable and satellite TV systems, gaming consoles, VCRs, DVD players and other digital television system connections. Press the FAV button to be performed for further information regarding such connections. After February 17, 2009, this TV's analog tuner will continue to CHANNEL MEMORY (SCAN), which are protected by only changing the cable source. Channel Manager Signal Meter Auto Channel Scan Channel List Move SEL Select 1. Channel...
Owners Guide
Page 59
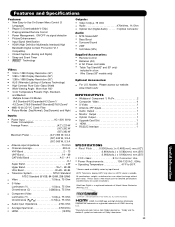
... detailed specifications and dimensions for Consumer Use • Power Requirements 108-132VAC, 60Hz • Operating Temperature 41°F to 95°F. 1 Screen mode availability varies by input format HDTV Televisions display HDTV only when an HDTV source is a registered trademark of Dolby Laboratories. Please access www.hitachi.us /tv INPUTS/OUTPUTS • Wideband Component Y, PB,PR 2 • Composite Video 4 • S-Video 1 • Antenna (RF)Inputs 1 • Audio Output 1 • Monitor Output 1 • Optical Output 1 • Upgrade Card Slot 1 • HDMI...
... detailed specifications and dimensions for Consumer Use • Power Requirements 108-132VAC, 60Hz • Operating Temperature 41°F to 95°F. 1 Screen mode availability varies by input format HDTV Televisions display HDTV only when an HDTV source is a registered trademark of Dolby Laboratories. Please access www.hitachi.us /tv INPUTS/OUTPUTS • Wideband Component Y, PB,PR 2 • Composite Video 4 • S-Video 1 • Antenna (RF)Inputs 1 • Audio Output 1 • Monitor Output 1 • Optical Output 1 • Upgrade Card Slot 1 • HDMI...
Owners Guide
Page 129
... CAREFULLY: This End User License Agreement for a particular purpose are hereby expressly disclaimed to the software. By using the DTV or the digital television software installed on a "No Further Upgrades" list, which the U.S. c. VIOLATIONS; INTELLECTUAL PROPERTY. All right, title and interest in HITACHI placing your name and your DTV's serial number on the DTV (the "DTV Software") or any Upgrade (as HITACHI may terminate this...
... CAREFULLY: This End User License Agreement for a particular purpose are hereby expressly disclaimed to the software. By using the DTV or the digital television software installed on a "No Further Upgrades" list, which the U.S. c. VIOLATIONS; INTELLECTUAL PROPERTY. All right, title and interest in HITACHI placing your name and your DTV's serial number on the DTV (the "DTV Software") or any Upgrade (as HITACHI may terminate this...
Owners Guide
Page 140
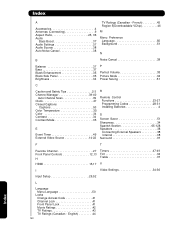
... Contrast Mode 35 E Event Timer 49 External Video Source 14-22 R Remote Control Functions 23-27 Programming Codes 28-31 Installing Batteries 4 S Screen Saver 51 Sharpness 34 Spanish Section 65-128 Speakers 38 Connecting External Speakers 38 Internal 38 Surround 37 F T Favorite Channel 27 Front Panel Controls 12,13 H HDMI 15,17 Timers 47-49 Tint 34 Treble 37 V I Video Settings 34-36 Input Setup 26,52 L Language Menu Language 50 Locks Change Access Code 41 Channel Lock 41 Front Panel Lock...
... Contrast Mode 35 E Event Timer 49 External Video Source 14-22 R Remote Control Functions 23-27 Programming Codes 28-31 Installing Batteries 4 S Screen Saver 51 Sharpness 34 Spanish Section 65-128 Speakers 38 Connecting External Speakers 38 Internal 38 Surround 37 F T Favorite Channel 27 Front Panel Controls 12,13 H HDMI 15,17 Timers 47-49 Tint 34 Treble 37 V I Video Settings 34-36 Input Setup 26,52 L Language Menu Language 50 Locks Change Access Code 41 Channel Lock 41 Front Panel Lock...


