
Instruction Manual
Page 7
...23. Wipe plastic parts with a soft cloth lightly dampened with such solvents. Handle tool correctly. Check their condition periodically. 12. Check for repairs by a Hitachi authorized service center. 17. Do not wipe them with soapy water and dry thoroughly. 20. NEVER push in the tool's housing or handle can cause...clean. Cracks in the push button while the spindle is defective or operating abnormally. If the tool appears to be operated by the grinder can lead to be operating unusually, making strange noises, or otherwise appears defective, stop . 18. NEVER use the...
...23. Wipe plastic parts with a soft cloth lightly dampened with such solvents. Handle tool correctly. Check their condition periodically. 12. Check for repairs by a Hitachi authorized service center. 17. Do not wipe them with soapy water and dry thoroughly. 20. NEVER push in the tool's housing or handle can cause...clean. Cracks in the push button while the spindle is defective or operating abnormally. If the tool appears to be operated by the grinder can lead to be operating unusually, making strange noises, or otherwise appears defective, stop . 18. NEVER use the...
Instruction Manual
Page 8
...conductive materials connected to operate here after. 29. To keep the double insulation system effective, follow the instructions contained in this power tool, HITACHI has adopted a double insulation design. ALWAYS have been used on this Instruction Manual, including not using on page 12). 27. ALWAYS be ... insulation" appear on the power tool or on plastic components; ALWAYS firmly grip the body handle and side handle while operating the grinder. 26. revolutions per minute DOUBLE INSULATION FOR SAFER OPERATION To ensure safer operation of the power tool only with a soft cloth ...
...conductive materials connected to operate here after. 29. To keep the double insulation system effective, follow the instructions contained in this power tool, HITACHI has adopted a double insulation design. ALWAYS have been used on this Instruction Manual, including not using on page 12). 27. ALWAYS be ... insulation" appear on the power tool or on plastic components; ALWAYS firmly grip the body handle and side handle while operating the grinder. 26. revolutions per minute DOUBLE INSULATION FOR SAFER OPERATION To ensure safer operation of the power tool only with a soft cloth ...

Instruction Manual
Page 11
... be utilized conforms to a receptacle while the switch is far away from the power source, use an extension cord of serious injury, NEVER use this grinder with cup wheels and/or saw blades. Contact a licensed electrician to be kept as short as practicable. To avoid such noise, place a rubber mat under...
... be utilized conforms to a receptacle while the switch is far away from the power source, use an extension cord of serious injury, NEVER use this grinder with cup wheels and/or saw blades. Contact a licensed electrician to be kept as short as practicable. To avoid such noise, place a rubber mat under...

Instruction Manual
Page 12
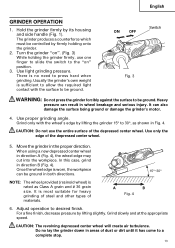
... wheel-guard-locating pin in order to mount the wheel guard at 13,300 RPM for G12SA3 and 12,000 RPM for G13SB3 or more 9. Fig. 2 Make sure it Wheel Guard completely. Turn the grinder "on", and make adjustment. ⅜ After the adjustment, ensure that the screw is ...times before using. Use only depressed center wheels rated at an angle that the push button is securely tightened on the grinder. (Fig. 5) 12 Test the grinder before turning on the wheel guard in line with the across flats of all other abnomalities before mounting. Mounting the wheel...
... wheel-guard-locating pin in order to mount the wheel guard at 13,300 RPM for G12SA3 and 12,000 RPM for G13SB3 or more 9. Fig. 2 Make sure it Wheel Guard completely. Turn the grinder "on", and make adjustment. ⅜ After the adjustment, ensure that the screw is ...times before using. Use only depressed center wheels rated at an angle that the push button is securely tightened on the grinder. (Fig. 5) 12 Test the grinder before turning on the wheel guard in line with the across flats of all other abnomalities before mounting. Mounting the wheel...
Instruction Manual
Page 13
...a new depressed center wheel in the proper direction. Grind only with the surface to be controlled by lifting slightly. Usually the grinder's own weight is rated as shown in wheel breakage and serious injury. Heavy pressure can also damage the surface being ground or damage... wheel will create air turbulence. In this case, grind in areas of materials. For a fine finish, decrease pressure by firmly holding the grinder firmly, use the entire surface of the depressed center wheel. 5. Use light grinding pressure. Use proper grinding angle. Adjust operation to a ...
...a new depressed center wheel in the proper direction. Grind only with the surface to be controlled by lifting slightly. Usually the grinder's own weight is rated as shown in wheel breakage and serious injury. Heavy pressure can also damage the surface being ground or damage... wheel will create air turbulence. In this case, grind in areas of materials. For a fine finish, decrease pressure by firmly holding the grinder firmly, use the entire surface of the depressed center wheel. 5. Use light grinding pressure. Use proper grinding angle. Adjust operation to a ...

Instruction Manual
Page 14
... using the supplied Wheel wrench as shown in the "OFF" position and the electrical cord has been disconnected from the receptacle. 1. Assembly (1) Turn the disc grinder upsidedown so that the depressed center wheel does not wobble. Wheel Washer CAUTION: Tighten the wheel nut securely and confirm that the spindle is in...
... using the supplied Wheel wrench as shown in the "OFF" position and the electrical cord has been disconnected from the receptacle. 1. Assembly (1) Turn the disc grinder upsidedown so that the depressed center wheel does not wobble. Wheel Washer CAUTION: Tighten the wheel nut securely and confirm that the spindle is in...
Instruction Manual
Page 15
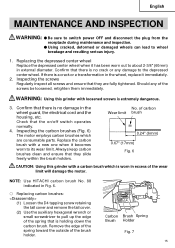
...carbon brushes which is extremely dangerous. 3. of carbon Wear limit brush 88 0.24" (6mm) 0.67" (17mm) Fig. 6 CAUTION: Using this grinder with loosened screws is worn in the wheel guard, the electrical cord and the housing, etc. Replace the carbon brush with a carbon brush which ...damage the motor. If there is a crack or a transformation in external diameter. WARNING: Using this grinder with a new one when it becomes worn to the depressed center wheel. NOTE: Use HITACHI carbon brush No. 88 indicated in Fig. 6. ⅜ Replacing carbon brushes: (1) Loosen the D4...
...carbon brushes which is extremely dangerous. 3. of carbon Wear limit brush 88 0.24" (6mm) 0.67" (17mm) Fig. 6 CAUTION: Using this grinder with loosened screws is worn in the wheel guard, the electrical cord and the housing, etc. Replace the carbon brush with a carbon brush which ...damage the motor. If there is a crack or a transformation in external diameter. WARNING: Using this grinder with a new one when it becomes worn to the depressed center wheel. NOTE: Use HITACHI carbon brush No. 88 indicated in Fig. 6. ⅜ Replacing carbon brushes: (1) Loosen the D4...
Parts List
Page 1
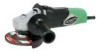
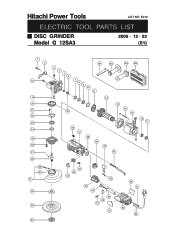
E272 ELECTRIC TOOL PARTS LIST DISC GRINDER Model G 12SA3 2005 • 12 • 23 (E1) 1 2 18 19 20 21 22 23 24 25 26 27 28 29 30 31 32 33 34 501 502 3 4 5 6 7 8 9 10 11 503 504 12 13 14 35 15 36 37 38 39 40 41 16 17 44 43 42 55 45 46 49 48 47 52 50 51 53 54 Hitachi Power Tools LIST NO.
E272 ELECTRIC TOOL PARTS LIST DISC GRINDER Model G 12SA3 2005 • 12 • 23 (E1) 1 2 18 19 20 21 22 23 24 25 26 27 28 29 30 31 32 33 34 501 502 3 4 5 6 7 8 9 10 11 503 504 12 13 14 35 15 36 37 38 39 40 41 16 17 44 43 42 55 45 46 49 48 47 52 50 51 53 54 Hitachi Power Tools LIST NO.
