
Owners Guide
Page 12
... Provided Accessories 15 Names of Parts 16 Setups Demonstration Function 20 Setting Up the DVD Video Camera/Recorder.. 20 HOLDING DVD VIDEO CAMERA/RECORDER . 20 ATTACHING SHOULDER STRAP 20 ATTACHING LENS CAP 21 INSERTING BATTERY INTO REMOTE CONTROL 21 REMOVING BATTERY FROM REMOTE CONTROL 22 Discs ...FOCUSING DURING RECORDING 53 Adjusting Brightness of Image to be recorded (Exposure 55 Compensating for Backlight 55 Built-in Video Flash (for DZ-GX3300A only) .... 56 Setting Up Camera Functions 57 SELECTING SHOOTING MODE TO MATCH THE SUBJECT (SWITCHING PROGRAM AE MODE 57 RECORDING...
... Provided Accessories 15 Names of Parts 16 Setups Demonstration Function 20 Setting Up the DVD Video Camera/Recorder.. 20 HOLDING DVD VIDEO CAMERA/RECORDER . 20 ATTACHING SHOULDER STRAP 20 ATTACHING LENS CAP 21 INSERTING BATTERY INTO REMOTE CONTROL 21 REMOVING BATTERY FROM REMOTE CONTROL 22 Discs ...FOCUSING DURING RECORDING 53 Adjusting Brightness of Image to be recorded (Exposure 55 Compensating for Backlight 55 Built-in Video Flash (for DZ-GX3300A only) .... 56 Setting Up Camera Functions 57 SELECTING SHOOTING MODE TO MATCH THE SUBJECT (SWITCHING PROGRAM AE MODE 57 RECORDING...
Owners Guide
Page 15
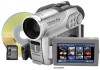
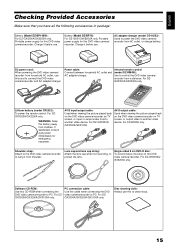
... use . Portable power supply for emergency treatment. For DZ-GX3300A/ GX3200A/GX3100A. Lens cap and lens cap string: Attach the lens cap when not recording, to power the DVD video camera/ recorder from shoulder. For DZ-GX3300A/ GX3200A only. For DZ- If swallowed, consult a physician immediately for this DVD video camera/ recorder. Single-sided 8 cm DVD-R disc: To record videos (movies) on this cable...
... use . Portable power supply for emergency treatment. For DZ-GX3300A/ GX3200A/GX3100A. Lens cap and lens cap string: Attach the lens cap when not recording, to power the DVD video camera/ recorder from shoulder. For DZ-GX3300A/ GX3200A only. For DZ- If swallowed, consult a physician immediately for this DVD video camera/ recorder. Single-sided 8 cm DVD-R disc: To record videos (movies) on this cable...

Owners Guide
Page 16
... identical. during recording. 3 Lens cap string attachment hole (p. 21) 4 Stereo microphone Take care that the microphone is not blocked by a hand, etc., during recording. 5 Recording indicator (p. 35) The red indicator will light during recording. 6 Infrared receiver (for DZ-GX3300A/GX3200A only) (p. 22) When the remote control is used to operate the DVD video camera/recorder...
... identical. during recording. 3 Lens cap string attachment hole (p. 21) 4 Stereo microphone Take care that the microphone is not blocked by a hand, etc., during recording. 5 Recording indicator (p. 35) The red indicator will light during recording. 6 Infrared receiver (for DZ-GX3300A/GX3200A only) (p. 22) When the remote control is used to operate the DVD video camera/recorder...

Owners Guide
Page 21
...with the positive R terminal facing down. 3 Slide the cover to the attachment hole of DVD video camera/ recorder. 3 Push the both sides of lens cap string to close it over the lens. Push and fit INSERTING BATTERY INTO REMOTE CONTROL Insert the provided lithium battery into remote control... LENS CAP 1 Attach the shorter end of lens cap string to the lens cap. 2 Attach the longer end of cap inward and attach it . Shorter end Longer end Note: • Always keep the lens cap on when not using the DVD video camera/recorder, to protect the lens. • When recording, attach the lens cap ...
...with the positive R terminal facing down. 3 Slide the cover to the attachment hole of DVD video camera/ recorder. 3 Push the both sides of lens cap string to close it over the lens. Push and fit INSERTING BATTERY INTO REMOTE CONTROL Insert the provided lithium battery into remote control... LENS CAP 1 Attach the shorter end of lens cap string to the lens cap. 2 Attach the longer end of cap inward and attach it . Shorter end Longer end Note: • Always keep the lens cap on when not using the DVD video camera/recorder, to protect the lens. • When recording, attach the lens cap ...

Owners Guide
Page 41
... (recording indicator) On/Off. • For various functions available during recording, see "Setting Up Camera Functions" on page 57. • Hitachi cannot be responsible for on-screen information display. • While the ACCESS/PC indicator is lit or blinking, do not turn the... will start recording; English Basic Techniques This section explains about recording of DVD video camera/recorder will light. ACCESS/PC indicator OFF 1 Remove the lens cap, and then point the DVD video camera/recorder at subject. 2 Turn the DVD camera/recorder on . Set the power switch to "O" to prevent the...
... (recording indicator) On/Off. • For various functions available during recording, see "Setting Up Camera Functions" on page 57. • Hitachi cannot be responsible for on-screen information display. • While the ACCESS/PC indicator is lit or blinking, do not turn the... will start recording; English Basic Techniques This section explains about recording of DVD video camera/recorder will light. ACCESS/PC indicator OFF 1 Remove the lens cap, and then point the DVD video camera/recorder at subject. 2 Turn the DVD camera/recorder on . Set the power switch to "O" to prevent the...

Owners Guide
Page 42
...Note: • If you wish to "P". CARD ACCESS indicator 1 Remove the lens cap, and then point the DVD video camera/recorder at subject. 2 Turn the DVD camera/recorder on the screen (viewfinder or LCD). When using DVD-RAM disc: Set the power switch to be recorded, and then press the PHOTO... When recording with higher zoom magnification, it out and close the LCD monitor. 4 Press the PHOTO button half way (half pressing). The DVD video camera/recorder will automatically focus on the subject at the center of screen, press the PHOTO button halfway down, determine the composition to ...
...Note: • If you wish to "P". CARD ACCESS indicator 1 Remove the lens cap, and then point the DVD video camera/recorder at subject. 2 Turn the DVD camera/recorder on the screen (viewfinder or LCD). When using DVD-RAM disc: Set the power switch to be recorded, and then press the PHOTO... When recording with higher zoom magnification, it out and close the LCD monitor. 4 Press the PHOTO button half way (half pressing). The DVD video camera/recorder will automatically focus on the subject at the center of screen, press the PHOTO button halfway down, determine the composition to ...

Owners Guide
Page 52
...you need not remove the lens hood. 2 Remove the cap of conversion lens, and screw the lens into the thread of step-up ring. Lens hood Conversion lens Step-up ring (Remove) • Tele-conversion lens: For stronger telephoto effect • Wide-conversion lens: For stronger wide-angle effect...DZ-GX3300A; 0.5 mm for DZ-GX3200A/GX3100A/BX35A When attaching the optional DZ-TL1 tele-conversion lens or DZ-WL1 wide-conversion lens, use the step-up ring. When using the DZ-GX3300A, you zoom in flash (for DZ-GX3300A only): Specify "Flash: Off" (see page 132). 1 Remove the lens hood from DVD...
...you need not remove the lens hood. 2 Remove the cap of conversion lens, and screw the lens into the thread of step-up ring. Lens hood Conversion lens Step-up ring (Remove) • Tele-conversion lens: For stronger telephoto effect • Wide-conversion lens: For stronger wide-angle effect...DZ-GX3300A; 0.5 mm for DZ-GX3200A/GX3100A/BX35A When attaching the optional DZ-TL1 tele-conversion lens or DZ-WL1 wide-conversion lens, use the step-up ring. When using the DZ-GX3300A, you zoom in flash (for DZ-GX3300A only): Specify "Flash: Off" (see page 132). 1 Remove the lens hood from DVD...

Owners Guide
Page 59
...button. 2 Choose the desired option, and then press the A button. 3 Press the MENU button to remove the lens cap before turning the DVD video camera/recorder on: If the DVD video camera/recorder is turned on -screen information. • The white balance setting will be stored in memory even when... the DVD video camera/recorder is turned off : The "h" indicator will be possible in a bright place with the lens capped, the white balance will be set using the on next time. When the "h" indicator ...
...button. 2 Choose the desired option, and then press the A button. 3 Press the MENU button to remove the lens cap before turning the DVD video camera/recorder on: If the DVD video camera/recorder is turned on -screen information. • The white balance setting will be stored in memory even when... the DVD video camera/recorder is turned off : The "h" indicator will be possible in a bright place with the lens capped, the white balance will be set using the on next time. When the "h" indicator ...

Owners Guide
Page 151
... battery or disc) DZ-GX3300A approx. 545 g DZ-GX3200A approx. 525 g DZ-GX3100A approx. 475 g DZ-BX35A approx. 475 g AC adapter/charger, Battery, AV/S input/output cable (DZ-BX35A is provided with AV/S output cable), Infrared remote control (not provided with DZ-GX3100A/BX35A), Lithium battery for remote control (not provided with DZ-GX3100A/ BX35A), Lens cap, Lens cap string, Shoulder strap...
... battery or disc) DZ-GX3300A approx. 545 g DZ-GX3200A approx. 525 g DZ-GX3100A approx. 475 g DZ-BX35A approx. 475 g AC adapter/charger, Battery, AV/S input/output cable (DZ-BX35A is provided with AV/S output cable), Infrared remote control (not provided with DZ-GX3100A/BX35A), Lithium battery for remote control (not provided with DZ-GX3100A/ BX35A), Lens cap, Lens cap string, Shoulder strap...

Owners Guide
Page 155
...Handling 9 Protect 100 Update Control Info 101 DISC EJECT button 38 Display Information LCD 44 Scenes information 88 Viewfinder 32 Divide 80 DVD player 108 DVD-R 24 DVD-RAM 24 DVD recorder 108 DVD-RW 24 E Edit (play list 98 Delete (scene 79, 95 Demo Mode 35 Detail (scene 88 Dig. English Index ...H Hand strap 20 Howling 106 I Information display mode 44 Infrared receiver 22 Initial Setup 34 Input Source 64 L Language 34 Laser pickup block 38 Lens cap 21 Lens cap string attachment hole 21 Linear PCM 150 Lock 86 Lock switch 41 Low Light (Program AE 58 155
...Handling 9 Protect 100 Update Control Info 101 DISC EJECT button 38 Display Information LCD 44 Scenes information 88 Viewfinder 32 Divide 80 DVD player 108 DVD-R 24 DVD-RAM 24 DVD recorder 108 DVD-RW 24 E Edit (play list 98 Delete (scene 79, 95 Demo Mode 35 Detail (scene 88 Dig. English Index ...H Hand strap 20 Howling 106 I Information display mode 44 Infrared receiver 22 Initial Setup 34 Input Source 64 L Language 34 Laser pickup block 38 Lens cap 21 Lens cap string attachment hole 21 Linear PCM 150 Lock 86 Lock switch 41 Low Light (Program AE 58 155
