
Owners Guide
Page 4
... 4 to 7. Plasma monitor speaker: x CMPAS24 4 Plasma monitor After the plasma monitor has been on screen display system The remote control included eases the work of setting display controls. Sometimes the screen might have been added. High Definition Digital processor creates the fine-textured image with a dry soft cloth. ...read this User's Manual thoroughly, especially the Safety Instructions on -screen display system, displays the status of signal reception and display control settings in an easy-to-view fashion. Mis-use remote control and on for further details. 1.
... 4 to 7. Plasma monitor speaker: x CMPAS24 4 Plasma monitor After the plasma monitor has been on screen display system The remote control included eases the work of setting display controls. Sometimes the screen might have been added. High Definition Digital processor creates the fine-textured image with a dry soft cloth. ...read this User's Manual thoroughly, especially the Safety Instructions on -screen display system, displays the status of signal reception and display control settings in an easy-to-view fashion. Mis-use remote control and on for further details. 1.
Owners Guide
Page 5
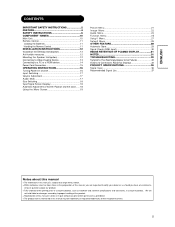
ENGLISH CONTENTS IMPORTANT SAFETY INSTRUCTIONS 2 FEATURE 4 SAFETY INSTRUCTIONS 6 COMPONENT NAMES 10 Main Unit 10 Remote Control 11 Loading the Batteries 11 Handing the Remote Control 11 INSTALLATION INSTRUCTIONS 12 Installation the Desktop stand(option 12 Anti-tumble measures 12 Mounting the Speaker Unit(option 12 Connecting to Video Imaging Device ...
ENGLISH CONTENTS IMPORTANT SAFETY INSTRUCTIONS 2 FEATURE 4 SAFETY INSTRUCTIONS 6 COMPONENT NAMES 10 Main Unit 10 Remote Control 11 Loading the Batteries 11 Handing the Remote Control 11 INSTALLATION INSTRUCTIONS 12 Installation the Desktop stand(option 12 Anti-tumble measures 12 Mounting the Speaker Unit(option 12 Connecting to Video Imaging Device ...
Owners Guide
Page 7
... with new one of heavy objects on disposing the battery. 7 If the provided plug does not fit your dealer. ENGLISH WARNING Be cautious of the remote control. x Keep the battery away from the power outlet to you. x Do not short circuit the battery. Incorrect connection of the power cord could result in...
... with new one of heavy objects on disposing the battery. 7 If the provided plug does not fit your dealer. ENGLISH WARNING Be cautious of the remote control. x Keep the battery away from the power outlet to you. x Do not short circuit the battery. Incorrect connection of the power cord could result in...
Owners Guide
Page 8
... or other parts, and could have adverse influence on image retention The plasma monitor illuminates phosphor to display images. x Do not place the monitor, the remote control and other than that contained in the operating instructions unless you can cause permanent damage to time. Remove the power cord for use by qualified...
... or other parts, and could have adverse influence on image retention The plasma monitor illuminates phosphor to display images. x Do not place the monitor, the remote control and other than that contained in the operating instructions unless you can cause permanent damage to time. Remove the power cord for use by qualified...
Owners Guide
Page 9
...transported. Furthermore, use caution when moving the cart/apparatus combination to avoid injury from that could invalidate the remote control. Do not physically impact the remote control. x Do not place heavy objects on the connector are tightened. Avoid radio interference. When a cart is...Save the original carton box and all connections, (including the power plug, extension leads and interconnections between the pieces of the remote control. x A physical impact could cause distorted images or noises. x Take care not to the ground. Any interfering radiation could...
...transported. Furthermore, use caution when moving the cart/apparatus combination to avoid injury from that could invalidate the remote control. Do not physically impact the remote control. x Do not place heavy objects on the connector are tightened. Avoid radio interference. When a cart is...Save the original carton box and all connections, (including the power plug, extension leads and interconnections between the pieces of the remote control. x A physical impact could cause distorted images or noises. x Take care not to the ground. Any interfering radiation could...
Owners Guide
Page 10
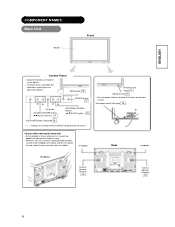
ENGLISH COMPONENT NAMES NOMS D ES COM POSANT S Main Unit Panel Front Control Panel x Adjustment buttons are required to distinguish the adjustment buttons. Handgrips Remote-control sensor 11 Indicating lamp 16 • The main power switch is moved it safely. • Whenever the unit is located at the base on the ...
ENGLISH COMPONENT NAMES NOMS D ES COM POSANT S Main Unit Panel Front Control Panel x Adjustment buttons are required to distinguish the adjustment buttons. Handgrips Remote-control sensor 11 Indicating lamp 16 • The main power switch is moved it safely. • Whenever the unit is located at the base on the ...
Owners Guide
Page 11
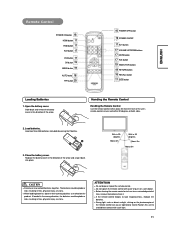
... or leak, resulting in fires, physical injury, or stains. z If the remote control begins to avoid direct contact with water or put it back into place. Handing the Remote Control Handling the Remote Control Use the remote control within 30 degrees on the product. Load batteries. Close the battery cover. z...Open the battery cover. The batteries could explode or leak, resulting in fires, physical injury, or stains. z Before leaving the remote control out of the arrow and snap it on the photoreceptor of the arrow. Slide back and remove the battery cover in the direction...
... or leak, resulting in fires, physical injury, or stains. z If the remote control begins to avoid direct contact with water or put it back into place. Handing the Remote Control Handling the Remote Control Use the remote control within 30 degrees on the product. Load batteries. Close the battery cover. z...Open the battery cover. The batteries could explode or leak, resulting in fires, physical injury, or stains. z Before leaving the remote control out of the arrow and snap it on the photoreceptor of the arrow. Slide back and remove the battery cover in the direction...

Owners Guide
Page 16
... Turing Power On and Off To turn the monitor power OFF, press the SUB POWER button or the ON/OFF or OFF button on the remote control, and then press the main power switch on and off the unit main power switch before leaving the monitor out of use , the main power... When the main power switch is set to ON, and then press the SUB POWER button or the ON/OFF or ON button on the remote control. x Turn off the main power switch before leaving the main unit. 16 To turn the monitor power ON, press the main power switch on the...
... Turing Power On and Off To turn the monitor power OFF, press the SUB POWER button or the ON/OFF or OFF button on the remote control, and then press the main power switch on and off the unit main power switch before leaving the monitor out of use , the main power... When the main power switch is set to ON, and then press the SUB POWER button or the ON/OFF or ON button on the remote control. x Turn off the main power switch before leaving the main unit. 16 To turn the monitor power ON, press the main power switch on the...

Owners Guide
Page 17
...be displayed at the bottom of the screen. AV1 S (AV2 S) Video input can be adjusted by pressing the VOLSand VOLT buttons of the remote control (or the Sand Tvolume buttons of the monitor unit). Depending on the input signal format received, the picture format ratio allows you to adjust ...button is pressed, the volume adjustment status guide will be cancelled by pressing the AV1, AV2, AV4, AV4, HDMI, or RGB buttons of the remote control. - x The volume setting can be switched by pressing the VOLS button or the MUTE button while the audio is being displayed. Input can be...
...be displayed at the bottom of the screen. AV1 S (AV2 S) Video input can be adjusted by pressing the VOLSand VOLT buttons of the remote control (or the Sand Tvolume buttons of the monitor unit). Depending on the input signal format received, the picture format ratio allows you to adjust ...button is pressed, the volume adjustment status guide will be cancelled by pressing the AV1, AV2, AV4, AV4, HDMI, or RGB buttons of the remote control. - x The volume setting can be switched by pressing the VOLS button or the MUTE button while the audio is being displayed. Input can be...

Owners Guide
Page 18
... a screen mode selection feature. x When a normal 4:3 image is selected to the Image Menu item. In such case, adjust by pressing the RECALL button of the remote control. 埛 The display will go out in some cases. Normal Cinema Panoramic (4:3 signal) (Cinema) (4:3 Signal) Blanking occurs on both sides appearing somewhat enlarged. Input ...by pressing the AUTO button of RGB Input mode 18 H: 48.4 kHz V: 60.0 Hz RGB Input horizontal frequency of RGB Input vertical frequency of the remote control. CAUTION Perform this into consideration when making screen mode choices.
... a screen mode selection feature. x When a normal 4:3 image is selected to the Image Menu item. In such case, adjust by pressing the RECALL button of the remote control. 埛 The display will go out in some cases. Normal Cinema Panoramic (4:3 signal) (Cinema) (4:3 Signal) Blanking occurs on both sides appearing somewhat enlarged. Input ...by pressing the AUTO button of RGB Input mode 18 H: 48.4 kHz V: 60.0 Hz RGB Input horizontal frequency of RGB Input vertical frequency of the remote control. CAUTION Perform this into consideration when making screen mode choices.

Owners Guide
Page 27
... press the OK button. This moves the picture around the screen in the Picture Menu. Select 30. Press the MENU button on the remote control to return to suppress the contrast of the screen regardless of power consumption is where stationary objects such as screen logos; By this function is...this item, the screen changes into the white pattern when the monitor enters power save mode, and it will continue for the OSD. When this control, power consumption can be reduced or degradation of unit 0 ~ 180 min. This function is also provided against the image retention. Set the display...
... press the OK button. This moves the picture around the screen in the Picture Menu. Select 30. Press the MENU button on the remote control to return to suppress the contrast of the screen regardless of power consumption is where stationary objects such as screen logos; By this function is...this item, the screen changes into the white pattern when the monitor enters power save mode, and it will continue for the OSD. When this control, power consumption can be reduced or degradation of unit 0 ~ 180 min. This function is also provided against the image retention. Set the display...
Owners Guide
Page 32
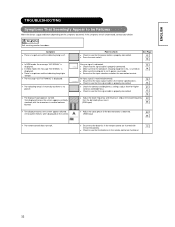
... the clock phase till the desired clarity is obtained. 22 A fine pattern flickers when displayed on the screen. (RGB input) 34 Ɣ The remote control does not work. ʳ Ɣ Ensure that the batteries in power-save mode. Ɣ Ensure that the input selection matches the connection terminal....properly connected. 14 Ɣ The indicating lamp is lit normally but there is no picture and the indicating lamp is not in the remote control are functional. 32 WARNING Self servicing can be Failures Make the checks suggested below depending on . 14 Ɣ Make sure the computer ...
... the clock phase till the desired clarity is obtained. 22 A fine pattern flickers when displayed on the screen. (RGB input) 34 Ɣ The remote control does not work. ʳ Ɣ Ensure that the batteries in power-save mode. Ɣ Ensure that the input selection matches the connection terminal....properly connected. 14 Ɣ The indicating lamp is lit normally but there is no picture and the indicating lamp is not in the remote control are functional. 32 WARNING Self servicing can be Failures Make the checks suggested below depending on . 14 Ɣ Make sure the computer ...


