Instruction Manual
Page 7
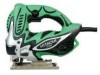
...at the rated voltage. Class II Construction ---/min ... NEVER leave tool running unattended. Carefully handle power tools. Do not wipe plastic parts with soapy water and dry thoroughly. 20. Touching ... wiring or electric cable with such solvents. Always adjust the blade speed to the motor which is not caught by a Hitachi authorized service center. 17. Operate power tools at a higher voltage... revision of ANSI Standard Z87.1. 21. If using it will result in motor seizure. This Jig Saw employs a high-power motor. no .......... Don't leave tool until it may be careful with...
...at the rated voltage. Class II Construction ---/min ... NEVER leave tool running unattended. Carefully handle power tools. Do not wipe plastic parts with soapy water and dry thoroughly. 20. Touching ... wiring or electric cable with such solvents. Always adjust the blade speed to the motor which is not caught by a Hitachi authorized service center. 17. Operate power tools at a higher voltage... revision of ANSI Standard Z87.1. 21. If using it will result in motor seizure. This Jig Saw employs a high-power motor. no .......... Don't leave tool until it may be careful with...
Instruction Manual
Page 11
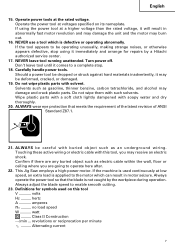
...dial set to eliminate the orbital operation (the blade moves only up and down ). Adjusting the orbital operation (1) This Jig Saw employs orbital operation which enables stepless speed control. English Blade Blade holder Lever Fig. 3 Blade Blade holder Fig. 4 Blade Roller Blade Roller Fig. 5 Dial... Fig. 6 11 Adjust the speed according to the material to be selected in Fig. 7 to "0" to "1", the jig saw operates at the minimum speed (850 /min.). When the dial is equipped with a thickness of more than 1/32" (1 ...
...dial set to eliminate the orbital operation (the blade moves only up and down ). Adjusting the orbital operation (1) This Jig Saw employs orbital operation which enables stepless speed control. English Blade Blade holder Lever Fig. 3 Blade Blade holder Fig. 4 Blade Roller Blade Roller Fig. 5 Dial... Fig. 6 11 Adjust the speed according to the material to be selected in Fig. 7 to "0" to "1", the jig saw operates at the minimum speed (850 /min.). When the dial is equipped with a thickness of more than 1/32" (1 ...
Instruction Manual
Page 12
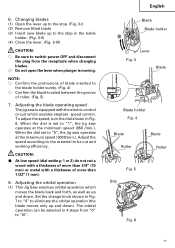
... for proper operation. 10. Insert the splinter guard in the light or see Fig. 8) 11. Using the sub base (made from the Jig Saw. To cut surface. Splinter guard (Sold separately) Using the splinter guard when cutting wood materials will reduce splintering of cut the material accurately, ... in place. (Fig. 9) When removing chip cover, hold both sides of base by using No. 97 blade. Cutting stainless steel plates This Jig Saw can be removed from steel) will reduce scratching of cut stainless steel plates by attached 4 screws. 13. Lighting up the lamp Fig. 9 Base...
... for proper operation. 10. Insert the splinter guard in the light or see Fig. 8) 11. Using the sub base (made from the Jig Saw. To cut surface. Splinter guard (Sold separately) Using the splinter guard when cutting wood materials will reduce splintering of cut the material accurately, ... in place. (Fig. 9) When removing chip cover, hold both sides of base by using No. 97 blade. Cutting stainless steel plates This Jig Saw can be removed from steel) will reduce scratching of cut stainless steel plates by attached 4 screws. 13. Lighting up the lamp Fig. 9 Base...

Instruction Manual
Page 17
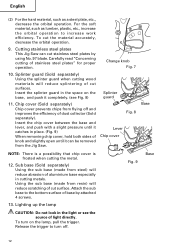
... Parts List will be used, all screws and ensure that only authorized replacement parts will be carried out by a HITACHI AUTHORIZED SERVICE CENTER, ONLY. 5. MODIFICATIONS: Hitachi Power Tools are properly tightened. WARNING: Using this Jig Saw with oil or water. 4. English MAINTENANCE AND INSPECTION WARNING: Be sure to switch power OFF and disconnect the...
... Parts List will be used, all screws and ensure that only authorized replacement parts will be carried out by a HITACHI AUTHORIZED SERVICE CENTER, ONLY. 5. MODIFICATIONS: Hitachi Power Tools are properly tightened. WARNING: Using this Jig Saw with oil or water. 4. English MAINTENANCE AND INSPECTION WARNING: Be sure to switch power OFF and disconnect the...
Parts List
Page 4
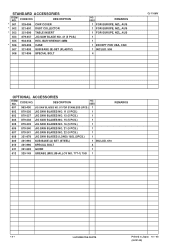
....) 1 602 879-336 JIG SAW BLADES NO. 11 (5 PCS.) 1 603 879-337 JIG SAW BLADES NO. 12 (5 PCS.) 1 604 879-338 JIG SAW BLADES NO. 15 (5 PCS.) 1 605 879-339 JIG SAW BLADES NO. 16 (5 PCS.) 1 606 879-340 JIG SAW BLADES NO. 21 (5 PCS.) 1 607 879-341 JIG SAW BLADES NO. 22 (5 PCS.) 1 608 321-878 JIG SAW BLADES (LONG) 185L (3PCS...CJ 110MV OPTIONAL ACCESSORIES ITEM NO. DESCRIPTION * 501 325-096 CHIP COVER * 502 321-591 DUST COLLECTOR * 503 321-590 TABLE INSERT 504 879-357 JIG SAW BLADE NO. 41 (5 PCS.) 505 944-458 HEX. CODE NO. STANDARD ACCESSORIES ITEM NO. DESCRIPTION NO.
....) 1 602 879-336 JIG SAW BLADES NO. 11 (5 PCS.) 1 603 879-337 JIG SAW BLADES NO. 12 (5 PCS.) 1 604 879-338 JIG SAW BLADES NO. 15 (5 PCS.) 1 605 879-339 JIG SAW BLADES NO. 16 (5 PCS.) 1 606 879-340 JIG SAW BLADES NO. 21 (5 PCS.) 1 607 879-341 JIG SAW BLADES NO. 22 (5 PCS.) 1 608 321-878 JIG SAW BLADES (LONG) 185L (3PCS...CJ 110MV OPTIONAL ACCESSORIES ITEM NO. DESCRIPTION * 501 325-096 CHIP COVER * 502 321-591 DUST COLLECTOR * 503 321-590 TABLE INSERT 504 879-357 JIG SAW BLADE NO. 41 (5 PCS.) 505 944-458 HEX. CODE NO. STANDARD ACCESSORIES ITEM NO. DESCRIPTION NO.


