Owners Guide
Page 1
has determined that this product meets the ENERGY STAR® guidelines for 50VX915, 60VX915, 70VX915 IMPORTANT SAFETY INSTRUCTIONS 2-3 FIRST TIME USE ...4-26 THE REMOTE CONTROL 27-50 ON-SCREEN DISPLAY...51-79 LAMP REPLACEMENT ...80-83 CARE OF YOUR HITACHI TV & REMOTE CONTROL 84 RECEPTION PROBLEMS ...85 USEFUL INFORMATION / INDEX 86-92 As an ENERGY STAR® Partner, Hitachi, Ltd. LCD REAR PROJECTION TELEVISION Operating Guide for energy efficiency.
has determined that this product meets the ENERGY STAR® guidelines for 50VX915, 60VX915, 70VX915 IMPORTANT SAFETY INSTRUCTIONS 2-3 FIRST TIME USE ...4-26 THE REMOTE CONTROL 27-50 ON-SCREEN DISPLAY...51-79 LAMP REPLACEMENT ...80-83 CARE OF YOUR HITACHI TV & REMOTE CONTROL 84 RECEPTION PROBLEMS ...85 USEFUL INFORMATION / INDEX 86-92 As an ENERGY STAR® Partner, Hitachi, Ltd. LCD REAR PROJECTION TELEVISION Operating Guide for energy efficiency.
Owners Guide
Page 2
... parts inside the television. • Model and serial numbers are indicated on the quality, performance, and ease of service of HITACHI televisions. NOTE: This television receiver will display television closed captioning, ( or ), in accordance with arrowhead symbol, within an equilateral...expressly approved by Hitachi America, Ltd. This will be notified that any changes or modifications made to you operate these units. REFER SERVICING TO QUALIFIED SERVICE PERSONNEL. IMPORTANT SAFETY INSTRUCTIONS SAFETY POINTS YOU SHOULD KNOW ABOUT YOUR HITACHI LCD REAR PROJECTION TELEVISION Our ...
... parts inside the television. • Model and serial numbers are indicated on the quality, performance, and ease of service of HITACHI televisions. NOTE: This television receiver will display television closed captioning, ( or ), in accordance with arrowhead symbol, within an equilateral...expressly approved by Hitachi America, Ltd. This will be notified that any changes or modifications made to you operate these units. REFER SERVICING TO QUALIFIED SERVICE PERSONNEL. IMPORTANT SAFETY INSTRUCTIONS SAFETY POINTS YOU SHOULD KNOW ABOUT YOUR HITACHI LCD REAR PROJECTION TELEVISION Our ...
Owners Guide
Page 4
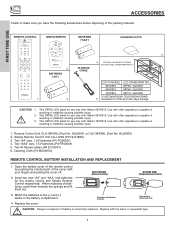
...Two IR Mouse cables (P# EY01641). 6. MENU EXIT FAV CH INPUTS 6. OPTIONAL LCD REAR PTV STAND (NOT INCLUDED, ORDER SEPARATELY) LCD TV MODEL LCD STAND/PART NO. 50VX915 SPF50 / QJ01521 60VX915 SPF60 / QJ01581 70VX915 SPF70 / QJ01591 CUSTOM HITACHI TELEVISION STAND 1. 3. 5. FIRST TIME USE REMOTE CONTROL SIMPLE REMOTE CH + ...of explosion if battery is capable of resulting in instability causing possible injury. Use with Hitachi 70VX915. Two "AA" size, 1.5V batteries (P# FQ00021). 4. ACCESSORIES Check to the (+) and (-) marks in instability causing possible injury....
...Two IR Mouse cables (P# EY01641). 6. MENU EXIT FAV CH INPUTS 6. OPTIONAL LCD REAR PTV STAND (NOT INCLUDED, ORDER SEPARATELY) LCD TV MODEL LCD STAND/PART NO. 50VX915 SPF50 / QJ01521 60VX915 SPF60 / QJ01581 70VX915 SPF70 / QJ01591 CUSTOM HITACHI TELEVISION STAND 1. 3. 5. FIRST TIME USE REMOTE CONTROL SIMPLE REMOTE CH + ...of explosion if battery is capable of resulting in instability causing possible injury. Use with Hitachi 70VX915. Two "AA" size, 1.5V batteries (P# FQ00021). 4. ACCESSORIES Check to the (+) and (-) marks in instability causing possible injury....
Owners Guide
Page 5
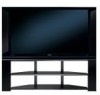
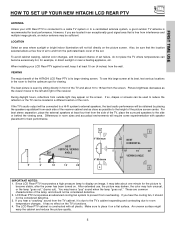
...best stereo separation, place the external speakers at least four feet from overheating. LCD Rear PTV incorporates an advanced cooling fan system to prevent from the side of the HITACHI LCD Rear PTV is due to the TV's cabinet expanding and contracting due to the side or behind the viewing area.... VIEWING The major benefit of the TV, place the surround speakers to room temperature changes. If the TV's audio output will be obtained...
...best stereo separation, place the external speakers at least four feet from overheating. LCD Rear PTV incorporates an advanced cooling fan system to prevent from the side of the HITACHI LCD Rear PTV is due to the TV's cabinet expanding and contracting due to the side or behind the viewing area.... VIEWING The major benefit of the TV, place the surround speakers to room temperature changes. If the TV's audio output will be obtained...
Owners Guide
Page 9
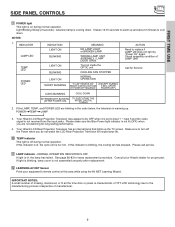
Your Hitachi LCD Rear Projection Television may appear to be OFF when it is not lit (OFF) when you do not watch the LCD Rear Projection Television for longer lamp life. ቫ TEMP indicator This light is warming up. Please make sure the Blue Power light indicator... NORMAL OPERATION TV CAN'T RECEIVE ANY (EXCEPT DURING REMOTE CONTROL BUTTONS 5 SEC AFTER BY POWER OFF SEQUENCE POWER OFF) ACTION Need to the manufacturing process irrespective of missing, discolored, or lit all the time dots or pixels is not received from the input jacks. Your Hitachi LCD Rear Projection Television has...
Your Hitachi LCD Rear Projection Television may appear to be OFF when it is not lit (OFF) when you do not watch the LCD Rear Projection Television for longer lamp life. ቫ TEMP indicator This light is warming up. Please make sure the Blue Power light indicator... NORMAL OPERATION TV CAN'T RECEIVE ANY (EXCEPT DURING REMOTE CONTROL BUTTONS 5 SEC AFTER BY POWER OFF SEQUENCE POWER OFF) ACTION Need to the manufacturing process irrespective of missing, discolored, or lit all the time dots or pixels is not received from the input jacks. Your Hitachi LCD Rear Projection Television has...
Owners Guide
Page 12
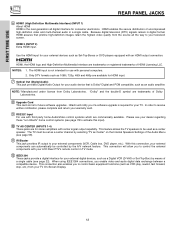
...retain the highest video quality from the source all digital interface for stereo amplifiers with an HDMI output connection. With this input). ቫ TV AS CENTER (INPUTS 1-4) These jacks are for consumer electronics. HDMI 2 (INPUT 2) Extra HDMI input. HDMI, the HDMI logo and High...notification, please complete and return your warranty card. ቪ RS232C Input For use with your LCD Rear PTV's remote control in a single cable. Please see your dealer regarding these "non Hitachi" home control systems (see page 78 to activate this connection, your external components can automatically...
...retain the highest video quality from the source all digital interface for stereo amplifiers with an HDMI output connection. With this input). ቫ TV AS CENTER (INPUTS 1-4) These jacks are for consumer electronics. HDMI 2 (INPUT 2) Extra HDMI input. HDMI, the HDMI logo and High...notification, please complete and return your warranty card. ቪ RS232C Input For use with your LCD Rear PTV's remote control in a single cable. Please see your dealer regarding these "non Hitachi" home control systems (see page 78 to activate this connection, your external components can automatically...
Owners Guide
Page 22
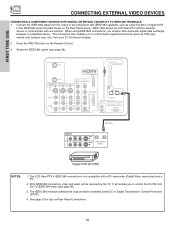
...Top-Box or Digital VCR, to the IEEE1394 input terminals shown on the Rear Panel below. It will be received by the TV. Patent Nos. 4,631,603; 4,577,216; 4,819,098; 4,907,093; This LCD Rear PTV's IEEE1394 connection is not compatible with one another. With IEEE1394 connection,... CONNECTING EXTERNAL VIDEO DEVICES CONNECTING A COMPONENT SOURCE WITH DIGITAL INTERFACE CAPABILITY TO IEEE1394 TERMINALS 1. IEEE 1394 allows the LCD Rear PTV and the external device to control the D-VHS from the TV IEEE1394 menu (see page 36). ANT A CableCARD (Top of card faces right) ANT B MONITOR OUT S-VIDEO...
...Top-Box or Digital VCR, to the IEEE1394 input terminals shown on the Rear Panel below. It will be received by the TV. Patent Nos. 4,631,603; 4,577,216; 4,819,098; 4,907,093; This LCD Rear PTV's IEEE1394 connection is not compatible with one another. With IEEE1394 connection,... CONNECTING EXTERNAL VIDEO DEVICES CONNECTING A COMPONENT SOURCE WITH DIGITAL INTERFACE CAPABILITY TO IEEE1394 TERMINALS 1. IEEE 1394 allows the LCD Rear PTV and the external device to control the D-VHS from the TV IEEE1394 menu (see page 36). ANT A CableCARD (Top of card faces right) ANT B MONITOR OUT S-VIDEO...

Owners Guide
Page 23
... Setup DVD POWER MENU DVD2 VCR VCR2 AV Receiver Move INFO Device Setting MORE NOTES: 1. FIRST TIME USE CONNECTING AV NETWORK Your Hitachi LCD Rear PTV is equipped with up to four components. CONNECTING EXTERNAL AUDIO/VIDEO COMPONENTS TO IR BLASTER FOR AV NETWORK 1. ANT A CableCARD ...L AUDIO R AUDIO TO HI-FI PR PR (MONO) (MONO) (MONO) (MONO) TV AS CENTER HDMI 2 IEEE1394 IR BLASTER OPTICAL OUT Digital Audio Upgrade Card Apparatus Claims of an AV Network setup between your Hitachi LCD PTV Remote Control. Patent Nos. 4,631,603; 4,577,216; 4,819,098; 4,907,093...
... Setup DVD POWER MENU DVD2 VCR VCR2 AV Receiver Move INFO Device Setting MORE NOTES: 1. FIRST TIME USE CONNECTING AV NETWORK Your Hitachi LCD Rear PTV is equipped with up to four components. CONNECTING EXTERNAL AUDIO/VIDEO COMPONENTS TO IR BLASTER FOR AV NETWORK 1. ANT A CableCARD ...L AUDIO R AUDIO TO HI-FI PR PR (MONO) (MONO) (MONO) (MONO) TV AS CENTER HDMI 2 IEEE1394 IR BLASTER OPTICAL OUT Digital Audio Upgrade Card Apparatus Claims of an AV Network setup between your Hitachi LCD PTV Remote Control. Patent Nos. 4,631,603; 4,577,216; 4,819,098; 4,907,093...

Owners Guide
Page 28
... different freeze modes (see page 47). ቦ PAUSE button Press the PAUSE button to freeze the picture. HOW TO USE THE REMOTE TO CONTROL YOUR LCD REAR PTV ቢ ባ ቤ ብ ቦ ቧ ቩ ቨ ቯ ቪ A/V NET ቭ ቮ ቫ ቱ GUIDE ተ ቲ ታ ታ ... THE REMOTE CONTROL ቢ POWER button Press this button to turn the TV set on or off when the remote is in TV mode. (See page 27 for instructions on how to set the remote control to TV mode.) ባ MODE Indicator Turns on or blinks to show remote control...
... different freeze modes (see page 47). ቦ PAUSE button Press the PAUSE button to freeze the picture. HOW TO USE THE REMOTE TO CONTROL YOUR LCD REAR PTV ቢ ባ ቤ ብ ቦ ቧ ቩ ቨ ቯ ቪ A/V NET ቭ ቮ ቫ ቱ GUIDE ተ ቲ ታ ታ ... THE REMOTE CONTROL ቢ POWER button Press this button to turn the TV set on or off when the remote is in TV mode. (See page 27 for instructions on how to set the remote control to TV mode.) ባ MODE Indicator Turns on or blinks to show remote control...
Owners Guide
Page 29
HOW TO USE THE REMOTE TO CONTROL YOUR LCD REAR PTV ቧ ASPECT button Press this aspect mode to display conventional (4:3) sources by linearly increasing image expansion from the center towards the edges of the ...
HOW TO USE THE REMOTE TO CONTROL YOUR LCD REAR PTV ቧ ASPECT button Press this aspect mode to display conventional (4:3) sources by linearly increasing image expansion from the center towards the edges of the ...
Owners Guide
Page 30
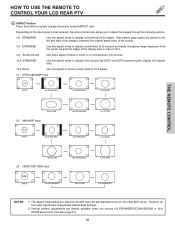
...toward desired direction and press the SELECT button to compete with less brightness and contrast for day time viewing with more detailed picture (see page 70. ቩ PICTURE-IN-PICTURE button See separate section on the type of choice (example: 15-1). Select CHANNEL GUIDE to toggle between Day... information. NOTE: For automatic DAY/NIGHT picture mode settings, see page 54 for numeric entries. HOW TO USE THE REMOTE TO CONTROL YOUR LCD REAR PTV ቨ DAY/NIGHT button Press this button to normal viewing. Press the GUIDE button again to return to access the Channel Guide. ...
...toward desired direction and press the SELECT button to compete with less brightness and contrast for day time viewing with more detailed picture (see page 70. ቩ PICTURE-IN-PICTURE button See separate section on the type of choice (example: 15-1). Select CHANNEL GUIDE to toggle between Day... information. NOTE: For automatic DAY/NIGHT picture mode settings, see page 54 for numeric entries. HOW TO USE THE REMOTE TO CONTROL YOUR LCD REAR PTV ቨ DAY/NIGHT button Press this button to normal viewing. Press the GUIDE button again to return to access the Channel Guide. ...
Owners Guide
Page 31
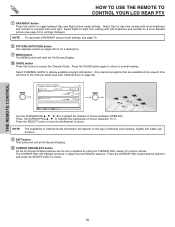
...POWER Move SEL Select MENU MORE MORE.. This window shows the available Audio/Video equipment soft keys. HOW TO USE THE REMOTE TO CONTROL YOUR LCD REAR PTV ቯ AV NET button Press this button to start. Use CURSOR PAD to navigate and SELECT to control external components with the device ... EQUIPMENT Move AV NET Return THE REMOTE CONTROL PV Recorder Cable Box Set Top Box Custom Device Setup POWER CH ̄ CH ̆ MENU TV/VCR INFO GUIDE MORE Move SEL Select MORE.. The second Custom device setup will disappear after 30 seconds if you press the AV NET button...
...POWER Move SEL Select MENU MORE MORE.. This window shows the available Audio/Video equipment soft keys. HOW TO USE THE REMOTE TO CONTROL YOUR LCD REAR PTV ቯ AV NET button Press this button to start. Use CURSOR PAD to navigate and SELECT to control external components with the device ... EQUIPMENT Move AV NET Return THE REMOTE CONTROL PV Recorder Cable Box Set Top Box Custom Device Setup POWER CH ̄ CH ̆ MENU TV/VCR INFO GUIDE MORE Move SEL Select MORE.. The second Custom device setup will disappear after 30 seconds if you press the AV NET button...
Owners Guide
Page 32
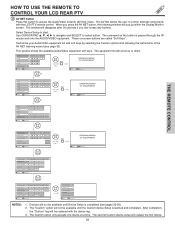
...should be learned. NO Move YES SEL Select YES HITACHI AV NET WIZARD (Learning) 1. When using the LCD Rear PTV remote control. VCR3). 4. Transfer was successfull Press OK to continue. Select TV Softkeys to AV NET. HITACHI AV NET WIZARD (Learning) THE REMOTE CONTROL Transfer not... completed! In order to use equipment that is not supported by using the Learned device with the LCD Rear PTV remote control. 2. For example,...
...should be learned. NO Move YES SEL Select YES HITACHI AV NET WIZARD (Learning) 1. When using the LCD Rear PTV remote control. VCR3). 4. Transfer was successfull Press OK to continue. Select TV Softkeys to AV NET. HITACHI AV NET WIZARD (Learning) THE REMOTE CONTROL Transfer not... completed! In order to use equipment that is not supported by using the Learned device with the LCD Rear PTV remote control. 2. For example,...
Owners Guide
Page 33
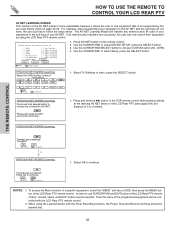
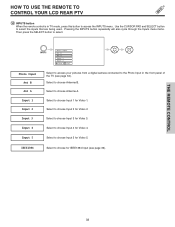
... Ant B Ant A Input 1 Input 2 Move SEL Sel Select to access your pictures from a digital camera connected to choose Antenna A. Select to the Photo Input in TV mode, press this button to choose Input 3 for Video 3. Select to select. THE REMOTE CONTROL 33 Pressing the INPUTS button repeatedly will also cycle through... to choose Input 1 for Video 1. Select to choose Input 5 for Video 5. Select to access the INPUTS menu. HOW TO USE THE REMOTE TO CONTROL YOUR LCD REAR PTV ተ INPUTS button When the remote control is in the front panel of the...
... Ant B Ant A Input 1 Input 2 Move SEL Sel Select to access your pictures from a digital camera connected to choose Antenna A. Select to the Photo Input in TV mode, press this button to choose Input 3 for Video 3. Select to select. THE REMOTE CONTROL 33 Pressing the INPUTS button repeatedly will also cycle through... to choose Input 1 for Video 1. Select to choose Input 5 for Video 5. Select to access the INPUTS menu. HOW TO USE THE REMOTE TO CONTROL YOUR LCD REAR PTV ተ INPUTS button When the remote control is in the front panel of the...

Owners Guide
Page 34
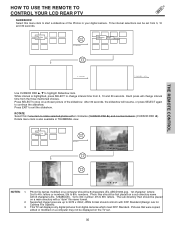
.../03 1632x1232 Vacation Picture No. Please wait 1 or 2 minutes before checking your photos in this Photo Input. 4. HOW TO USE THE REMOTE TO CONTROL YOUR LCD REAR PTV PHOTO INPUT This feature is useful for viewing digital still pictures from your Photo Input connections. 7. Jump Slideshow Rotate Jump 7 0 Please Enter Picture Number...
.../03 1632x1232 Vacation Picture No. Please wait 1 or 2 minutes before checking your photos in this Photo Input. 4. HOW TO USE THE REMOTE TO CONTROL YOUR LCD REAR PTV PHOTO INPUT This feature is useful for viewing digital still pictures from your Photo Input connections. 7. Jump Slideshow Rotate Jump 7 0 Please Enter Picture Number...
Owners Guide
Page 35
..., press SELECT to change interval time from digital cameras which meet DCF Standard. HOW TO USE THE REMOTE TO CONTROL YOUR LCD REAR PTV SLIDESHOW Select this menu item to rotate selected photos either clockwise (CURSOR PAD ̈) and counterclockwise (CURSOR PAD ̇). This... TV set . 35 Each press will resume, or press SELECT again to 8th: numbers. Pictures that were copied, edited or modified on a computer may not be placed on the TV set displays only digital pictures from the three mentioned choices.
..., press SELECT to change interval time from digital cameras which meet DCF Standard. HOW TO USE THE REMOTE TO CONTROL YOUR LCD REAR PTV SLIDESHOW Select this menu item to rotate selected photos either clockwise (CURSOR PAD ̈) and counterclockwise (CURSOR PAD ̇). This... TV set . 35 Each press will resume, or press SELECT again to 8th: numbers. Pictures that were copied, edited or modified on a computer may not be placed on the TV set displays only digital pictures from the three mentioned choices.

Owners Guide
Page 36
...manufacturers. 6. This TV's IEEE1394 connection is connected) Device not detected INPUTS Input 4 Input 5 IEEE 1394 Photo Input Ant B Move SEL Sel. TV IN/OUT functions are compatible with digital interface capability. THE REMOTE CONTROL HOW TO USE THE REMOTE TO CONTROL YOUR LCD REAR PTV IEEE1394 Use ...this function to control your devices with this TV. Press the INPUTS button, CURSOR PAD and ...
...manufacturers. 6. This TV's IEEE1394 connection is connected) Device not detected INPUTS Input 4 Input 5 IEEE 1394 Photo Input Ant B Move SEL Sel. TV IN/OUT functions are compatible with digital interface capability. THE REMOTE CONTROL HOW TO USE THE REMOTE TO CONTROL YOUR LCD REAR PTV IEEE1394 Use ...this function to control your devices with this TV. Press the INPUTS button, CURSOR PAD and ...
Owners Guide
Page 37
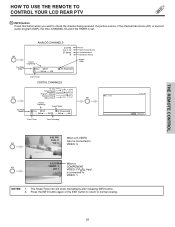
...1 VIDEO: Y-PBPR Input is set. NOTES: 1. PM 4:3 Expanded Event Timer DIGITAL CHANNELS TV Time 3:32PM Picture Source Ant A 122-1 Channel ID KPBS-DT Program Language Engl Broadcast Rating TV-Y INFO Signal Format 720p Format Day/Night Mode Closed Captioning Aspect Mode Day CC Off 4:3 ...Expanded View --:-- AM REC --:-- AM --:-- THE REMOTE CONTROL HOW TO USE THE REMOTE TO CONTROL YOUR LCD REAR PTV ቱ INFO button ...
...1 VIDEO: Y-PBPR Input is set. NOTES: 1. PM 4:3 Expanded Event Timer DIGITAL CHANNELS TV Time 3:32PM Picture Source Ant A 122-1 Channel ID KPBS-DT Program Language Engl Broadcast Rating TV-Y INFO Signal Format 720p Format Day/Night Mode Closed Captioning Aspect Mode Day CC Off 4:3 ...Expanded View --:-- AM REC --:-- AM --:-- THE REMOTE CONTROL HOW TO USE THE REMOTE TO CONTROL YOUR LCD REAR PTV ቱ INFO button ...
Owners Guide
Page 38
...level it again to return to your favorite channel list by CHANNEL WHEEL up (̆) or CHANNEL WHEEL down . Press it was set when the TV is turned ON. ታ CHANNEL (CH) WHEEL/CHANNEL SELECTOR buttons The CHANNEL wheel or the CHANNEL SELECTOR buttons are in Favorite Channel mode when ... volume (SOFT MUTE) to answer the telephone, etc., press the VOL wheel down (̄). THE REMOTE CONTROL HOW TO USE THE REMOTE TO CONTROL YOUR LCD REAR PTV ቲ VOLUME (VOL) WHEEL, MUTE button Use the VOL WHEEL (̆ or ̄) until the displayed channel turns highlighted GREEN to WHITE. ...
...level it again to return to your favorite channel list by CHANNEL WHEEL up (̆) or CHANNEL WHEEL down . Press it was set when the TV is turned ON. ታ CHANNEL (CH) WHEEL/CHANNEL SELECTOR buttons The CHANNEL wheel or the CHANNEL SELECTOR buttons are in Favorite Channel mode when ... volume (SOFT MUTE) to answer the telephone, etc., press the VOL wheel down (̄). THE REMOTE CONTROL HOW TO USE THE REMOTE TO CONTROL YOUR LCD REAR PTV ቲ VOLUME (VOL) WHEEL, MUTE button Use the VOL WHEEL (̆ or ̄) until the displayed channel turns highlighted GREEN to WHITE. ...
Owners Guide
Page 39
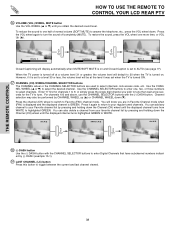
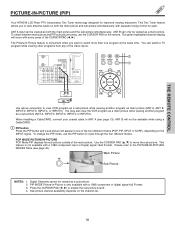
... 3 INPUT 2 Y/ VIDEO PB INPUT 1 Y/ VIDEO PB HDMI 1 VIDEO L AUDIO R AUDIO TO HI-FI PR PR (MONO) (MONO) (MONO) (MONO) TV AS CENTER HDMI 2 IEEE1394 IR BLASTER OPTICAL OUT Digital Audio Upgrade Card Apparatus Claims of the main picture. Use the CURSOR PAD (̆, ̄) to...NET Audio Video OUTPUT GUIDE VCR Use above connection to enable the sub-picture sound. 4. THE REMOTE CONTROL PICTURE-IN-PICTURE (PIP) Your HITACHI LCD Rear PTV incorporates Two Tuner technology designed for limited viewing uses only. ANT B can be available while using a CableCARD. ቢ PIP button Press...
... 3 INPUT 2 Y/ VIDEO PB INPUT 1 Y/ VIDEO PB HDMI 1 VIDEO L AUDIO R AUDIO TO HI-FI PR PR (MONO) (MONO) (MONO) (MONO) TV AS CENTER HDMI 2 IEEE1394 IR BLASTER OPTICAL OUT Digital Audio Upgrade Card Apparatus Claims of the main picture. Use the CURSOR PAD (̆, ̄) to...NET Audio Video OUTPUT GUIDE VCR Use above connection to enable the sub-picture sound. 4. THE REMOTE CONTROL PICTURE-IN-PICTURE (PIP) Your HITACHI LCD Rear PTV incorporates Two Tuner technology designed for limited viewing uses only. ANT B can be available while using a CableCARD. ቢ PIP button Press...


