
Owners Guide
Page 1
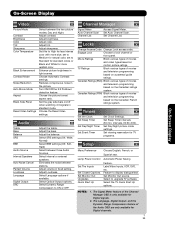
has determined that this product meets the Energy Star® guidelines for 55VS69 and 62VS69 IMPORTANT SAFETY INSTRUCTIONS 2-3 FIRST TIME USE ...4-19 THE REMOTE CONTROL ...20-31 ON-SCREEN DISPLAY ...32-55 LAMP REPLACEMENT ...56-59 USEFUL INFORMATION...60-63 LICENSE AGREEMENT...64 APPENDIXES ...65 INDEX ...66 As an Energy Star® Partner, Hitachi, Ltd. LCD REAR PROJECTION TELEVISION Operating Guide for energy efficiency.
has determined that this product meets the Energy Star® guidelines for 55VS69 and 62VS69 IMPORTANT SAFETY INSTRUCTIONS 2-3 FIRST TIME USE ...4-19 THE REMOTE CONTROL ...20-31 ON-SCREEN DISPLAY ...32-55 LAMP REPLACEMENT ...56-59 USEFUL INFORMATION...60-63 LICENSE AGREEMENT...64 APPENDIXES ...65 INDEX ...66 As an Energy Star® Partner, Hitachi, Ltd. LCD REAR PROJECTION TELEVISION Operating Guide for energy efficiency.
Owners Guide
Page 3
... are indicated on back side of the television as this product and its lamp in the instructions, as the disconnect device and shall remain readily operable. FOR MORE INFORMATION, CALL 1-800-HITACHI. To prevent electric shock, do not expose this device that contains mercury. If the ...changes or modifications made to this apparatus to rain or moisture. • The television should not be exposed to be authorized by Hitachi America, Ltd. Reverse engineering or disassembly is designed to very high voltages and other limited consumer uses only unless otherwise authorized by ...
... are indicated on back side of the television as this product and its lamp in the instructions, as the disconnect device and shall remain readily operable. FOR MORE INFORMATION, CALL 1-800-HITACHI. To prevent electric shock, do not expose this device that contains mercury. If the ...changes or modifications made to this apparatus to rain or moisture. • The television should not be exposed to be authorized by Hitachi America, Ltd. Reverse engineering or disassembly is designed to very high voltages and other limited consumer uses only unless otherwise authorized by ...
Owners Guide
Page 5
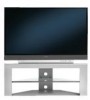
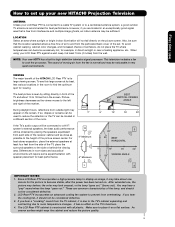
...on the TV's functions. 4. However, if you are common characteristics of the TV, place the surround speakers to prevent from the side of the lamp, and should not be 0' used to become excessively hot, for best performance. Also, be sure that is free from the perforated back cover of... be located in front of the picture screen center. Make sure to cool the processor. After extended use How to set up your new HITACHI Projection Television ANTENNA Unless your LCD Rear PTV against a wall, keep it should not be sufficient. An uneven surface might warp the cabinet ...
...on the TV's functions. 4. However, if you are common characteristics of the TV, place the surround speakers to prevent from the side of the lamp, and should not be 0' used to become excessively hot, for best performance. Also, be sure that is free from the perforated back cover of... be located in front of the picture screen center. Make sure to cool the processor. After extended use How to set up your new HITACHI Projection Television ANTENNA Unless your LCD Rear PTV against a wall, keep it should not be sufficient. An uneven surface might warp the cabinet ...
Owners Guide
Page 9
...blinking, the cooling fan has stopped. If light is blinking, lamp cover is not received from the input jacks. This light will be cooling down and the light will eventually turn off during normal operation. Consult your Hitachi dealer for Service LONG BLINKING (1 SEC CYCLE) COOL DOWN (FOR... PERIOD EXCEPT WITHIN THE BEGINNING 5 SEC.) ACTION Need to display an On-Screen warning. Check assembly condition of LAMP UNIT Call for proper part. Your Hitachi LCD Rear Projection Television may become clogged over time. If this indicator is off the Power when you are blinking...
...blinking, the cooling fan has stopped. If light is blinking, lamp cover is not received from the input jacks. This light will be cooling down and the light will eventually turn off during normal operation. Consult your Hitachi dealer for Service LONG BLINKING (1 SEC CYCLE) COOL DOWN (FOR... PERIOD EXCEPT WITHIN THE BEGINNING 5 SEC.) ACTION Need to display an On-Screen warning. Check assembly condition of LAMP UNIT Call for proper part. Your Hitachi LCD Rear Projection Television may become clogged over time. If this indicator is off the Power when you are blinking...

Owners Guide
Page 13
... ID and Host ID, use only. CableCARD Info. Press the MENU button on the Remote Control to access the CableCARD Information menu. 1. Setup Menu Preference Lamp Power Control Set The Inputs Set Closed Captions Set Monitor Out CableCARD Information Upgrades Quick Start-Up Move SEL Select Setup CableCARD Information Select the...
... ID and Host ID, use only. CableCARD Info. Press the MENU button on the Remote Control to access the CableCARD Information menu. 1. Setup Menu Preference Lamp Power Control Set The Inputs Set Closed Captions Set Monitor Out CableCARD Information Upgrades Quick Start-Up Move SEL Select Setup CableCARD Information Select the...
Owners Guide
Page 33
..., set to ON or OFF. Canadian Ratings (ENG) Block various types of the Channel Manager OSD is only available for TV programs. Setup Menu Preference Lamp Power Control Set The Inputs Set Closed Captions Set Monitor Out Upgrades Quick Start Up Choose English, French, or Spanish text. Select to display dialogue...
..., set to ON or OFF. Canadian Ratings (ENG) Block various types of the Channel Manager OSD is only available for TV programs. Setup Menu Preference Lamp Power Control Set The Inputs Set Closed Captions Set Monitor Out Upgrades Quick Start Up Choose English, French, or Spanish text. Select to display dialogue...
Owners Guide
Page 50
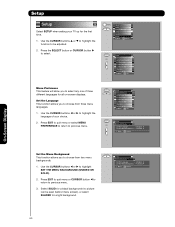
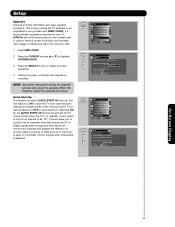
...a black background (no picture can be adjusted. 2. MENU Video Audio Channel Manager Locks Timers Setup Move SEL Select Setup Menu Preference OR Lamp Power Control Set The Inputs Set Closed Captions Set Monitor Out Upgrades Quick Start Up Move SEL Set Menu Preference This feature will allow you... to select. Press the SELECT button or CURSOR button ̈ to choose from three menu languages. 1. Setup Menu Preference Lamp Power Control Set The Inputs Set Closed Captions Set Monitor Out Upgrades Quick Start Up Move SEL Set Setup Menu Preference OR Set The ...
...a black background (no picture can be adjusted. 2. MENU Video Audio Channel Manager Locks Timers Setup Move SEL Select Setup Menu Preference OR Lamp Power Control Set The Inputs Set Closed Captions Set Monitor Out Upgrades Quick Start Up Move SEL Set Menu Preference This feature will allow you... to select. Press the SELECT button or CURSOR button ̈ to choose from three menu languages. 1. Setup Menu Preference Lamp Power Control Set The Inputs Set Closed Captions Set Monitor Out Upgrades Quick Start Up Move SEL Set Setup Menu Preference OR Set The ...
Owners Guide
Page 51
...when a video signal is completed, set up is not detected for this feature to Off. 4. Select from one of the remote control. 3. Setup Lamp Power Control Use this feature to give a name to any CableCARD set the Auto Power Saving feature to ON (Yes). Navigate the menu to highlight... Yes or No. INSTRUCTIONS: 1. Setup Menu Preference Lamp Power Control Set The Inputs Set Closed Captions Set Monitor Out Upgrades Quick Start Up Move SEL Set Setup OR Set The Inputs Input1 : **** Input2...
...when a video signal is completed, set up is not detected for this feature to Off. 4. Select from one of the remote control. 3. Setup Lamp Power Control Use this feature to give a name to any CableCARD set the Auto Power Saving feature to ON (Yes). Navigate the menu to highlight... Yes or No. INSTRUCTIONS: 1. Setup Menu Preference Lamp Power Control Set The Inputs Set Closed Captions Set Monitor Out Upgrades Quick Start Up Move SEL Set Setup OR Set The Inputs Input1 : **** Input2...
Owners Guide
Page 52
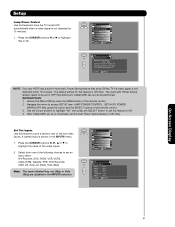
... function to automatically turn the TV on and tune to INPUT 4 when it must be available with your TV as described above. 2. Setup Menu Preference Lamp Power Control Set The Inputs Set Closed Captions Set Monitor Out Upgrades Quick Start Up Move SEL Set 2. This feature is not possible.
... function to automatically turn the TV on and tune to INPUT 4 when it must be available with your TV as described above. 2. Setup Menu Preference Lamp Power Control Set The Inputs Set Closed Captions Set Monitor Out Upgrades Quick Start Up Move SEL Set 2. This feature is not possible.

Owners Guide
Page 53
... highlight and select DIGITAL CAPTIONS feature. 2. Use the CURSOR buttons ̇, ̈, ̆ or ̄ to have the Audio at fixed volume. Setup Menu Preference Lamp Power Control Set The Inputs Set Closed Captions Set Monitor Out Upgrades Quick Start Up Move SEL Set TV Tuner Out: Select TV TUNER OUT...
... highlight and select DIGITAL CAPTIONS feature. 2. Use the CURSOR buttons ̇, ̈, ̆ or ̄ to have the Audio at fixed volume. Setup Menu Preference Lamp Power Control Set The Inputs Set Closed Captions Set Monitor Out Upgrades Quick Start Up Move SEL Set TV Tuner Out: Select TV TUNER OUT...
Owners Guide
Page 55
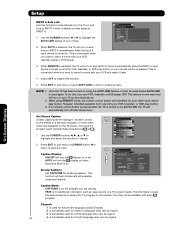
...This feature will cancel the upgrade. Set this feature will allow you with a flash card. Setup Menu Preference Lamp Power Control Set The Inputs Set Closed Captions Set Monitor Out Upgrades Quick Start Up Move SEL Set Setup Upgrades...to have the TV tune channels quickly at 1st turn on . Move SEL Return Setup Menu Preference Lamp Power Control Set The Inputs Set Closed Captions Set Monitor Out Upgrades Quick Start Up Move SEL Set ... quickly tune to as "off". Selecting ON for your TV, HITACHI will activate the TV tuners circuits when the TV is in "standby mode" which is complete.
...This feature will cancel the upgrade. Set this feature will allow you with a flash card. Setup Menu Preference Lamp Power Control Set The Inputs Set Closed Captions Set Monitor Out Upgrades Quick Start Up Move SEL Set Setup Upgrades...to have the TV tune channels quickly at 1st turn on . Move SEL Return Setup Menu Preference Lamp Power Control Set The Inputs Set Closed Captions Set Monitor Out Upgrades Quick Start Up Move SEL Set ... quickly tune to as "off". Selecting ON for your TV, HITACHI will activate the TV tuners circuits when the TV is in "standby mode" which is complete.

Owners Guide
Page 56
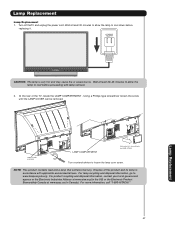
...: • Contact your authorized service center (see page 63). Using other lamps may explode if improperly handled. MODEL# 55VS69 62VS69 LAMP TYPE LP600 LP600 PART# UX25951 UX25951 • When replacing the lamp, let it dirty which can cause injury. cord has been unplugged. • Do ... any object inside the lamp. • Once the lamp is still lit, please contact your Hitachi dealer for approximately 30 to cool before opening the lamp compartment or touching the lamp assembly or any broken pieces. • Broken lamp pieces can shorten the life of the lamp and reduce the picture...
...: • Contact your authorized service center (see page 63). Using other lamps may explode if improperly handled. MODEL# 55VS69 62VS69 LAMP TYPE LP600 LP600 PART# UX25951 UX25951 • When replacing the lamp, let it dirty which can cause injury. cord has been unplugged. • Do ... any object inside the lamp. • Once the lamp is still lit, please contact your Hitachi dealer for approximately 30 to cool before opening the lamp compartment or touching the lamp assembly or any broken pieces. • Broken lamp pieces can shorten the life of the lamp and reduce the picture...
Owners Guide
Page 57
... loosen the screw until the LAMP COVER can be removed. Dispose of the TV, locate the LAMP COMPARTMENT . Lamp Replacement Lamp Replacement 1. Wait at least 30 minutes to allow the lamp to cool before replacing it. 120V CAUTION: The lamp is very hot and may cause fire or severe burns. For more information, call "1-800-HITACHI." 57
... loosen the screw until the LAMP COVER can be removed. Dispose of the TV, locate the LAMP COMPARTMENT . Lamp Replacement Lamp Replacement 1. Wait at least 30 minutes to allow the lamp to cool before replacing it. 120V CAUTION: The lamp is very hot and may cause fire or severe burns. For more information, call "1-800-HITACHI." 57

Owners Guide
Page 58
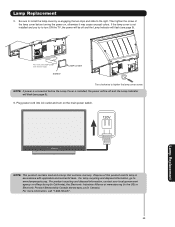
...driver as shown. LAMP UNIT PULL OUTWARDS THE LAMP UNIT Turn counterclockwise to tighten the screw of the new lamp or its original position. • Tighten the screw firmly on the lamp unit. LAMP UNIT CAUTION: The lamp is very hot ...and may shorten the life of the replacement lamp. Lamp Replacement PUSH INWARDS THE LAMP UNIT HANDLE LAMP UNIT Turn clockwise to loosen the lamp unit screw. Lamp...
...driver as shown. LAMP UNIT PULL OUTWARDS THE LAMP UNIT Turn counterclockwise to tighten the screw of the new lamp or its original position. • Tighten the screw firmly on the lamp unit. LAMP UNIT CAUTION: The lamp is very hot ...and may shorten the life of the replacement lamp. Lamp Replacement PUSH INWARDS THE LAMP UNIT HANDLE LAMP UNIT Turn clockwise to loosen the lamp unit screw. Lamp...
Owners Guide
Page 59
...is not installed and you try to turn on , otherwise it may cause unusual colors. For more information, call "1-800-Hitachi". 59 SCREW LAMP COVER Turn clockwise to the right. Place back in accordance with applicable environmental laws. Plug power cord into AC outlet and turn...power is connected before turning the power on the main power switch. 120V Lamp Replacement NOTE: This product contains lead and a lamp that contains mercury. Then tighten the screw of this product and its lamp in the LAMP COVER then slide to www.lamprecycle.org. For product recycling and disposal ...
...is not installed and you try to turn on , otherwise it may cause unusual colors. For more information, call "1-800-Hitachi". 59 SCREW LAMP COVER Turn clockwise to the right. Place back in accordance with applicable environmental laws. Plug power cord into AC outlet and turn...power is connected before turning the power on the main power switch. 120V Lamp Replacement NOTE: This product contains lead and a lamp that contains mercury. Then tighten the screw of this product and its lamp in the LAMP COVER then slide to www.lamprecycle.org. For product recycling and disposal ...

Owners Guide
Page 61
...other electrical appliances. NOTE: The TV set to improve the picture. When the signal is reflected from automobile ignition systems, neon lamps, electrical drills, and other objects. RADIO FREQUENCY INTERFERENCE: The interference produces moving ripples or diagonal streaks, and in external devices ... antenna without using an antenna, weak signals will display a black screen. Please separate radio equipment from automobile ignition systems, neon lamps, electrical drills, ghosting of the screen. Usually caused by the television signal following two paths. One is the direct path and...
...other electrical appliances. NOTE: The TV set to improve the picture. When the signal is reflected from automobile ignition systems, neon lamps, electrical drills, and other objects. RADIO FREQUENCY INTERFERENCE: The interference produces moving ripples or diagonal streaks, and in external devices ... antenna without using an antenna, weak signals will display a black screen. Please separate radio equipment from automobile ignition systems, neon lamps, electrical drills, ghosting of the screen. Usually caused by the television signal following two paths. One is the direct path and...
Owners Guide
Page 66
... 34 Contrast 34 Contrast Mode 35 D Date 47 Daylight Saving Correction 47 E Event Timer 49 G Guide Button 7, 23 H HDMI 11, 14, 18 I Input button 7, 23 L Lamp Replacement 60-63 Language Menu Language 50 Audio Language 39 Locks Change Access Code 42 Channel Lock 42 Front Panel Lock 42 Movie Ratings 43...
... 34 Contrast 34 Contrast Mode 35 D Date 47 Daylight Saving Correction 47 E Event Timer 49 G Guide Button 7, 23 H HDMI 11, 14, 18 I Input button 7, 23 L Lamp Replacement 60-63 Language Menu Language 50 Audio Language 39 Locks Change Access Code 42 Channel Lock 42 Front Panel Lock 42 Movie Ratings 43...


