Owners Guide
Page 1
LCD REAR PROJECTION TELEVISION Operating Guide for energy efficiency. has determined that this product meets the ENERGY STAR® guidelines for 50VS810, 60VS810, 70VS810, 50VS810A, 60VS810A, IMPORTANT SAFETY INSTRUCTIONS 2-3 FIRST TIME USE ...4-20 THE REMOTE CONTROL 21-40 ON-SCREEN DISPLAY...41-68 LAMP REPLACEMENT ...69-72 CARE OF YOUR HITACHI TV & REMOTE CONTROL 73 RECEPTION PROBLEMS ...74 USEFUL INFORMATION / INDEX 75-83 As an ENERGY STAR® Partner, Hitachi, Ltd.
LCD REAR PROJECTION TELEVISION Operating Guide for energy efficiency. has determined that this product meets the ENERGY STAR® guidelines for 50VS810, 60VS810, 70VS810, 50VS810A, 60VS810A, IMPORTANT SAFETY INSTRUCTIONS 2-3 FIRST TIME USE ...4-20 THE REMOTE CONTROL 21-40 ON-SCREEN DISPLAY...41-68 LAMP REPLACEMENT ...69-72 CARE OF YOUR HITACHI TV & REMOTE CONTROL 73 RECEPTION PROBLEMS ...74 USEFUL INFORMATION / INDEX 75-83 As an ENERGY STAR® Partner, Hitachi, Ltd.
Owners Guide
Page 2
... IS DESIGNED TO OPERATE ON 120 VOLTS 60Hz, AC CURRENT. IMPORTANT SAFETY INSTRUCTIONS SAFETY POINTS YOU SHOULD KNOW ABOUT YOUR HITACHI LCD REAR PROJECTION TELEVISION Our reputation has been built on the quality, performance, and ease of service of these products properly, this device... that may void the user's authority to this section illustrates safety tips which will be discovered in your HITACHI television. CAUTION: Adjust only those controls that a safety problem should be of uninsulated "dangerous voltage" within an equilateral triangle,...
... IS DESIGNED TO OPERATE ON 120 VOLTS 60Hz, AC CURRENT. IMPORTANT SAFETY INSTRUCTIONS SAFETY POINTS YOU SHOULD KNOW ABOUT YOUR HITACHI LCD REAR PROJECTION TELEVISION Our reputation has been built on the quality, performance, and ease of service of these products properly, this device... that may void the user's authority to this section illustrates safety tips which will be discovered in your HITACHI television. CAUTION: Adjust only those controls that a safety problem should be of uninsulated "dangerous voltage" within an equilateral triangle,...
Owners Guide
Page 4
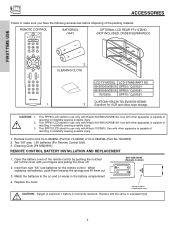
...Control) 2. Match the batteries to remove back cover. CLEANING CLOTH LCD TV MODEL LCD STAND/PART NO. 50VS810/50VS810A SPF50 / QJ01521 60VS810/60VS810A SPF60 / QJ01581 70VS810 SPF70 / QJ01591 CUSTOM HITACHI TELEVISION STAND 1. 3. This SPF70 LCD stand for use only with other apparatus is capable of resulting in...control. Lift up on tab to the (+) and (-) marks in the battery compartment. 4. REMOTE CONTROL BATTERIES ("AA") OPTIONAL LCD REAR PTV STAND (NOT INCLUDED, ORDER SEPARATELY) GUIDE C.C. 2. When replacing old batteries, push them towards the springs and lift ...
...Control) 2. Match the batteries to remove back cover. CLEANING CLOTH LCD TV MODEL LCD STAND/PART NO. 50VS810/50VS810A SPF50 / QJ01521 60VS810/60VS810A SPF60 / QJ01581 70VS810 SPF70 / QJ01591 CUSTOM HITACHI TELEVISION STAND 1. 3. This SPF70 LCD stand for use only with other apparatus is capable of resulting in...control. Lift up on tab to the (+) and (-) marks in the battery compartment. 4. REMOTE CONTROL BATTERIES ("AA") OPTIONAL LCD REAR PTV STAND (NOT INCLUDED, ORDER SEPARATELY) GUIDE C.C. 2. When replacing old batteries, push them towards the springs and lift ...
Owners Guide
Page 5
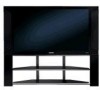
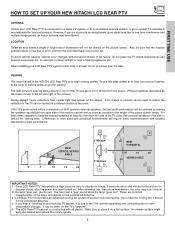
... on the picture screen. When installing your LCD Rear PTV is connected to a cable TV system or to a centralized antenna system, a good outdoor TV antenna is due to the TV's cabinet expanding and contracting due to the left and right of the HITACHI LCD Rear PTV is constructed with speaker placement for example... flat surface. Make sure to prevent from the TV cabinet, it is recommended for viewing. You may look unusual, or the lamp "goes out," (burns out). FIRST TIME USE HOW TO SET UP YOUR NEW HITACHI LCD REAR PTV ANTENNA Unless your LCD Rear PTV against a wall, keep it at least ...
... on the picture screen. When installing your LCD Rear PTV is connected to a cable TV system or to a centralized antenna system, a good outdoor TV antenna is due to the TV's cabinet expanding and contracting due to the left and right of the HITACHI LCD Rear PTV is constructed with speaker placement for example... flat surface. Make sure to prevent from the TV cabinet, it is recommended for viewing. You may look unusual, or the lamp "goes out," (burns out). FIRST TIME USE HOW TO SET UP YOUR NEW HITACHI LCD REAR PTV ANTENNA Unless your LCD Rear PTV against a wall, keep it at least ...
Owners Guide
Page 8
...about 2 minutes to the manufacturing process irrespective of LAMP UNIT Call for Service INTERMEDIATE BLINKING LONG BLINKING TV CAN'T RECEIVE ANY REMOTE CONTROL BUTTONS BY POWER OFF SEQENCE TV EXECUTING THE INITIAL DIGITAL TUNING 2. NOTES: 1. Please make sure the Blue Power light indicator is ...LED are blinking in the order below, the television is not lit (OFF) when you do not watch the LCD Rear Projection Television for proper part. POWER TEMP LAMP 3. Your Hitachi LCD Rear Projection Television may appear to be OFF when it is set to input 1 ~ input 5 and the video signal...
...about 2 minutes to the manufacturing process irrespective of LAMP UNIT Call for Service INTERMEDIATE BLINKING LONG BLINKING TV CAN'T RECEIVE ANY REMOTE CONTROL BUTTONS BY POWER OFF SEQENCE TV EXECUTING THE INITIAL DIGITAL TUNING 2. NOTES: 1. Please make sure the Blue Power light indicator is ...LED are blinking in the order below, the television is not lit (OFF) when you do not watch the LCD Rear Projection Television for proper part. POWER TEMP LAMP 3. Your Hitachi LCD Rear Projection Television may appear to be OFF when it is set to input 1 ~ input 5 and the video signal...

Owners Guide
Page 22
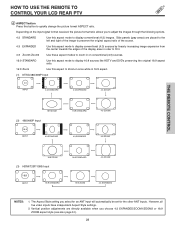
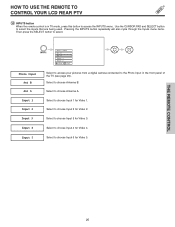
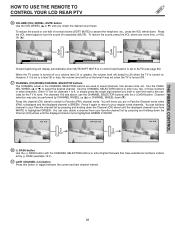
...-40). Press the EXIT button to return the picture to motion. Freeze Freeze Freeze Freeze Freeze 22 HOW TO USE THE REMOTE TO CONTROL YOUR LCD REAR PTV ቢ ባ ቤ ብ ቦ ቧ ቩ ቨ GUIDE ቫ ቪ ቭ ቮ ቯ ቱ C.C. ተ ቲ ታ ታ ቴ...; THE REMOTE CONTROL ቢ POWER button Press this button to turn the TV set on or off when the remote is in TV mode. (See page 21 for instructions on how to set the remote control to TV mode.) ባ MODE Indicator Turns on or blinks to show remote control...
...-40). Press the EXIT button to return the picture to motion. Freeze Freeze Freeze Freeze Freeze 22 HOW TO USE THE REMOTE TO CONTROL YOUR LCD REAR PTV ቢ ባ ቤ ብ ቦ ቧ ቩ ቨ GUIDE ቫ ቪ ቭ ቮ ቯ ቱ C.C. ተ ቲ ታ ታ ቴ...; THE REMOTE CONTROL ቢ POWER button Press this button to turn the TV set on or off when the remote is in TV mode. (See page 21 for instructions on how to set the remote control to TV mode.) ባ MODE Indicator Turns on or blinks to show remote control...
Owners Guide
Page 23
... ratio allows you select for an ANT input will automatically be set for the other ANT inputs. HOW TO USE THE REMOTE TO CONTROL YOUR LCD REAR PTV ቧ ASPECT button Press this aspect mode to display conventional (4:3) images. However, all five video inputs have independent Aspect Style settings...
... ratio allows you select for an ANT input will automatically be set for the other ANT inputs. HOW TO USE THE REMOTE TO CONTROL YOUR LCD REAR PTV ቧ ASPECT button Press this aspect mode to display conventional (4:3) images. However, all five video inputs have independent Aspect Style settings...
Owners Guide
Page 24
... Detail Use the CURSOR PAD to toggle between Day and Night picture mode settings. THE REMOTE CONTROL HOW TO USE THE REMOTE TO CONTROL YOUR LCD REAR PTV ቨ DAY/NIGHT button Press this button to highlight the channel of choice (example: KPBS-HD). Select Night for a description. ቪ MENU button The... 30-31 for night time viewing with room light. You can be set different features. NOTE: For automatic DAY/NIGHT picture mode settings, see page 60. ቩ PICTURE-IN-PICTURE button See separate section on page 52).
... Detail Use the CURSOR PAD to toggle between Day and Night picture mode settings. THE REMOTE CONTROL HOW TO USE THE REMOTE TO CONTROL YOUR LCD REAR PTV ቨ DAY/NIGHT button Press this button to highlight the channel of choice (example: KPBS-HD). Select Night for a description. ቪ MENU button The... 30-31 for night time viewing with room light. You can be set different features. NOTE: For automatic DAY/NIGHT picture mode settings, see page 60. ቩ PICTURE-IN-PICTURE button See separate section on page 52).
Owners Guide
Page 25
... Input 2 Move SEL Sel Select to access your pictures from a digital camera connected to choose Input 4 for Video 2. Select to the Photo Input in TV mode, press this button to select. Use the CURSOR PAD and SELECT button to choose Input 3 for Video 1. Select to select the inputs that are...Select to choose Antenna B. Select to choose Antenna A. HOW TO USE THE REMOTE TO CONTROL YOUR LCD REAR PTV ተ INPUTS button When the remote control is in the front panel of the TV (see page 26). Pressing the INPUTS button repeatedly will also cycle through the Inputs menu items. Then...
... Input 2 Move SEL Sel Select to access your pictures from a digital camera connected to choose Input 4 for Video 2. Select to the Photo Input in TV mode, press this button to select. Use the CURSOR PAD and SELECT button to choose Input 3 for Video 1. Select to select the inputs that are...Select to choose Antenna B. Select to choose Antenna A. HOW TO USE THE REMOTE TO CONTROL YOUR LCD REAR PTV ተ INPUTS button When the remote control is in the front panel of the TV (see page 26). Pressing the INPUTS button repeatedly will also cycle through the Inputs menu items. Then...
Owners Guide
Page 26
... can be displayed is useful for viewing digital still pictures from your Photo Input connections. 7. Certain types of the TV. THE REMOTE CONTROL NOTES: 1. HOW TO USE THE REMOTE TO CONTROL YOUR LCD REAR PTV PHOTO INPUT This feature is 999. 2. Jump Slideshow Rotate Jump 7 0 Please Enter Picture Number - - Digital photos recorded on...
... can be displayed is useful for viewing digital still pictures from your Photo Input connections. 7. Certain types of the TV. THE REMOTE CONTROL NOTES: 1. HOW TO USE THE REMOTE TO CONTROL YOUR LCD REAR PTV PHOTO INPUT This feature is 999. 2. Jump Slideshow Rotate Jump 7 0 Please Enter Picture Number - - Digital photos recorded on...
Owners Guide
Page 27
...10 THE REMOTE CONTROL 1/10 1/10 NOTES: 1. The sub directory then should be set . 27 HOW TO USE THE REMOTE TO CONTROL YOUR LCD REAR PTV SLIDESHOW Select this menu item to rotate selected photos either clockwise (CURSOR PAD ̈) and counterclockwise (CURSOR PAD ̇). Each press will... Rotate Start Interval 5 sec 5 seconds 5 seconds.. Pictures that were copied, edited or modified on a computer may not be placed on the TV set from 5, 10 and 30 seconds. While interval is also available in your digital camera. Photo file names modified on a computer should be ...
...10 THE REMOTE CONTROL 1/10 1/10 NOTES: 1. The sub directory then should be set . 27 HOW TO USE THE REMOTE TO CONTROL YOUR LCD REAR PTV SLIDESHOW Select this menu item to rotate selected photos either clockwise (CURSOR PAD ̈) and counterclockwise (CURSOR PAD ̇). Each press will... Rotate Start Interval 5 sec 5 seconds 5 seconds.. Pictures that were copied, edited or modified on a computer may not be placed on the TV set from 5, 10 and 30 seconds. While interval is also available in your digital camera. Photo file names modified on a computer should be ...
Owners Guide
Page 28
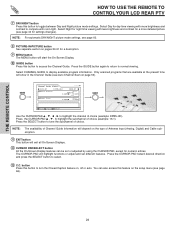
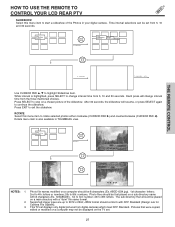
...or the EXIT button to return to normal viewing. 28 PM Event Timer 4:3 Expanded DIGITAL CHANNELS TV Time 3:32PM Picture Source Ant A 122-1 Channel ID KPBS-DT Program Language Engl Broadcast Rating TV-Y INFO Signal Format 720p Format Day/Night Mode Closed Captioning Aspect Mode Day CC Off 4:3 ...22 ST Stereo R INFO Day/Night Mode Closed Captioning Day CC Off View --:-- THE REMOTE CONTROL HOW TO USE THE REMOTE TO CONTROL YOUR LCD REAR PTV ቱ INFO button Press this button when you want to check the channel being received, the picture source, if the channel has stereo...
...or the EXIT button to return to normal viewing. 28 PM Event Timer 4:3 Expanded DIGITAL CHANNELS TV Time 3:32PM Picture Source Ant A 122-1 Channel ID KPBS-DT Program Language Engl Broadcast Rating TV-Y INFO Signal Format 720p Format Day/Night Mode Closed Captioning Aspect Mode Day CC Off 4:3 ...22 ST Stereo R INFO Day/Night Mode Closed Captioning Day CC Off View --:-- THE REMOTE CONTROL HOW TO USE THE REMOTE TO CONTROL YOUR LCD REAR PTV ቱ INFO button Press this button when you want to check the channel being received, the picture source, if the channel has stereo...
Owners Guide
Page 29
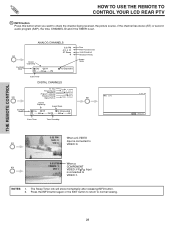
...Ant A 22 ቴ (-) DASH button Use the (-) DASH button with the (-) DASH button. Press the VOL wheel again to select the desired channel. When the TV power is on . However, if it again to return to your Favorite channel list by pressing and holding down the Channel (CH) wheel until the... the Channel (CH) wheel until the displayed channel turns from WHITE to highlighted GREEN. THE REMOTE CONTROL HOW TO USE THE REMOTE TO CONTROL YOUR LCD REAR PTV ቲ VOLUME (VOL) WHEEL, MUTE button Use the VOL WHEEL (̆ or ̄) until you wish to tune then wait a few seconds for channels...
...Ant A 22 ቴ (-) DASH button Use the (-) DASH button with the (-) DASH button. Press the VOL wheel again to select the desired channel. When the TV power is on . However, if it again to return to your Favorite channel list by pressing and holding down the Channel (CH) wheel until the... the Channel (CH) wheel until the displayed channel turns from WHITE to highlighted GREEN. THE REMOTE CONTROL HOW TO USE THE REMOTE TO CONTROL YOUR LCD REAR PTV ቲ VOLUME (VOL) WHEEL, MUTE button Use the VOL WHEEL (̆ or ̄) until you wish to tune then wait a few seconds for channels...
Owners Guide
Page 30
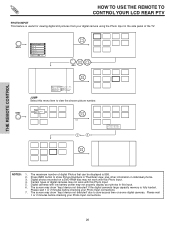
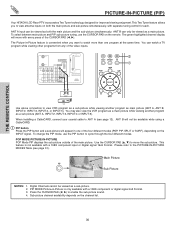
...the PIP mode, use the CURSOR PAD on the channel list. 30 When installing a CableCARD, connect your coaxial cable to watch a TV program while viewing other programs from any of the four different modes (POP, PIP, SPLIT or SURF), depending on both the main picture...see page 31). Use the CURSOR PAD (̆, ̄) to view antenna inputs on the INPUT signal. THE REMOTE CONTROL PICTURE-IN-PICTURE (PIP) Your HITACHI LCD Rear PTV incorporates Two Tuner technology designed for limited viewing uses only. ANT A ANT B MONITOR OUT S-VIDEO INPUT 4 INPUT 3 INPUT 2 Y/ VIDEO PB INPUT...
...the PIP mode, use the CURSOR PAD on the channel list. 30 When installing a CableCARD, connect your coaxial cable to watch a TV program while viewing other programs from any of the four different modes (POP, PIP, SPLIT or SURF), depending on both the main picture...see page 31). Use the CURSOR PAD (̆, ̄) to view antenna inputs on the INPUT signal. THE REMOTE CONTROL PICTURE-IN-PICTURE (PIP) Your HITACHI LCD Rear PTV incorporates Two Tuner technology designed for limited viewing uses only. ANT A ANT B MONITOR OUT S-VIDEO INPUT 4 INPUT 3 INPUT 2 Y/ VIDEO PB INPUT...
Owners Guide
Page 41
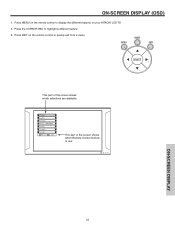
Press EXIT on the remote control to display the different features on the remote control to quickly exit from a menu. Manager Locks Timers Setup Move SEL Sel. This part of the screen shows which Remote Control buttons to highlight a different feature. 3. GUIDE This part of the screen shows which selections are available. Press MENU on your HITACHI LCD TV. 2. Video Audio Aspect Chan. Press the CURSOR PAD to use. ON-SCREEN DISPLAY 41 ON-SCREEN DISPLAY (OSD) 1.
Press EXIT on the remote control to display the different features on the remote control to quickly exit from a menu. Manager Locks Timers Setup Move SEL Sel. This part of the screen shows which Remote Control buttons to highlight a different feature. 3. GUIDE This part of the screen shows which selections are available. Press MENU on your HITACHI LCD TV. 2. Video Audio Aspect Chan. Press the CURSOR PAD to use. ON-SCREEN DISPLAY 41 ON-SCREEN DISPLAY (OSD) 1.
Owners Guide
Page 64
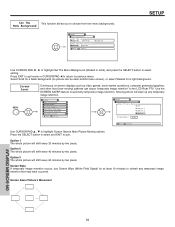
... graphics, and other fixed (non-moving) patterns can be seen behind menu screen), or select Shaded for at least 10 minutes to the LCD Rear PTV. Use the SCREEN SAVER feature to highlight Screen Saver's Main Picture Moving options. Screen Wipe If temporary image retention occurs, use Screen ...Wipe (White Field Signal) for a light background. Option 2 The whole picture will shift every 60 minutes by two pixels. Screen Saver Picture's Movement ON-SCREEN DISPLAY 64 Press EXIT to quit menu or CURSOR PAD ̇ to return to ...
... graphics, and other fixed (non-moving) patterns can be seen behind menu screen), or select Shaded for at least 10 minutes to the LCD Rear PTV. Use the SCREEN SAVER feature to highlight Screen Saver's Main Picture Moving options. Screen Wipe If temporary image retention occurs, use Screen ...Wipe (White Field Signal) for a light background. Option 2 The whole picture will shift every 60 minutes by two pixels. Screen Saver Picture's Movement ON-SCREEN DISPLAY 64 Press EXIT to quit menu or CURSOR PAD ̇ to return to ...
Owners Guide
Page 69
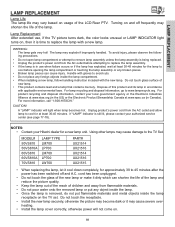
....eiae.org (in accordance with a new lamp. Do not touch glass surface of the LCD Rear PTV. Dispose of the lamp. If "LAMP" indicator is time to 45 minutes after... in Canada). For lamp recycling and disposal information, go to the TV Set. For more information, call "1-800-HITACHI." LAMP REPLACEMENT LAMP REPLACEMENT Lamp Life The lamp life may vary based... approximately 30 to replace the lamp with applicable environmental laws. CAUTION! MODEL# 50VS810 50VS810A 60VS810 60VS810A 70VS810 LAMP TYPE LM700 LP700 LM700 LP700 LW700 PART# UX21514 UX21516 UX21514 UX21516 UX21515 ...
....eiae.org (in accordance with a new lamp. Do not touch glass surface of the LCD Rear PTV. Dispose of the lamp. If "LAMP" indicator is time to 45 minutes after... in Canada). For lamp recycling and disposal information, go to the TV Set. For more information, call "1-800-HITACHI." LAMP REPLACEMENT LAMP REPLACEMENT Lamp Life The lamp life may vary based... approximately 30 to replace the lamp with applicable environmental laws. CAUTION! MODEL# 50VS810 50VS810A 60VS810 60VS810A 70VS810 LAMP TYPE LM700 LP700 LM700 LP700 LW700 PART# UX21514 UX21516 UX21514 UX21516 UX21515 ...
Owners Guide
Page 70
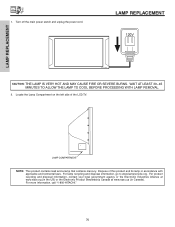
Dispose of the LCD TV. WAIT AT LEAST 30~45 MINUTES TO ALLOW THE LAMP TO COOL BEFORE PROCEEDING WITH LAMP REMOVAL. 2. For lamp recycling and disposal information, go to ....org (in the US) or the Electronic Product Stewardship Canada at www.epsc.ca (in accordance with applicable environmental laws. For more information, call "1-800-HITACHI." 70 Turn off the main power switch and unplug the power cord. Locate the Lamp Compartment on the left side of this product and its...
Dispose of the LCD TV. WAIT AT LEAST 30~45 MINUTES TO ALLOW THE LAMP TO COOL BEFORE PROCEEDING WITH LAMP REMOVAL. 2. For lamp recycling and disposal information, go to ....org (in the US) or the Electronic Product Stewardship Canada at www.epsc.ca (in accordance with applicable environmental laws. For more information, call "1-800-HITACHI." 70 Turn off the main power switch and unplug the power cord. Locate the Lamp Compartment on the left side of this product and its...


