Owners Guide
Page 1
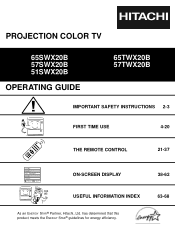
PROJECTION COLOR TV 65SWX20B 57SWX20B 51SWX20B OPERATING GUIDE 65TWX20B 57TWX20B IMPORTANT SAFETY INSTRUCTIONS 2-3 FIRST TIME USE 4-20 THE REMOTE CONTROL Video Audio Ch. Manager Locks Setup Move SEL Sel ON-SCREEN DISPLAY USEFUL INFORMATION INDEX As an ENERGY STAR® Partner, Hitachi, Ltd. has determined that this product meets the ENERGY STAR® guidelines for energy efficiency. 21-37 38-62 63-68
PROJECTION COLOR TV 65SWX20B 57SWX20B 51SWX20B OPERATING GUIDE 65TWX20B 57TWX20B IMPORTANT SAFETY INSTRUCTIONS 2-3 FIRST TIME USE 4-20 THE REMOTE CONTROL Video Audio Ch. Manager Locks Setup Move SEL Sel ON-SCREEN DISPLAY USEFUL INFORMATION INDEX As an ENERGY STAR® Partner, Hitachi, Ltd. has determined that this product meets the ENERGY STAR® guidelines for energy efficiency. 21-37 38-62 63-68

Owners Guide
Page 3
...or table specified by your safety. Refer all instructions. 5. Televisions are heavy and can cause permanent damage to proper grounding for your HITACHI Factory Warranty. For disposal or recycling information, please contact your resident state. Such "SCREEN BURNS" constitute misuse and are provided for ...SCREEN BURN Continuous on this apparatus near any ventilation openings. Heed all warnings. 4. Do not use the attachments/accessories specified by TV stations and cable companies, as well as power-supply cord or plug is used, use caution when moving the cart/apparatus ...
...or table specified by your safety. Refer all instructions. 5. Televisions are heavy and can cause permanent damage to proper grounding for your HITACHI Factory Warranty. For disposal or recycling information, please contact your resident state. Such "SCREEN BURNS" constitute misuse and are provided for ...SCREEN BURN Continuous on this apparatus near any ventilation openings. Heed all warnings. 4. Do not use the attachments/accessories specified by TV stations and cable companies, as well as power-supply cord or plug is used, use caution when moving the cart/apparatus ...
Owners Guide
Page 4
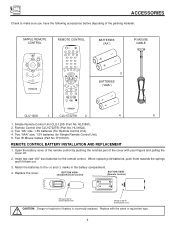
MENU EXIT FAV CH ANT POWER REMOTE CONTROL POWER TV DVD VCR CBL SOURCE WIZARD CD TAPE STB AMP 1 2 3 4 5 6 7 8 9 SLEEP C.C. EY01641). REMOTE CONTROL BATTERY INSTALLATION AND REPLACEMENT 1. Insert two new "AA" size batteries for Simple ... Control Unit). 5. SELECT VOL + MUTE CH - ANT 0 INFO A/V NET ASPECT VIRTUAL HD MENU EXIT VOL SELECT CH SVCS VID 1 MUTE VCR PLUS+ LAST CH GUIDE/TV SCHD VID 5 VID 2 PIP VID 3 PIP CH VID 4 FREEZE PIP MODE PIP ACCESS SWAP VIDEO BATTERIES ("AA") IR MOUSE CABLE 3. Remote Control Unit CLU-5722TSI...
MENU EXIT FAV CH ANT POWER REMOTE CONTROL POWER TV DVD VCR CBL SOURCE WIZARD CD TAPE STB AMP 1 2 3 4 5 6 7 8 9 SLEEP C.C. EY01641). REMOTE CONTROL BATTERY INSTALLATION AND REPLACEMENT 1. Insert two new "AA" size batteries for Simple ... Control Unit). 5. SELECT VOL + MUTE CH - ANT 0 INFO A/V NET ASPECT VIRTUAL HD MENU EXIT VOL SELECT CH SVCS VID 1 MUTE VCR PLUS+ LAST CH GUIDE/TV SCHD VID 5 VID 2 PIP VID 3 PIP CH VID 4 FREEZE PIP MODE PIP ACCESS SWAP VIDEO BATTERIES ("AA") IR MOUSE CABLE 3. Remote Control Unit CLU-5722TSI...
Owners Guide
Page 5
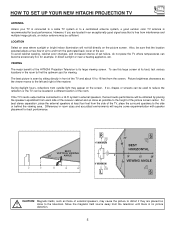
...daylight hours, reflections from the screen. Differences in the room to find the optimum spot for example, in a different section of the TV, place the surround speakers to the side or behind the viewing area. Also, be obtained by sitting directly in an exceptionally good ... screen. Move the magnetic field source away from the perforated back cover of the HITACHI Projection Television is no picture distortion. 5 HOW TO SET UP YOUR NEW HITACHI PROJECTION TV ANTENNA Unless your TV is connected to a cable TV system or to a centralized antenna system, a good outdoor color...
...daylight hours, reflections from the screen. Differences in the room to find the optimum spot for example, in a different section of the TV, place the surround speakers to the side or behind the viewing area. Also, be obtained by sitting directly in an exceptionally good ... screen. Move the magnetic field source away from the perforated back cover of the HITACHI Projection Television is no picture distortion. 5 HOW TO SET UP YOUR NEW HITACHI PROJECTION TV ANTENNA Unless your TV is connected to a cable TV system or to a centralized antenna system, a good outdoor color...

Owners Guide
Page 6
... (Provided) Connect the IR Mouse Cable to the ANT A (75-Ohm) terminal. ANTENNA CONNECTIONS TO REAR JACK PANEL VHF (75-Ohm) antenna/CATV (Cable TV) When using a 75-Ohm coaxial cable system, connect the outdoor antenna or CATV coaxial cable to the IR BLASTER ouput on your...Ohm coaxial shielded wire. VHF (300-Ohm) antenna/UHF antenna When using your dealer or service store for the antenna mixer. This connection allows your TV when A/V Network is used to produce a high quality picture. "F" Type 75-Ohm Coaxial Antenna Connector For connecting RF signals (antenna or cable...
... (Provided) Connect the IR Mouse Cable to the ANT A (75-Ohm) terminal. ANTENNA CONNECTIONS TO REAR JACK PANEL VHF (75-Ohm) antenna/CATV (Cable TV) When using a 75-Ohm coaxial cable system, connect the outdoor antenna or CATV coaxial cable to the IR BLASTER ouput on your...Ohm coaxial shielded wire. VHF (300-Ohm) antenna/UHF antenna When using your dealer or service store for the antenna mixer. This connection allows your TV when A/V Network is used to produce a high quality picture. "F" Type 75-Ohm Coaxial Antenna Connector For connecting RF signals (antenna or cable...
Owners Guide
Page 7
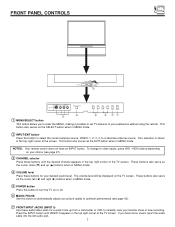
... (̇) and right (̈) buttons when in the top right corner of the screen. If you to enter the MENU, making it possible to set TV features to your choice (see page 42). ቨ FRONT INPUT JACKS (INPUT 5) Use these buttons until VIDEO: 5 appears in MENU mode. ቦ .../video jacks for your favorite show or new recording. These buttons also serve as the EXIT button when in the top right corner of the TV screen. CH+ INPUT MENU ̇ ̈ ̄ ̆ EXIT SELECT ቢ MENU/SELECT button ቨ ቧ ብ ቤ ባቢ This button ...
... (̇) and right (̈) buttons when in the top right corner of the screen. If you to enter the MENU, making it possible to set TV features to your choice (see page 42). ቨ FRONT INPUT JACKS (INPUT 5) Use these buttons until VIDEO: 5 appears in MENU mode. ቦ .../video jacks for your favorite show or new recording. These buttons also serve as the EXIT button when in the top right corner of the TV screen. CH+ INPUT MENU ̇ ̈ ̄ ̆ EXIT SELECT ቢ MENU/SELECT button ቨ ቧ ብ ቤ ባቢ This button ...

Owners Guide
Page 8
... not, the played back picture may be abnormal. 2. FRONT PANEL JACKS AND CONNECTORS The front panel jacks are provided as shown in place of your TV. 8
... not, the played back picture may be abnormal. 2. FRONT PANEL JACKS AND CONNECTORS The front panel jacks are provided as shown in place of your TV. 8
Owners Guide
Page 9
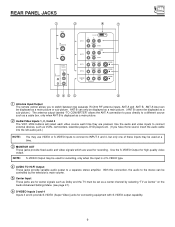
...; Audio/Video Inputs 1, 2, 3 and 4 The VID1~VID4 buttons will select each video source each time they are for center signals such as Dolby and the TV must be set as a center channel by the television's main volume. ቦ Center Input These jacks are pressed. ANT B can only be displayed as a main... ANT B. Use the audio and video inputs to connect external devices, such as a main picture or sub-picture. ANT A input can be controlled by selecting "TV as a cable box, only when ANT B is of these inputs may be used for recording.
...; Audio/Video Inputs 1, 2, 3 and 4 The VID1~VID4 buttons will select each video source each time they are for center signals such as Dolby and the TV must be set as a center channel by the television's main volume. ቦ Center Input These jacks are pressed. ANT B can only be displayed as a main... ANT B. Use the audio and video inputs to connect external devices, such as a main picture or sub-picture. ANT A input can be controlled by selecting "TV as a cable box, only when ANT B is of these inputs may be used for recording.

Owners Guide
Page 10
... optimum picture quality when using the Y-PBPR jacks. 6. In this case, connect the component CB output to the TV's PB input and the component CR output to the TV's PR input. 4. Your component outputs may be used for INPUT:2. To ensure no copyright infringement, the MONITOR OUT... can be labeled Y, B-Y, and R-Y. S-VIDEO has priority over VIDEO input. 2. In this case, connect the components B-Y output to the TV's PB input and the components R-Y output to the TV's PR input. 3. Input 2 (Y/VIDEO) can be abnormal, when using the Y-PBPR inputs. (See page 41) 5. Only DTV format ...
... optimum picture quality when using the Y-PBPR jacks. 6. In this case, connect the component CB output to the TV's PB input and the component CR output to the TV's PR input. 4. Your component outputs may be used for INPUT:2. To ensure no copyright infringement, the MONITOR OUT... can be labeled Y, B-Y, and R-Y. S-VIDEO has priority over VIDEO input. 2. In this case, connect the components B-Y output to the TV's PB input and the components R-Y output to the TV's PR input. 3. Input 2 (Y/VIDEO) can be abnormal, when using the Y-PBPR inputs. (See page 41) 5. Only DTV format ...

Owners Guide
Page 11
... 2. Composite video signal can be input to Input2~Input5. 4. REAR PANEL CONNECTIONS TYPICAL FULL-FEATURE SETUP Outside antenna or cable TV coaxial cable 2-Way signal splitter CONNECT TO IR BLASTER (Provided) Infrared Receiver DVD Player OUTPUT Y PB/CB PR/CR L ...R (MONO)/L VIDEO R (MONO)/L VIDEO MONITOR OUT R L AUDIO VIDEO S-VIDEO S-VIDEO S-VIDEO VCR #1 ANT OUTPUT IN S-VIDEO V L R INPUT OUTPUT Cable TV Box LR INPUT Infrared S-VIDEO V L R Receiver INPUT S-VIDEO V L R OUTPUT Stereo System Amplifier CONNECT TO IR BLASTER VCR #2 (Provided) Laserdisc player, VCR, camcorder, etc...
... 2. Composite video signal can be input to Input2~Input5. 4. REAR PANEL CONNECTIONS TYPICAL FULL-FEATURE SETUP Outside antenna or cable TV coaxial cable 2-Way signal splitter CONNECT TO IR BLASTER (Provided) Infrared Receiver DVD Player OUTPUT Y PB/CB PR/CR L ...R (MONO)/L VIDEO R (MONO)/L VIDEO MONITOR OUT R L AUDIO VIDEO S-VIDEO S-VIDEO S-VIDEO VCR #1 ANT OUTPUT IN S-VIDEO V L R INPUT OUTPUT Cable TV Box LR INPUT Infrared S-VIDEO V L R Receiver INPUT S-VIDEO V L R OUTPUT Stereo System Amplifier CONNECT TO IR BLASTER VCR #2 (Provided) Laserdisc player, VCR, camcorder, etc...
Owners Guide
Page 12
...players, VCRs etc. Refer to Input 3, Input 4 or Input 5, but note that have this case, connect the components B-Y output to the TV's PB input and the components R-Y output to your VCR operating guide for more information on connecting your other electronic equipment for Input 2~Input 5. ... picture quality when using the Y-PBPR jacks. 12 Input 2 accepts both composite and component video signals. In this feature. Refer to the TV's PR input. Use these connections in place of the standard video connection if your device has this feature. Your component outputs may be labeled...
...players, VCRs etc. Refer to Input 3, Input 4 or Input 5, but note that have this case, connect the components B-Y output to the TV's PB input and the components R-Y output to your VCR operating guide for more information on connecting your other electronic equipment for Input 2~Input 5. ... picture quality when using the Y-PBPR jacks. 12 Input 2 accepts both composite and component video signals. In this feature. Refer to the TV's PR input. Use these connections in place of the standard video connection if your device has this feature. Your component outputs may be labeled...
Owners Guide
Page 13
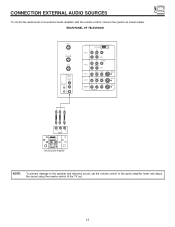
CONNECTION EXTERNAL AUDIO SOURCES To control the audio level of the TV set the volume control of the audio amplifier lower and adjust the sound using the remote control of an external audio amplifier with the remote ...
CONNECTION EXTERNAL AUDIO SOURCES To control the audio level of the TV set the volume control of the audio amplifier lower and adjust the sound using the remote control of an external audio amplifier with the remote ...
Owners Guide
Page 14
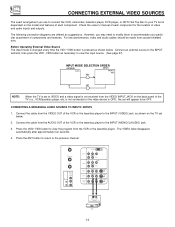
... to view the input source. (See page 27) INPUT MODE SELECTION ORDER (ANTENNA) (INPUT) Ant A VID1 YPBPR:1 VID1 ANT NOTE: When the TV is pressed as shown below . 2. Before Operating External Video Source The input mode is changed every time the VID1~VID5 button is set to accommodate... your TV set will appear to the INPUT (MONO)/L(AUDIO) jack. 3. Press the VID2~VID5 button to the INPUT (VIDEO) jack, as suggestions. Connect the...
... to view the input source. (See page 27) INPUT MODE SELECTION ORDER (ANTENNA) (INPUT) Ant A VID1 YPBPR:1 VID1 ANT NOTE: When the TV is pressed as shown below . 2. Before Operating External Video Source The input mode is changed every time the VID1~VID5 button is set to accommodate... your TV set will appear to the INPUT (MONO)/L(AUDIO) jack. 3. Press the VID2~VID5 button to the INPUT (VIDEO) jack, as suggestions. Connect the...

Owners Guide
Page 15
... to view the program from the AUDIO OUT R of the VCR or the laserdisc player to your VCR operating guide for more information on the TV set below. 2. Press the ANT button to return to rear panel jacks.
... to view the program from the AUDIO OUT R of the VCR or the laserdisc player to your VCR operating guide for more information on the TV set below. 2. Press the ANT button to return to rear panel jacks.

Owners Guide
Page 16
.../R) jack. 3. Connect the cable from the S-VIDEO OUT of the VCR or the laserdisc player to your VCR operating guide for more information on the TV set below. 2. Completely insert the connection cord plugs when connecting to the previous channel. Press the ANT button to return to rear panel jacks. The...
.../R) jack. 3. Connect the cable from the S-VIDEO OUT of the VCR or the laserdisc player to your VCR operating guide for more information on the TV set below. 2. Completely insert the connection cord plugs when connecting to the previous channel. Press the ANT button to return to rear panel jacks. The...

Owners Guide
Page 17
.... 4. Connect the cable from the Laserdisc/DVD player or HDTV set top box to the INPUT (PB) jack. 3. See page 12 for tips on the TV set top box to the INPUT (AUDIO/L) jack. 6. Press the VID1~VID2 button, to the INPUT (Y) jack, as shown on REAR PANEL CONNECTIONS. 17 Connect...
.... 4. Connect the cable from the Laserdisc/DVD player or HDTV set top box to the INPUT (PB) jack. 3. See page 12 for tips on the TV set top box to the INPUT (AUDIO/L) jack. 6. Press the VID1~VID2 button, to the INPUT (Y) jack, as shown on REAR PANEL CONNECTIONS. 17 Connect...
Owners Guide
Page 18
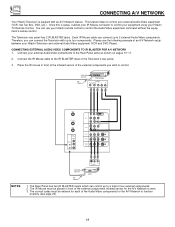
...wish to work. 3. The Rear Panel has two IR BLASTER inputs which can use your Hitachi remote control to control your IR Mouse connector to the Rear Panel jacks as shown on ...2 IR BLASTER jacks. Connect your external Audio/Video components to control your equipment using your Hitachi Television and external Audio/Video equipment (VCR and DVD Player). Connect the IR Mouse cable to... 2 external Audio/Video components. Please see page 20). 18 CONNECTING A/V NETWORK Your Hitachi Television is setup, it allows your external Audio/Video equipment (VCR, Set Top Box, DVD,...
...wish to work. 3. The Rear Panel has two IR BLASTER inputs which can use your Hitachi remote control to control your IR Mouse connector to the Rear Panel jacks as shown on ...2 IR BLASTER jacks. Connect your external Audio/Video components to control your equipment using your Hitachi Television and external Audio/Video equipment (VCR and DVD Player). Connect the IR Mouse cable to... 2 external Audio/Video components. Please see page 20). 18 CONNECTING A/V NETWORK Your Hitachi Television is setup, it allows your external Audio/Video equipment (VCR, Set Top Box, DVD,...

Owners Guide
Page 19
... equipment code has not been precoded into the A/V Net. 2. BACK NEXT HITACHI AV NET Wizard (step 2 of 6) Follow the digrams shown in Hitachi's Easy Graphic Guide to the TV? (b) Channel 03 ( ) Channel 04 BACK NEXT HITACHI AV NET Wizard (step 5 of the 3 function keys below to setup ...-enter a valid code - - - - Your VCR is connected to proceed? Would you like to your VCR as shown in the EASY GRAPHIC GUIDE. HITACHI AV NET Wizard (step 4a of 6) Which TV Rear Panel Input is now conected to one of your VCR? (b) ANT A ( ) INPUT 3 ( ) ANT B ( ) INPUT 4 ( ) INPUT 1 (...
... equipment code has not been precoded into the A/V Net. 2. BACK NEXT HITACHI AV NET Wizard (step 2 of 6) Follow the digrams shown in Hitachi's Easy Graphic Guide to the TV? (b) Channel 03 ( ) Channel 04 BACK NEXT HITACHI AV NET Wizard (step 5 of the 3 function keys below to setup ...-enter a valid code - - - - Your VCR is connected to proceed? Would you like to your VCR as shown in the EASY GRAPHIC GUIDE. HITACHI AV NET Wizard (step 4a of 6) Which TV Rear Panel Input is now conected to one of your VCR? (b) ANT A ( ) INPUT 3 ( ) ANT B ( ) INPUT 4 ( ) INPUT 1 (...

Owners Guide
Page 21
...remote at the remote sensor of the TV and press the TV button. THE REMOTE CONTROL In addition to controlling all the functions on your HITACHI Projection TV, the new remote control is designed to operate different types of VCRs, CATV (Cable TV) converters, set-top-box, satellite receiver... blink, indicating that the remote will stay on for instructions on how to program the remote to control additional Audio/Video equipment.) ቢ POWER ባ TV DVD VCR CBL SOURCE WIZARD CD TAPE STB AMP 1 2 3 4 5 6 ቤ 7 8 9 SLEEP C.C. The light will now control your ...
...remote at the remote sensor of the TV and press the TV button. THE REMOTE CONTROL In addition to controlling all the functions on your HITACHI Projection TV, the new remote control is designed to operate different types of VCRs, CATV (Cable TV) converters, set-top-box, satellite receiver... blink, indicating that the remote will stay on for instructions on how to program the remote to control additional Audio/Video equipment.) ቢ POWER ባ TV DVD VCR CBL SOURCE WIZARD CD TAPE STB AMP 1 2 3 4 5 6 ቤ 7 8 9 SLEEP C.C. The light will now control your ...

Owners Guide
Page 22
...2 3 4 5 6 7 8 9 SLEEP C.C. ANT 0 INFO A/V NET ASPECT VIRTUAL HD MENU EXIT VOL SELECT CH ብ ቦ ቨ ቫ SVCS VID 1 MUTE VCR PLUS+ LAST CH GUIDE/TV SCHD VID 5 VID 2 PIP VID 3 PIP CH VID 4 FREEZE PIP MODE PIP ACCESS SWAP VIDEO ቶ 23 1 24 REC CLU-5722TSI ᕃ POWER button Press... this button to turn the TV set on or off when the remote is in TV mode. (See page 21 for instructions on how to set the remote control to TV mode.) ባ TV button When the TV button is pressed, it will blink, to indicate the ...
...2 3 4 5 6 7 8 9 SLEEP C.C. ANT 0 INFO A/V NET ASPECT VIRTUAL HD MENU EXIT VOL SELECT CH ብ ቦ ቨ ቫ SVCS VID 1 MUTE VCR PLUS+ LAST CH GUIDE/TV SCHD VID 5 VID 2 PIP VID 3 PIP CH VID 4 FREEZE PIP MODE PIP ACCESS SWAP VIDEO ቶ 23 1 24 REC CLU-5722TSI ᕃ POWER button Press... this button to turn the TV set on or off when the remote is in TV mode. (See page 21 for instructions on how to set the remote control to TV mode.) ባ TV button When the TV button is pressed, it will blink, to indicate the ...


