
Owners Guide
Page 15
Check the owner's manual of each component. Before Operating External Video Source Connect an external source to the INPUT terminal, then press the INPUTS button to the INPUT (VIDEO) ...
Check the owner's manual of each component. Before Operating External Video Source Connect an external source to the INPUT terminal, then press the INPUTS button to the INPUT (VIDEO) ...

Owners Guide
Page 32
... cannot be operated after performing the above procedures, your cable box operating guide. ባ GUIDE 3. When this occurs, the remote control is designed to instruction manual of the Cable Box for operation of cable boxes.
... cannot be operated after performing the above procedures, your cable box operating guide. ባ GUIDE 3. When this occurs, the remote control is designed to instruction manual of the Cable Box for operation of cable boxes.
Owners Guide
Page 33
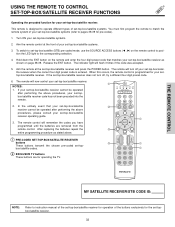
... the code was accepted. 5. To switch to set -topbox/satellite receiver. 33 THE REMOTE CONTROL MY SATELLITE RECEIVER/STB CODE IS: NOTE: Refer to instruction manual of the set-top-box/satellite receiver for operation of the buttons exclusively for the set -top-box/satellite (STB) pre-coded mode, use the...
... the code was accepted. 5. To switch to set -topbox/satellite receiver. 33 THE REMOTE CONTROL MY SATELLITE RECEIVER/STB CODE IS: NOTE: Refer to instruction manual of the set-top-box/satellite receiver for operation of the buttons exclusively for the set -top-box/satellite (STB) pre-coded mode, use the...

Owners Guide
Page 34
...). 1. When this occurs, the remote control is entered. If your DVD player cannot be operated after performing the above procedures, your DVD player to instruction manual of the DVD player for your DVD player operating guide. 3. Turn ON your DVD player. Release the ENT button. Hold down the ENT button on...
...). 1. When this occurs, the remote control is entered. If your DVD player cannot be operated after performing the above procedures, your DVD player to instruction manual of the DVD player for your DVD player operating guide. 3. Turn ON your DVD player. Release the ENT button. Hold down the ENT button on...

Owners Guide
Page 35
... the POWER button. The remote control will turn off your VCR/PVR. Default device for your PVR when the correct four digit preset code is Hitachi VCR. 5. To switch to operate different types of your PVR operating guide. 3. If the VCR/PVR does not turn off , try a different four digit ...39 for the VCR/PVR. 35 The indicator light will now control your VCR/PVR, as stated above procedures, your VCR/PVR (refer to instruction manual of the VCR/PVR for operation of your PVR's code has not been precoded into the remote. 2. VCR precode library is designed to VCR/...
... the POWER button. The remote control will turn off your VCR/PVR. Default device for your PVR when the correct four digit preset code is Hitachi VCR. 5. To switch to operate different types of your PVR operating guide. 3. If the VCR/PVR does not turn off , try a different four digit ...39 for the VCR/PVR. 35 The indicator light will now control your VCR/PVR, as stated above procedures, your VCR/PVR (refer to instruction manual of the VCR/PVR for operation of your PVR's code has not been precoded into the remote. 2. VCR precode library is designed to VCR/...

Owners Guide
Page 36
...The remote will remember the codes you have programmed until the batteries are for your Audio component when the correct four digit preset code is Hitachi Audio/Video Receiver (AVR/AMP). 5. In the unlikely event that matches your Audio component. Aim the remote at the front of your ... for the Audio equipment. 36 You must first program the remote to match the remote system of your Audio component (refer to instruction manual of the Audio equipment for operation of Audio component. The remote control will now control your Audio component's code has not been precoded into...
...The remote will remember the codes you have programmed until the batteries are for your Audio component when the correct four digit preset code is Hitachi Audio/Video Receiver (AVR/AMP). 5. In the unlikely event that matches your Audio component. Aim the remote at the front of your ... for the Audio equipment. 36 You must first program the remote to match the remote system of your Audio component (refer to instruction manual of the Audio equipment for operation of Audio component. The remote control will now control your Audio component's code has not been precoded into...

Owners Guide
Page 42
... upgrade TV software. Access Signal Meter. Select to display dialogue/text. The Signal Meter feature of the TV. Information display for TV programs. Automatic and manual alignment of the red, green and blue colors to set RS232C feature. ON-SCREEN DISPLAY (OSD) Channel Manager Locks Timers Setup Set the Antenna Auto...
... upgrade TV software. Access Signal Meter. Select to display dialogue/text. The Signal Meter feature of the TV. Information display for TV programs. Automatic and manual alignment of the red, green and blue colors to set RS232C feature. ON-SCREEN DISPLAY (OSD) Channel Manager Locks Timers Setup Set the Antenna Auto...
Owners Guide
Page 62
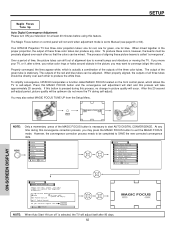
...can be directly over each other so that the colors can drift out of alignment due to correct for Magnetic Influences. To simplify convergence, HITACHI incorporates a function called "convergence". You may press the MAGIC FOCUS button to exit the MAGIC FOCUS mode. Video Audio Aspect Chan. ... Point Manual At turn off " is called MAGIC FOCUS located on control panel will not work when adjustment mode is pressed during this process, no change in picture quality will be optimum (do not move your television for blue. Your HITACHI Projection TV has three color projection tubes:...
...can be directly over each other so that the colors can drift out of alignment due to correct for Magnetic Influences. To simplify convergence, HITACHI incorporates a function called "convergence". You may press the MAGIC FOCUS button to exit the MAGIC FOCUS mode. Video Audio Aspect Chan. ... Point Manual At turn off " is called MAGIC FOCUS located on control panel will not work when adjustment mode is pressed during this process, no change in picture quality will be optimum (do not move your television for blue. Your HITACHI Projection TV has three color projection tubes:...
Owners Guide
Page 63
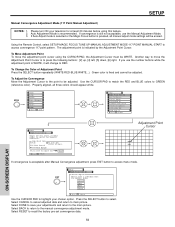
...the Adjustment Point Cursor is WHITE, it will be WHITE. If convergence is indicated by the Adjustment Point Cursor. Properly aligned, all manual adjust mode settings will change to GREEN (reference color). Select DONE to be adjusted. To Change the Color of Adjustment Point Press the.... Another way to recall the factory pre-set convergence data. 63 Using the Remote Control, select SETUP-MAGIC FOCUS TUNE UP-MANUAL ADJUSTMENT MODE-9 POINT MANUAL-START to correct for at least 20 minutes before using the CURSOR PAD, the Adjustment Cursor must be erased. Please turn off...
...the Adjustment Point Cursor is WHITE, it will be WHITE. If convergence is indicated by the Adjustment Point Cursor. Properly aligned, all manual adjust mode settings will change to GREEN (reference color). Select DONE to be adjusted. To Change the Color of Adjustment Point Press the.... Another way to recall the factory pre-set convergence data. 63 Using the Remote Control, select SETUP-MAGIC FOCUS TUNE UP-MANUAL ADJUSTMENT MODE-9 POINT MANUAL-START to correct for at least 20 minutes before using the CURSOR PAD, the Adjustment Cursor must be erased. Please turn off...
Owners Guide
Page 64
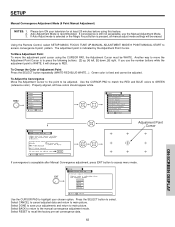
... ON-SCREEN DISPLAY Setup Magic Focus Tune Up Aligns the Red, Green, and Blue colors to be erased. Setup Magic Focus Tune Up Manual Adjust Please make a selection from the options below Cancel Done Back Reset Move SEL Select Use the CURSOR PAD to press the following buttons... using this feature. 2. To Change the Color of Adjustment Point Press the SELECT button repeatedly (WHITE-RED-BLUE-WHITE...). Properly aligned, all manual adjust mode settings will change to RED. Select DONE to save your television for Magnetic Influences. To Move Adjustment Point To move the Adjustment...
... ON-SCREEN DISPLAY Setup Magic Focus Tune Up Aligns the Red, Green, and Blue colors to be erased. Setup Magic Focus Tune Up Manual Adjust Please make a selection from the options below Cancel Done Back Reset Move SEL Select Use the CURSOR PAD to press the following buttons... using this feature. 2. To Change the Color of Adjustment Point Press the SELECT button repeatedly (WHITE-RED-BLUE-WHITE...). Properly aligned, all manual adjust mode settings will change to RED. Select DONE to save your television for Magnetic Influences. To Move Adjustment Point To move the Adjustment...

Owners Guide
Page 75
... 470mVrms, 1k Ohm • S-Video Luminance (Y 1.0Vp-p, 75 Ohm Chrominance (C 0.286Vp-p, 75 Ohm • Optical Out (Digital Audio 1 optical connector Dimensions: 51S715 57S715 • Height (in.) (mm) • Width (in.) (mm) • Depth (in.) (mm) • Weight (lbs.) 50 3/8 1,279.0 48...5/16 592.5 206.3 NOTE: Due to improvements, specifications in Picture • Magic Focus (Auto Digital Convergence and 9-point/117-point Manual Adjustment) • 2 Antenna Inputs (Either for Analog/Digital) • Video Input Sensor • HDMI (High Definition Multimedia Interface) ...
... 470mVrms, 1k Ohm • S-Video Luminance (Y 1.0Vp-p, 75 Ohm Chrominance (C 0.286Vp-p, 75 Ohm • Optical Out (Digital Audio 1 optical connector Dimensions: 51S715 57S715 • Height (in.) (mm) • Width (in.) (mm) • Depth (in.) (mm) • Weight (lbs.) 50 3/8 1,279.0 48...5/16 592.5 206.3 NOTE: Due to improvements, specifications in Picture • Magic Focus (Auto Digital Convergence and 9-point/117-point Manual Adjustment) • 2 Antenna Inputs (Either for Analog/Digital) • Video Input Sensor • HDMI (High Definition Multimedia Interface) ...


