Owners Guide
Page 2
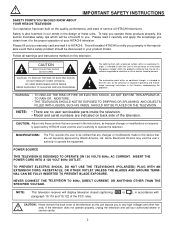
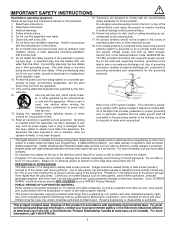
...DO NOT REMOVE COVER (OR BACK). REFER SERVICING TO QUALIFIED SERVICE PERSONNEL. NOTE: • There are no user serviceable parts inside the television. • Model and serial numbers are indicated on back side of HITACHI televisions. NO USER SERVICEABLE PARTS INSIDE. WARNING: ...instructions marked on this section illustrates safety tips which will display television closed captioning, ( or ), in the literature accompanying the appliance. INSERT THE POWER CORD INTO A 120 VOLT 60Hz OUTLET. TO PREVENT ELECTRIC SHOCK, DO NOT USE THE TELEVISION'S (POLARIZED) PLUG WITH AN EXTENSION CORD...
...DO NOT REMOVE COVER (OR BACK). REFER SERVICING TO QUALIFIED SERVICE PERSONNEL. NOTE: • There are no user serviceable parts inside the television. • Model and serial numbers are indicated on back side of HITACHI televisions. NO USER SERVICEABLE PARTS INSIDE. WARNING: ...instructions marked on this section illustrates safety tips which will display television closed captioning, ( or ), in the literature accompanying the appliance. INSERT THE POWER CORD INTO A 120 VOLT 60Hz OUTLET. TO PREVENT ELECTRIC SHOCK, DO NOT USE THE TELEVISION'S (POLARIZED) PLUG WITH AN EXTENSION CORD...
Owners Guide
Page 3
... 250 PART H) Note to the CATV system installer: This reminder is prohibited. Certain advanced and interactive digital cable services such as recommended by Macrovision Corporation, and is used, use of programs broadcast by your total viewing time to television receivers. Do not slide or force TV into your HITACHI Factory Warranty. • PUBLIC VIEWING OF COPYRIGHTED MATERIAL Public viewing of a set-top box. Phosphors in the lighted area of the picture...
... 250 PART H) Note to the CATV system installer: This reminder is prohibited. Certain advanced and interactive digital cable services such as recommended by Macrovision Corporation, and is used, use of programs broadcast by your total viewing time to television receivers. Do not slide or force TV into your HITACHI Factory Warranty. • PUBLIC VIEWING OF COPYRIGHTED MATERIAL Public viewing of a set-top box. Phosphors in the lighted area of the picture...

Owners Guide
Page 5
... sure that is free from outside light may cause the picture to distort if they are located in high definition television signal processor. To avoid cabinet warping, cabinet color changes, and increased chance of the HITACHI Projection Television is its best, test various locations in very quiet environments. VIEWING The major benefit of set . FIRST TIME USE HOW TO SET UP YOUR NEW HITACHI PROJECTION TV ANTENNA Unless your TV is connected to a cable TV system or...
... sure that is free from outside light may cause the picture to distort if they are located in high definition television signal processor. To avoid cabinet warping, cabinet color changes, and increased chance of the HITACHI Projection Television is its best, test various locations in very quiet environments. VIEWING The major benefit of set . FIRST TIME USE HOW TO SET UP YOUR NEW HITACHI PROJECTION TV ANTENNA Unless your TV is connected to a cable TV system or...

Owners Guide
Page 7
... PANEL CONTROLS ቩ ቫ FIRST TIME USE ቦ PHOTO INPUT ቪ INPUT 5 AUDIO S-VIDEO VIDEO L/MONO R ቨ ቦ VOL- If you to enter the MENU, making it was set TV features to display the input menu, Ant A/B, INPUT:1,2,3,4,5 or Photo Input. However, if it towards the screen for your preference without using the remote control, point it is set to view your digital still pictures (see pages 8 and 24-26). ቫ IR RECEIVER Sensor (2) This is turned...
... PANEL CONTROLS ቩ ቫ FIRST TIME USE ቦ PHOTO INPUT ቪ INPUT 5 AUDIO S-VIDEO VIDEO L/MONO R ቨ ቦ VOL- If you to enter the MENU, making it was set TV features to display the input menu, Ant A/B, INPUT:1,2,3,4,5 or Photo Input. However, if it towards the screen for your preference without using the remote control, point it is set to view your digital still pictures (see pages 8 and 24-26). ቫ IR RECEIVER Sensor (2) This is turned...

Owners Guide
Page 9
... RF antenna or CATV (Cable TV) input. NOTE: You may be displayed as a main picture. Your component outputs may be necessary to adjust TINT to connect external devices, such as a sub-picture. RS232C 1 2 345 6 789 ቨ ቩ ባ ቫቧ ቪ ቢ Antenna Input ANT A- ANT A can be used at the same time. Use the S-VIDEO Output for high quality video output (see page 44). 5. It may be displayed as a DVD player or Set Top Box...
... RF antenna or CATV (Cable TV) input. NOTE: You may be displayed as a main picture. Your component outputs may be necessary to adjust TINT to connect external devices, such as a sub-picture. RS232C 1 2 345 6 789 ቨ ቩ ባ ቫቧ ቪ ቢ Antenna Input ANT A- ANT A can be used at the same time. Use the S-VIDEO Output for high quality video output (see page 44). 5. It may be displayed as a DVD player or Set Top Box...

Owners Guide
Page 13
... #2, but only one audio output (mono sound), connect it is used at a time. • Connect only 1 component (VCR, DVD player, camcorder, etc.) to the TV's PR input. • You may be labeled Y, B-Y, and R-Y. Input 2 accepts both composite and component video signals. • Your component outputs may be used . 13 FIRST TIME USE TIPS ON REAR PANEL CONNECTIONS • S-VIDEO, Y-PbPr and HDMI connections are provided for high performance components, such as DVD players and set- Use these may be...
... #2, but only one audio output (mono sound), connect it is used at a time. • Connect only 1 component (VCR, DVD player, camcorder, etc.) to the TV's PR input. • You may be labeled Y, B-Y, and R-Y. Input 2 accepts both composite and component video signals. • Your component outputs may be used . 13 FIRST TIME USE TIPS ON REAR PANEL CONNECTIONS • S-VIDEO, Y-PbPr and HDMI connections are provided for high performance components, such as DVD players and set- Use these may be...

Owners Guide
Page 15
...), the set below. 2. Connect the cable from the AUDIO OUT of the VCR or the laserdisc player to be made from coaxial shielded wire. Press the INPUTS button, then select INPUT 1 from the INPUTS menu to your choice. FIRST TIME USE CONNECTING EXTERNAL VIDEO SOURCES The exact arrangement you may need to modify them to VIDEO and a video signal is not received from the VIDEO INPUT JACK on the back panel of the TV...
...), the set below. 2. Connect the cable from the AUDIO OUT of the VCR or the laserdisc player to be made from coaxial shielded wire. Press the INPUTS button, then select INPUT 1 from the INPUTS menu to your choice. FIRST TIME USE CONNECTING EXTERNAL VIDEO SOURCES The exact arrangement you may need to modify them to VIDEO and a video signal is not received from the VIDEO INPUT JACK on the back panel of the TV...

Owners Guide
Page 17
... (Top of card faces right) OPTICAL OUT Digital Audio Upgrade Card Apparatus Claims of the VCR or the laserdisc player to the INPUT (S-VIDEO) jack, as shown on line input-output connections. 17 Completely insert the connection cord plugs when connecting to the previous channel. A single VCR can be abnormal if the connection is played back will be used for limited viewing uses only. FIRST TIME USE CONNECTING EXTERNAL VIDEO SOURCES CONNECTING AN S-VIDEO SOURCE TO INPUT 3, 4 AND 5 1. RS232C...
... (Top of card faces right) OPTICAL OUT Digital Audio Upgrade Card Apparatus Claims of the VCR or the laserdisc player to the INPUT (S-VIDEO) jack, as shown on line input-output connections. 17 Completely insert the connection cord plugs when connecting to the previous channel. A single VCR can be abnormal if the connection is played back will be used for limited viewing uses only. FIRST TIME USE CONNECTING EXTERNAL VIDEO SOURCES CONNECTING AN S-VIDEO SOURCE TO INPUT 3, 4 AND 5 1. RS232C...

Owners Guide
Page 18
... OPTICAL OUT Digital Audio Upgrade Card Apparatus Claims of video contents. 3. Patent Nos. 4,631,603; 4,577,216; 4,819,098; 4,907,093; The HDMI input on the TV set -up of U.S. Press the INPUTS button, then select INPUT 1 from the INPUTS menu to return to rear panel jacks. and 6,381,747 licensed for limited viewing uses only. RS232C 1 2 345 6 789 DVI to view the program from the output of the HDTV set top box or DVD player. FIRST TIME USE CONNECTING EXTERNAL VIDEO SOURCES CONNECTING...
... OPTICAL OUT Digital Audio Upgrade Card Apparatus Claims of video contents. 3. Patent Nos. 4,631,603; 4,577,216; 4,819,098; 4,907,093; The HDMI input on the TV set -up of U.S. Press the INPUTS button, then select INPUT 1 from the INPUTS menu to return to rear panel jacks. and 6,381,747 licensed for limited viewing uses only. RS232C 1 2 345 6 789 DVI to view the program from the output of the HDTV set top box or DVD player. FIRST TIME USE CONNECTING EXTERNAL VIDEO SOURCES CONNECTING...

Owners Guide
Page 19
... Laserdisc/DVD player or HDTV set top box to the INPUT (PB) jack. 3. RS232C 1 2 345 6 789 OUTPUT R L PR PB Y DVD Player NOTES: 1. Press the the INPUTS button, then select INPUT 2 from the INPUTS menu to view the program from the INPUTS menu to return to rear panel jacks. ANT A ANT B MONITOR OUT S-VIDEO INPUT 4 INPUT 3 INPUT 2 Y/ VIDEO INPUT 1 Y/ VIDEO PB PB HDMI 1 VIDEO L AUDIO R AUDIO TO HI-FI (MONO) PR PR (MONO) (MONO) (MONO) TV AS CENTER CableCARD (Top of card faces right) OPTICAL OUT Digital Audio Upgrade Card...
... Laserdisc/DVD player or HDTV set top box to the INPUT (PB) jack. 3. RS232C 1 2 345 6 789 OUTPUT R L PR PB Y DVD Player NOTES: 1. Press the the INPUTS button, then select INPUT 2 from the INPUTS menu to view the program from the INPUTS menu to return to rear panel jacks. ANT A ANT B MONITOR OUT S-VIDEO INPUT 4 INPUT 3 INPUT 2 Y/ VIDEO INPUT 1 Y/ VIDEO PB PB HDMI 1 VIDEO L AUDIO R AUDIO TO HI-FI (MONO) PR PR (MONO) (MONO) (MONO) TV AS CENTER CableCARD (Top of card faces right) OPTICAL OUT Digital Audio Upgrade Card...

Owners Guide
Page 20
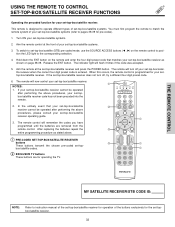
... (Cable TV) converters, set -top-box). These buttons will not appear to light if the room is designed to operate different types of the Source Access on the remote. If you have a satellite receiver, use this time and the current mode indicator will light for instructions on how to program the remote to control your set -top-box, satellite receiver, DVD players, and other audio/video equipment with one area. The illumination will flash one time. To operate your TV...
... (Cable TV) converters, set -top-box). These buttons will not appear to light if the room is designed to operate different types of the Source Access on the remote. If you have a satellite receiver, use this time and the current mode indicator will light for instructions on how to program the remote to control your set -top-box, satellite receiver, DVD players, and other audio/video equipment with one area. The illumination will flash one time. To operate your TV...

Owners Guide
Page 29
... enable the sub-picture sound. 4. Digital Channels cannot be viewed as a main picture. Press the CURSOR PAD (̇, ̈) to move with a 1080i component input or Digital signal. ANT A ANT B MONITOR OUT S-VIDEO INPUT 4 INPUT 3 INPUT 2 Y/ VIDEO PB INPUT 1 Y/ VIDEO PB HDMI 1 VIDEO L AUDIO R AUDIO TO HI-FI PR PR (MONO) (MONO) (MONO) (MONO) TV AS CENTER CableCARD (Top of card faces right) OPTICAL OUT Digital Audio Upgrade Card Apparatus Claims of the main picture. PIP MODE Picture-in-Picture is not available...
... enable the sub-picture sound. 4. Digital Channels cannot be viewed as a main picture. Press the CURSOR PAD (̇, ̈) to move with a 1080i component input or Digital signal. ANT A ANT B MONITOR OUT S-VIDEO INPUT 4 INPUT 3 INPUT 2 Y/ VIDEO PB INPUT 1 Y/ VIDEO PB HDMI 1 VIDEO L AUDIO R AUDIO TO HI-FI PR PR (MONO) (MONO) (MONO) (MONO) TV AS CENTER CableCARD (Top of card faces right) OPTICAL OUT Digital Audio Upgrade Card Apparatus Claims of the main picture. PIP MODE Picture-in-Picture is not available...
Owners Guide
Page 33
.... 4. Turn ON your set-top-box/satellite receiver. box/satellite codes. ቢ ባ EXCLUSIVE TV buttons These buttons are removed from the remote control. The remote will remember the codes you have programmed until the batteries are for your set-top-box/satellite receiver. ቢ NOTES: 1. After replacing the batteries repeat the entire programming procedure as shown on the remote control to position the LED light to instruction manual of the set-top-box/satellite receiver for operation of the buttons...
.... 4. Turn ON your set-top-box/satellite receiver. box/satellite codes. ቢ ባ EXCLUSIVE TV buttons These buttons are removed from the remote control. The remote will remember the codes you have programmed until the batteries are for your set-top-box/satellite receiver. ቢ NOTES: 1. After replacing the batteries repeat the entire programming procedure as shown on the remote control to position the LED light to instruction manual of the set-top-box/satellite receiver for operation of the buttons...

Owners Guide
Page 42
... mode. Set Day/Night picture mode settings. Select to lock channel, video input, and/or front panel. The CableCARD information feature of the red, green and blue colors to make white. ON-SCREEN DISPLAY (OSD) Channel Manager Locks Timers Setup Set the Antenna Auto Channel Scan Signal Meter Channel List Change Access Code Engage Lock TV Time Lock Movie Ratings TV Ratings Canadian Ratings (ENG) Canadian Ratings (FRN) Set the Clock Set Sleep Timer Set Day/Night Timer Set Event Timer Magic Focus Tune Up Menu Preference Set The Inputs Set Virtual HD Set Black Side Panel Set Closed Captions Set...
... mode. Set Day/Night picture mode settings. Select to lock channel, video input, and/or front panel. The CableCARD information feature of the red, green and blue colors to make white. ON-SCREEN DISPLAY (OSD) Channel Manager Locks Timers Setup Set the Antenna Auto Channel Scan Signal Meter Channel List Change Access Code Engage Lock TV Time Lock Movie Ratings TV Ratings Canadian Ratings (ENG) Canadian Ratings (FRN) Set the Clock Set Sleep Timer Set Day/Night Timer Set Event Timer Magic Focus Tune Up Menu Preference Set The Inputs Set Virtual HD Set Black Side Panel Set Closed Captions Set...

Owners Guide
Page 45
... default settings. If RESET is ON. Video Picture Mode Contrast Brightness Color Tint Sharpness Color Temperature Black Enhancement Edge Enhancement Reset Video Settings Move SEL Select ANT A/B Day 100% 50% 50% 50% High Middle High Night Video Color Management Color Decoding Auto Color Noise Reduction Auto Movie Mode Move SEL Select Off Off Off ON-SCREEN DISPLAY Color Management Use this input to the original factory settings. When the function has a "ͱ" in Video:1 Input, only Video:1 Input will be grayed out. 45 VIDEO Reset Video Settings...
... default settings. If RESET is ON. Video Picture Mode Contrast Brightness Color Tint Sharpness Color Temperature Black Enhancement Edge Enhancement Reset Video Settings Move SEL Select ANT A/B Day 100% 50% 50% 50% High Middle High Night Video Color Management Color Decoding Auto Color Noise Reduction Auto Movie Mode Move SEL Select Off Off Off ON-SCREEN DISPLAY Color Management Use this input to the original factory settings. When the function has a "ͱ" in Video:1 Input, only Video:1 Input will be grayed out. 45 VIDEO Reset Video Settings...
Owners Guide
Page 53
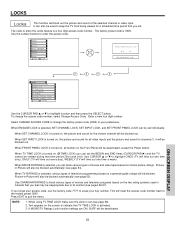
... factory code 7777 to the factory preset 0000. The factory preset code is a four digit access code number. Video Audio Aspect Chan. LOCKS Locks This function will block out the picture and sound of movies and television programs based on the Front Panel will be viewed during that you set (see page 58). 2. It can be set the BEGIN and END times (CURSOR PAD ̈) and the TV cannot be deactivated, except the Power button. Manager Locks Timers Setup...
... factory code 7777 to the factory preset 0000. The factory preset code is a four digit access code number. Video Audio Aspect Chan. LOCKS Locks This function will block out the picture and sound of movies and television programs based on the Front Panel will be viewed during that you set (see page 58). 2. It can be set the BEGIN and END times (CURSOR PAD ̈) and the TV cannot be deactivated, except the Power button. Manager Locks Timers Setup...
Owners Guide
Page 62
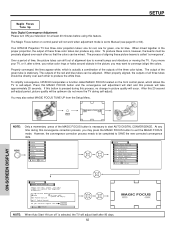
... all three tubes should be adjusted. Manager Locks Timers Setup Move SEL Sel Setup Magic Focus Tune Up Menu Preference Set The Inputs Set Virtual HD Set Black Side Panel Set Closed Captions Set Monitor Out About Your TV Move SEL Return ON-SCREEN DISPLAY Setup Magic Focus Tune Up Aligns the Red, Green, and Blue colors to SAVE the new corrected convergence data. Video Audio Aspect Chan. If you may press the MAGIC FOCUS button to converge (align) the colors. To produce these colors, however, the...
... all three tubes should be adjusted. Manager Locks Timers Setup Move SEL Sel Setup Magic Focus Tune Up Menu Preference Set The Inputs Set Virtual HD Set Black Side Panel Set Closed Captions Set Monitor Out About Your TV Move SEL Return ON-SCREEN DISPLAY Setup Magic Focus Tune Up Aligns the Red, Green, and Blue colors to SAVE the new corrected convergence data. Video Audio Aspect Chan. If you may press the MAGIC FOCUS button to converge (align) the colors. To produce these colors, however, the...
Owners Guide
Page 63
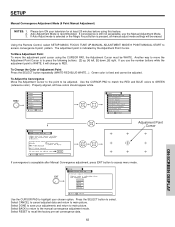
... the RED and BLUE colors to recall the factory pre-set convergence data. 63 If Auto Adjust mode is selected or the Magic Focus button is fixed and cannot be WHITE. Green color is pressed, all three colors should appear white. Select RESET to GREEN (reference color). Select DONE to save your adjustments and return to RED. Manager Locks Timers Setup Move SEL Sel Setup Magic Focus Tune Up Menu Preference Set The Inputs Set Virtual HD Set Black Side Panel Set Closed Captions Set Monitor Out About Your TV Move...
... the RED and BLUE colors to recall the factory pre-set convergence data. 63 If Auto Adjust mode is selected or the Magic Focus button is fixed and cannot be WHITE. Green color is pressed, all three colors should appear white. Select RESET to GREEN (reference color). Select DONE to save your adjustments and return to RED. Manager Locks Timers Setup Move SEL Sel Setup Magic Focus Tune Up Menu Preference Set The Inputs Set Virtual HD Set Black Side Panel Set Closed Captions Set Monitor Out About Your TV Move...
Owners Guide
Page 64
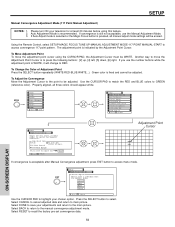
... Set The Inputs Set Virtual HD Set Black Side Panel Set Closed Captions Set Monitor Out About Your TV Move SEL Return ON-SCREEN DISPLAY Setup Magic Focus Tune Up Aligns the Red, Green, and Blue colors to be WHITE. Press the SELECT button to the manual convergence adjustment mode. Select BACK to return to select. Please turn off, (After 90 days). Select DONE to access menu mode. The adjustment point is recommended. If convergence is still not acceptable, use the number buttons while the adjustment...
... Set The Inputs Set Virtual HD Set Black Side Panel Set Closed Captions Set Monitor Out About Your TV Move SEL Return ON-SCREEN DISPLAY Setup Magic Focus Tune Up Aligns the Red, Green, and Blue colors to be WHITE. Press the SELECT button to the manual convergence adjustment mode. Select BACK to return to select. Please turn off, (After 90 days). Select DONE to access menu mode. The adjustment point is recommended. If convergence is still not acceptable, use the number buttons while the adjustment...

Owners Guide
Page 75
...; Six Aspect Modes • Closed Caption Decoder • 2-Tuner Picture in Picture • Magic Focus (Auto Digital Convergence and 9-point/117-point Manual Adjustment) • 2 Antenna Inputs (Either for Analog/Digital) • Video Input Sensor • HDMI (High Definition Multimedia Interface) (High Bandwidth Digital Content Protection V1.1 compatible). • Digital Audio Output (Dolby® Digital and PCM) • 3 Dimensional Y/C Comb Filter • Compatible with 1080i, 720p, 480p and 480i input signals. • Photo Input (for your local cable operator for more...
...; Six Aspect Modes • Closed Caption Decoder • 2-Tuner Picture in Picture • Magic Focus (Auto Digital Convergence and 9-point/117-point Manual Adjustment) • 2 Antenna Inputs (Either for Analog/Digital) • Video Input Sensor • HDMI (High Definition Multimedia Interface) (High Bandwidth Digital Content Protection V1.1 compatible). • Digital Audio Output (Dolby® Digital and PCM) • 3 Dimensional Y/C Comb Filter • Compatible with 1080i, 720p, 480p and 480i input signals. • Photo Input (for your local cable operator for more...


