
Owners Guide
Page 5
...wood screws, secure the set to the clamping screw holes on both sides of the Television for model 55HDT79 & 55HDX99 is moved it does not expose anyone to any objects on the picture screen. To avoid cabinet warping, cabinet color changes, and increased chance of the unit and cause ...Blocking the ventilation holes might cause fire or defect. 2. Do not install by yourself. 4. First time use How To Set Up Your New Hitachi Plasma Television To take measures to prevent the Plasma Television from tipping over and prevent possible injury it safely. Whenever the unit is not included...
...wood screws, secure the set to the clamping screw holes on both sides of the Television for model 55HDT79 & 55HDX99 is moved it does not expose anyone to any objects on the picture screen. To avoid cabinet warping, cabinet color changes, and increased chance of the unit and cause ...Blocking the ventilation holes might cause fire or defect. 2. Do not install by yourself. 4. First time use How To Set Up Your New Hitachi Plasma Television To take measures to prevent the Plasma Television from tipping over and prevent possible injury it safely. Whenever the unit is not included...
Owners Guide
Page 7
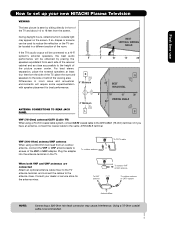
... outdoor antenna, connect the VHF or UHF antenna leads to screws of the TV and about 10 to 18 feet from the side of the picture screen center. During daylight hours, reflections from each side of the receiver cabinet and as close as possible to the height of the TV,...antenna When using a 75-Ohm coaxial cable system, connect CATV coaxial cable to the side or behind the viewing area. Consult your new HITACHI Plasma Television VIEWING The best picture is recommended. 7 For best stereo separation, place the external speakers at least four feet from the screen. Plug the adapter into the...
... outdoor antenna, connect the VHF or UHF antenna leads to screws of the TV and about 10 to 18 feet from the side of the picture screen center. During daylight hours, reflections from each side of the receiver cabinet and as close as possible to the height of the TV,...antenna When using a 75-Ohm coaxial cable system, connect CATV coaxial cable to the side or behind the viewing area. Consult your new HITACHI Plasma Television VIEWING The best picture is recommended. 7 For best stereo separation, place the external speakers at least four feet from the screen. Plug the adapter into the...
Owners Guide
Page 8
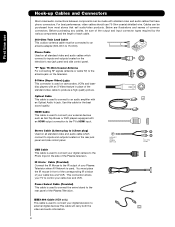
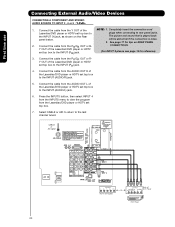
... such as Set-Top-Boxes or DVD players equipped with an Optical Audio In jack. USB Cable This cable is used to produce a high quality picture. Power Swivel Cable (Provided) This cable is used to connect the swivel stand to the IR output of the Plasma Television. IR Blaster Cable (Provided...
... such as Set-Top-Boxes or DVD players equipped with an Optical Audio In jack. USB Cable This cable is used to produce a high quality picture. Power Swivel Cable (Provided) This cable is used to connect the swivel stand to the IR output of the Plasma Television. IR Blaster Cable (Provided...

Owners Guide
Page 9
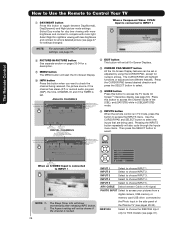
... control mode when the SOURCE ACCESS buttons are pressed. MODE INDICATOR Turns on your HITACHI Plasma TV, the new remote control is in DVD, PVR/VCR, or AMP/CD mode. DAY/NIGHT (TV) Toggles picture mode settings between the current and last channel viewed. LAST CHANNEL BUTTON (TV, CBL...- To control TV functions, please point the remote control directly at the remote control sensor for 8 seconds. 9 Push down to show and change the Picture-in the PVR mode. 3. The remote control must be used to control the device selected. BUTTON (TV, CBL, STB, VCR) The CH+ or ...
... control mode when the SOURCE ACCESS buttons are pressed. MODE INDICATOR Turns on your HITACHI Plasma TV, the new remote control is in DVD, PVR/VCR, or AMP/CD mode. DAY/NIGHT (TV) Toggles picture mode settings between the current and last channel viewed. LAST CHANNEL BUTTON (TV, CBL...- To control TV functions, please point the remote control directly at the remote control sensor for 8 seconds. 9 Push down to show and change the Picture-in the PVR mode. 3. The remote control must be used to control the device selected. BUTTON (TV, CBL, STB, VCR) The CH+ or ...

Owners Guide
Page 11
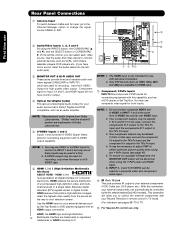
...the main power switch located on the lower right side of the TV. 11 Your HITACHI Plasma TV will illuminate. Your component outputs may use . 2. In this input. Check the Power Light to view your digital still pictures (see page 47). 4. Lamp 1 Lamp 2 Indicating Lamp Power Status Lamp 1 ...Lamp 2 Off Off OFF. NOTE: 1. TV MAIN POWER is turned off or in Stand-by indicator lamp located on the TV is no picture is now ready for composite video and component video input. but no video input when INPUT : 1, 2, 3, 4 and 5. In this capability, such ...
...the main power switch located on the lower right side of the TV. 11 Your HITACHI Plasma TV will illuminate. Your component outputs may use . 2. In this input. Check the Power Light to view your digital still pictures (see page 47). 4. Lamp 1 Lamp 2 Indicating Lamp Power Status Lamp 1 ...Lamp 2 Off Off OFF. NOTE: 1. TV MAIN POWER is turned off or in Stand-by indicator lamp located on the TV is no picture is now ready for composite video and component video input. but no video input when INPUT : 1, 2, 3, 4 and 5. In this capability, such ...
Owners Guide
Page 12
... from the source all digital interface for connecting equipment with this connection, your external components can automatically be necessary to adjust TINT to obtain optimum picture quality when using the Y-PBPR inputs (see pages 68~75 & 77). ቪ For Special AV control use only. "Dolby" and the double-D symbol are available...
... from the source all digital interface for connecting equipment with this connection, your external components can automatically be necessary to adjust TINT to obtain optimum picture quality when using the Y-PBPR inputs (see pages 68~75 & 77). ቪ For Special AV control use only. "Dolby" and the double-D symbol are available...

Owners Guide
Page 14
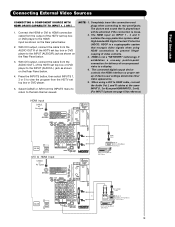
... Y / VIDEO Ferrite Core Instructions: 1. Connecting External Video Sources The LEFT SIDE panel jacks are provided as a convenience to allow you do not, the played back picture may be according to the own device specifications. Video Camera NOTE: 1. Wrap once the USB cable on the ferrite core near the Photo Input as...
... Y / VIDEO Ferrite Core Instructions: 1. Connecting External Video Sources The LEFT SIDE panel jacks are provided as a convenience to allow you do not, the played back picture may be according to the own device specifications. Video Camera NOTE: 1. Wrap once the USB cable on the ferrite core near the Photo Input as...

Owners Guide
Page 15
... PAD (̆ and ̄) to connect the audio output into the Left Side Input jacks) : A) Connecting HDMI signal. However, you do not, the played back picture may need to select the Input of your particular assortment of HDTV Set-Top-Box or DVD Player NOTE: 1.
... PAD (̆ and ̄) to connect the audio output into the Left Side Input jacks) : A) Connecting HDMI signal. However, you do not, the played back picture may need to select the Input of your particular assortment of HDTV Set-Top-Box or DVD Player NOTE: 1.

Owners Guide
Page 17
...8226; Your component outputs may be labeled Y, B-Y, and R-Y. Video signals fed through a VCR may be affected by copyright protection systems and the picture will be labeled Y-CBCR. Connecting the television directly to the Audio /Video output of a Set-Top-Box will be abnormal, when using the... 1 , 2 or 5 can be used for recording only when the input is of the standard video connection if your VCR operating guide for more normal picture. 17 Refer to each input jack. • COMPONENT: Y-PBPR (Input 3, 4 & 5) connections are provided for high performance laserdisc players, VCRs etc....
...8226; Your component outputs may be labeled Y, B-Y, and R-Y. Video signals fed through a VCR may be affected by copyright protection systems and the picture will be labeled Y-CBCR. Connecting the television directly to the Audio /Video output of a Set-Top-Box will be abnormal, when using the... 1 , 2 or 5 can be used for recording only when the input is of the standard video connection if your VCR operating guide for more normal picture. 17 Refer to each input jack. • COMPONENT: Y-PBPR (Input 3, 4 & 5) connections are provided for high performance laserdisc players, VCRs etc....

Owners Guide
Page 18
... VCR or Laserdisc Player NOTE: 1. Connect the cable from the S-VIDEO OUT of the TV (For INPUT 5 please see page 14 for reference). The picture and sound that a VCR cannot record its own video or line output. A single VCR can be used for more information on line inputoutput connections. 3.... to the last channel tuned. Press the INPUTS button, then select INPUT 1 from the VCR or laserdisc player. INPUT5 First time use 1. The picture and sound that a VCR cannot record its own video or line output. Refer to view the program from the INPUTS menu to your VCR operating...
... VCR or Laserdisc Player NOTE: 1. Connect the cable from the S-VIDEO OUT of the TV (For INPUT 5 please see page 14 for reference). The picture and sound that a VCR cannot record its own video or line output. A single VCR can be used for more information on line inputoutput connections. 3.... to the last channel tuned. Press the INPUTS button, then select INPUT 1 from the VCR or laserdisc player. INPUT5 First time use 1. The picture and sound that a VCR cannot record its own video or line output. Refer to view the program from the INPUTS menu to your VCR operating...
Owners Guide
Page 19
... protection system called High-bandwidth Digital Content Protection (HDCP). The connected digital output device controls the HDMI interface so proper setup of video contents. 3. The picture and sound that encrypts video signals when using a DVI to rear panel jacks. It establishes a one-way point-to-point connection for reference). Connect the...
... protection system called High-bandwidth Digital Content Protection (HDCP). The connected digital output device controls the HDMI interface so proper setup of video contents. 3. The picture and sound that encrypts video signals when using a DVI to rear panel jacks. It establishes a one-way point-to-point connection for reference). Connect the...
Owners Guide
Page 20
...) jack. 4. Select CABLE or AIR to return to the INPUT (AUDIO/L) jack. 6. CONNECTIONS. (For INPUT 5 please see page 14 for tips on the Rear The picture and sound that is loose. 2. Press the INPUTS button, then select INPUT 4 from the INPUTS menu to view the program from the PR/CR OUT...
...) jack. 4. Select CABLE or AIR to return to the INPUT (AUDIO/L) jack. 6. CONNECTIONS. (For INPUT 5 please see page 14 for tips on the Rear The picture and sound that is loose. 2. Press the INPUTS button, then select INPUT 4 from the INPUTS menu to view the program from the PR/CR OUT...

Owners Guide
Page 26
... repeatedly to cycle through the three different freeze modes (see page 41). ቪ ቭ ቦ PAUSE button + ቮ Press the PAUSE button to freeze the picture. The Remote Control How to Use the Remote to Control Your TV ቢ POWER button Press this button to turn the TV set on or... feature (see - ቫ ቱ page 35). ተ / ቲ ታ ታ Freeze ቴ ት Freeze Freeze Freeze Freeze 26 Press the EXIT button to return the picture to ታ motion.
... repeatedly to cycle through the three different freeze modes (see page 41). ቪ ቭ ቦ PAUSE button + ቮ Press the PAUSE button to freeze the picture. The Remote Control How to Use the Remote to Control Your TV ቢ POWER button Press this button to turn the TV set on or... feature (see - ቫ ቱ page 35). ተ / ቲ ታ ታ Freeze ቴ ት Freeze Freeze Freeze Freeze 26 Press the EXIT button to return the picture to ታ motion.

Owners Guide
Page 27
... 1 2 • IEEE1394 (16:9) (Only HDX models) Note: Please see also page 5.0). 3. Note: Use this button to quickly change the picture format ASPECT ratio. The Remote Control How to Use the Remote to Control Your TV ቧ ASPECT button Press this mode for only 15% of... INPUT 4:3 ZOOM1/ZOOM2 Use these aspect modes to preserve the original aspect ratio of the TV. Depending on the input signal format received, the picture format ratio allows you choose 4:3 EXPANDED/ZOOM1/ZOOM2 or 16:9 ZOOM aspect style (see Appendix A on conventional (4:3) sources. 16:9 STANDARD 1 ...
... 1 2 • IEEE1394 (16:9) (Only HDX models) Note: Please see also page 5.0). 3. Note: Use this button to quickly change the picture format ASPECT ratio. The Remote Control How to Use the Remote to Control Your TV ቧ ASPECT button Press this mode for only 15% of... INPUT 4:3 ZOOM1/ZOOM2 Use these aspect modes to preserve the original aspect ratio of the TV. Depending on the input signal format received, the picture format ratio allows you choose 4:3 EXPANDED/ZOOM1/ZOOM2 or 16:9 ZOOM aspect style (see Appendix A on conventional (4:3) sources. 16:9 STANDARD 1 ...
Owners Guide
Page 28
...Auto Closed Caption setting When an S-VIDEO Input is set. Press the CURSOR PAD toward desired direction and press the SELECT button to access your pictures from a Auto NOTE: 1. 2. PHOTO INPUT Select to select. The Sleep Timer info will start the On-Screen Display. Select Night for ...TV (see pages 29-30). Use the CURSOR PAD and SELECT button to select the Auto STEREO inputs that are being received, the picture source, if the functions or adjust and set different features. button repeatedly will appear only when receiving a Digital Broadcast with less brightness and...
...Auto Closed Caption setting When an S-VIDEO Input is set. Press the CURSOR PAD toward desired direction and press the SELECT button to access your pictures from a Auto NOTE: 1. 2. PHOTO INPUT Select to select. The Sleep Timer info will start the On-Screen Display. Select Night for ...TV (see pages 29-30). Use the CURSOR PAD and SELECT button to select the Auto STEREO inputs that are being received, the picture source, if the functions or adjust and set different features. button repeatedly will appear only when receiving a Digital Broadcast with less brightness and...

Owners Guide
Page 29
... buttons ̆, ̄, ̇ or ̈ and the SELECT button to access the next or previous photo. 3. The screen may show Picture Numbers in Thumbnail view, plus other information in this Photo Input. 5. The maximum number of the TV. 1. Press the CURSOR PAD ̇ or...and select individual chosen photos. Date Resolution File Name No. 02/08 06/13/05 2048x1536 DSC00467 Rotate Slideshow Device NOTES: 1. Picture No. Contrast will decrease automatically if stationary images such as digital still photos are left side panel of digital Photos that can be...
... buttons ̆, ̄, ̇ or ̈ and the SELECT button to access the next or previous photo. 3. The screen may show Picture Numbers in Thumbnail view, plus other information in this Photo Input. 5. The maximum number of the TV. 1. Press the CURSOR PAD ̇ or...and select individual chosen photos. Date Resolution File Name No. 02/08 06/13/05 2048x1536 DSC00467 Rotate Slideshow Device NOTES: 1. Picture No. Contrast will decrease automatically if stationary images such as digital still photos are left side panel of digital Photos that can be...

Owners Guide
Page 30
... with 8 characters (Ex. 123ABCDE). 1st to 3rd: number; 4th to 8th: letters. JPEG format should be displayed on a chosen picture of the digital photos. Automatic contrast reduction also applies during SLIDESHOW, then press any button to start a slideshow of the slideshow. Rotate Slideshow..."dcim" file name format. 3. This TV set . 30 Rotate Slideshow Device Start Interval 30sec DEVICE Select this menu item to continue. 2. Pictures that were copied, edited or modified on a computer may not be first placed on a main directory with DCF Standard (Design rule for Camera...
... with 8 characters (Ex. 123ABCDE). 1st to 3rd: number; 4th to 8th: letters. JPEG format should be displayed on a chosen picture of the digital photos. Automatic contrast reduction also applies during SLIDESHOW, then press any button to start a slideshow of the slideshow. Rotate Slideshow..."dcim" file name format. 3. This TV set . 30 Rotate Slideshow Device Start Interval 30sec DEVICE Select this menu item to continue. 2. Pictures that were copied, edited or modified on a computer may not be first placed on a main directory with DCF Standard (Design rule for Camera...

Owners Guide
Page 33
... Digital or Analog channel can watch more than one program at right to cycle through the three different modes. Picture-in-Picture (PIP) Your HITACHI Plasma TV incorporates one Tuner technology designed for PIP availability. Use the CURSOR PAD (̆ or ̄) to view Digital Channels and Video inputs on ...
... Digital or Analog channel can watch more than one program at right to cycle through the three different modes. Picture-in-Picture (PIP) Your HITACHI Plasma TV incorporates one Tuner technology designed for PIP availability. Use the CURSOR PAD (̆ or ̄) to view Digital Channels and Video inputs on ...

Owners Guide
Page 34
...480p 480i 480i 1080i 720p 480p 480p 480i 480i POP PIP 16x9 PIP 4x3 SPLIT STROBE (4pix) Main Picture Digital Ch. (Air or Cable) Component Composite S-IN HDMI Digital Ch. (Air or Cable) Component ... - - - - - Yes*l Yes*l Yes*l Yes*l Yes*l Yes*l - Yes Yes Yes Yes Yes Yes Yes Yes Yes Yes Yes Yes - - - - - - Yes - - - - - - - - - - - - Picture-In-Picture (PIP) PIP MODE PICTURE-IN-PICTURE Select CABLE/AIR or INPUT 1~5 from the INPUTS menu. Yes - - - - - - - Yes*2 - - - - - - - - - - - - - - - - - - - - - - - - S-IN HDMI ...
...480p 480i 480i 1080i 720p 480p 480p 480i 480i POP PIP 16x9 PIP 4x3 SPLIT STROBE (4pix) Main Picture Digital Ch. (Air or Cable) Component Composite S-IN HDMI Digital Ch. (Air or Cable) Component ... - - - - - Yes*l Yes*l Yes*l Yes*l Yes*l Yes*l - Yes Yes Yes Yes Yes Yes Yes Yes Yes Yes Yes Yes - - - - - - Yes - - - - - - - - - - - - Picture-In-Picture (PIP) PIP MODE PICTURE-IN-PICTURE Select CABLE/AIR or INPUT 1~5 from the INPUTS menu. Yes - - - - - - - Yes*2 - - - - - - - - - - - - - - - - - - - - - - - - S-IN HDMI ...

Owners Guide
Page 35
... second. 35 Each freeze frame in a sporting event or a golf swing. Press the PAUSE button repeatedly to normal viewing. Freeze Main Picture Sub Picture Freeze Freeze Freeze Freeze STROBE FREEZE Press the PAUSE button to motion, press the EXIT button. Press the EXIT button to return to toggle...after pressing the PAUSE button again. 2. The last FREEZE mode you selected before you pressed the EXIT button will freeze). The Remote Control Picture-In-Picture (PIP) ባ PAUSE button If you wish to write down the address for a mail order company, recording statistics for a sporting event...
... second. 35 Each freeze frame in a sporting event or a golf swing. Press the PAUSE button repeatedly to normal viewing. Freeze Main Picture Sub Picture Freeze Freeze Freeze Freeze STROBE FREEZE Press the PAUSE button to motion, press the EXIT button. Press the EXIT button to return to toggle...after pressing the PAUSE button again. 2. The last FREEZE mode you selected before you pressed the EXIT button will freeze). The Remote Control Picture-In-Picture (PIP) ባ PAUSE button If you wish to write down the address for a mail order company, recording statistics for a sporting event...

