Owners Guide
Page 14
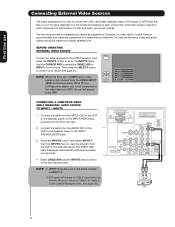
... will change to the right. 2. Check the owner's manual of each component. However, you use to connect the VCR, camcorder, laserdisc player, DVD player, or HDTV Set Top Box to show the INPUTS menu. The VIDEO OSD label disappears automatically after approximately four seconds. 4.
... will change to the right. 2. Check the owner's manual of each component. However, you use to connect the VCR, camcorder, laserdisc player, DVD player, or HDTV Set Top Box to show the INPUTS menu. The VIDEO OSD label disappears automatically after approximately four seconds. 4.

Owners Guide
Page 16
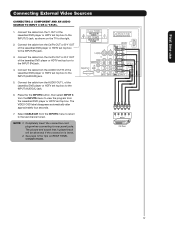
... is played back will be abnormal if the connection is not a "NETWORK" technology. HDMI HDMI OUT DVD Player or HDTV STB DVI to view the program from the HDTV set -up of video contents. 3. First time use Connecting External Video Sources CONNECTING A COMPONENT SOURCE WITH HDMI OR DVI...the right. Press the INPUTS button, then select INPUT 1 from the INPUTS menu to HDMI Cable R LV OUTPUT DIGITAL OUTPUT DVD Player or HDTV STB 16 The VIDEO OSD label disappears automatically after approximately four seconds. 3. The picture and sound that encrypts video signals when using a component ...
... is played back will be abnormal if the connection is not a "NETWORK" technology. HDMI HDMI OUT DVD Player or HDTV STB DVI to view the program from the HDTV set -up of video contents. 3. First time use Connecting External Video Sources CONNECTING A COMPONENT SOURCE WITH HDMI OR DVI...the right. Press the INPUTS button, then select INPUT 1 from the INPUTS menu to HDMI Cable R LV OUTPUT DIGITAL OUTPUT DVD Player or HDTV STB 16 The VIDEO OSD label disappears automatically after approximately four seconds. 3. The picture and sound that encrypts video signals when using a component ...
Owners Guide
Page 17
... INPUTS menu to view the program from the INPUTS menu to return to rear panel jacks. Select CABLE/AIR from the Laserdisc/DVD player or HDTV set top box to the INPUT (PR) jack. 4. First time use Connecting External Video Sources CONNECTING A COMPONENT AND AN AUDIO SOURCE TO INPUT 3 OR 4: Y-... sound that is played back will be abnormal if the connection is loose. 2. Connect the cable from the Y OUT of the Laserdisc/DVD player or HDTV set top box to the right. 2. Completely insert the connection cord plugs when connecting to the last channel tuned. R L PR PB Y OUTPUT DVD Player 17...
... INPUTS menu to view the program from the INPUTS menu to return to rear panel jacks. Select CABLE/AIR from the Laserdisc/DVD player or HDTV set top box to the INPUT (PR) jack. 4. First time use Connecting External Video Sources CONNECTING A COMPONENT AND AN AUDIO SOURCE TO INPUT 3 OR 4: Y-... sound that is played back will be abnormal if the connection is loose. 2. Connect the cable from the Y OUT of the Laserdisc/DVD player or HDTV set top box to the right. 2. Completely insert the connection cord plugs when connecting to the last channel tuned. R L PR PB Y OUTPUT DVD Player 17...
Owners Guide
Page 20
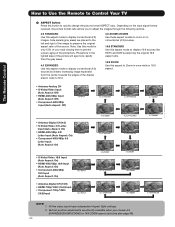
... (4:3) images. All five video inputs have independent Aspect Style settings. 2. Depending on conventional (4:3) sources. 16:9 STANDARD Use this aspect mode to display 16:9 sources like HDTV and DVD's preserving the original 16:9 aspect ratio. 16:9 ZOOM Use this aspect to prevent uneven aging of the phosphors. Side panels (gray areas) are...
... (4:3) images. All five video inputs have independent Aspect Style settings. 2. Depending on conventional (4:3) sources. 16:9 STANDARD Use this aspect mode to display 16:9 sources like HDTV and DVD's preserving the original 16:9 aspect ratio. 16:9 ZOOM Use this aspect to prevent uneven aging of the phosphors. Side panels (gray areas) are...


