Owners Guide
Page 1
has determined that this product meets the ENERGY STAR® guidelines for 51F520, 57F520 IMPORTANT SAFETY INSTRUCTIONS 2-3 FIRST TIME USE ...4-18 THE REMOTE CONTROL 19-32 ON-SCREEN DISPLAY...33-65 CARE OF YOUR HITACHI TELEVISION 66 RECEPTION PROBLEMS...67 USEFUL INFORMATION / INDEX 68-71 57" DISASSEMBLY/ASSEMBLY INSTRUCTIONS 72-74 INDEX ...75 As an ENERGY STAR® Partner, Hitachi, Ltd. PROJECTION COLOR TV Operating Guide for energy efficiency.
has determined that this product meets the ENERGY STAR® guidelines for 51F520, 57F520 IMPORTANT SAFETY INSTRUCTIONS 2-3 FIRST TIME USE ...4-18 THE REMOTE CONTROL 19-32 ON-SCREEN DISPLAY...33-65 CARE OF YOUR HITACHI TELEVISION 66 RECEPTION PROBLEMS...67 USEFUL INFORMATION / INDEX 68-71 57" DISASSEMBLY/ASSEMBLY INSTRUCTIONS 72-74 INDEX ...75 As an ENERGY STAR® Partner, Hitachi, Ltd. PROJECTION COLOR TV Operating Guide for energy efficiency.
Owners Guide
Page 4
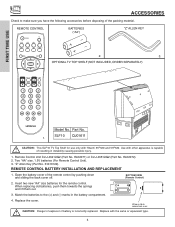
...AND REPLACEMENT 1. When replacing old batteries, push them towards the springs and lift them out. 3. SLF10 QJ01611 1. HL02072). 2. BOTTOM VIEW (Remote Control) 2. Match the batteries to the (+) and (-) marks in instability causing possible injury. 1. Replace the cover. "Z" Allen Key (Part ...accessories before disposing of resulting in the battery compartment. 4. Remote Control Unit CLU-4341UG2 (Part No. Two "AA" size, 1.5V batteries (For Remote Control Unit). 3. Insert two new "AA" size batteries for use only with Hitachi 51F520 and 57F520. Lift up on tab to remove back ...
...AND REPLACEMENT 1. When replacing old batteries, push them towards the springs and lift them out. 3. SLF10 QJ01611 1. HL02072). 2. BOTTOM VIEW (Remote Control) 2. Match the batteries to the (+) and (-) marks in instability causing possible injury. 1. Replace the cover. "Z" Allen Key (Part ...accessories before disposing of resulting in the battery compartment. 4. Remote Control Unit CLU-4341UG2 (Part No. Two "AA" size, 1.5V batteries (For Remote Control Unit). 3. Insert two new "AA" size batteries for use only with Hitachi 51F520 and 57F520. Lift up on tab to remove back ...
Owners Guide
Page 7
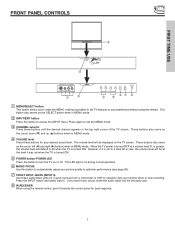
... on the TV screen. When the TV power is turned OFF at the level it towards the control panel for your preference without using the remote control, point it was set TV features to exit the MENU mode. ቤ CHANNEL selector Press these buttons for best response. 7 However, if ... instantly view your favorite show or new recording. This button also serves as the cursor left audio jack. ቩ IR RECEIVER When using the remote. These buttons also serve as the SELECT button when in MENU mode. ብ VOLUME level Press these buttons until the desired channel appears in ...
... on the TV screen. When the TV power is turned OFF at the level it towards the control panel for your preference without using the remote control, point it was set TV features to exit the MENU mode. ቤ CHANNEL selector Press these buttons for best response. 7 However, if ... instantly view your favorite show or new recording. This button also serves as the cursor left audio jack. ቩ IR RECEIVER When using the remote. These buttons also serve as the SELECT button when in MENU mode. ብ VOLUME level Press these buttons until the desired channel appears in ...

Owners Guide
Page 9
... as a sub-picture.) The antenna output labeled "TO CONVERTER" allows the ANT A connection to pass directly to INPUT 3 and 4, but only one of the remote control you can be labeled Y, B-Y, and R-Y. REAR PANEL JACKS ቢ ቦ FIRST TIME USE ANT A To Converter ቤ ብ ANT B MONITOR...R AUDIO TO HI-FI PR PR (MONO) (MONO) (MONO) (MONO) RS232C 1 2 345 6 789 ባ ቧ ቨ ቢ Antenna Input/Output The remote control allows you to the TV's PB 4. ANT B can be used at the same time. You may be used for composite video and component video...
... as a sub-picture.) The antenna output labeled "TO CONVERTER" allows the ANT A connection to pass directly to INPUT 3 and 4, but only one of the remote control you can be labeled Y, B-Y, and R-Y. REAR PANEL JACKS ቢ ቦ FIRST TIME USE ANT A To Converter ቤ ብ ANT B MONITOR...R AUDIO TO HI-FI PR PR (MONO) (MONO) (MONO) (MONO) RS232C 1 2 345 6 789 ባ ቧ ቨ ቢ Antenna Input/Output The remote control allows you to the TV's PB 4. ANT B can be used at the same time. You may be used for composite video and component video...

Owners Guide
Page 13
REAR PANEL OF TELEVISION ANT A To Converter ANT B MONITOR OUT S-VIDEO INPUT 4 INPUT 3 INPUT 2 Y/ VIDEO PB INPUT 1 Y/ VIDEO PB HDMI 1 VIDEO L AUDIO R AUDIO TO HI-FI PR PR (MONO) (MONO) (MONO) (MONO) RS232C 1 2 345 6 789 LR INPUT Stereo System Amplifier or DVD Player 13 FIRST TIME USE CONNECTING EXTERNAL AUDIO SOURCES To control the audio level of an external audio amplifier with the remote control, connect the system as shown below.
REAR PANEL OF TELEVISION ANT A To Converter ANT B MONITOR OUT S-VIDEO INPUT 4 INPUT 3 INPUT 2 Y/ VIDEO PB INPUT 1 Y/ VIDEO PB HDMI 1 VIDEO L AUDIO R AUDIO TO HI-FI PR PR (MONO) (MONO) (MONO) (MONO) RS232C 1 2 345 6 789 LR INPUT Stereo System Amplifier or DVD Player 13 FIRST TIME USE CONNECTING EXTERNAL AUDIO SOURCES To control the audio level of an external audio amplifier with the remote control, connect the system as shown below.

Owners Guide
Page 19
... In addition to controlling all the functions on your HITACHI Projection TV, the new remote control is designed to operate different types of the VCR and press the VCR button. Basic operation keys are grouped together in one touch. The remote will now control your cable box (see page 29 ...to program your satellite receiver (see page 28 for instructions on how to program the remote to control your cable box, point the remote at the remote sensor of the TV and press the TV button. The remote will now control your television. To operate your DVD player). 19 To operate your...
... In addition to controlling all the functions on your HITACHI Projection TV, the new remote control is designed to operate different types of the VCR and press the VCR button. Basic operation keys are grouped together in one touch. The remote will now control your cable box (see page 29 ...to program your satellite receiver (see page 28 for instructions on how to program the remote to control your cable box, point the remote at the remote sensor of the TV and press the TV button. The remote will now control your television. To operate your DVD player). 19 To operate your...
Owners Guide
Page 20
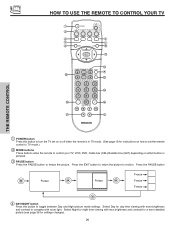
... Press this button to turn the TV set on or off when the remote is in TV mode. (See page 19 for instructions on how to set the remote control to TV mode.) ባ MODE buttons These buttons allow the remote to control your TV, VCR, DVD, Cable box (CBL)/Satellite box (SAT... Night picture mode settings. Select Day for day time viewing with more detailed picture (see page 36 for settings changes). 20 HOW TO USE THE REMOTE TO CONTROL YOUR TV ቢ ባ ቧ ብ ቦ ቨ ቩ ቫ ቭ ተ ቱ ቲ ታ ቤ THE...
... Press this button to turn the TV set on or off when the remote is in TV mode. (See page 19 for instructions on how to set the remote control to TV mode.) ባ MODE buttons These buttons allow the remote to control your TV, VCR, DVD, Cable box (CBL)/Satellite box (SAT... Night picture mode settings. Select Day for day time viewing with more detailed picture (see page 36 for settings changes). 20 HOW TO USE THE REMOTE TO CONTROL YOUR TV ቢ ባ ቧ ብ ቦ ቨ ቩ ቫ ቭ ተ ቱ ቲ ታ ቤ THE...

Owners Guide
Page 21
... through the following options. 4:3 STANDARD Use this aspect mode to Zoom-in once while in 16:9 aspect. (1) Antenna Analog Channels 4:3 INPUT 4:3 STANDARD 4:3 EXPANDED 4:3 ZOOM1 THE REMOTE CONTROL (2) 480p Input 16:9 INPUT 16:9 ZOOM 16:9 STANDARD 4:3 ZOOM2 4:3 STANDARD 4:3 EXPANDED 4:3 ZOOM1 (3) 720p/1080i Input 16:9 INPUT 16:9 ZOOM 16:9 STANDARD 16:9 STANDARD ...panels (gray areas) are placed to the left and right of the image to prevent uneven aging of the source. HOW TO USE THE REMOTE TO CONTROL YOUR TV ቦ ASPECT button Press this mode for the other ANT inputs.
... through the following options. 4:3 STANDARD Use this aspect mode to Zoom-in once while in 16:9 aspect. (1) Antenna Analog Channels 4:3 INPUT 4:3 STANDARD 4:3 EXPANDED 4:3 ZOOM1 THE REMOTE CONTROL (2) 480p Input 16:9 INPUT 16:9 ZOOM 16:9 STANDARD 4:3 ZOOM2 4:3 STANDARD 4:3 EXPANDED 4:3 ZOOM1 (3) 720p/1080i Input 16:9 INPUT 16:9 ZOOM 16:9 STANDARD 16:9 STANDARD ...panels (gray areas) are placed to the left and right of the image to prevent uneven aging of the source. HOW TO USE THE REMOTE TO CONTROL YOUR TV ቦ ASPECT button Press this mode for the other ANT inputs.

Owners Guide
Page 22
... 4 for Video 4. Select to choose Input 1 for Video 1. Select to choose Input 3 for Video 3. Select to choose Input 5 for Video 5. THE REMOTE CONTROL 22 Select to select. Pressing the INPUTS button repeatedly will also cycle through the Inputs menu items. Then press the SELECT button to choose ...select the inputs that are being used. Use the CURSOR and SELECT buttons to choose Antenna B. HOW TO USE THE REMOTE TO CONTROL YOUR TV ቧ INPUTS button When the remote control is in TV mode, press this button to choose Input 2 for Video 2. Select to access the INPUTS ...
... 4 for Video 4. Select to choose Input 1 for Video 1. Select to choose Input 3 for Video 3. Select to choose Input 5 for Video 5. THE REMOTE CONTROL 22 Select to select. Pressing the INPUTS button repeatedly will also cycle through the Inputs menu items. Then press the SELECT button to choose ...select the inputs that are being used. Use the CURSOR and SELECT buttons to choose Antenna B. HOW TO USE THE REMOTE TO CONTROL YOUR TV ቧ INPUTS button When the remote control is in TV mode, press this button to choose Input 2 for Video 2. Select to access the INPUTS ...

Owners Guide
Page 23
...SAP), the time, CHANNEL ID and if the TIMER is in (CBL) and (SAT/STB) mode. Press this button is only applicable when the remote control is set or adjusted by using the CURSOR buttons and the SELECT button, except for a description. ቩ MENU button The MENU button will show... momentarily after releasing INFO button. 2. THE REMOTE CONTROL HOW TO USE THE REMOTE TO CONTROL YOUR TV ቨ PICTURE-IN-PICTURE button See separate section on pages 25-27 for numeric entries.
...SAP), the time, CHANNEL ID and if the TIMER is in (CBL) and (SAT/STB) mode. Press this button is only applicable when the remote control is set or adjusted by using the CURSOR buttons and the SELECT button, except for a description. ቩ MENU button The MENU button will show... momentarily after releasing INFO button. 2. THE REMOTE CONTROL HOW TO USE THE REMOTE TO CONTROL YOUR TV ቨ PICTURE-IN-PICTURE button See separate section on pages 25-27 for numeric entries.

Owners Guide
Page 24
... (LC) button Press this button to toggle between the current and last channel viewed. ታ RECORD button Press twice (2 times) to record programs when the remote is GREEN. To restore the sound, press the MUTE button one , two, or three numbers to select channels. Volume 8 Soft Mute 8 Mute 8 Closed ... you obtain the desired sound level. Enter "0" first for channels 1 to 9, or simply press the single digit channel you are used when the remote control is in VCR mode. 24 Channel selection may also be at a volume level 31 or greater, the volume level will know you wish to...
... (LC) button Press this button to toggle between the current and last channel viewed. ታ RECORD button Press twice (2 times) to record programs when the remote is GREEN. To restore the sound, press the MUTE button one , two, or three numbers to select channels. Volume 8 Soft Mute 8 Mute 8 Closed ... you obtain the desired sound level. Enter "0" first for channels 1 to 9, or simply press the single digit channel you are used when the remote control is in VCR mode. 24 Channel selection may also be at a volume level 31 or greater, the volume level will know you wish to...
Owners Guide
Page 25
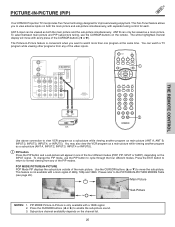
... on both the main picture and the sub-picture simultaneously. Please refer to enable the sub-picture sound. 3. PICTURE-IN-PICTURE (PIP) Your HITACHI Projection TV incorporates Two Tuner technology designed for each. ANT A input can be viewed as a sub-picture (ANT A, INPUT:2, INPUT:3, INPUT:4... INPUT 1 Y/ VIDEO PB HDMI 1 VIDEO L AUDIO R AUDIO TO HI-FI PR PR (MONO) (MONO) (MONO) (MONO) RS232C 1 2 345 6 789 ቢ THE REMOTE CONTROL Audio Video OUTPUT VCR ባ Use above connection to normal viewing from any of the video inputs. Press the EXIT button to return to...
... on both the main picture and the sub-picture simultaneously. Please refer to enable the sub-picture sound. 3. PICTURE-IN-PICTURE (PIP) Your HITACHI Projection TV incorporates Two Tuner technology designed for each. ANT A input can be viewed as a sub-picture (ANT A, INPUT:2, INPUT:3, INPUT:4... INPUT 1 Y/ VIDEO PB HDMI 1 VIDEO L AUDIO R AUDIO TO HI-FI PR PR (MONO) (MONO) (MONO) (MONO) RS232C 1 2 345 6 789 ቢ THE REMOTE CONTROL Audio Video OUTPUT VCR ባ Use above connection to normal viewing from any of the video inputs. Press the EXIT button to return to...

Owners Guide
Page 26
... viewing. PICTURE-IN-PICTURE (PIP) PIP MODE PICTURE-IN-PICTURE This feature is only available with a main signal of 1080i. Main Picture Sub Picture THE REMOTE CONTROL SURF MODE PICTURE-IN-PICTURE Surf Mode PIP automatically scans all four PIP modes. PICTURE-IN-PICTURE (PIP) MODES PIP Mode POP PIP 4x3...
... viewing. PICTURE-IN-PICTURE (PIP) PIP MODE PICTURE-IN-PICTURE This feature is only available with a main signal of 1080i. Main Picture Sub Picture THE REMOTE CONTROL SURF MODE PICTURE-IN-PICTURE Surf Mode PIP automatically scans all four PIP modes. PICTURE-IN-PICTURE (PIP) MODES PIP Mode POP PIP 4x3...

Owners Guide
Page 27
... the MAIN freeze followed by the SPLIT freeze and then the STROBE freeze. To return the picture to normal viewing. Main Picture Sub Picture THE REMOTE CONTROL STROBE FREEZE Press the PAUSE button to write down the address for a mail order company, recording statistics for example, a close play in a sporting event...
... the MAIN freeze followed by the SPLIT freeze and then the STROBE freeze. To return the picture to normal viewing. Main Picture Sub Picture THE REMOTE CONTROL STROBE FREEZE Press the PAUSE button to write down the address for a mail order company, recording statistics for example, a close play in a sporting event...
Owners Guide
Page 28
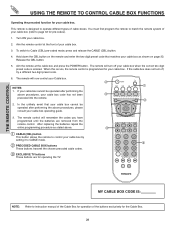
... cable box (refer to instruction manual of the Cable Box for operation of the buttons exclusively for the Cable Box. 28 Aim the remote at the front of cable boxes. In the unlikely event that matches your cable box as stated above. ቤ ቢ CABLE ...; PRECODED CABLE BOX buttons These buttons transmit the chosen precoded cable codes. ቤ EXCLUSIVE TV buttons These buttons are removed from the remote control. The remote will now control your cable box. If your cable box cannot be operated after performing the above procedures, please consult your cable box....
... cable box (refer to instruction manual of the Cable Box for operation of the buttons exclusively for the Cable Box. 28 Aim the remote at the front of cable boxes. In the unlikely event that matches your cable box as stated above. ቤ ቢ CABLE ...; PRECODED CABLE BOX buttons These buttons transmit the chosen precoded cable codes. ቤ EXCLUSIVE TV buttons These buttons are removed from the remote control. The remote will now control your cable box. If your cable box cannot be operated after performing the above procedures, please consult your cable box....
Owners Guide
Page 29
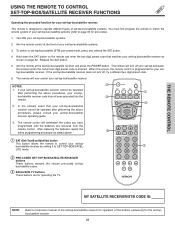
...RECEIVER buttons These buttons transmit the chosen pre-coded set-topbox/satellite codes. ቤ EXCLUSIVE TV buttons These buttons are removed from the remote control. Turn ON your set-top-box/satellite receiver. Hold down the SAT button on page 32. After replacing the batteries repeat ...is programmed for pre-codes). 1. To switch to control your set-top- ቢ box/satellite receiver code has not been precoded into the ቤ remote. ባ 2. Release the SAT button. 5. If the set-top-box/satellite receiver does not turn off , try a different two digit preset code....
...RECEIVER buttons These buttons transmit the chosen pre-coded set-topbox/satellite codes. ቤ EXCLUSIVE TV buttons These buttons are removed from the remote control. Turn ON your set-top-box/satellite receiver. Hold down the SAT button on page 32. After replacing the batteries repeat ...is programmed for pre-codes). 1. To switch to control your set-top- ቢ box/satellite receiver code has not been precoded into the ቤ remote. ባ 2. Release the SAT button. 5. If the set-top-box/satellite receiver does not turn off , try a different two digit preset code....
Owners Guide
Page 30
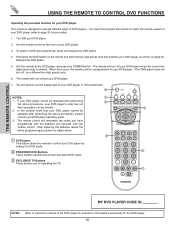
.... In the unlikely event that matches your DVD player. 7. After replacing the batteries repeat the entire programming procedure as shown on the remote and enter the two digit preset code that your DVD player cannot be operated after performing the above . ቤ ቢ DVD ...4707; PRECODED DVD Buttons ባ These buttons transmit the chosen precoded DVD codes. ቤ EXCLUSIVE TV Buttons These buttons are removed from the remote control. The remote will need to 16:9 widescreen. ባ NOTES: ቢ 1. Turn ON your DVD player when the correct two digit preset code is...
.... In the unlikely event that matches your DVD player. 7. After replacing the batteries repeat the entire programming procedure as shown on the remote and enter the two digit preset code that your DVD player cannot be operated after performing the above . ቤ ቢ DVD ...4707; PRECODED DVD Buttons ባ These buttons transmit the chosen precoded DVD codes. ቤ EXCLUSIVE TV Buttons These buttons are removed from the remote control. The remote will need to 16:9 widescreen. ባ NOTES: ቢ 1. Turn ON your DVD player when the correct two digit preset code is...
Owners Guide
Page 31
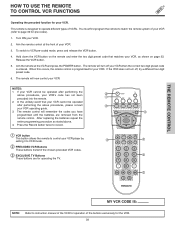
... for operating the TV. ባ MY VCR CODE IS: NOTE: Refer to operate different types of your VCR's code has not been precoded into the remote. ባ ቢ 2. In the unlikely event that matches your VCR player by setting it to VCR mode. ቤ ባ ባ PRECODED VCR ... two digit preset code that your VCR cannot be operated after performing the above procedures, please consult ቤ your VCR operating guide. 3. This remote is designed to instruction manual of the VCR for operation of your VCR when the correct two digit preset code is programmed for your VCR...
... for operating the TV. ባ MY VCR CODE IS: NOTE: Refer to operate different types of your VCR's code has not been precoded into the remote. ባ ቢ 2. In the unlikely event that matches your VCR player by setting it to VCR mode. ቤ ባ ባ PRECODED VCR ... two digit preset code that your VCR cannot be operated after performing the above procedures, please consult ቤ your VCR operating guide. 3. This remote is designed to instruction manual of the VCR for operation of your VCR when the correct two digit preset code is programmed for your VCR...

Owners Guide
Page 32
... 07 ZENITH 08 32 CODE PIONEER 29 SCIENTIFIC ATLANTA 30 SATELLITE BRAND CODE ECOSTAR 03 HITACHI 00 HUGHES 04 RCA 01 SONY 02 SET TOP BOX BRAND . . . . THE REMOTE CONTROL VCR, CABLE, SATELLITE, AND DVD CODES FOR REMOTE CONTROL VCR BRAND CODE EMERSON . . . . . 20, 21, 22, 23 ,24 FISHER 34, 37, 38, 39... HITACHI . 00, 01, 02, 03, 04, 05, 06 JVC 49, 50, 51 MAGNAVOX 12, 13 MITSUBISHI ...
... 07 ZENITH 08 32 CODE PIONEER 29 SCIENTIFIC ATLANTA 30 SATELLITE BRAND CODE ECOSTAR 03 HITACHI 00 HUGHES 04 RCA 01 SONY 02 SET TOP BOX BRAND . . . . THE REMOTE CONTROL VCR, CABLE, SATELLITE, AND DVD CODES FOR REMOTE CONTROL VCR BRAND CODE EMERSON . . . . . 20, 21, 22, 23 ,24 FISHER 34, 37, 38, 39... HITACHI . 00, 01, 02, 03, 04, 05, 06 JVC 49, 50, 51 MAGNAVOX 12, 13 MITSUBISHI ...
Owners Guide
Page 33
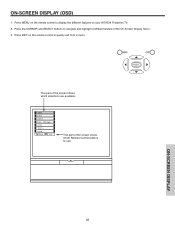
ON-SCREEN DISPLAY (OSD) 1. This part of the screen shows which selections are available. Manager Locks Timers Setup Move SEL Sel This part of the screen shows which Remote Control buttons to use. ON-SCREEN DISPLAY 33 Press EXIT on your HITACHI Projection TV. 2. Video Audio Aspect Chan. Press the CURSOR and SELECT buttons to quickly exit from a menu. Press MENU on the remote control to display the different features on the remote control to navigate and highlight a different feature of the On-Screen Display menu. 3.
ON-SCREEN DISPLAY (OSD) 1. This part of the screen shows which selections are available. Manager Locks Timers Setup Move SEL Sel This part of the screen shows which Remote Control buttons to use. ON-SCREEN DISPLAY 33 Press EXIT on your HITACHI Projection TV. 2. Video Audio Aspect Chan. Press the CURSOR and SELECT buttons to quickly exit from a menu. Press MENU on the remote control to display the different features on the remote control to navigate and highlight a different feature of the On-Screen Display menu. 3.


