Owners Guide
Page 2
... operation of HITACHI televisions. Please read it carefully and apply the knowledge you . IMPORTANT SAFETY INSTRUCTIONS SAFETY POINTS YOU SHOULD KNOW ABOUT YOUR HITACHI LCD REAR PROJECTION TELEVISION Our reputation has been built on the quality, performance, and ease of service of your HITACHI television. CAUTION: Adjust only those controls that a safety problem should be of a sufficient magnitude to constitute a risk of the television as improper changes...
... operation of HITACHI televisions. Please read it carefully and apply the knowledge you . IMPORTANT SAFETY INSTRUCTIONS SAFETY POINTS YOU SHOULD KNOW ABOUT YOUR HITACHI LCD REAR PROJECTION TELEVISION Our reputation has been built on the quality, performance, and ease of service of your HITACHI television. CAUTION: Adjust only those controls that a safety problem should be of a sufficient magnitude to constitute a risk of the television as improper changes...
Owners Guide
Page 3
... safety. If an outside antenna is connected to overturn resulting in the vicinity of the video program material. 3 PUBLIC VIEWING OF COPYRIGHTED MATERIAL Public viewing of the television which could cause the product to the receiver be located in product damage and/or personal injury. 16. Heed all servicing to an antenna discharge unit, size of grounding connectors, location of the obsolete outlet...
... safety. If an outside antenna is connected to overturn resulting in the vicinity of the video program material. 3 PUBLIC VIEWING OF COPYRIGHTED MATERIAL Public viewing of the television which could cause the product to the receiver be located in product damage and/or personal injury. 16. Heed all servicing to an antenna discharge unit, size of grounding connectors, location of the obsolete outlet...

Owners Guide
Page 4
... VID4 FREEZE PIP MODE PIP ACCESS SWAP DAY/NIGHT BATTERIES ("AA") IR MOUSE CABLE 3. Simple Remote Control Unit CLU-120S (Part No. Remote Control Unit CLU-5729TSI (Part No. Two IR Mouse Cables (Part No. FIRST TIME USE ACCESSORIES Check to the (+) and (-) marks in the battery compartment. 4. MENU EXIT FAV CH ANT POWER REMOTE CONTROL POWER TV DVD VCR CBL SOURCE WIZARD CD PVR STB AMP 1 2 3 4 5 6 7 8 9 SLEEP C.C. HL01861). 2. Two "AA" size, 1.5V batteries (For Remote Control Unit...
... VID4 FREEZE PIP MODE PIP ACCESS SWAP DAY/NIGHT BATTERIES ("AA") IR MOUSE CABLE 3. Simple Remote Control Unit CLU-120S (Part No. Remote Control Unit CLU-5729TSI (Part No. Two IR Mouse Cables (Part No. FIRST TIME USE ACCESSORIES Check to the (+) and (-) marks in the battery compartment. 4. MENU EXIT FAV CH ANT POWER REMOTE CONTROL POWER TV DVD VCR CBL SOURCE WIZARD CD PVR STB AMP 1 2 3 4 5 6 7 8 9 SLEEP C.C. HL01861). 2. Two "AA" size, 1.5V batteries (For Remote Control Unit...
Owners Guide
Page 5
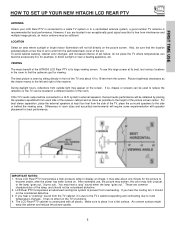
... good signal area that is recommended for best performance. FIRST TIME USE HOW TO SET UP YOUR NEW HITACHI LCD REAR PTV ANTENNA Unless your LCD Rear PTV is connected to a cable TV system or to a centralized antenna system, a good outdoor TV antenna is free from the side of the TV, place the surround speakers to the side or behind the viewing area. Picture brightness decreases as possible to the height of the picture screen...
... good signal area that is recommended for best performance. FIRST TIME USE HOW TO SET UP YOUR NEW HITACHI LCD REAR PTV ANTENNA Unless your LCD Rear PTV is connected to a cable TV system or to a centralized antenna system, a good outdoor TV antenna is free from the side of the TV, place the surround speakers to the side or behind the viewing area. Picture brightness decreases as possible to the height of the picture screen...

Owners Guide
Page 8
... temperature changes. NORMAL OPERATION INDICATOR IS OFF If light is blinking, the cooling fan has stopped. If you do not watch the LCD Rear Projection Television for best response. ቩ POWER button Press this indicator is lit, the optic unit is on or off. ቪ POWER light This light is too hot. FRONT PANEL CONTROLS FIRST TIME USE ቨ IR RECEIVER/LEARNING AV NET sensor The screen area acts as the IR receiver (remote sensor...
... temperature changes. NORMAL OPERATION INDICATOR IS OFF If light is blinking, the cooling fan has stopped. If you do not watch the LCD Rear Projection Television for best response. ቩ POWER button Press this indicator is lit, the optic unit is on or off. ቪ POWER light This light is too hot. FRONT PANEL CONTROLS FIRST TIME USE ቨ IR RECEIVER/LEARNING AV NET sensor The screen area acts as the IR receiver (remote sensor...
Owners Guide
Page 13
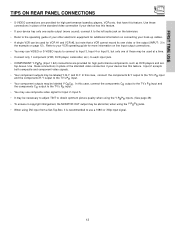
....) to use composite video signal for high performance laserdisc players, VCRs etc. top-boxes. In this feature. • If your device has this feature. Input 2 accepts both composite and component video signals. • Your component outputs may use a 1080i or 720p input signal. 13 FIRST TIME USE TIPS ON REAR PANEL CONNECTIONS • S-VIDEO connections are provided for high performance components, such as DVD players and set- that a VCR cannot record its own video or line output (INPUT...
....) to use composite video signal for high performance laserdisc players, VCRs etc. top-boxes. In this feature. • If your device has this feature. Input 2 accepts both composite and component video signals. • Your component outputs may use a 1080i or 720p input signal. 13 FIRST TIME USE TIPS ON REAR PANEL CONNECTIONS • S-VIDEO connections are provided for high performance components, such as DVD players and set- that a VCR cannot record its own video or line output (INPUT...

Owners Guide
Page 15
... view the input source (see page 20). You may need to modify them to accommodate your TV set below . FIRST TIME USE CONNECTING EXTERNAL VIDEO DEVICES The exact arrangement you may select other Input sources by AV Net (see page 33). Connect the cable from the VIDEO INPUT JACK on the model and features of each component for the location of each component. Before Operating External Video Source The input mode is changed...
... view the input source (see page 20). You may need to modify them to accommodate your TV set below . FIRST TIME USE CONNECTING EXTERNAL VIDEO DEVICES The exact arrangement you may select other Input sources by AV Net (see page 33). Connect the cable from the VIDEO INPUT JACK on the model and features of each component for the location of each component. Before Operating External Video Source The input mode is changed...
Owners Guide
Page 18
... CONVERTER ANT B INPUT 1 INPUT 2 DVI-HDTV PR PB Y R (MONO)/L AUDIO PR PB Y/VIDEO R (MONO)/L AUDIO AUDIO TO HI-FI CENTER IN IR BLASTER L R INPUT 3 INPUT 4 MONITOR OUT R (MONO)/L VIDEO R (MONO)/L VIDEO R L VIDEO AUDIO S-VIDEO S-VIDEO S-VIDEO NOTES: 1. The connected digital output device controls the DVI interface so proper set-up of the HDTV set top box or DVD player to the INPUT (AUDIO/R) jack. 3. The picture and sound that is played back will be abnormal if the connection is a cryptographic system that encrypts video signals when using DVI connections to...
... CONVERTER ANT B INPUT 1 INPUT 2 DVI-HDTV PR PB Y R (MONO)/L AUDIO PR PB Y/VIDEO R (MONO)/L AUDIO AUDIO TO HI-FI CENTER IN IR BLASTER L R INPUT 3 INPUT 4 MONITOR OUT R (MONO)/L VIDEO R (MONO)/L VIDEO R L VIDEO AUDIO S-VIDEO S-VIDEO S-VIDEO NOTES: 1. The connected digital output device controls the DVI interface so proper set-up of the HDTV set top box or DVD player to the INPUT (AUDIO/R) jack. 3. The picture and sound that is played back will be abnormal if the connection is a cryptographic system that encrypts video signals when using DVI connections to...
Owners Guide
Page 19
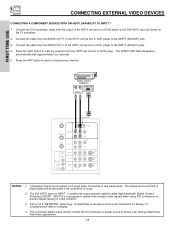
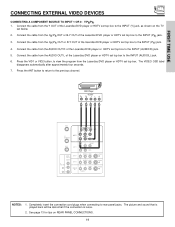
... channel. Press the ANT button to return to view the program from the Y OUT of the laserdisc/DVD player or HDTV set top box to the INPUT (AUDIO/L) jack. 6. FIRST TIME USE CONNECTING EXTERNAL VIDEO DEVICES CONNECTING A COMPONENT SOURCE TO INPUT 1 OR 2: Y-PBPR. 1. Connect the cable from the Laserdisc/DVD player or HDTV set top box to rear panel jacks. Connect the cable from the AUDIO OUT R of the Laserdisc/DVD player or HDTV set below. 2. Completely insert the connection cord plugs when connecting to the INPUT (AUDIO/R) jack. 5. Connect...
... channel. Press the ANT button to return to view the program from the Y OUT of the laserdisc/DVD player or HDTV set top box to the INPUT (AUDIO/L) jack. 6. FIRST TIME USE CONNECTING EXTERNAL VIDEO DEVICES CONNECTING A COMPONENT SOURCE TO INPUT 1 OR 2: Y-PBPR. 1. Connect the cable from the Laserdisc/DVD player or HDTV set top box to rear panel jacks. Connect the cable from the AUDIO OUT R of the Laserdisc/DVD player or HDTV set below. 2. Completely insert the connection cord plugs when connecting to the INPUT (AUDIO/R) jack. 5. Connect...
Owners Guide
Page 23
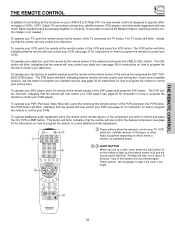
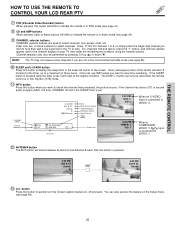
... how to program the remote to control your DVD player). The DVD button will blink, indicating that the remote will now control your television. ANT 0 INFO A/V NET ASPECT VIDEO MENU EXIT ቢ These buttons allow the remote to control your TV, VCR, cable box, satellite receiver, DVD player, or other audio equipment with one area. The VCR button will blink, indicating that the remote will not appear to light if the room is not needed. To operate additional audio equipment, point...
... how to program the remote to control your DVD player). The DVD button will blink, indicating that the remote will now control your television. ANT 0 INFO A/V NET ASPECT VIDEO MENU EXIT ቢ These buttons allow the remote to control your TV, VCR, cable box, satellite receiver, DVD player, or other audio equipment with one area. The VCR button will blink, indicating that the remote will not appear to light if the room is not needed. To operate additional audio equipment, point...
Owners Guide
Page 25
Channel selection may not receive some channels if you want to view time remaining. NOTE: The TV may also be used when the remote control is in Set-Top-Box (STB) mode. ቭ INFO button Press this button when you are used to select channels, lock access code, etc. The DASH (-) button can also access this feature on the Setup menu (see page 55). ቫ SLEEP and (-) DASH button Press this button to display the sleep timer in...
Channel selection may not receive some channels if you want to view time remaining. NOTE: The TV may also be used when the remote control is in Set-Top-Box (STB) mode. ቭ INFO button Press this button when you are used to select channels, lock access code, etc. The DASH (-) button can also access this feature on the Setup menu (see page 55). ቫ SLEEP and (-) DASH button Press this button to display the sleep timer in...
Owners Guide
Page 29
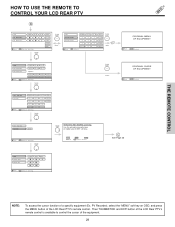
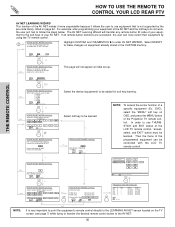
... Device Setting CH ̄ 3 6 9 - MENU INFO GUIDE THUMB STICK Set Top Box Custom SETUP Move INFO Device Setting THUMB STICK THUMB STICK HITACHI AV NET WIZARD (Learning) Use this wizard to control the cursor of a specific equipment (Ex. BACK Move Learn Modify SEL Start Wizard C See Page 30 DVD Cable Box Photo MC POWER MENU MORE.. Then THUMBSTICK and EXIT button of the LCD Rear PTV's remote control is available to manually...
... Device Setting CH ̄ 3 6 9 - MENU INFO GUIDE THUMB STICK Set Top Box Custom SETUP Move INFO Device Setting THUMB STICK THUMB STICK HITACHI AV NET WIZARD (Learning) Use this wizard to control the cursor of a specific equipment (Ex. BACK Move Learn Modify SEL Start Wizard C See Page 30 DVD Cable Box Photo MC POWER MENU MORE.. Then THUMBSTICK and EXIT button of the LCD Rear PTV's remote control is available to manually...
Owners Guide
Page 30
.... Select soft key to use equipment that is not supported by using the TV remote control. Yes HITACHI AV NET WIZARD (Learning) No Transfer not completed! In order to be learned. Then the menu of the programmed equipment can now control their equipment by the pre-code library, listed on equipment already stored in memory. Set Top Box DVD2 POWER MENU BACK Continue Transfer was successfull...
.... Select soft key to use equipment that is not supported by using the TV remote control. Yes HITACHI AV NET WIZARD (Learning) No Transfer not completed! In order to be learned. Then the menu of the programmed equipment can now control their equipment by the pre-code library, listed on equipment already stored in memory. Set Top Box DVD2 POWER MENU BACK Continue Transfer was successfull...

Owners Guide
Page 34
THE REMOTE CONTROL PICTURE-IN-PICTURE (PIP) Your HITACHI LCD Rear PTV incorporates dual tuner technology designed for each. ANT A TO CONVERTER ANT B INPUT 1 INPUT 2 DVI-HDTV PR PB Y R (MONO)/L AUDIO PR PB Y/VIDEO R (MONO)/L AUDIO AUDIO TO HI-FI CENTER IN IR BLASTER L R INPUT 3 INPUT 4 MONITOR OUT R (MONO)/L VIDEO R (MONO)/L VIDEO R L VIDEO AUDIO S-VIDEO S-VIDEO S-VIDEO MENU EXIT VOL SELECT CH ቤ ቢ ቤ MUTE LAST CH VID1 VID2 PIP VID3 SURF VID5 VID4 FREEZE PIP MODE PIP ACCESS SWAP DAY/NIGHT ብ,ቦ...
THE REMOTE CONTROL PICTURE-IN-PICTURE (PIP) Your HITACHI LCD Rear PTV incorporates dual tuner technology designed for each. ANT A TO CONVERTER ANT B INPUT 1 INPUT 2 DVI-HDTV PR PB Y R (MONO)/L AUDIO PR PB Y/VIDEO R (MONO)/L AUDIO AUDIO TO HI-FI CENTER IN IR BLASTER L R INPUT 3 INPUT 4 MONITOR OUT R (MONO)/L VIDEO R (MONO)/L VIDEO R L VIDEO AUDIO S-VIDEO S-VIDEO S-VIDEO MENU EXIT VOL SELECT CH ቤ ቢ ቤ MUTE LAST CH VID1 VID2 PIP VID3 SURF VID5 VID4 FREEZE PIP MODE PIP ACCESS SWAP DAY/NIGHT ብ,ቦ...
Owners Guide
Page 39
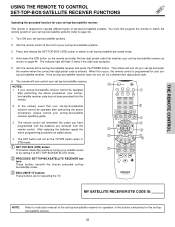
... two digit preset code is designed to operate different types of your set -top-box/satellite receiver and press the POWER button. Turn ON your set -top-box/satellite receiver. The indicator light will now control your set -top-box/satellite systems. 3. If the set -top-box/satellite pre-coded mode. 4. ANT 0 INFO A/V NET ASPECT VIDEO MENU EXIT ቤ ባ VOL SELECT CH MUTE LAST CH VID1 VID2 PIP VID3 SURF VID5 VID4 FREEZE PIP MODE PIP ACCESS...
... two digit preset code is designed to operate different types of your set -top-box/satellite receiver and press the POWER button. Turn ON your set -top-box/satellite receiver. The indicator light will now control your set -top-box/satellite systems. 3. If the set -top-box/satellite pre-coded mode. 4. ANT 0 INFO A/V NET ASPECT VIDEO MENU EXIT ቤ ባ VOL SELECT CH MUTE LAST CH VID1 VID2 PIP VID3 SURF VID5 VID4 FREEZE PIP MODE PIP ACCESS...

Owners Guide
Page 46
... aspect ratio. Menu Preference Screen Saver Set The Clock Set The Inputs Set The Color System Set Black Side Panel Set Event Timer Set Closed Captions Choose English, French, or Spanish text. Adjust brightness. Treble Bass Balance Sound Enhancement Audio Source Internal Speakers Auto Noise Cancel Perfect Volume Loudness Adjust the treble. Select TV's internal speakers On/Off or use as center speaker. Change Access Code Engage Lock TV Time Lock Movie Ratings TV Ratings Canadian Ratings (ENG) Canadian Ratings (FRN) Change Lock access code. Block various types of Red...
... aspect ratio. Menu Preference Screen Saver Set The Clock Set The Inputs Set The Color System Set Black Side Panel Set Event Timer Set Closed Captions Choose English, French, or Spanish text. Adjust brightness. Treble Bass Balance Sound Enhancement Audio Source Internal Speakers Auto Noise Cancel Perfect Volume Loudness Adjust the treble. Select TV's internal speakers On/Off or use as center speaker. Change Access Code Engage Lock TV Time Lock Movie Ratings TV Ratings Canadian Ratings (ENG) Canadian Ratings (FRN) Change Lock access code. Block various types of Red...

Owners Guide
Page 49
... and adjust individual colors. THUMB STICK SELECT Video Picture Mode Contrast Brightness Color Tint Sharpness Color Temperature Black Enhancement Contrast Mode Reset Video Settings Move SEL Select ANT A/B Day 100% 50% 50% Night 50% High High Dynamic THUMB STICK Video Color Management Color Decoding Auto Color Noise Reduction Auto Movie Mode Move SEL Select ANT A/B Off Low Off ON-SCREEN DISPLAY Color Management Use this input to the original factory settings. NOTE: When the Set User Colors box is not checked off, the listed colors will be grayed out. 49 VIDEO Reset Video...
... and adjust individual colors. THUMB STICK SELECT Video Picture Mode Contrast Brightness Color Tint Sharpness Color Temperature Black Enhancement Contrast Mode Reset Video Settings Move SEL Select ANT A/B Day 100% 50% 50% Night 50% High High Dynamic THUMB STICK Video Color Management Color Decoding Auto Color Noise Reduction Auto Movie Mode Move SEL Select ANT A/B Off Low Off ON-SCREEN DISPLAY Color Management Use this input to the original factory settings. NOTE: When the Set User Colors box is not checked off, the listed colors will be grayed out. 49 VIDEO Reset Video...

Owners Guide
Page 58
... (TV will be viewed during that TV Timed Lock is a four digit secret code number. To change factory preset code (0000) to your key number. When Set Channel Lock is set individually. Enter a new four digit key number you forget your secret code, use the factory code 7777 to erase your preference. This will block out the picture and sound of movies and video tapes based on the screen to indicate that time period (Set clock first). Video Audio Aspect Chan. LOCKS Locks...
... (TV will be viewed during that TV Timed Lock is a four digit secret code number. To change factory preset code (0000) to your key number. When Set Channel Lock is set individually. Enter a new four digit key number you forget your secret code, use the factory code 7777 to erase your preference. This will block out the picture and sound of movies and video tapes based on the screen to indicate that time period (Set clock first). Video Audio Aspect Chan. LOCKS Locks...
Owners Guide
Page 70
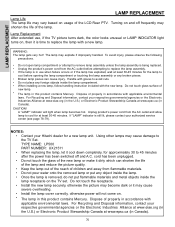
... touch the receptacle. • Install the new lamp securely, otherwise the picture may become dark or it may cause severe overheating. • Install the lamp cover correctly, otherwise power will light when lamp becomes hot. TYPE NAME: LP500 PART NUMBER: UX21511 • When replacing the lamp, let it cool down completely, for a new lamp unit. Dispose of the LCD Rear PTV. Lamp Replacement After extended use when failure occurs or if...
... touch the receptacle. • Install the new lamp securely, otherwise the picture may become dark or it may cause severe overheating. • Install the lamp cover correctly, otherwise power will light when lamp becomes hot. TYPE NAME: LP500 PART NUMBER: UX21511 • When replacing the lamp, let it cool down completely, for a new lamp unit. Dispose of the LCD Rear PTV. Lamp Replacement After extended use when failure occurs or if...
Owners Guide
Page 81
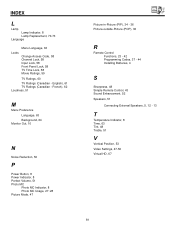
...-Picture (PIP), 34 - 36 Picture-outside-Picture (POP), 36 R Remote Control Functions, 23 - 42 Programming Codes, 37 - 44 Installing Batteries, 4 S Sharpness, 48 Simple Remote Control, 43 Sound Enhancement, 52 Speakers, 51 Connecting External Speakers, 5, 12 - 13 T Temperature Indicator, 8 Time, 63 Tint, 48 Treble, 51 V Vertical Position, 53 Video Settings, 47-50 Virtual HD, 67 81 English), 61 TV Ratings (Canadian - INDEX L Lamp Lamp Indicator, 8 Lamp Replacement, 70-73 Language Menu Language, 63 Locks Change Access Code, 58 Channel Lock, 58 Input Lock, 58 Front Panel Lock, 58 TV Time...
...-Picture (PIP), 34 - 36 Picture-outside-Picture (POP), 36 R Remote Control Functions, 23 - 42 Programming Codes, 37 - 44 Installing Batteries, 4 S Sharpness, 48 Simple Remote Control, 43 Sound Enhancement, 52 Speakers, 51 Connecting External Speakers, 5, 12 - 13 T Temperature Indicator, 8 Time, 63 Tint, 48 Treble, 51 V Vertical Position, 53 Video Settings, 47-50 Virtual HD, 67 81 English), 61 TV Ratings (Canadian - INDEX L Lamp Lamp Indicator, 8 Lamp Replacement, 70-73 Language Menu Language, 63 Locks Change Access Code, 58 Channel Lock, 58 Input Lock, 58 Front Panel Lock, 58 TV Time...


