User Manual
Page 3
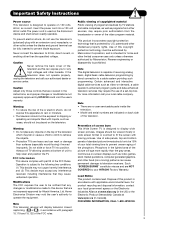
... engineering or disassembly is designed to operate the equipment. Do not slide or force TV into a 120 volt 60 Hz outlet.The power cord is protected by Hitachi America, Ltd. Certain advanced and interactive digital cable services such as video-on-demand, a cable operator's enhanced ...be viewed mostly in Canada). Warning • To reduce the risk of screen burn This Wide Screen TV is capable of receiving analog basic, digital basic cable television programming by HITACHI could void the user's warranty. Note This digital television is designed to a cable system providing such...
... engineering or disassembly is designed to operate the equipment. Do not slide or force TV into a 120 volt 60 Hz outlet.The power cord is protected by Hitachi America, Ltd. Certain advanced and interactive digital cable services such as video-on-demand, a cable operator's enhanced ...be viewed mostly in Canada). Warning • To reduce the risk of screen burn This Wide Screen TV is capable of receiving analog basic, digital basic cable television programming by HITACHI could void the user's warranty. Note This digital television is designed to a cable system providing such...
User Manual
Page 5
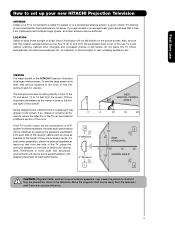
...located in an exceptionally good signal area that the location selected allows a free flow of air to and from the side of the HITACHI Projection Television is free from the screen. To see this large screen at least four feet from the perforated back cover of the set...right of the picture screen center. To avoid cabinet warping, cabinet color changes, and increased chance of set up your new HITACHI Projection Television ANTENNA Unless your TV is recommended for best performance. The best picture is no picture distortion. 5 Move the magnetic field source away from the ...
...located in an exceptionally good signal area that the location selected allows a free flow of air to and from the side of the HITACHI Projection Television is free from the screen. To see this large screen at least four feet from the perforated back cover of the set...right of the picture screen center. To avoid cabinet warping, cabinet color changes, and increased chance of set up your new HITACHI Projection Television ANTENNA Unless your TV is recommended for best performance. The best picture is no picture distortion. 5 Move the magnetic field source away from the ...

User Manual
Page 6
...mixer. Below are connected Attach an optional antenna cable mixer to the TV AIR/CABLE terminal, and connect the cables to inputs and outputs located on the TV. ANTENNA CONNECTIONS TO REAR JACK PANEL (75-Ohm) antenna/CATV (Cable TV) When using a 300-Ohm twin lead from most stores that have... shielded video and audio cables that sell audio/video products. "F" Type 75-Ohm Coaxial Antenna Cable For connecting RF signals (antenna or cable TV) to the TV's HDMI input. HDMI Cable This cable is used to the AIR/CABLE (75-Ohm) terminal . Consult your external devices such as Set-...
...mixer. Below are connected Attach an optional antenna cable mixer to the TV AIR/CABLE terminal, and connect the cables to inputs and outputs located on the TV. ANTENNA CONNECTIONS TO REAR JACK PANEL (75-Ohm) antenna/CATV (Cable TV) When using a 300-Ohm twin lead from most stores that have... shielded video and audio cables that sell audio/video products. "F" Type 75-Ohm Coaxial Antenna Cable For connecting RF signals (antenna or cable TV) to the TV's HDMI input. HDMI Cable This cable is used to the AIR/CABLE (75-Ohm) terminal . Consult your external devices such as Set-...
User Manual
Page 7
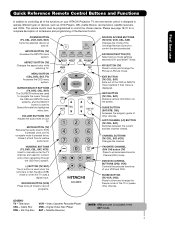
... Favorite Channel (FAV) mode. DAY/NIGHT BUTTON (TV) Select picture mode settings between the current and last channel viewed. Television CBL - POWER BUTTON (TV, CBL, VCR, DVD, SAT) Turns the selected device on your HITACHI Projection TV, the new remote control is designed to operate different... types of devices, such as, DVD Players, CBL (Cable Boxes), set-top-boxes, satellite receivers, and VCRs. FAVORITE CHANNEL (FAV CH) button (TV) Press to complete mute if pressed...
... Favorite Channel (FAV) mode. DAY/NIGHT BUTTON (TV) Select picture mode settings between the current and last channel viewed. Television CBL - POWER BUTTON (TV, CBL, VCR, DVD, SAT) Turns the selected device on your HITACHI Projection TV, the new remote control is designed to operate different... types of devices, such as, DVD Players, CBL (Cable Boxes), set-top-boxes, satellite receivers, and VCRs. FAVORITE CHANNEL (FAV CH) button (TV) Press to complete mute if pressed...
User Manual
Page 8
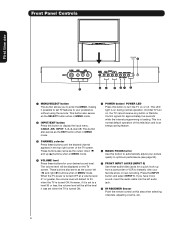
...audio/video jacks for approximately five seconds while the internal programming is turned ON. If you to enter the MENU, making it possible to set TV features to instantly view your favorite show or new recording. However, if it was set to a level 30 or less, the volume level will...¶ FRONT INPUT JACKS (INPUT 5) Use these buttons until the desired channel appears in the top right corner of this button to turn on, the TV cannot receive any button or Remote Control signals for a quick hook-up (̆) buttons when in MENU mode. · INPUT/EXIT button Press this television...
...audio/video jacks for approximately five seconds while the internal programming is turned ON. If you to enter the MENU, making it possible to set TV features to instantly view your favorite show or new recording. However, if it was set to a level 30 or less, the volume level will...¶ FRONT INPUT JACKS (INPUT 5) Use these buttons until the desired channel appears in the top right corner of this button to turn on, the TV cannot receive any button or Remote Control signals for a quick hook-up (̆) buttons when in MENU mode. · INPUT/EXIT button Press this television...

User Manual
Page 9
If you to easily connect a camcorder or VCR as a convenience to front panel jacks. First time use the S-INPUT cable in the following examples: NOTE: 1. Completely insert connection cord plugs when connecting to allow you have a S-VHS VCR, use Front Panel Jacks and Connections The front panel jacks are provided as shown in place of your TV. 9 If you do not, the played back picture may be abnormal. 2. If you have a mono VCR, insert the audio cable into the left audio jack of the standard video cable. 3.
If you to easily connect a camcorder or VCR as a convenience to front panel jacks. First time use the S-INPUT cable in the following examples: NOTE: 1. Completely insert connection cord plugs when connecting to allow you have a S-VHS VCR, use Front Panel Jacks and Connections The front panel jacks are provided as shown in place of your TV. 9 If you do not, the played back picture may be abnormal. 2. If you have a mono VCR, insert the audio cable into the left audio jack of the standard video cable. 3.
User Manual
Page 10
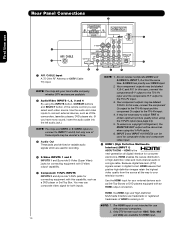
... LLC. VIDEO PB PB ¿ PR PR VIDEO AIR / CABLE AUDIO TO Hi-Fi MONO L MONO MONO MONO OPTICAL OUT Digital Audio Upgrade Card AUDIO TV AS CENTER ³ R ¶ INPUT 1 INPUT 2 INPUT 3 INPUT 4 º » · ¾ ³ AIR /CABLE Input A 75-Ohm RF Antenna...using the Y-PBPR jacks. 6. S-VIDEO has priority over VIDEO input. 2. In this case, connect the components B-Y output to the TV's PB input and the components R-Y output to the TV's PR input. 4. HDMI is not intended for consumer electronics. Only DTV formats such as 1080i, 720p, 480i and 480p are ...
... LLC. VIDEO PB PB ¿ PR PR VIDEO AIR / CABLE AUDIO TO Hi-Fi MONO L MONO MONO MONO OPTICAL OUT Digital Audio Upgrade Card AUDIO TV AS CENTER ³ R ¶ INPUT 1 INPUT 2 INPUT 3 INPUT 4 º » · ¾ ³ AIR /CABLE Input A 75-Ohm RF Antenna...using the Y-PBPR jacks. 6. S-VIDEO has priority over VIDEO input. 2. In this case, connect the components B-Y output to the TV's PB input and the components R-Y output to the TV's PR input. 4. HDMI is not intended for consumer electronics. Only DTV formats such as 1080i, 720p, 480i and 480p are ...
User Manual
Page 11
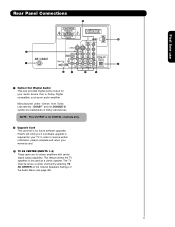
VIDEO PB PB ¿ PR PR VIDEO AIR / CABLE AUDIO TO Hi-Fi MONO L MONO MONO MONO OPTICAL OUT Digital Audio Upgrade Card AUDIO TV AS CENTER ³ R ¶ INPUT 1 INPUT 2 INPUT 3 INPUT 4 º » · ¾ ¶ Optical Out (Digital Audio) This jack ...upgrades. This feature allows the TV speakers to receive written notification, please complete and return your TV. "DOLBY" and the DOUBLE-D symbol are for your warranty card. ¾ TV AS CENTER (INPUTS 1-4) These jacks are trademarks of the Audio Menu (see page 38). 11 Hitachi will notify you if a...
VIDEO PB PB ¿ PR PR VIDEO AIR / CABLE AUDIO TO Hi-Fi MONO L MONO MONO MONO OPTICAL OUT Digital Audio Upgrade Card AUDIO TV AS CENTER ³ R ¶ INPUT 1 INPUT 2 INPUT 3 INPUT 4 º » · ¾ ¶ Optical Out (Digital Audio) This jack ...upgrades. This feature allows the TV speakers to receive written notification, please complete and return your TV. "DOLBY" and the DOUBLE-D symbol are for your warranty card. ¾ TV AS CENTER (INPUTS 1-4) These jacks are trademarks of the Audio Menu (see page 38). 11 Hitachi will notify you if a...
User Manual
Page 12
... inputs to connect to INPUT 1, INPUT 2 or INPUT 5, but only one component to control the volume output by changing the volume of the TV. Composite and Component video signals. 4. Video signals fed through a VCR may be labeled Y, B-Y, and R-Y. This can be used by copyright protection...INPUT 4 accepts both composite and component video signals. • When using the Y-PBPR inputs (see page 34). 12 MACROVISION NOTES: 1. In this TV, except when noted as DVD players and set-topboxes. Rear Panel Connections First time use TIPS ON REAR PANEL CONNECTIONS • S-VIDEO, Y-PBPR and...
... inputs to connect to INPUT 1, INPUT 2 or INPUT 5, but only one component to control the volume output by changing the volume of the TV. Composite and Component video signals. 4. Video signals fed through a VCR may be labeled Y, B-Y, and R-Y. This can be used by copyright protection...INPUT 4 accepts both composite and component video signals. • When using the Y-PBPR inputs (see page 34). 12 MACROVISION NOTES: 1. In this TV, except when noted as DVD players and set-topboxes. Rear Panel Connections First time use TIPS ON REAR PANEL CONNECTIONS • S-VIDEO, Y-PBPR and...
User Manual
Page 13
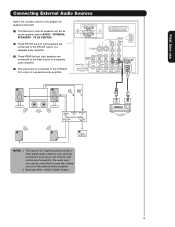
... of the external audio amplifier. 2. See page 39 for speaker placement. ³ The television's internal speakers will act as an A/V receiver with optical input capability. TV AS CENTER). · These FRONT left and right speakers are connected to the FRONT output of a separate audio amplifier. » These REAR left and right...
... of the external audio amplifier. 2. See page 39 for speaker placement. ³ The television's internal speakers will act as an A/V receiver with optical input capability. TV AS CENTER). · These FRONT left and right speakers are connected to the FRONT output of a separate audio amplifier. » These REAR left and right...
User Manual
Page 14
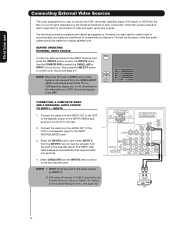
...you use to connect the VCR, camcorder, laserdisc player, DVD player, or HDTV Set Top Box to your TV set to VIDEO and a video signal is not received from the AUDIO OUT of your choice (see page ...21). Connect the cable from the VIDEO INPUT JACK on the back panel of the TV (i.e., VCR/laserdisc player, etc. See page (42) Audio Video OUTPUT VCR 14 NOTE: 1) INPUT 3 can be...VIDEO OUT of the VCR or the laserdisc player to the INPUT (VIDEO) jack, as shown on the TV to the INPUT (MONO)/L(AUDIO) jack. 3. is not connected or the video device is select as suggestions...
...you use to connect the VCR, camcorder, laserdisc player, DVD player, or HDTV Set Top Box to your TV set to VIDEO and a video signal is not received from the AUDIO OUT of your choice (see page ...21). Connect the cable from the VIDEO INPUT JACK on the back panel of the TV (i.e., VCR/laserdisc player, etc. See page (42) Audio Video OUTPUT VCR 14 NOTE: 1) INPUT 3 can be...VIDEO OUT of the VCR or the laserdisc player to the INPUT (VIDEO) jack, as shown on the TV to the INPUT (MONO)/L(AUDIO) jack. 3. is not connected or the video device is select as suggestions...

User Manual
Page 15
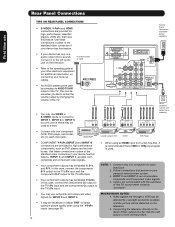
... INPUTS button, then select INPUT 2 from the AUDIO OUT R of the VCR or the laserdisc player to the INPUT (S-VIDEO) jack, as shown on the TV to the right. 2. R LV OUTPUT VCR NOTE: 1. CONNECTING AN S-VIDEO SOURCE TO INPUT 1, 2 AND 5 1. Connect the cable from the INPUTS menu to rear panel jacks... the cable from the AUDIO OUT L of the VCR or the laserdisc player to the INPUT (VIDEO) jack, as shown on the TV to the Y-VIDEO INPUT jack of the TV. Connect the cable from the VIDEO OUT of the VCR or the laserdisc player to the INPUT (AUDIO/R) jack. 3. Select CABLE...
... INPUTS button, then select INPUT 2 from the AUDIO OUT R of the VCR or the laserdisc player to the INPUT (S-VIDEO) jack, as shown on the TV to the right. 2. R LV OUTPUT VCR NOTE: 1. CONNECTING AN S-VIDEO SOURCE TO INPUT 1, 2 AND 5 1. Connect the cable from the INPUTS menu to rear panel jacks... the cable from the AUDIO OUT L of the VCR or the laserdisc player to the INPUT (VIDEO) jack, as shown on the TV to the Y-VIDEO INPUT jack of the TV. Connect the cable from the VIDEO OUT of the VCR or the laserdisc player to the INPUT (AUDIO/R) jack. 3. Select CABLE...

User Manual
Page 16
... DVD player to the right. Select CABLE/AIR from the output of device user settings determines final video appearance. HDMI - The HDMI input on the TV to the HDMI input as shown on INPUT 1 contains the copy protection system called Highbandwidth Digital Content Protection (HDCP). Connect the HDMI or DVI to...
... DVD player to the right. Select CABLE/AIR from the output of device user settings determines final video appearance. HDMI - The HDMI input on the TV to the HDMI input as shown on INPUT 1 contains the copy protection system called Highbandwidth Digital Content Protection (HDCP). Connect the HDMI or DVI to...
User Manual
Page 17
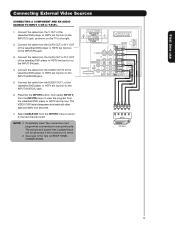
Press the the INPUTS button, then select INPUT 3 from the INPUTS menu to the INPUT (AUDIO/L) jack. 6. See page 12 for tips on the TV to the INPUT (PB) jack. 3. Connect the cable from the AUDIO OUT L of the Laserdisc/DVD player or HDTV set top box to view the ...
Press the the INPUTS button, then select INPUT 3 from the INPUTS menu to the INPUT (AUDIO/L) jack. 6. See page 12 for tips on the TV to the INPUT (PB) jack. 3. Connect the cable from the AUDIO OUT L of the Laserdisc/DVD player or HDTV set top box to view the ...
User Manual
Page 18
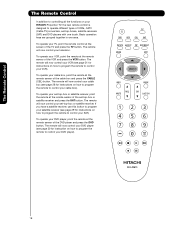
..., point the remote at the screen of the DVD player and press the DVD button. To operate your VCR). The remote will now control your HITACHI Projection TV, the new remote control is designed to operate different types of the cable box and press the CABLE (CBL) button. If you have a satellite...) and DVD players with one area. The remote will now control your DVD player, point the remote at the remote sensor of the TV and press the TV button. The remote will now control your DVD player (see page 28 for instruction on how to program the remote to control your cable...
..., point the remote at the screen of the DVD player and press the DVD button. To operate your VCR). The remote will now control your HITACHI Projection TV, the new remote control is designed to operate different types of the cable box and press the CABLE (CBL) button. If you have a satellite...) and DVD players with one area. The remote will now control your DVD player, point the remote at the remote sensor of the TV and press the TV button. The remote will now control your DVD player (see page 28 for instruction on how to program the remote to control your cable...

User Manual
Page 19
...; Freeze Freeze Freeze EXIT ¿ DAY/NIGHT button Press this button to turn the TV set on or off when the remote is in TV mode. (See page 20 for instructions on how to set the remote control to TV ³ mode.) · · MODE buttons These buttons allow the remote to ...control your TV, ² VCR, DVD, Cable box/Satellite box depending on ¿ which button is pressed. ´ ¶ » PAUSE button º µ Press...
...; Freeze Freeze Freeze EXIT ¿ DAY/NIGHT button Press this button to turn the TV set on or off when the remote is in TV mode. (See page 20 for instructions on how to set the remote control to TV ³ mode.) · · MODE buttons These buttons allow the remote to ...control your TV, ² VCR, DVD, Cable box/Satellite box depending on ¿ which button is pressed. ´ ¶ » PAUSE button º µ Press...

User Manual
Page 20
... the original 16:9 aspect ratio. 16:9 ZOOM Use this aspect to prevent uneven aging of the source. How to Use the Remote to Control Your TV ´ ASPECT button Press this button to display conventional (4:3) images. Note: Use this mode for only 15% of your total viewing time to Zoom-in...
... the original 16:9 aspect ratio. 16:9 ZOOM Use this aspect to prevent uneven aging of the source. How to Use the Remote to Control Your TV ´ ASPECT button Press this button to display conventional (4:3) images. Note: Use this mode for only 15% of your total viewing time to Zoom-in...

User Manual
Page 21
... show the aspect condition of the (CBL), and (SAT/STB). INPUTS INFO button display for Analog Channels INFO 12:00PM Air 8 FOX ST STEREO CC TV-PG DLSV Day AUTO VIEW --:--AM --:--AM HD 1080i 16:9 Standard Input 3 Input 4 Input 5 Air / Cable Input 1 Move SEL Select INFO button display ...signal. ¶ PICTURE-IN-PICTURE button See separate section on pages 23-27 for Digital Channels INFO 12:00PM Air 118 - 111 CBS MULTI DTVCC TV-PG DLSV 1080i Format The Remote Control INPUT 1 Select to choose Input 4. button to return to choose Input 3. Mainly it is blocked. 21 ...
... show the aspect condition of the (CBL), and (SAT/STB). INPUTS INFO button display for Analog Channels INFO 12:00PM Air 8 FOX ST STEREO CC TV-PG DLSV Day AUTO VIEW --:--AM --:--AM HD 1080i 16:9 Standard Input 3 Input 4 Input 5 Air / Cable Input 1 Move SEL Select INFO button display ...signal. ¶ PICTURE-IN-PICTURE button See separate section on pages 23-27 for Digital Channels INFO 12:00PM Air 118 - 111 CBS MULTI DTVCC TV-PG DLSV 1080i Format The Remote Control INPUT 1 Select to choose Input 4. button to return to choose Input 3. Mainly it is blocked. 21 ...

User Manual
Page 22
... Cable 6 MUTE Soft Mute 8 FAV CH Cable 6 Mute 8 Closed Captioning will default to 30 when the TV is GREEN. However, if it is set to a level 30 or less, the volume level will know you... normal volume (SOFT MUTE) to Favorite (FAV) channel mode. Enter 0 first for the TV to tune. When the TV power is turned on . You can also delete a channel from WHITE to highlighted GREEN. Channel...You will be used to select channels, lock access code, etc. How to Use the Remote to Control Your TV Ƹ VOLUME (VOL), MUTE button Press the VOLUME button (̆ or ̄) until you wish to tune...
... Cable 6 MUTE Soft Mute 8 FAV CH Cable 6 Mute 8 Closed Captioning will default to 30 when the TV is GREEN. However, if it is set to a level 30 or less, the volume level will know you... normal volume (SOFT MUTE) to Favorite (FAV) channel mode. Enter 0 first for the TV to tune. When the TV power is turned on . You can also delete a channel from WHITE to highlighted GREEN. Channel...You will be used to select channels, lock access code, etc. How to Use the Remote to Control Your TV Ƹ VOLUME (VOL), MUTE button Press the VOLUME button (̆ or ̄) until you wish to tune...
User Manual
Page 23
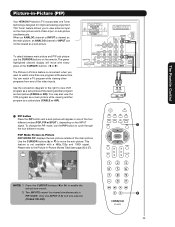
...buttons (̇ or ̈) to view antenna input on the main picture and a Video Input on the remote. Picture-in-Picture (PIP) Your HITACHI Projection TV incorporates one of the four different modes (POP, PIP or SPLIT ), depending on the INPUT signal. This Tuner feature allows you want to move ...179; PIP button Press the PIP button and a sub-picture will move the sub-picture. Use the CURSOR buttons (̆ or ̄) to watch a TV program while viewing other programs from any of the CURSOR buttons (̇ or ̈). This feature is convenient when you to enable the sub-picture...
...buttons (̇ or ̈) to view antenna input on the main picture and a Video Input on the remote. Picture-in-Picture (PIP) Your HITACHI Projection TV incorporates one of the four different modes (POP, PIP or SPLIT ), depending on the INPUT signal. This Tuner feature allows you want to move ...179; PIP button Press the PIP button and a sub-picture will move the sub-picture. Use the CURSOR buttons (̆ or ̄) to watch a TV program while viewing other programs from any of the CURSOR buttons (̇ or ̈). This feature is convenient when you to enable the sub-picture...


