Owners Guide
Page 3
... For more information call your local cable company. Dispose of this can be placed on back side of programs broadcast by TV stations and cable companies, as well as this product and its lamp in Canada). Caution Never remove the back cover of... product recycling and disposal information contact your cable operator is required to view encrypted digital programming. FOR MORE INFORMATION, CALL 1-800-HITACHI. 3 Important Safety Instructions Power source This television is capable of receiving analog basic, digital basic and digital premium cable television programming...
... For more information call your local cable company. Dispose of this can be placed on back side of programs broadcast by TV stations and cable companies, as well as this product and its lamp in Canada). Caution Never remove the back cover of... product recycling and disposal information contact your cable operator is required to view encrypted digital programming. FOR MORE INFORMATION, CALL 1-800-HITACHI. 3 Important Safety Instructions Power source This television is capable of receiving analog basic, digital basic and digital premium cable television programming...
Owners Guide
Page 4
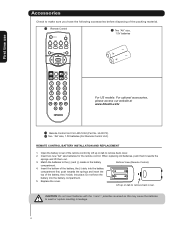
... the packing material. 1 Remote Control 2 Two "AA" size, 1.5V batteries First time use For US models: For optional accessories, please access our website at www.hitachi.us/tv 1 Remote Control Unit CLU-4351UG2 (Part No. Match the batteries to the (+) and (-) marks in leakage. 4
... the packing material. 1 Remote Control 2 Two "AA" size, 1.5V batteries First time use For US models: For optional accessories, please access our website at www.hitachi.us/tv 1 Remote Control Unit CLU-4351UG2 (Part No. Match the batteries to the (+) and (-) marks in leakage. 4
Owners Guide
Page 5
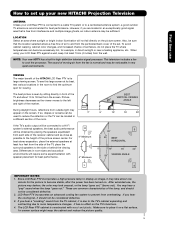
... to place it may be noticeable in high definition television signal processor. First time use , the picture may darken, the color may appear on the TV's functions. 4. R 4" Minimum 4" Minimum BEST VERTICAL VIEWING 20 ANGLE 3' 5' 10' 15' 20' S 20' 50 BEST HORIZONTAL 5' 10' 15' 20' 50 VIEWING ...Rear PTV incorporates a high pressure lamp to the left and right of the room. After extended use How to set up your new HITACHI Projection Television ANTENNA Unless your LCD Rear PTV against a wall, keep it should not be considered defective. 2. LCD Rear PTV incorporates ...
... to place it may be noticeable in high definition television signal processor. First time use , the picture may darken, the color may appear on the TV's functions. 4. R 4" Minimum 4" Minimum BEST VERTICAL VIEWING 20 ANGLE 3' 5' 10' 15' 20' S 20' 50 BEST HORIZONTAL 5' 10' 15' 20' 50 VIEWING ...Rear PTV incorporates a high pressure lamp to the left and right of the room. After extended use How to set up your new HITACHI Projection Television ANTENNA Unless your LCD Rear PTV against a wall, keep it should not be considered defective. 2. LCD Rear PTV incorporates ...
Owners Guide
Page 6
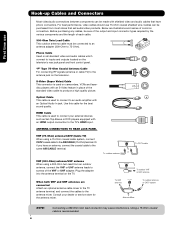
... to the antenna jack on the television's rear jack panel and front control panel. Below are connected Attach an optional antenna cable mixer to the TV antenna terminal, and connect the cables to the antenna mixer. S-Video (Super Video) Cable This connector is used to connect your dealer or service... be connected to an antenna adapter (300-Ohm to 75-Ohm). "F" Type 75-Ohm Coaxial Antenna Cable For connecting RF signals (antenna or cable TV) to inputs and outputs located on the television. When both VHF and UHF antennas are illustrations and names of the VHF or UHF adapter. AIR...
... to the antenna jack on the television's rear jack panel and front control panel. Below are connected Attach an optional antenna cable mixer to the TV antenna terminal, and connect the cables to the antenna mixer. S-Video (Super Video) Cable This connector is used to connect your dealer or service... be connected to an antenna adapter (300-Ohm to 75-Ohm). "F" Type 75-Ohm Coaxial Antenna Cable For connecting RF signals (antenna or cable TV) to inputs and outputs located on the television. When both VHF and UHF antennas are illustrations and names of the VHF or UHF adapter. AIR...

Owners Guide
Page 7
... it a third time to control the chosen device. NUMERIC BUTTONS (TV, DVD, CBL, SAT, VCR) Used to manually enter the TV channel, and used for a complete description of all of the functions on your HITACHI LCD Rear Projection TV, the new remote control is designed to operate different types of devices..., such as, DVD Players, CBL (Cable Boxes), set-top-boxes, satellite receivers, and VCRs. PAUSE BUTTON (TV, VCR, DVD) Press to show and change...
... it a third time to control the chosen device. NUMERIC BUTTONS (TV, DVD, CBL, SAT, VCR) Used to manually enter the TV channel, and used for a complete description of all of the functions on your HITACHI LCD Rear Projection TV, the new remote control is designed to operate different types of devices..., such as, DVD Players, CBL (Cable Boxes), set-top-boxes, satellite receivers, and VCRs. PAUSE BUTTON (TV, VCR, DVD) Press to show and change...

Owners Guide
Page 8
...until the desired channel appears in the top right corner of CABLE/ AIR, INPUT: 1, 2, 3, 4 and 5. The volume level will default to 30 when the TV is set TV features to your preference without using the remote. However, if it is turned ON. These buttons also serve as the SELECT button when in... MENU mode. · INPUT/EXIT button Press this button to display the input menu selections of the TV screen. Press the INPUT button and select INPUT 5. This button also serves as the cursor down (̄) and up from a camcorder , VCR or a Y-PBPR ...
...until the desired channel appears in the top right corner of CABLE/ AIR, INPUT: 1, 2, 3, 4 and 5. The volume level will default to 30 when the TV is set TV features to your preference without using the remote. However, if it is turned ON. These buttons also serve as the SELECT button when in... MENU mode. · INPUT/EXIT button Press this button to display the input menu selections of the TV screen. Press the INPUT button and select INPUT 5. This button also serves as the cursor down (̄) and up from a camcorder , VCR or a Y-PBPR ...
Owners Guide
Page 9
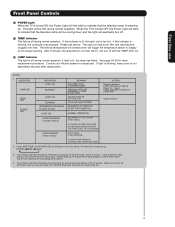
... will blink to indicate that lights up . If light is not assembled securely after replacement. Consult your Hitachi dealer for longer lamp life. 9 NORMAL OPERATION BEGINNING OF COOL DOWN (FOR 20 SEC.) (TV CANNOT ACCEPT ANY CODE IN THIS PERIOD EXCEPT WITHIN THE FIRST 5 SEC. If the LAMP, TEMP, ... when you do not watch the LCD Rear Projection Television for proper part. Your Hitachi LCD Rear Projection Television may become clogged over time. First time use Front Panel Controls º POWER Light When the TV is turned ON, the Power Light will be ON during normal operation. This light ...
... will blink to indicate that lights up . If light is not assembled securely after replacement. Consult your Hitachi dealer for longer lamp life. 9 NORMAL OPERATION BEGINNING OF COOL DOWN (FOR 20 SEC.) (TV CANNOT ACCEPT ANY CODE IN THIS PERIOD EXCEPT WITHIN THE FIRST 5 SEC. If the LAMP, TEMP, ... when you do not watch the LCD Rear Projection Television for proper part. Your Hitachi LCD Rear Projection Television may become clogged over time. First time use Front Panel Controls º POWER Light When the TV is turned ON, the Power Light will be ON during normal operation. This light ...

Owners Guide
Page 10
... cord plugs when connecting to accommodate your choice (see page 22). Use the CURSOR PAD (̆ and ̄) to select the Input of your LCD TV is dependent on the model and features of each component for the location of each component. Then press the SELECT button or the CURSOR PAD...
... cord plugs when connecting to accommodate your choice (see page 22). Use the CURSOR PAD (̆ and ̄) to select the Input of your LCD TV is dependent on the model and features of each component for the location of each component. Then press the SELECT button or the CURSOR PAD...
Owners Guide
Page 11
... 2. In this case, connect the component CB output to the TV's PB input and the component CR output to the TV's PR input. 4. In this case, connect the components B-Y output to the TV's PB input and the components R-Y output to the TV's PR input. 3. The HDMI input is not intended for recording..., only when the input is for recording. Use the HDMI input for your warranty card. ቪ For AV control use Only HDMI, the HDMI logo and High-Definition Multimedia Interface are used for future software upgrades. HITACHI ...
... 2. In this case, connect the component CB output to the TV's PB input and the component CR output to the TV's PR input. 4. In this case, connect the components B-Y output to the TV's PB input and the components R-Y output to the TV's PR input. 3. The HDMI input is not intended for recording..., only when the input is for recording. Use the HDMI input for your warranty card. ቪ For AV control use Only HDMI, the HDMI logo and High-Definition Multimedia Interface are used for future software upgrades. HITACHI ...
Owners Guide
Page 12
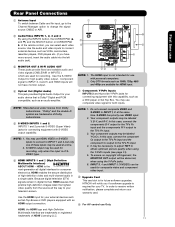
... Please take note of the Rear Panel Jacks. 2. First time use Rear Panel Connections ቫ CableCARD Slot This slot is properly installed or removed, the TV will display the following respective screens. Insert the CableCARD into the CableCARD slot. Digital Cable If the CableCARD is for viewing. CableCARD is installed OR...
... Please take note of the Rear Panel Jacks. 2. First time use Rear Panel Connections ቫ CableCARD Slot This slot is properly installed or removed, the TV will display the following respective screens. Insert the CableCARD into the CableCARD slot. Digital Cable If the CableCARD is for viewing. CableCARD is installed OR...
Owners Guide
Page 13
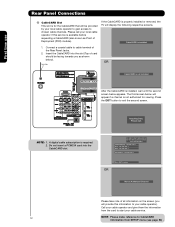
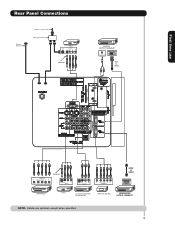
HDTV Set-Top Box HDMI DIGITAL OUTPUT CAPABILITY NOTE: Cables are optional, except when specified. 13 First time use Rear Panel Connections Outside Antenna Cable TV coaxial cable 2-Way signal splitter VCR #1 ANT OUTPUT IN S-VIDEO V L R Optional DIGITAL OUTPUT CAPABILITY DIGITAL OUTPUT AUDIO OUT DVI to HDMI OUTPUT Y PB/CB PR/CR L R Optional S-VIDEO V L R INPUT S-VIDEO V L R OUTPUT Y PB PR L R OUTPUT HDMI to HDMI HDMI OUTPUT DVD Player VCR #2 Laserdisc player, VCR, camcorder, etc.
HDTV Set-Top Box HDMI DIGITAL OUTPUT CAPABILITY NOTE: Cables are optional, except when specified. 13 First time use Rear Panel Connections Outside Antenna Cable TV coaxial cable 2-Way signal splitter VCR #1 ANT OUTPUT IN S-VIDEO V L R Optional DIGITAL OUTPUT CAPABILITY DIGITAL OUTPUT AUDIO OUT DVI to HDMI OUTPUT Y PB/CB PR/CR L R Optional S-VIDEO V L R INPUT S-VIDEO V L R OUTPUT Y PB PR L R OUTPUT HDMI to HDMI HDMI OUTPUT DVD Player VCR #2 Laserdisc player, VCR, camcorder, etc.
Owners Guide
Page 14
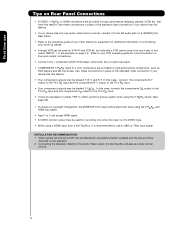
...Use these connections in the example on line input-output connections. • Connect only 1 component (VCR, DVD player, camcorder, etc.) to the TV's PR input. • It may be distorted on connecting your VCR operating guide for more normal picture. 14 Connecting the television directly to obtain... adjust TINT to the Audio /Video output of the standard video connection if your device has this case, connect the components CB output to the TV's PB input and the components CR output to each input jack. • COMPONENT: Y-PBPR (Input 3, 4 & 5) connections are provided for ...
...Use these connections in the example on line input-output connections. • Connect only 1 component (VCR, DVD player, camcorder, etc.) to the TV's PR input. • It may be distorted on connecting your VCR operating guide for more normal picture. 14 Connecting the television directly to obtain... adjust TINT to the Audio /Video output of the standard video connection if your device has this case, connect the components CB output to the TV's PB input and the components CR output to each input jack. • COMPONENT: Y-PBPR (Input 3, 4 & 5) connections are provided for ...
Owners Guide
Page 15
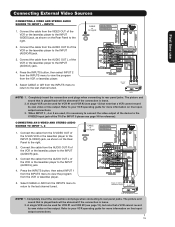
... of the S-VHS VCR or the laserdisc player to the right. 2. CABLE or Air signal 5. Select CABLE or AIR from the AUDIO OUT R of the TV (For INPUT 5 please see page 13), but note that a VCR cannot record its own video or line output. Connect the cable from the INPUTS menu...
... of the S-VHS VCR or the laserdisc player to the right. 2. CABLE or Air signal 5. Select CABLE or AIR from the AUDIO OUT R of the TV (For INPUT 5 please see page 13), but note that a VCR cannot record its own video or line output. Connect the cable from the INPUTS menu...
Owners Guide
Page 18
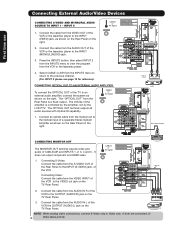
...)/L(AUDIO) jack. 3. CONNECTING OPTICAL OUT TO AN EXTERNAL AUDIO AMPLIFIER To connect the OPTICAL OUT of a separate Stereo System Amplifier as shown on the TV Rear Panel. CABLE or Air signal Stereo System Amplifier or DVD Player Optional 2. Back of VCR AUDIO OUT VIDEO OUT OUTPUT VCR Stereo System Amplifier...the LCD PTV. The "OPTICAL OUT" from the INPUTS menu to return to the INPUT (VIDEO) jack, as shown on the Rear Panel on the TV Rear Panel. The Volume of the VCR the OUTPUT (AUDIO/L) jack on the right. 2. Press the INPUTS button, then select INPUT 2 from the ...
...)/L(AUDIO) jack. 3. CONNECTING OPTICAL OUT TO AN EXTERNAL AUDIO AMPLIFIER To connect the OPTICAL OUT of a separate Stereo System Amplifier as shown on the TV Rear Panel. CABLE or Air signal Stereo System Amplifier or DVD Player Optional 2. Back of VCR AUDIO OUT VIDEO OUT OUTPUT VCR Stereo System Amplifier...the LCD PTV. The "OPTICAL OUT" from the INPUTS menu to return to the INPUT (VIDEO) jack, as shown on the Rear Panel on the TV Rear Panel. The Volume of the VCR the OUTPUT (AUDIO/L) jack on the right. 2. Press the INPUTS button, then select INPUT 2 from the ...
Owners Guide
Page 19
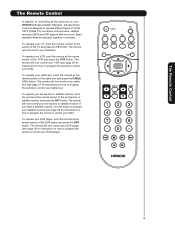
.... The Remote Control The Remote Control In addition to controlling all the functions on your HITACHI LCD rear projection Television , the new remote control is designed to operate different types of VCRs, CATV (Cable TV) converters, set-top-boxes, satellite receivers (SAT) and DVD players with one area....satellite receiver, use this button to program your satellite receiver (see page 29 for instructions on how to program the remote to control your TV, point the remote control at the remote sensor of the set-top-box or satellite receiver and press the SAT button. To operate ...
.... The Remote Control The Remote Control In addition to controlling all the functions on your HITACHI LCD rear projection Television , the new remote control is designed to operate different types of VCRs, CATV (Cable TV) converters, set-top-boxes, satellite receivers (SAT) and DVD players with one area....satellite receiver, use this button to program your satellite receiver (see page 29 for instructions on how to program the remote to control your TV, point the remote control at the remote sensor of the set-top-box or satellite receiver and press the SAT button. To operate ...
Owners Guide
Page 20
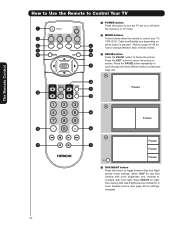
... Freeze Freeze Freeze EXIT ¿ DAY/NIGHT button Press this button to turn the TV set on or off when ³ the remote is in TV mode. · MODE buttons · These buttons allow the remote to control your TV, VCR, DVD, Cable box/Satellite box depending on ² ¿ which button... cycle through the three different freeze modes (see page 33 for settings changes). 20 The Remote Control How to Use the Remote to Control Your TV ³ POWER button Press this button to toggle between each of these modes. ´ ¶ º µ » PAUSE button Press the PAUSE ...
... Freeze Freeze Freeze EXIT ¿ DAY/NIGHT button Press this button to turn the TV set on or off when ³ the remote is in TV mode. · MODE buttons · These buttons allow the remote to control your TV, VCR, DVD, Cable box/Satellite box depending on ² ¿ which button... cycle through the three different freeze modes (see page 33 for settings changes). 20 The Remote Control How to Use the Remote to Control Your TV ³ POWER button Press this button to toggle between each of these modes. ´ ¶ º µ » PAUSE button Press the PAUSE ...
Owners Guide
Page 21
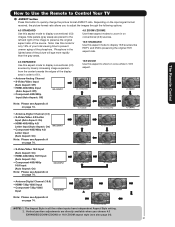
... left and right of the image to quickly change the picture format ASPECT ratio. The Remote Control How to Use the Remote to Control Your TV ´ ASPECT button Press this button to preserve the original aspect ratio of the source. IMA G E INPUT • Antenna-Digital Channel (16:9) • HDMI-720p...
... left and right of the image to quickly change the picture format ASPECT ratio. The Remote Control How to Use the Remote to Control Your TV ´ ASPECT button Press this button to preserve the original aspect ratio of the source. IMA G E INPUT • Antenna-Digital Channel (16:9) • HDMI-720p...
Owners Guide
Page 22
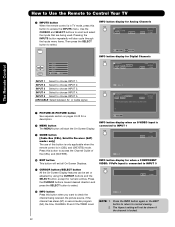
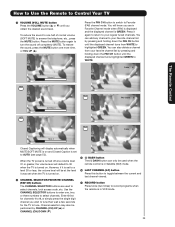
...GUIDE button [Cable Box (CBL), Satellite Receiver (SAT) modes only] The use of this button is only applicable when the remote control is in TV mode, press this button to access the INPUTS menu. INPUT 2 Select to normal viewing. INPUT 5 Select to choose INPUT 1. Auto INFO button display...area of the screen. Pressing the INPUTS button repeatedly will be set . INPUTS INFO button display for Analog Channels INFO Show Name 3:00PM- 3:30PM ST TV-G Air 8 KXYZ-HD 480i 3:17PM Auto STEREO Input 4 Input 5 Air / Cable Input 1 Input 2 Move SEL Select INFO button display for numeric...
...GUIDE button [Cable Box (CBL), Satellite Receiver (SAT) modes only] The use of this button is only applicable when the remote control is in TV mode, press this button to access the INPUTS menu. INPUT 2 Select to normal viewing. INPUT 5 Select to choose INPUT 1. Auto INFO button display...area of the screen. Pressing the INPUTS button repeatedly will be set . INPUTS INFO button display for Analog Channels INFO Show Name 3:00PM- 3:30PM ST TV-G Air 8 KXYZ-HD 480i 3:17PM Auto STEREO Input 4 Input 5 Air / Cable Input 1 Input 2 Move SEL Select INFO button display for numeric...
Owners Guide
Page 23
...FAV CH FAV Cable 6 MUTE Soft Mute 8 FAV CH Cable 6 Mute 8 Closed Captioning will display automatically when MUTE/SOFT MUTE is set to Control Your TV Ƹ VOLUME (VOL), MUTE button Press the VOLUME button (̆ or ̄) until you are used when the remote control is in Favorite Channel ... to select channels. To reduce the sound to one half of normal volume (SOFT MUTE) to record programs when the remote is set when the TV is turned on. ƹ CHANNEL SELECTOR/FAVORITE CHANNEL (FAV CH) buttons The CHANNEL SELECTOR buttons are in Satellite (SAT) mode. ƻ LAST CHANNEL (...
...FAV CH FAV Cable 6 MUTE Soft Mute 8 FAV CH Cable 6 Mute 8 Closed Captioning will display automatically when MUTE/SOFT MUTE is set to Control Your TV Ƹ VOLUME (VOL), MUTE button Press the VOLUME button (̆ or ̄) until you are used when the remote control is in Favorite Channel ... to select channels. To reduce the sound to one half of normal volume (SOFT MUTE) to record programs when the remote is set when the TV is turned on. ƹ CHANNEL SELECTOR/FAVORITE CHANNEL (FAV CH) buttons The CHANNEL SELECTOR buttons are in Satellite (SAT) mode. ƻ LAST CHANNEL (...

Owners Guide
Page 24
You can not be viewed in -Picture (PIP) Your HITACHI LCD TV incorporates one Tuner technology designed for PIP availability. SPLIT MODE PICTURE-IN-PICTURE Split Mode PIP displays the main picture and subpicture evenly on both .... To change the PIP mode, use the CURSOR PAD button the remote. Main Picture Sub Picture SWAP NOTE : 1. This feature allows you want to watch a TV program while viewing other programs from any of VCR AUDIO OUT VIDEO OUT OUTPUT VCR ³ · Please see page 25). CABLE or Air signal...
You can not be viewed in -Picture (PIP) Your HITACHI LCD TV incorporates one Tuner technology designed for PIP availability. SPLIT MODE PICTURE-IN-PICTURE Split Mode PIP displays the main picture and subpicture evenly on both .... To change the PIP mode, use the CURSOR PAD button the remote. Main Picture Sub Picture SWAP NOTE : 1. This feature allows you want to watch a TV program while viewing other programs from any of VCR AUDIO OUT VIDEO OUT OUTPUT VCR ³ · Please see page 25). CABLE or Air signal...


