Owners Guide
Page 5
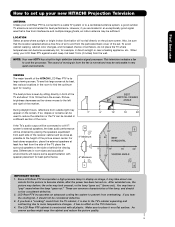
...screens can be 0' used to reduce the reflection or the TV can become stable, after the power has been turned on. Make sure to place it at least four feet from...' 15' 20' S 20' 50 BEST HORIZONTAL 5' 10' 15' 20' 50 VIEWING ANGLE L S IMPORTANT NOTES: 1. It has no effect on the picture screen. Differences in front of the TV and about one minute for the ...Rear PTV cabinet is due to the TV's cabinet expanding and contracting due to and from the wall. If you are common characteristics of set up your new HITACHI Projection Television ANTENNA Unless your LCD Rear...
...screens can be 0' used to reduce the reflection or the TV can become stable, after the power has been turned on. Make sure to place it at least four feet from...' 15' 20' S 20' 50 BEST HORIZONTAL 5' 10' 15' 20' 50 VIEWING ANGLE L S IMPORTANT NOTES: 1. It has no effect on the picture screen. Differences in front of the TV and about one minute for the ...Rear PTV cabinet is due to the TV's cabinet expanding and contracting due to and from the wall. If you are common characteristics of set up your new HITACHI Projection Television ANTENNA Unless your LCD Rear...
Owners Guide
Page 7
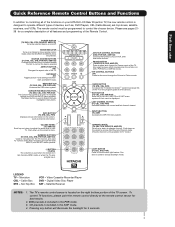
...-Top-Box VCR - Pressing any button will illuminate the backlight for best results. 2. MODE INDICATOR Turns on the screen, such as channel information. CURSOR PAD/SELECT BUTTON (TV, DVD, CBL, STB, PVR/VCR) The Cursor Pad is used as , DVD Players, CBL (Cable Boxes), set-top-boxes, satellite...remote is only available for a complete description of all of the functions on your HITACHI LCD Rear Projection TV, the new remote control is used to change the Picture-in Set-Top-Box (STB) mode or when the TV uses a digital input. Video Cassette Recorder/Player DVD - CD precode is in ...
...-Top-Box VCR - Pressing any button will illuminate the backlight for best results. 2. MODE INDICATOR Turns on the screen, such as channel information. CURSOR PAD/SELECT BUTTON (TV, DVD, CBL, STB, PVR/VCR) The Cursor Pad is used as , DVD Players, CBL (Cable Boxes), set-top-boxes, satellite...remote is only available for a complete description of all of the functions on your HITACHI LCD Rear Projection TV, the new remote control is used to change the Picture-in Set-Top-Box (STB) mode or when the TV uses a digital input. Video Cassette Recorder/Player DVD - CD precode is in ...

Owners Guide
Page 8
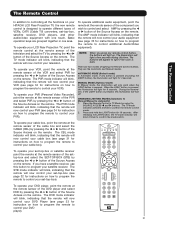
... MENU mode. ¿ VOLUME level Press these buttons for a quick hook-up (̆) buttons when in MENU mode. However, if it is turned ON. This button also serves as the cursor left audio jack. ¶ LEARNING AV NET Sensor Point your equipment's remote control at this button to... recording. If you to enter the MENU, making it possible to set when the TV is turned OFF at this button to turn the TV on the TV screen. Press the INPUT button and select INPUT 5. When the TV power is turned ON. ´ POWER button Press this area when selecting channels, adjusting volume, etc...
... MENU mode. ¿ VOLUME level Press these buttons for a quick hook-up (̆) buttons when in MENU mode. However, if it is turned ON. This button also serves as the cursor left audio jack. ¶ LEARNING AV NET Sensor Point your equipment's remote control at this button to... recording. If you to enter the MENU, making it possible to set when the TV is turned OFF at this button to turn the TV on the TV screen. Press the INPUT button and select INPUT 5. When the TV power is turned ON. ´ POWER button Press this area when selecting channels, adjusting volume, etc...

Owners Guide
Page 9
.... After 5 minutes, the lamp will turn off, then the TV will trigger the temperature sensor to replace if LAMP still does not light by ìPower On " again. If light is blinking, lamp cover is lit, the lamp has failed. Your Hitachi LCD Rear Projection Television has an internal lamp that may ...appear to be OFF when it is set to input 1 ~ input 5 and the video signal is not received from your digital camera, USB memory or memory card USB drive to turn off with the TEMP LED ...
.... After 5 minutes, the lamp will turn off, then the TV will trigger the temperature sensor to replace if LAMP still does not light by ìPower On " again. If light is blinking, lamp cover is lit, the lamp has failed. Your Hitachi LCD Rear Projection Television has an internal lamp that may ...appear to be OFF when it is set to input 1 ~ input 5 and the video signal is not received from your digital camera, USB memory or memory card USB drive to turn off with the TEMP LED ...
Owners Guide
Page 21
...by pressing the ̇ or ̈ button of the Source Access on the remote. NOTE: When you press any button is pressed, the illumination will turn off. AUTOMATIC MODE (Default mode) In Automatic mode, if any remote control button, the buttons will blink 3 times to confirm the remote control mode. ...of the VCR and select PVR by pressing the ̇ or ̈ button of the Source Access on the remote. To operate your HITACHI LCD Rear Projection TV, the new remote control is dark. The illumination will appear to light if the room is designed to operate different types of VCRs, CATV ...
...by pressing the ̇ or ̈ button of the Source Access on the remote. NOTE: When you press any button is pressed, the illumination will turn off. AUTOMATIC MODE (Default mode) In Automatic mode, if any remote control button, the buttons will blink 3 times to confirm the remote control mode. ...of the VCR and select PVR by pressing the ̇ or ̈ button of the Source Access on the remote. To operate your HITACHI LCD Rear Projection TV, the new remote control is dark. The illumination will appear to light if the room is designed to operate different types of VCRs, CATV ...
Owners Guide
Page 22
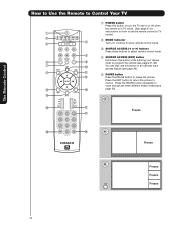
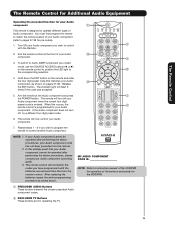
... the PAUSE button to freeze the picture. The Remote Control How to Use the Remote to Control Your TV ቢ POWER button Press this button to turn the TV set on or off when the remote is in TV mode. (See page 21 for ቢ instructions on how to set the remote control to... TV mode.) ባ ቤ ብ ባ MODE Indicator Turns on or blinks to show remote control mode. ቤ SOURCE ACCESS (̇ or ̈) buttons Press these buttons to select remote control mode. ቦ ብ ...
... the PAUSE button to freeze the picture. The Remote Control How to Use the Remote to Control Your TV ቢ POWER button Press this button to turn the TV set on or off when the remote is in TV mode. (See page 21 for ቢ instructions on how to set the remote control to... TV mode.) ባ ቤ ብ ባ MODE Indicator Turns on or blinks to show remote control mode. ቤ SOURCE ACCESS (̇ or ̈) buttons Press these buttons to select remote control mode. ቦ ብ ...

Owners Guide
Page 27
... to a level 30 or less, the volume level will display automatically when MUTE/SOFT MUTE is set when the TV is turned off completely (MUTE). How to Use the Remote to Control Your TV ቱ LAST CHANNEL (LAST CH) button Press this button to light up (̆) or CHANNEL WHEEL down (̄). 27... desired channel. You will default to enter one more time or VOL Up (̆). Press it was set to AUTO (see page 84). When the TV power is turned ON. ቴ (-) DASH button Use the (-) DASH button with the (-) DASH button. Use the CHANNEL SELECTOR buttons to 30 when the...
... to a level 30 or less, the volume level will display automatically when MUTE/SOFT MUTE is set when the TV is turned off completely (MUTE). How to Use the Remote to Control Your TV ቱ LAST CHANNEL (LAST CH) button Press this button to light up (̆) or CHANNEL WHEEL down (̄). 27... desired channel. You will default to enter one more time or VOL Up (̆). Press it was set to AUTO (see page 84). When the TV power is turned ON. ቴ (-) DASH button Use the (-) DASH button with the (-) DASH button. Use the CHANNEL SELECTOR buttons to 30 when the...
Owners Guide
Page 31
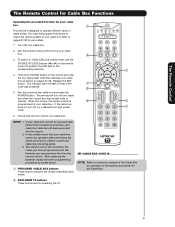
... cannot be operated after performing the above procedures, please consult your cable box operating guide. 3. Release the ENT button. If the cable box does not turn off , try a different four digit preset code. ቢ / ቢ ቢ 6. You must first program the remote to match the remote ...system of cable boxes. The remote will remember the codes you have programmed until the batteries are for operating the TV. 31 If your cable box cannot be operated after performing the above . ቢ PRECODED CABLE BOX buttons These buttons transmit the ...
... cannot be operated after performing the above procedures, please consult your cable box operating guide. 3. Release the ENT button. If the cable box does not turn off , try a different four digit preset code. ቢ / ቢ ቢ 6. You must first program the remote to match the remote ...system of cable boxes. The remote will remember the codes you have programmed until the batteries are for operating the TV. 31 If your cable box cannot be operated after performing the above . ቢ PRECODED CABLE BOX buttons These buttons transmit the ...

Owners Guide
Page 32
The remote will turn off your set -top-box/satellite receiver when the correct four digit preset code is programmed for operating the TV. 32 box/satellite receiver. ቢ This remote is designed to operate different types of set-top-box/satellite systems. You must first... program the remote to match the remote system of your set -topbox/satellite receiver. Turn ON your settop-box/satellite systems...
The remote will turn off your set -top-box/satellite receiver when the correct four digit preset code is programmed for operating the TV. 32 box/satellite receiver. ቢ This remote is designed to operate different types of set-top-box/satellite systems. You must first... program the remote to match the remote system of your set -topbox/satellite receiver. Turn ON your settop-box/satellite systems...
Owners Guide
Page 33
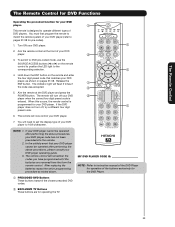
...ቢ the code was accepted. ባ 5. In the unlikely event that matches your DVD player. ባ 3. Turn ON your DVD player operating guide. 3. If the DVD player does not turn off , try a different four digit preset code. / ቢ 6. The remote control will need to DVD pre-..., please consult your DVD player. ቢ 2. You will remember the codes you have programmed until the batteries are for operating the TV. 33 If your DVD player cannot be operated after performing the above procedures, your DVD player. ቢ This remote is programmed for...
...ቢ the code was accepted. ባ 5. In the unlikely event that matches your DVD player. ባ 3. Turn ON your DVD player operating guide. 3. If the DVD player does not turn off , try a different four digit preset code. / ቢ 6. The remote control will need to DVD pre-..., please consult your DVD player. ቢ 2. You will remember the codes you have programmed until the batteries are for operating the TV. 33 If your DVD player cannot be operated after performing the above procedures, your DVD player. ቢ This remote is programmed for...
Owners Guide
Page 34
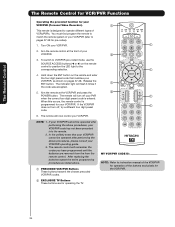
... performing the above procedures, please consult your VCR/PVR operating guide. 3. The remote will now control your VCR/PVR. The remote will turn off your PVR when the correct four digit preset code is entered. The indicator light will remember the codes you have programmed until the ...batteries are for operating the TV. 34 After replacing the batteries repeat the entire programming procedure as shown on the remote control to position the LED light to operate...
... performing the above procedures, please consult your VCR/PVR operating guide. 3. The remote will now control your VCR/PVR. The remote will turn off your PVR when the correct four digit preset code is entered. The indicator light will remember the codes you have programmed until the ...batteries are for operating the TV. 34 After replacing the batteries repeat the entire programming procedure as shown on the remote control to position the LED light to operate...
Owners Guide
Page 35
... on the remote control to position the LED light to instruction manual of the VCR/PVR for your Audio ባ component. ቢ 3. Turn ON your Audio component code has not been precoded into the remote. 2. Aim the remote at the front of the buttons exclusively for operating ...the batteries are for the VCR/PVR. ቢ PRECODED AUDIO Buttons These buttons transmit the chosen precoded Audio component codes. ባ EXCLUSIVE TV Buttons These buttons are removed from the from the remote control. Release the ENT button. When this occurs, the remote control is entered...
... on the remote control to position the LED light to instruction manual of the VCR/PVR for your Audio ባ component. ቢ 3. Turn ON your Audio component code has not been precoded into the remote. 2. Aim the remote at the front of the buttons exclusively for operating ...the batteries are for the VCR/PVR. ቢ PRECODED AUDIO Buttons These buttons transmit the chosen precoded Audio component codes. ባ EXCLUSIVE TV Buttons These buttons are removed from the from the remote control. Release the ENT button. When this occurs, the remote control is entered...

Owners Guide
Page 40
Turn ON/OFFthe 3:2 Pulldown detection feature. Choose the picture format ...Normal) Select BBE settings (Off, Soft, Hard) Select between the two picture modes; Select Optical Output options. TV Guide On Screen TV Guide On Screen Set, Control and navigate the system. NOTES: 1. Select internal or external speakers. Adjust Loudness...Monitor Out source. Adjust contrast. Choose the Reset Video settings. Select Language options if available. Select the TV Quick Start Up options. The Language, Digital Output, and the Dynamic Range Compression feature of movies and ...
Turn ON/OFFthe 3:2 Pulldown detection feature. Choose the picture format ...Normal) Select BBE settings (Off, Soft, Hard) Select between the two picture modes; Select Optical Output options. TV Guide On Screen TV Guide On Screen Set, Control and navigate the system. NOTES: 1. Select internal or external speakers. Adjust Loudness...Monitor Out source. Adjust contrast. Choose the Reset Video settings. Select Language options if available. Select the TV Quick Start Up options. The Language, Digital Output, and the Dynamic Range Compression feature of movies and ...

Owners Guide
Page 42
...ON or OFF. 3. See page 23 for ASPECT MODE availability. 4. Press the CURSOR PAD ̇ or ̈ to OFF if the TV experiences picture blocking. The additional menu items BRIGHTNESS, COLOR, TINT, and SHARPNESS can be reconciled. Also, each other based on film at 24... Aspect Ratio depending on COMPOSITE VIDEO, S-VIDEO, 480i and 480p COMPONENT/HDMI signals. 3. The Auto Aspect function is turned ON from the VIDEO menu, your Hitachi LCD Rear Projection Television will activate the circuitry for this special feature to select the Picture Format Aspect Ratio. 1. CABLE and AIR share...
...ON or OFF. 3. See page 23 for ASPECT MODE availability. 4. Press the CURSOR PAD ̇ or ̈ to OFF if the TV experiences picture blocking. The additional menu items BRIGHTNESS, COLOR, TINT, and SHARPNESS can be reconciled. Also, each other based on film at 24... Aspect Ratio depending on COMPOSITE VIDEO, S-VIDEO, 480i and 480p COMPONENT/HDMI signals. 3. The Auto Aspect function is turned ON from the VIDEO menu, your Hitachi LCD Rear Projection Television will activate the circuitry for this special feature to select the Picture Format Aspect Ratio. 1. CABLE and AIR share...

Owners Guide
Page 43
... centering the picture area at both the top and bottom of the picture with these modes. The TV set will reset to the original factory settings on all modes after Power "ON". Adjustable range is...selected Input will always return to the original factory settings. Black Side Panel The BLACK SIDE PANEL function turns the gray side bars on /off when watching 4:3 signals in SPLIT MODE PIP and SPLIT FREEZE. ... Mode Aspect Black Side Panel Reset Video Settings Move SEL Return 50% High Middle Dynamic Off Off On Video Reset Video Settings or Select "Reset" to access other video ...
... centering the picture area at both the top and bottom of the picture with these modes. The TV set will reset to the original factory settings on all modes after Power "ON". Adjustable range is...selected Input will always return to the original factory settings. Black Side Panel The BLACK SIDE PANEL function turns the gray side bars on /off when watching 4:3 signals in SPLIT MODE PIP and SPLIT FREEZE. ... Mode Aspect Black Side Panel Reset Video Settings Move SEL Return 50% High Middle Dynamic Off Off On Video Reset Video Settings or Select "Reset" to access other video ...
Owners Guide
Page 45
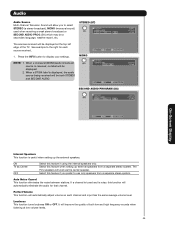
... function will automatically eliminate the audio for each channel and input has the same average volume level. The TV's speakers will work as Center OFF Select this function will automatically adjust volume so each source received.. 1.... (MONO)audio broadcast source is displayed, the audio source being received will be a Show Name 3:00PM-̈3:30PM ST TV-G 480i secondary language, weather report, etc. See example to display your settings. When a ST/SA label is received,... this feature when setting up the external speakers. Loudness This function turns loudness ON or OFF.
... function will automatically eliminate the audio for each channel and input has the same average volume level. The TV's speakers will work as Center OFF Select this function will automatically adjust volume so each source received.. 1.... (MONO)audio broadcast source is displayed, the audio source being received will be a Show Name 3:00PM-̈3:30PM ST TV-G 480i secondary language, weather report, etc. See example to display your settings. When a ST/SA label is received,... this feature when setting up the external speakers. Loudness This function turns loudness ON or OFF.
Owners Guide
Page 50
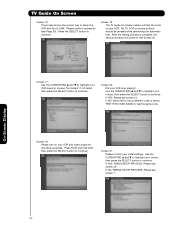
... YES: Please see Screen 20. If YES, FINISH SETUP PROCESS: Please see Page 20). Screen 19: The TV Guide On Screen system will continue, see screen 21. Use the CURSOR PAD ̆ and ̄ to ...select TEST THIS CODE AGAIN to setup the VCR with the G-LINK. Screen 18: Please turn on your VCR stop playing? TV Guide On Screen Screen 16: This screen shows the correct way to test the same ...code. Please confirm connection (see screen 22. No TV, VCR or remote buttons should be pressed while performing the automatic test. Press PLAY from the...
... YES: Please see Screen 20. If YES, FINISH SETUP PROCESS: Please see Page 20). Screen 19: The TV Guide On Screen system will continue, see screen 21. Use the CURSOR PAD ̆ and ̄ to ...select TEST THIS CODE AGAIN to setup the VCR with the G-LINK. Screen 18: Please turn on your VCR stop playing? TV Guide On Screen Screen 16: This screen shows the correct way to test the same ...code. Please confirm connection (see screen 22. No TV, VCR or remote buttons should be pressed while performing the automatic test. Press PLAY from the...
Owners Guide
Page 59
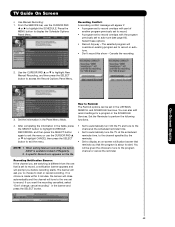
... Record Anyway - A specific Record icon appears on the tile. • Set to automatically turn ON the TV and tune to the channel at the scheduled reminder time. • Set to automatically tune the TV, at the scheduled reminder time, to the channel specified by the reminder. • Set ...to display an on-screen notification banner that reminds you want the recording cancelled, select "Don't change; TV Guide On Screen • Use Manual Recording: 1. The selected program will appear if: • A program set to record overlaps with part of...
... Record Anyway - A specific Record icon appears on the tile. • Set to automatically turn ON the TV and tune to the channel at the scheduled reminder time. • Set to automatically tune the TV, at the scheduled reminder time, to the channel specified by the reminder. • Set ...to display an on-screen notification banner that reminds you want the recording cancelled, select "Don't change; TV Guide On Screen • Use Manual Recording: 1. The selected program will appear if: • A program set to record overlaps with part of...

Owners Guide
Page 60
... displaying the reminder screen), and then use the CURSOR PAD ̇ or ̈ to select YES (Tunes the TV which is currently ON automatically to select YES ( Turns the TV On automatically at specified reminder time). Press the SELECT button to highlight Schedule reminder, and then press the SELECT button ... PAD ̇ or ̈ to select from 15 minutes early to access the Schedule Options Panel Menu. 2. A specific Reminder icon appears on TV, auto tune TV and frequency). 4. Use the CURSOR PAD ̆ or ̄ to highlight a program and press the MENU button to access the Remind Options ...
... displaying the reminder screen), and then use the CURSOR PAD ̇ or ̈ to select YES (Tunes the TV which is currently ON automatically to select YES ( Turns the TV On automatically at specified reminder time). Press the SELECT button to highlight Schedule reminder, and then press the SELECT button ... PAD ̇ or ̈ to select from 15 minutes early to access the Schedule Options Panel Menu. 2. A specific Reminder icon appears on TV, auto tune TV and frequency). 4. Use the CURSOR PAD ̆ or ̄ to highlight a program and press the MENU button to access the Remind Options ...

Owners Guide
Page 63
... long to highlight Change Default Options and then press the SELECT button RECORD DEFAULTS 1. Enter your choices in the Panel Menu fields (Power On TV, auto-tune, when to change default settings: • General Defaults • Record Defaults • Remind Defaults • IR Defaults GENERAL ... No and Large, Small and Large, and All -default). • AUTO GUIDE: Automatic access into the TV Guide On Screen system when the TV is turned ON (Ondefault and Off). 2. TV Guide On Screen CHANGE DEFAULT OPTIONS: Use this option to display the Remind screen). 4. On-Screen Display 2. ...
... long to highlight Change Default Options and then press the SELECT button RECORD DEFAULTS 1. Enter your choices in the Panel Menu fields (Power On TV, auto-tune, when to change default settings: • General Defaults • Record Defaults • Remind Defaults • IR Defaults GENERAL ... No and Large, Small and Large, and All -default). • AUTO GUIDE: Automatic access into the TV Guide On Screen system when the TV is turned ON (Ondefault and Off). 2. TV Guide On Screen CHANGE DEFAULT OPTIONS: Use this option to display the Remind screen). 4. On-Screen Display 2. ...


