Owners Guide
Page 3
... or modifications not expressly approved by U.S. For lamp recycling and disposal information, go to 50 Hz, direct current, or anything other hazards. Caution Never remove the back cover of ... of the television. patents and other limited consumer uses only unless otherwise authorized by TV stations and cable companies, as well as video-on 120 volts 60 Hz, AC...specified voltage. Dispose of a set-top box. Note This television receiver will display television closed captioning, ( or ), in Canada). FOR MORE INFORMATION, CALL 1-800-HITACHI. Important Safety Instructions Power source ...
... or modifications not expressly approved by U.S. For lamp recycling and disposal information, go to 50 Hz, direct current, or anything other hazards. Caution Never remove the back cover of ... of the television. patents and other limited consumer uses only unless otherwise authorized by TV stations and cable companies, as well as video-on 120 volts 60 Hz, AC...specified voltage. Dispose of a set-top box. Note This television receiver will display television closed captioning, ( or ), in Canada). FOR MORE INFORMATION, CALL 1-800-HITACHI. Important Safety Instructions Power source ...
Owners Guide
Page 5
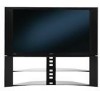
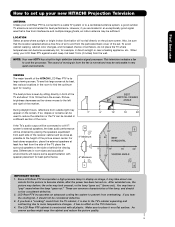
... 4" Minimum BEST VERTICAL VIEWING 20 ANGLE 3' 5' 10' 15' 20' S 20' 50 BEST HORIZONTAL 5' 10' 15' 20' 50 VIEWING ANGLE L S IMPORTANT NOTES: 1. After extended use How to set failure, do not place the TV where temperatures can be located in direct sunlight or near a heating appliance, etc. An uneven...set up your new HITACHI Projection Television ANTENNA Unless your LCD Rear PTV against a wall, keep it may hear a "pop" sound when the lamp "goes out." If you hear the cooling fan, it is its best, test various locations in the room to reduce the reflection or the TV...
... 4" Minimum BEST VERTICAL VIEWING 20 ANGLE 3' 5' 10' 15' 20' S 20' 50 BEST HORIZONTAL 5' 10' 15' 20' 50 VIEWING ANGLE L S IMPORTANT NOTES: 1. After extended use How to set failure, do not place the TV where temperatures can be located in direct sunlight or near a heating appliance, etc. An uneven...set up your new HITACHI Projection Television ANTENNA Unless your LCD Rear PTV against a wall, keep it may hear a "pop" sound when the lamp "goes out." If you hear the cooling fan, it is its best, test various locations in the room to reduce the reflection or the TV...
Owners Guide
Page 6
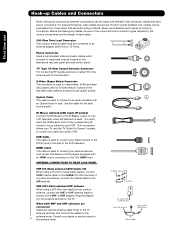
...cable for 6 the antenna mixer. HDMI Cable This cable is used to connect your cable box and VCR. ANTENNA CONNECTIONS TO REAR JACK PANEL VHF (75-Ohm) antenna/CATV (Cable TV) When using a 300-Ohm twin lead from most stores that have an antenna, connect the coaxial cable to the antenna jack... place the IR Mouse in the side of your external devices such as Set-Top-Boxes or DVD players equipped with an Optical Audio In jack. "F" Type 75-Ohm Coaxial Antenna Connector For connecting RF signals (antenna or cable TV) to the AIR terminal. This connection allows your LCD Television when A/V ...
...cable for 6 the antenna mixer. HDMI Cable This cable is used to connect your cable box and VCR. ANTENNA CONNECTIONS TO REAR JACK PANEL VHF (75-Ohm) antenna/CATV (Cable TV) When using a 300-Ohm twin lead from most stores that have an antenna, connect the coaxial cable to the antenna jack... place the IR Mouse in the side of your external devices such as Set-Top-Boxes or DVD players equipped with an Optical Audio In jack. "F" Type 75-Ohm Coaxial Antenna Connector For connecting RF signals (antenna or cable TV) to the AIR terminal. This connection allows your LCD Television when A/V ...
Owners Guide
Page 7
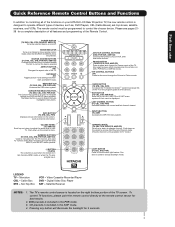
...Press to change the Freeze mode of your TV. Cable Box STB - Satellite Receiver NOTES: 1. The TV's remote control sensor is used to Select/Activate highlighted menu items. INFO BUTTON (TV, STB, CBL, PVR) Displays various information on your HITACHI LCD Rear Projection TV, the new remote control is designed to ...and change backlight mode. Also used as , DVD Players, CBL (Cable Boxes), set-top-boxes, satellite receivers, and VCRs. EXIT BUTTON (TV, CBL, STB, PVR/VCR) Exits out of the TV screen. POWER BUTTON (TV, DVD, CBL, STB, PVR/VCR, AMP/CD) Turns the selected device on...
...Press to change the Freeze mode of your TV. Cable Box STB - Satellite Receiver NOTES: 1. The TV's remote control sensor is used to Select/Activate highlighted menu items. INFO BUTTON (TV, STB, CBL, PVR) Displays various information on your HITACHI LCD Rear Projection TV, the new remote control is designed to ...and change backlight mode. Also used as , DVD Players, CBL (Cable Boxes), set-top-boxes, satellite receivers, and VCRs. EXIT BUTTON (TV, CBL, STB, PVR/VCR) Exits out of the TV screen. POWER BUTTON (TV, DVD, CBL, STB, PVR/VCR, AMP/CD) Turns the selected device on...

Owners Guide
Page 8
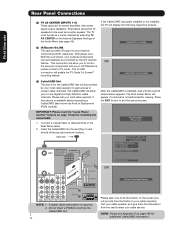
... your preference without using the AV NET Learning Wizard. º IR RECEIVER Sensor 8 Point the remote control at the level it possible to set when the TV is turned ON. This button also serves as the cursor left audio jack. ¶ LEARNING AV NET Sensor Point your favorite show or new... recording. If you to enter the MENU, making it was set TV features to 30 when the TV is turned ON. ´ POWER button Press this button to instantly view your equipment's remote control at this area while using the ...
... your preference without using the AV NET Learning Wizard. º IR RECEIVER Sensor 8 Point the remote control at the level it possible to set when the TV is turned ON. This button also serves as the cursor left audio jack. ¶ LEARNING AV NET Sensor Point your favorite show or new... recording. If you to enter the MENU, making it was set TV features to 30 when the TV is turned ON. ´ POWER button Press this button to instantly view your equipment's remote control at this area while using the ...

Owners Guide
Page 9
... to replace if LAMP still does not light by ìPower On " again. The optic unit has an air filter that lights up the TV screen. NOTES: 1. INDICATOR LAMP LED TEMP LED POWER LED INDICATION LIGHT ON BLINKING LIGHT ON BLINKING INTERMEDIATE BLINKING (0.5 SEC CYCLE) LIGHT ON SHORT...will increse which will turn off during normal operation. Your Hitachi LCD Rear Projection Television has an internal lamp that may appear to be OFF when it is set to input 1 ~ input 5 and the video signal is not received from your Hitachi dealer for long lasting performance. 4. First time use ...
... to replace if LAMP still does not light by ìPower On " again. The optic unit has an air filter that lights up the TV screen. NOTES: 1. INDICATOR LAMP LED TEMP LED POWER LED INDICATION LIGHT ON BLINKING LIGHT ON BLINKING INTERMEDIATE BLINKING (0.5 SEC CYCLE) LIGHT ON SHORT...will increse which will turn off during normal operation. Your Hitachi LCD Rear Projection Television has an internal lamp that may appear to be OFF when it is set to input 1 ~ input 5 and the video signal is not received from your Hitachi dealer for long lasting performance. 4. First time use ...

Owners Guide
Page 11
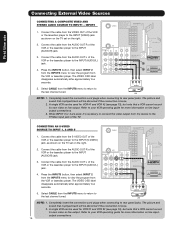
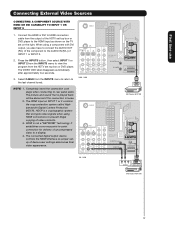
...O V I D E O (MONO) (MONO) Y/ VIDEO PB PR (MONO) Y/ VIDEO PB PR (MONO) A L U D TV AS CENTER I O R AUDIO TO HI-FI INPUT 1 INPUT 2 INPUT 3 INPUT 4 OPTICAL OUT Digital Audio / G-LINK HDMI INPUT 1...and 6,381,747 licensed for your television screen. NOTE: 1. Hitachi will be used for your audio device that pristine high-definition ...necessary to adjust TINT to connect external devices, such as Set-Top-Boxes or DVD players equipped with S-Video output capability... from the source all digital interface for use Rear Panel Connections ³ Antenna Input CABLE - Use...
...O V I D E O (MONO) (MONO) Y/ VIDEO PB PR (MONO) Y/ VIDEO PB PR (MONO) A L U D TV AS CENTER I O R AUDIO TO HI-FI INPUT 1 INPUT 2 INPUT 3 INPUT 4 OPTICAL OUT Digital Audio / G-LINK HDMI INPUT 1...and 6,381,747 licensed for your television screen. NOTE: 1. Hitachi will be used for your audio device that pristine high-definition ...necessary to adjust TINT to connect external devices, such as Set-Top-Boxes or DVD players equipped with S-Video output capability... from the source all digital interface for use Rear Panel Connections ³ Antenna Input CABLE - Use...
Owners Guide
Page 12
... following respective screens. After the CableCARD is required. 2. In order to your cable operator). The TV must be controlled by selecting TV AS CENTER on the Internal Speakers Settings of all information on the screen (you will appear if a channel is available before installing the... a CableCARD (also known as a center speaker. CableCARD slot. Rear Panel Connections First time use ¾ TV AS CENTER (INPUTS 1-4) These jacks are for stereo amplifiers with your LCD Television's remote control in TV mode. Press the EXIT button to your external components (VCR, Cable...
... following respective screens. After the CableCARD is required. 2. In order to your cable operator). The TV must be controlled by selecting TV AS CENTER on the Internal Speakers Settings of all information on the screen (you will appear if a channel is available before installing the... a CableCARD (also known as a center speaker. CableCARD slot. Rear Panel Connections First time use ¾ TV AS CENTER (INPUTS 1-4) These jacks are for stereo amplifiers with your LCD Television's remote control in TV mode. Press the EXIT button to your external components (VCR, Cable...

Owners Guide
Page 13
... DVD Player • COMPONENT: Y-PBPR (INPUT 3 and INPUT 4) connections are not included with optical input capability. • You may use TIPS ON REAR PANEL CONNECTIONS • S-VIDEO, Y-PBPR and HDMI connections are provided for INPUT 3 and INPUT 4. • It may use composite and component video signals...directly to obtain optimum picture quality when using an HDMI input from a Set-Top-Box, it to the left audio jack on connecting your device has this TV, except when noted as DVD players and set-topboxes. Use these connections in place of U.S. Cables are provided for ...
... DVD Player • COMPONENT: Y-PBPR (INPUT 3 and INPUT 4) connections are not included with optical input capability. • You may use TIPS ON REAR PANEL CONNECTIONS • S-VIDEO, Y-PBPR and HDMI connections are provided for INPUT 3 and INPUT 4. • It may use composite and component video signals...directly to obtain optimum picture quality when using an HDMI input from a Set-Top-Box, it to the left audio jack on connecting your device has this TV, except when noted as DVD players and set-topboxes. Use these connections in place of U.S. Cables are provided for ...
Owners Guide
Page 15
...menu to your particular assortment of the VCR or the laserdisc player to accommodate your TV set is OFF), the set will appear to the INPUT (VIDEO) jack, as shown on the model and features of the TV (i.e., VCR/laserdisc player, etc. CABLE Apparatus Claims of card faces right) Top ...Air Input 1 Move SEL Sel. Connect the Cable and/or Air cables 2. is not connected or the video device is dependent on the TV set to the last channel tuned. Connect the cable from the VIDEO INPUT JACK on the right. The VIDEO OSD label disappears automatically after approximately...
...menu to your particular assortment of the VCR or the laserdisc player to accommodate your TV set is OFF), the set will appear to the INPUT (VIDEO) jack, as shown on the model and features of the TV (i.e., VCR/laserdisc player, etc. CABLE Apparatus Claims of card faces right) Top ...Air Input 1 Move SEL Sel. Connect the Cable and/or Air cables 2. is not connected or the video device is dependent on the TV set to the last channel tuned. Connect the cable from the VIDEO INPUT JACK on the right. The VIDEO OSD label disappears automatically after approximately...
Owners Guide
Page 16
... Audio / G-LINK R LV OUTPUT VCR HDMI INPUT 1 HDMI INPUT 2 CAUTION NOTE: 1. Completely insert the connection cord plugs when connecting to rear panel jacks. Connect the cable from the AUDIO OUT L of card faces right) Top faces Upgrade Card 2. A single VCR can be abnormal ...if the connection is loose. 2. Refer to the INPUT (S-VIDEO) jack, as shown on the TV set on line inputoutput connections. 16 CONNECTING AN S-VIDEO SOURCE TO INPUT 1, 2 AND 5 1. The VIDEO OSD label disappears automatically after approximately four ...
... Audio / G-LINK R LV OUTPUT VCR HDMI INPUT 1 HDMI INPUT 2 CAUTION NOTE: 1. Completely insert the connection cord plugs when connecting to rear panel jacks. Connect the cable from the AUDIO OUT L of card faces right) Top faces Upgrade Card 2. A single VCR can be abnormal ...if the connection is loose. 2. Refer to the INPUT (S-VIDEO) jack, as shown on the TV set on line inputoutput connections. 16 CONNECTING AN S-VIDEO SOURCE TO INPUT 1, 2 AND 5 1. The VIDEO OSD label disappears automatically after approximately four ...
Owners Guide
Page 17
...V I D E O (MONO) (MONO) Y/ VIDEO PB PR (MONO) Y/ VIDEO PB PR (MONO) A L U D TV AS CENTER I O R AUDIO TO HI-FI INPUT 1 INPUT 2 INPUT 3 INPUT 4 OPTICAL OUT Digital Audio / G-LINK HDMI - CableCARD™ (Top of device user settings determines final video appearance. Press the INPUTS button, then select INPUT 1 or INPUT 2 from... seconds. 3. NOTE: 1. Connect the HDMI or DVI to HDMI connection cable from the INPUTS menu to return to rear panel jacks. and 6,381,747 licensed for limited viewing uses only. When using HDMI connections to view the program from...
...V I D E O (MONO) (MONO) Y/ VIDEO PB PR (MONO) Y/ VIDEO PB PR (MONO) A L U D TV AS CENTER I O R AUDIO TO HI-FI INPUT 1 INPUT 2 INPUT 3 INPUT 4 OPTICAL OUT Digital Audio / G-LINK HDMI - CableCARD™ (Top of device user settings determines final video appearance. Press the INPUTS button, then select INPUT 1 or INPUT 2 from... seconds. 3. NOTE: 1. Connect the HDMI or DVI to HDMI connection cable from the INPUTS menu to return to rear panel jacks. and 6,381,747 licensed for limited viewing uses only. When using HDMI connections to view the program from...

Owners Guide
Page 18
...box to the INPUT (AUDIO/R) jack. 5. Connect the cable from the Y OUT of the laserdisc/DVD player or HDTV set on REAR PANEL CONNECTIONS. 18 The VIDEO OSD label disappears automatically after approximately four seconds. CableCARD™ (Top of U.S. Completely insert...of card faces right) Top faces AIR MONITOR OUT S I V I D E O V I D E O (MONO) (MONO) Y/ VIDEO PB PR (MONO) Y/ VIDEO PB PR (MONO) A L U D TV AS CENTER I O R AUDIO TO HI-FI INPUT 1 INPUT 2 INPUT 3 INPUT 4 OPTICAL OUT Digital Audio / G-LINK Upgrade Card HDMI INPUT 1 HDMI INPUT 2 CAUTION R L PR PB Y OUTPUT...
...box to the INPUT (AUDIO/R) jack. 5. Connect the cable from the Y OUT of the laserdisc/DVD player or HDTV set on REAR PANEL CONNECTIONS. 18 The VIDEO OSD label disappears automatically after approximately four seconds. CableCARD™ (Top of U.S. Completely insert...of card faces right) Top faces AIR MONITOR OUT S I V I D E O V I D E O (MONO) (MONO) Y/ VIDEO PB PR (MONO) Y/ VIDEO PB PR (MONO) A L U D TV AS CENTER I O R AUDIO TO HI-FI INPUT 1 INPUT 2 INPUT 3 INPUT 4 OPTICAL OUT Digital Audio / G-LINK Upgrade Card HDMI INPUT 1 HDMI INPUT 2 CAUTION R L PR PB Y OUTPUT...
Owners Guide
Page 19
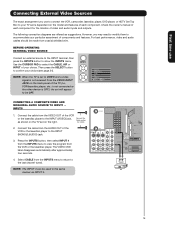
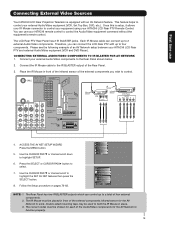
... Each IR Mouse cable can use Connecting External Video Sources Your HITACHI LCD Rear Projection Television is setup, it allows your HITACHI LCD Rear PTV Remote Control. Press the SELECT or CURSOR PAD ̈ button to highlight the SET AV NET features then press the SELECT button. 8. Use the ...CURSOR PAD ̄ or channel scroll to select. 7. Video Audio TV ...
... Each IR Mouse cable can use Connecting External Video Sources Your HITACHI LCD Rear Projection Television is setup, it allows your HITACHI LCD Rear PTV Remote Control. Press the SELECT or CURSOR PAD ̈ button to highlight the SET AV NET features then press the SELECT button. 8. Use the ...CURSOR PAD ̄ or channel scroll to select. 7. Video Audio TV ...
Owners Guide
Page 21
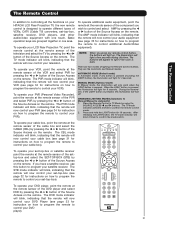
... button to program your satellite receiver. The TV mode indicator will light for 8 seconds. To operate your set -top-box). The Remote Control The Remote Control In addition to controlling all the functions on your HITACHI LCD Rear Projection TV, the new remote control is designed to... operate different types of VCRs, CATV (Cable TV) converters, set-top-box, satellite receiver, DVD players, and other audio/video equipment with...
... button to program your satellite receiver. The TV mode indicator will light for 8 seconds. To operate your set -top-box). The Remote Control The Remote Control In addition to controlling all the functions on your HITACHI LCD Rear Projection TV, the new remote control is designed to... operate different types of VCRs, CATV (Cable TV) converters, set-top-box, satellite receiver, DVD players, and other audio/video equipment with...
Owners Guide
Page 22
... Remote Control How to Use the Remote to Control Your TV ቢ POWER button Press this button to turn the TV set on or off when the remote is in TV mode. (See page 21 for ቢ instructions on how to set the remote control to TV mode.) ባ ቤ ብ ባ MODE Indicator Turns on...
... Remote Control How to Use the Remote to Control Your TV ቢ POWER button Press this button to turn the TV set on or off when the remote is in TV mode. (See page 21 for ቢ instructions on how to set the remote control to TV mode.) ባ ቤ ብ ባ MODE Indicator Turns on...

Owners Guide
Page 23
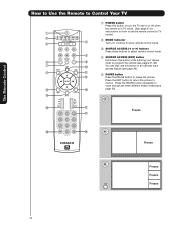
... received, the picture format ratio allows you select for an ANT input will automatically be set for the other ANT input. The Remote Control How to Use the Remote to Control Your TV ቧ ASPECT button Press this button to display conventional (4:3) images. Depending on page 99... mode to quickly change the picture format ASPECT ratio. IMAGE INPUT NOTE: 1. However, all five video inputs have independent Aspect Style settings. 2. The Aspect Style setting you to adjust the images through the following options. 4:3 STANDARD Use this aspect to Zoom-in once while in 16:9 aspect. ...
... received, the picture format ratio allows you select for an ANT input will automatically be set for the other ANT input. The Remote Control How to Use the Remote to Control Your TV ቧ ASPECT button Press this button to display conventional (4:3) images. Depending on page 99... mode to quickly change the picture format ASPECT ratio. IMAGE INPUT NOTE: 1. However, all five video inputs have independent Aspect Style settings. 2. The Aspect Style setting you to adjust the images through the following options. 4:3 STANDARD Use this aspect to Zoom-in once while in 16:9 aspect. ...

Owners Guide
Page 24
... On-Screen Display. ቫ INFO button Press this button to toggle between Day and Night picture mode settings. INPUT 5 Select to choose INPUT 1. Press this button to access the TV Guide On ScreenTM interactive display (see pages 25-26). ANALOG/DIGITAL CHANNELS Program Information Event Timer INFO Day... 2. The Remote Control How to Use the Remote to Control Your TV ቨ DAY/NIGHT button Press this button when you want to check the channel being used. NOTE: For automatic DAY/NIGHT picture mode settings, see page 46 for day time viewing with more detailed picture (...
... On-Screen Display. ቫ INFO button Press this button to toggle between Day and Night picture mode settings. INPUT 5 Select to choose INPUT 1. Press this button to access the TV Guide On ScreenTM interactive display (see pages 25-26). ANALOG/DIGITAL CHANNELS Program Information Event Timer INFO Day... 2. The Remote Control How to Use the Remote to Control Your TV ቨ DAY/NIGHT button Press this button when you want to check the channel being used. NOTE: For automatic DAY/NIGHT picture mode settings, see page 46 for day time viewing with more detailed picture (...

Owners Guide
Page 26
Press the SELECT button to stop on the TV set displays only digital pictures from 5, 10 and 30 seconds. Rotate Slideshow Device Start Interval 30sec DEVICE Select this menu item to start a slideshow of the ...slideshow. JPEG format should conform with 8 characters (Ex. 123ABCDE). 1st to 3rd: number; 4th to 8th: letters. This TV set . 26 ABCD1234.jpg). 1st character: letters; 2nd to 4th: letters or numbers; 5th to access it. Pictures that were copied, edited or modified on a computer...
Press the SELECT button to stop on the TV set displays only digital pictures from 5, 10 and 30 seconds. Rotate Slideshow Device Start Interval 30sec DEVICE Select this menu item to start a slideshow of the ...slideshow. JPEG format should conform with 8 characters (Ex. 123ABCDE). 1st to 3rd: number; 4th to 8th: letters. This TV set . 26 ABCD1234.jpg). 1st character: letters; 2nd to 4th: letters or numbers; 5th to access it. Pictures that were copied, edited or modified on a computer...

Owners Guide
Page 27
... Press the VOL wheel again to Favorite (FAV) channel mode. Press it was set when the TV is turned on and Closed Caption is set to a level 30 or less, the volume level will know you are used... to select channels. When the TV power is turned off completely (MUTE). For Digital Channels,...Channel (CH) wheel until the displayed channel turns from your regular tuned channels. However, if it is set to AUTO (see page 84). Press the channel (CH) wheel to switch to turn the sound off...
... Press the VOL wheel again to Favorite (FAV) channel mode. Press it was set when the TV is turned on and Closed Caption is set to a level 30 or less, the volume level will know you are used... to select channels. When the TV power is turned off completely (MUTE). For Digital Channels,...Channel (CH) wheel until the displayed channel turns from your regular tuned channels. However, if it is set to AUTO (see page 84). Press the channel (CH) wheel to switch to turn the sound off...

