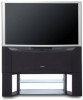
Owners Guide
Page 2
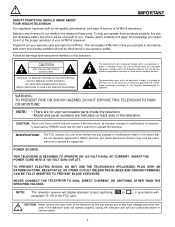
... promptly in the improbable event that are covered in the literature accompanying the appliance. NOTE: • There are no user serviceable parts inside the television. • Model and serial numbers are not expressly approved by HITACHI could void the user's authority to the proper operation of benefit to very high voltages and other hazards. NEVER CONNECT THE TELEVISION TO 50Hz, DIRECT CURRENT, OR ANYTHING...
... promptly in the improbable event that are covered in the literature accompanying the appliance. NOTE: • There are no user serviceable parts inside the television. • Model and serial numbers are not expressly approved by HITACHI could void the user's authority to the proper operation of benefit to very high voltages and other hazards. NEVER CONNECT THE TELEVISION TO 50Hz, DIRECT CURRENT, OR ANYTHING...
Owners Guide
Page 3
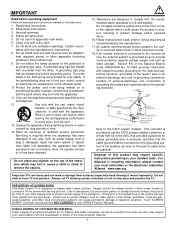
... the video program material. 3 Projection TV's are provided for replacement of the polarized or grounding-type plug. Heed all instructions. 5. Install in the lighted area of this television. 1. Protect the power cord from the apparatus. 11. Only use caution when moving pictures. When a cart is connected to the receiver be located in wide screen format or zoomed to television receivers. PUBLIC VIEWING OF COPYRIGHTED MATERIAL Public viewing of your total viewing time to...
... the video program material. 3 Projection TV's are provided for replacement of the polarized or grounding-type plug. Heed all instructions. 5. Install in the lighted area of this television. 1. Protect the power cord from the apparatus. 11. Only use caution when moving pictures. When a cart is connected to the receiver be located in wide screen format or zoomed to television receivers. PUBLIC VIEWING OF COPYRIGHTED MATERIAL Public viewing of your total viewing time to...
Owners Guide
Page 5
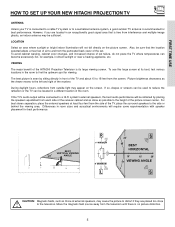
... the room. FIRST TIME USE HOW TO SET UP YOUR NEW HITACHI PROJECTION TV ANTENNA Unless your TV is connected to a cable TV system or to a centralized antenna system, a good outdoor TV antenna is seen by placing the speakers equidistant from the television until there is its best, test various locations in the room to the side or behind the viewing area. Picture brightness decreases as those of the receiver. BEST VERTICAL VIEWING 20 ANGLE...
... the room. FIRST TIME USE HOW TO SET UP YOUR NEW HITACHI PROJECTION TV ANTENNA Unless your TV is connected to a cable TV system or to a centralized antenna system, a good outdoor TV antenna is seen by placing the speakers equidistant from the television until there is its best, test various locations in the room to the side or behind the viewing area. Picture brightness decreases as those of the receiver. BEST VERTICAL VIEWING 20 ANGLE...
Owners Guide
Page 7
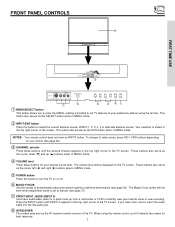
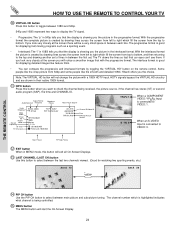
... sound, insert the audio cable into the left (̇) and right (̈) buttons when in MENU mode. ባ INPUT/EXIT button Press this button to turn the TV on the TV screen. Press the INPUT button until the desired channel appears in the top right corner of the TV screen. The volume level will not work when adjustment mode is shown in the top right corner of the screen. FRONT PANEL CONTROLS ቩ FIRST TIME USE PULL POWER...
... sound, insert the audio cable into the left (̇) and right (̈) buttons when in MENU mode. ባ INPUT/EXIT button Press this button to turn the TV on the TV screen. Press the INPUT button until the desired channel appears in the top right corner of the TV screen. The volume level will not work when adjustment mode is shown in the top right corner of the screen. FRONT PANEL CONTROLS ቩ FIRST TIME USE PULL POWER...
Owners Guide
Page 11
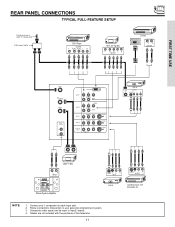
REAR PANEL CONNECTIONS TYPICAL FULL-FEATURE SETUP Outside antenna or cable TV coaxial cable 2-Way signal splitter DVD Player OUTPUT Y PB/CB PR/CR L R HDTV Set-Top Box Y PB PR L R OUTPUT D-VHS DIGITAL OUTPUT LR OUTPUT FIRST TIME USE ANT A TO CONVERTER ANT B AUDIO TO HI-FI L R INPUT 1 DVI-HDTV PR PB Y R (MONO)/L AUDIO INPUT 2 PR PB Y/VIDEO R (MONO)/L AUDIO INPUT 3 R (MONO)/L VIDEO INPUT 4 R (MONO)/L VIDEO MONITOR OUT R L VIDEO AUDIO S-VIDEO S-VIDEO S-VIDEO VCR #1 ANT OUTPUT IN S-VIDEO V L R OUTPUT INPUT Cable TV Box LR INPUT Stereo System Amplifier S-VIDEO V L...
REAR PANEL CONNECTIONS TYPICAL FULL-FEATURE SETUP Outside antenna or cable TV coaxial cable 2-Way signal splitter DVD Player OUTPUT Y PB/CB PR/CR L R HDTV Set-Top Box Y PB PR L R OUTPUT D-VHS DIGITAL OUTPUT LR OUTPUT FIRST TIME USE ANT A TO CONVERTER ANT B AUDIO TO HI-FI L R INPUT 1 DVI-HDTV PR PB Y R (MONO)/L AUDIO INPUT 2 PR PB Y/VIDEO R (MONO)/L AUDIO INPUT 3 R (MONO)/L VIDEO INPUT 4 R (MONO)/L VIDEO MONITOR OUT R L VIDEO AUDIO S-VIDEO S-VIDEO S-VIDEO VCR #1 ANT OUTPUT IN S-VIDEO V L R OUTPUT INPUT Cable TV Box LR INPUT Stereo System Amplifier S-VIDEO V L...
Owners Guide
Page 12
... MONITOR OUT output will be labeled Y-CBCR. In this feature. COMPONENT: Y-PBPR (Input 1 &2) connections are provided for high performance laserdisc players, VCRs etc. Your component outputs may be used for Input 2~Input 5. Your component outputs may use composite video signal for VCR #1 and VCR #2, but only one audio output (mono sound), connect it to each input jack. Input 2 accepts both composite and component video signals. that a VCR cannot record its own video or line output (INPUT...
... MONITOR OUT output will be labeled Y-CBCR. In this feature. COMPONENT: Y-PBPR (Input 1 &2) connections are provided for high performance laserdisc players, VCRs etc. Your component outputs may be used for Input 2~Input 5. Your component outputs may use composite video signal for VCR #1 and VCR #2, but only one audio output (mono sound), connect it to each input jack. Input 2 accepts both composite and component video signals. that a VCR cannot record its own video or line output (INPUT...

Owners Guide
Page 14
.... However, you use to connect the VCR, camcorder, laserdisc player, DVD player, or HDTV Set Top Box to accommodate your TV set to be made from the VIDEO INPUT JACK on the model and features of each component for the location of video and audio inputs and outputs. Check the owner's manual of each component. The following connection diagrams are offered as shown below. FIRST TIME USE CONNECTING EXTERNAL VIDEO SOURCES The exact arrangement you may need to modify...
.... However, you use to connect the VCR, camcorder, laserdisc player, DVD player, or HDTV Set Top Box to accommodate your TV set to be made from the VIDEO INPUT JACK on the model and features of each component for the location of video and audio inputs and outputs. Check the owner's manual of each component. The following connection diagrams are offered as shown below. FIRST TIME USE CONNECTING EXTERNAL VIDEO SOURCES The exact arrangement you may need to modify...
Owners Guide
Page 20
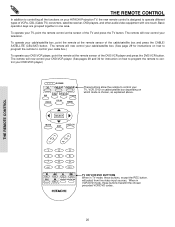
... VIDEO PIP CH MENU These buttons allow the remote to operate different types of the TV and press the TV button. Basic operation keys are grouped together in TV mode, these buttons transmit the chosen precoded VCR/DVD codes. The remote will select from five video input sources. When in VCR/DVD mode, these buttons, except the REC button, will now control your television. To operate your TV, point the remote control at the screen of VCRs, CBL (Cable TV) converters, satellite receiver, DVD players...
... VIDEO PIP CH MENU These buttons allow the remote to operate different types of the TV and press the TV button. Basic operation keys are grouped together in TV mode, these buttons transmit the chosen precoded VCR/DVD codes. The remote will select from five video input sources. When in VCR/DVD mode, these buttons, except the REC button, will now control your television. To operate your TV, point the remote control at the screen of VCRs, CBL (Cable TV) converters, satellite receiver, DVD players...
Owners Guide
Page 24
... image that with a 1080i HDTV input. Signal Format Audio Selected Received Broadcast Rating Main Picture Source YPBPR:1 When a COMPONENT VIDEO: Y-PBPR Input is connected to VIDEO: 3. IN: 3 When an S-VIDEO Input is connected to VIDEO: 1. If you look very closely at the screen there will be a very small space in MENU mode, this button will start the On-Screen Display. 24 Audio Broadcast Wide Mode Virtual HD Picture Closed Mode Captioning Off Timer TV Time Lock Stereo (480i) ST/SA TV-PG DLSV PIP TV...
... image that with a 1080i HDTV input. Signal Format Audio Selected Received Broadcast Rating Main Picture Source YPBPR:1 When a COMPONENT VIDEO: Y-PBPR Input is connected to VIDEO: 3. IN: 3 When an S-VIDEO Input is connected to VIDEO: 1. If you look very closely at the screen there will be a very small space in MENU mode, this button will start the On-Screen Display. 24 Audio Broadcast Wide Mode Virtual HD Picture Closed Mode Captioning Off Timer TV Time Lock Stereo (480i) ST/SA TV-PG DLSV PIP TV...
Owners Guide
Page 25
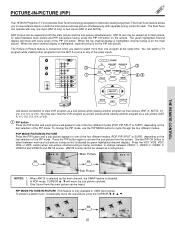
...-picture while viewing another program as both the main picture and sub-picture simultaneously, with every press of the PIP mode. ANT A TO CONVERTER ANT B AUDIO TO HI-FI L R INPUT 1 INPUT 2 DVI-HDTV PR PB Y R (MONO)/L AUDIO PR PB Y/VIDEO R (MONO)/L AUDIO INPUT 3 R (MONO)/L VIDEO INPUT 4 R (MONO)/L VIDEO MONITOR OUT R L VIDEO AUDIO S-VIDEO S-VIDEO S-VIDEO ባ ቢ POWER TV CBL/SAT DVD/VCR SWAP PIP MODE PIP FREEZE VIDEO PIP CH MENU ቤ ብ,ቦ SELECT Audio Video OUTPUT MUTE EXIT LAST CH VCR Use above connection to view antenna inputs...
...-picture while viewing another program as both the main picture and sub-picture simultaneously, with every press of the PIP mode. ANT A TO CONVERTER ANT B AUDIO TO HI-FI L R INPUT 1 INPUT 2 DVI-HDTV PR PB Y R (MONO)/L AUDIO PR PB Y/VIDEO R (MONO)/L AUDIO INPUT 3 R (MONO)/L VIDEO INPUT 4 R (MONO)/L VIDEO MONITOR OUT R L VIDEO AUDIO S-VIDEO S-VIDEO S-VIDEO ባ ቢ POWER TV CBL/SAT DVD/VCR SWAP PIP MODE PIP FREEZE VIDEO PIP CH MENU ቤ ብ,ቦ SELECT Audio Video OUTPUT MUTE EXIT LAST CH VCR Use above connection to view antenna inputs...
Owners Guide
Page 29
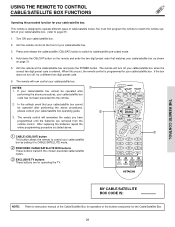
... setting it to operate different types of the buttons exclusively for operating the TV. Turn ON your cable/satellite box. When this occurs, the remote control is entered. NOTES: ቢ 1. Press and release the cable/satellite (CBL/SAT) button to switch to instruction manual of the Cable/Satellite Box for operation of cable/satellite boxes. If the box does not turn off , try a different two digit preset code. 6. After replacing the batteries repeat the entire programming...
... setting it to operate different types of the buttons exclusively for operating the TV. Turn ON your cable/satellite box. When this occurs, the remote control is entered. NOTES: ቢ 1. Press and release the cable/satellite (CBL/SAT) button to switch to instruction manual of the Cable/Satellite Box for operation of cable/satellite boxes. If the box does not turn off , try a different two digit preset code. 6. After replacing the batteries repeat the entire programming...

Owners Guide
Page 33
... the TV clock. Turn TV on the Canadian ratings system. Adjust color. Choose to Lock TV. Set specific time to lock channel, video input, and front panel. Menu Preference Set The Clock Set The Channels Set The Inputs Set Event Timer Set Closed Captions About Your TV Choose English, French, or Spanish text. It must be set before using Lock/Event Timer feature. Set Channel Source and Auto Channel Scan. ON-SCREEN DISPLAY 33 Improve picture performance. ON-SCREEN DISPLAY (OSD) Video Picture Mode Contrast Brightness Color Tint Sharpness Vertical Position Magic Focus Color...
... the TV clock. Turn TV on the Canadian ratings system. Adjust color. Choose to Lock TV. Set specific time to lock channel, video input, and front panel. Menu Preference Set The Clock Set The Channels Set The Inputs Set Event Timer Set Closed Captions About Your TV Choose English, French, or Spanish text. It must be set before using Lock/Event Timer feature. Set Channel Source and Auto Channel Scan. ON-SCREEN DISPLAY 33 Improve picture performance. ON-SCREEN DISPLAY (OSD) Video Picture Mode Contrast Brightness Color Tint Sharpness Vertical Position Magic Focus Color...
Owners Guide
Page 36
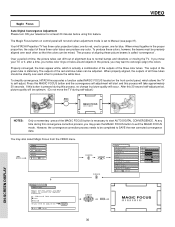
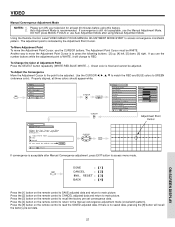
... start AUTO DIGITAL CONVERGENCE. MENU Video Audio Ch. Over a period of time, the picture tubes can drift out of the red and blue tubes can be directly over each other so that the colors can be completed to SAVE the new corrected convergence data. Properly converged, the lines appear white, which allows the TV to self-adjust. When properly aligned, the outputs of the three color tubes. The Magic Focus button on the front control panel...
... start AUTO DIGITAL CONVERGENCE. MENU Video Audio Ch. Over a period of time, the picture tubes can drift out of the red and blue tubes can be directly over each other so that the colors can be completed to SAVE the new corrected convergence data. Properly converged, the lines appear white, which allows the TV to self-adjust. When properly aligned, the outputs of the three color tubes. The Magic Focus button on the front control panel...
Owners Guide
Page 37
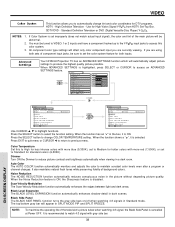
... adjusted data and return to access menu mode. Please turn ON your television for Magnetic Influences. The Adjustment Point Cursor must be adjusted. MENU Video Audio Ch. If convergence is acceptable after using this feature. 2. Adjustment Mode Auto Manual If you use Auto Adjustment Mode after Manual Convergence adjustment, press EXIT button to main picture. RESET : [3] BACK : [4] ON-SCREEN DISPLAY Press the [1] button on the remote control to return to recall the factory pre-set data. 37 Green color is no saved data, pressing the [9] button will change...
... adjusted data and return to access menu mode. Please turn ON your television for Magnetic Influences. The Adjustment Point Cursor must be adjusted. MENU Video Audio Ch. If convergence is acceptable after using this feature. 2. Adjustment Mode Auto Manual If you use Auto Adjustment Mode after Manual Convergence adjustment, press EXIT button to main picture. RESET : [3] BACK : [4] ON-SCREEN DISPLAY Press the [1] button on the remote control to return to recall the factory pre-set data. 37 Green color is no saved data, pressing the [9] button will change...
Owners Guide
Page 38
... input jacks to access this to High for High Vision Signal Y-PBPR from HDTV Set-Top Box. Color Temperature Set this color system. 3. Video Picture Mode Sports Contrast 100% CURSOR Brightness Color Tint 50% 50% Sharpness Vertical Position 50% 0 Magic Focus Color System Advanced Settings Move SEL Select CURSOR Video Advanced Settings Color Temperature High Medium Dimmer Auto Color Noise Reduction Scan Velocity Modulation Black Level Expansion Black Side Panel Move SEL Return Standard CURSOR SELECT Video Advanced Settings Color Temperature High Medium Dimmer Auto Color...
... input jacks to access this to High for High Vision Signal Y-PBPR from HDTV Set-Top Box. Color Temperature Set this color system. 3. Video Picture Mode Sports Contrast 100% CURSOR Brightness Color Tint 50% 50% Sharpness Vertical Position 50% 0 Magic Focus Color System Advanced Settings Move SEL Select CURSOR Video Advanced Settings Color Temperature High Medium Dimmer Auto Color Noise Reduction Scan Velocity Modulation Black Level Expansion Black Side Panel Move SEL Return Standard CURSOR SELECT Video Advanced Settings Color Temperature High Medium Dimmer Auto Color...
Owners Guide
Page 44
... ANT B are ON, PIP SURF mode will be set . Text appears on both antenna inputs. 2. If MOVIE/TV Ratings Lock and Closed Caption settings are in the same signal source mode (see page 45). Use the number buttons to highlight function and then press the SELECT button. Select CHANGE ACCESS CODE to keep the TV from being viewed for the chosen channel will reset the secret code number back to quit the menu. Picture-in Canada that you...
... ANT B are ON, PIP SURF mode will be set . Text appears on both antenna inputs. 2. If MOVIE/TV Ratings Lock and Closed Caption settings are in the same signal source mode (see page 45). Use the number buttons to highlight function and then press the SELECT button. Select CHANGE ACCESS CODE to keep the TV from being viewed for the chosen channel will reset the secret code number back to quit the menu. Picture-in Canada that you...

Owners Guide
Page 52
... CHANNEL SCAN. ON-SCREEN DISPLAY 52 Remember to select the correct ANTENNA/CABLE mode before using CHANNEL UP (̆) or DOWN (̄). Setup Set The Channels Ant A Source Antenna Cable(1) Auto Channel Scan Move SEL Select Cable(2) Start CURSOR Setup Set The Channels Ant A Source Antenna Cable(1) Auto Channel Scan Move SEL Select Cable(2) Start Setup Set The Channels Ant A Auto Channel Scan Scanning Channel Number: 66 SEL Cancel Cancel SELECT If the EXIT button is pressed while AUTO CHANNEL SCAN function is engaged, programming will automatically store active TV channels...
... CHANNEL SCAN. ON-SCREEN DISPLAY 52 Remember to select the correct ANTENNA/CABLE mode before using CHANNEL UP (̆) or DOWN (̄). Setup Set The Channels Ant A Source Antenna Cable(1) Auto Channel Scan Move SEL Select Cable(2) Start CURSOR Setup Set The Channels Ant A Source Antenna Cable(1) Auto Channel Scan Move SEL Select Cable(2) Start Setup Set The Channels Ant A Auto Channel Scan Scanning Channel Number: 66 SEL Cancel Cancel SELECT If the EXIT button is pressed while AUTO CHANNEL SCAN function is engaged, programming will automatically store active TV channels...

Owners Guide
Page 54
... Setup Set The Inputs Video2 Auto Link Auto Input Signal Sensor Remote Control Sensor Off Move SEL Return Move SEL Select Use CURSOR ̆ or ̄, then press the SELECT button to quit menu. Once the TV has been turned on using REMOTE CONTROL SENSOR mode, any remote control button will substitute for use with your remote control is pressed. If no remote control button is pressed after three hours. NOTES: 1. When using the AUTO LINK feature, it must be reset...
... Setup Set The Inputs Video2 Auto Link Auto Input Signal Sensor Remote Control Sensor Off Move SEL Return Move SEL Select Use CURSOR ̆ or ̄, then press the SELECT button to quit menu. Once the TV has been turned on using REMOTE CONTROL SENSOR mode, any remote control button will substitute for use with your remote control is pressed. If no remote control button is pressed after three hours. NOTES: 1. When using the AUTO LINK feature, it must be reset...
Owners Guide
Page 60
... W+1 - USEFUL INFO Features: • Superfine Picture Quality 1280 Line Horizontal Resolution • Remote (Controls many VCRs, DVD players, cable boxes, and satellite boxes.) • New Easy-to-Use (3-Language) On-Screen Menu • Full Set of Input Jacks, including S-VIDEO • COMPONENT VIDEO: Y-PB/PR • Velocity Modulation • Six Aspect Modes • Closed Caption Decoder • 2-Tuner Picture in this operating guide are subject to change without notice. 60 symbol are registered trademarks of BBE Sound, Inc...
... W+1 - USEFUL INFO Features: • Superfine Picture Quality 1280 Line Horizontal Resolution • Remote (Controls many VCRs, DVD players, cable boxes, and satellite boxes.) • New Easy-to-Use (3-Language) On-Screen Menu • Full Set of Input Jacks, including S-VIDEO • COMPONENT VIDEO: Y-PB/PR • Velocity Modulation • Six Aspect Modes • Closed Caption Decoder • 2-Tuner Picture in this operating guide are subject to change without notice. 60 symbol are registered trademarks of BBE Sound, Inc...
Owners Guide
Page 63
..., 4 Antennas (Connecting), 5, 6 Aspect Ratio, 23 Audio (Sound Enhancement) SRS, 40 BBE, 40 Audio Settings, 39 - 41 Audio Source, 41 Auto Color, 38 Auto Noise Cancel, 41 B Balance, 39 Bass, 39 Black Level Expansion, 38 Black Side Panel, 38 Brightness, 35 C Channel Manager, 42 - 43 Channel Setup, 51 Auto Channel Scan, 52 Clock Time, 50 Closed Captions Captions, 56 Color System, 38 Color Temperature, 38 Color, 35 Contrast, 35 Convergence (see Magic Focus) D Dimmer, 38 E Event Timer, 55 I Input Setup, 53 - 54 L Language Menu Language, 49 Locks Change Access Code...
..., 4 Antennas (Connecting), 5, 6 Aspect Ratio, 23 Audio (Sound Enhancement) SRS, 40 BBE, 40 Audio Settings, 39 - 41 Audio Source, 41 Auto Color, 38 Auto Noise Cancel, 41 B Balance, 39 Bass, 39 Black Level Expansion, 38 Black Side Panel, 38 Brightness, 35 C Channel Manager, 42 - 43 Channel Setup, 51 Auto Channel Scan, 52 Clock Time, 50 Closed Captions Captions, 56 Color System, 38 Color Temperature, 38 Color, 35 Contrast, 35 Convergence (see Magic Focus) D Dimmer, 38 E Event Timer, 55 I Input Setup, 53 - 54 L Language Menu Language, 49 Locks Change Access Code...


