
Owners Guide
Page 2
... be of benefit to very high voltages and other hazards. NEVER CONNECT THE TELEVISION TO 50Hz, DIRECT CURRENT, OR ANYTHING OTHER THAN THE SPECIFIED VOLTAGE. Please read it carefully and apply the knowledge you obtain from it to notify you operate these units. NO USER SERVICEABLE PARTS INSIDE. NOTE: This television receiver will display television closed captioning, ( or ), in the instructions, as this section illustrates...
... be of benefit to very high voltages and other hazards. NEVER CONNECT THE TELEVISION TO 50Hz, DIRECT CURRENT, OR ANYTHING OTHER THAN THE SPECIFIED VOLTAGE. Please read it carefully and apply the knowledge you obtain from it to notify you operate these units. NO USER SERVICEABLE PARTS INSIDE. NOTE: This television receiver will display television closed captioning, ( or ), in the instructions, as this section illustrates...

Owners Guide
Page 3
.... 16. If an outside antenna is connected to the receiver be located in any heat sources such as power-supply cord or plug is used, use caution when moving the cart/apparatus combination to avoid injury from the broadcaster or owner of the television which could cause the product to call "1-800-HITACHI." IMPORTANT SAFETY INSTRUCTIONS Read before operating equipment Follow all warnings and...
.... 16. If an outside antenna is connected to the receiver be located in any heat sources such as power-supply cord or plug is used, use caution when moving the cart/apparatus combination to avoid injury from the broadcaster or owner of the television which could cause the product to call "1-800-HITACHI." IMPORTANT SAFETY INSTRUCTIONS Read before operating equipment Follow all warnings and...
Owners Guide
Page 5
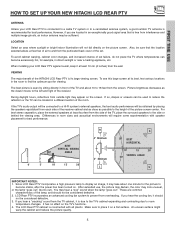
..." sound when the lamp "goes out." During daylight hours, reflections from outside light may take about 10 to the height of the picture screen center. It has no effect on the picture screen. To avoid cabinet warping, cabinet color changes, and increased chance of set . If so, drapes or screens can become stable, after the power has been turned on the screen. LCD Rear PTV incorporates an advanced cooling fan...
..." sound when the lamp "goes out." During daylight hours, reflections from outside light may take about 10 to the height of the picture screen center. It has no effect on the picture screen. To avoid cabinet warping, cabinet color changes, and increased chance of set . If so, drapes or screens can become stable, after the power has been turned on the screen. LCD Rear PTV incorporates an advanced cooling fan...
Owners Guide
Page 6
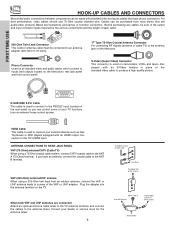
... inputs and outputs located on the TV. HDMI Cable This cable is used on camcorders, VCRs and laser- Phono Connector Used on all standard video and audio cables which connect to the antenna mixer. FIRST TIME USE HOOK-UP CABLES AND CONNECTORS Most video/audio connections between components can be made with shielded video and audio cables that sell audio/video products. If you can be connected to an antenna adapter (300-Ohm to the RS232C input located on the television...
... inputs and outputs located on the TV. HDMI Cable This cable is used on camcorders, VCRs and laser- Phono Connector Used on all standard video and audio cables which connect to the antenna mixer. FIRST TIME USE HOOK-UP CABLES AND CONNECTORS Most video/audio connections between components can be made with shielded video and audio cables that sell audio/video products. If you can be connected to an antenna adapter (300-Ohm to the RS232C input located on the television...

Owners Guide
Page 8
... LAMP LED TEMP LED POWER INDICATION LIGHT ON BLINKING LIGHT ON BLINKING LIGHT ON FAST BLINKING MEANING NO LAMP LIGHT or BROKEN LAMP WRONG LAMP UNIT ASSEMBLY / LAMP DOOR OPEN Too hot inside the OPTIC unit COOLING FAN STOPPED NORMAL OPERATION 1. ~5 secs. Make sure to cool down . FIRST TIME USE SIDE PANEL CONTROLS ቩ POWER light This light is on . Power ON is available. If light is blinking, lamp cover is cooling down . Your Hitachi LCD Rear Projection Television may appear to be OFF when it is set to replace if LAMP still...
... LAMP LED TEMP LED POWER INDICATION LIGHT ON BLINKING LIGHT ON BLINKING LIGHT ON FAST BLINKING MEANING NO LAMP LIGHT or BROKEN LAMP WRONG LAMP UNIT ASSEMBLY / LAMP DOOR OPEN Too hot inside the OPTIC unit COOLING FAN STOPPED NORMAL OPERATION 1. ~5 secs. Make sure to cool down . FIRST TIME USE SIDE PANEL CONTROLS ቩ POWER light This light is on . Power ON is available. If light is blinking, lamp cover is cooling down . Your Hitachi LCD Rear Projection Television may appear to be OFF when it is set to replace if LAMP still...
Owners Guide
Page 13
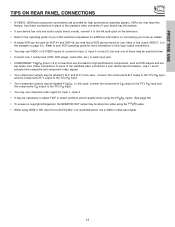
... TV's PR input. • You may use composite video signal for Input 1~Input 5. • It may be necessary to adjust TINT to obtain optimum picture quality when using HDMI or DVI input from a Set-Top-Box, it to the left audio jack on the television. • Refer to the operating guide of the standard video connection if your VCR operating guide for high performance laserdisc players, VCRs etc. that a VCR cannot record its own video or line output (INPUT...
... TV's PR input. • You may use composite video signal for Input 1~Input 5. • It may be necessary to adjust TINT to obtain optimum picture quality when using HDMI or DVI input from a Set-Top-Box, it to the left audio jack on the television. • Refer to the operating guide of the standard video connection if your VCR operating guide for high performance laserdisc players, VCRs etc. that a VCR cannot record its own video or line output (INPUT...

Owners Guide
Page 15
... best performance, video and audio cables should be OFF. Connect the cable from the INPUTS menu to return to show the INPUTS menu. However, you use to connect the VCR, camcorder, laserdisc player, DVD player, or HDTV Set Top Box to your TV set below. 2. Press the INPUTS button, then select INPUT 1 from the VIDEO INPUT JACK on the TV set is dependent on the model and features of each component for the location of video and audio inputs and outputs. Check the owner's manual of...
... best performance, video and audio cables should be OFF. Connect the cable from the INPUTS menu to return to show the INPUTS menu. However, you use to connect the VCR, camcorder, laserdisc player, DVD player, or HDTV Set Top Box to your TV set below. 2. Press the INPUTS button, then select INPUT 1 from the VIDEO INPUT JACK on the TV set is dependent on the model and features of each component for the location of video and audio inputs and outputs. Check the owner's manual of...
Owners Guide
Page 16
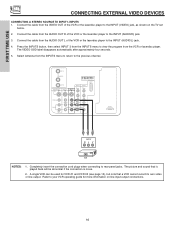
... played back will be used for more information on the TV set below. 2. FIRST TIME USE CONNECTING EXTERNAL VIDEO DEVICES CONNECTING A STEREO SOURCE TO INPUT1~INPUT5 1. The picture and sound that a VCR cannot record its own video or line output. Refer to the INPUT (VIDEO) jack, as shown on line input-output connections. 16 Connect the cable from the INPUTS menu to return to rear panel jacks. ANT A TO CONVERTER ANT B MONITOR OUT S-VIDEO INPUT 4 INPUT 3 INPUT 2 Y/ VIDEO INPUT 1 Y/ VIDEO PB PB HDMI 1 VIDEO L AUDIO R AUDIO TO HI-FI...
... played back will be used for more information on the TV set below. 2. FIRST TIME USE CONNECTING EXTERNAL VIDEO DEVICES CONNECTING A STEREO SOURCE TO INPUT1~INPUT5 1. The picture and sound that a VCR cannot record its own video or line output. Refer to the INPUT (VIDEO) jack, as shown on line input-output connections. 16 Connect the cable from the INPUTS menu to return to rear panel jacks. ANT A TO CONVERTER ANT B MONITOR OUT S-VIDEO INPUT 4 INPUT 3 INPUT 2 Y/ VIDEO INPUT 1 Y/ VIDEO PB PB HDMI 1 VIDEO L AUDIO R AUDIO TO HI-FI...

Owners Guide
Page 18
...ANT B MONITOR OUT S-VIDEO INPUT 4 INPUT 3 INPUT 2 Y/ VIDEO PB INPUT 1 Y/ VIDEO PB HDMI 1 VIDEO L AUDIO R AUDIO TO HI-FI PR PR (MONO) (MONO) (MONO) (MONO) TV AS CENTER RS232C 1 2 345 6 789 HDMI Cable HDMI Output DVD Player or HDTV STB DVI-HDMI ANT A TO CONVERTER ANT B MONITOR OUT S-VIDEO INPUT 4 INPUT 3 INPUT 2 Y/ VIDEO PB INPUT 1 Y/ VIDEO PB HDMI 1 VIDEO L AUDIO R AUDIO TO HI-FI PR PR (MONO) (MONO) (MONO) (MONO) TV AS CENTER RS232C 1 2 345 6 78 9 DVI to rear panel jacks. When using HDMI connections to the previous channel. Select Antenna from the HDTV set -up...
...ANT B MONITOR OUT S-VIDEO INPUT 4 INPUT 3 INPUT 2 Y/ VIDEO PB INPUT 1 Y/ VIDEO PB HDMI 1 VIDEO L AUDIO R AUDIO TO HI-FI PR PR (MONO) (MONO) (MONO) (MONO) TV AS CENTER RS232C 1 2 345 6 789 HDMI Cable HDMI Output DVD Player or HDTV STB DVI-HDMI ANT A TO CONVERTER ANT B MONITOR OUT S-VIDEO INPUT 4 INPUT 3 INPUT 2 Y/ VIDEO PB INPUT 1 Y/ VIDEO PB HDMI 1 VIDEO L AUDIO R AUDIO TO HI-FI PR PR (MONO) (MONO) (MONO) (MONO) TV AS CENTER RS232C 1 2 345 6 78 9 DVI to rear panel jacks. When using HDMI connections to the previous channel. Select Antenna from the HDTV set -up...
Owners Guide
Page 19
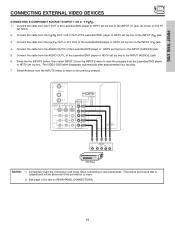
... cable from the INPUTS menu to the INPUT (AUDIO/L) jack. 6. See page 13 for tips on the TV set top box to the previous channel. Select Antenna from the Laserdisc/DVD player or HDTV set top box to the INPUT (PB) jack. 3. Connect the cable from the Y OUT of the Laserdisc/DVD player or HDTV set top box to view the program from the INPUTS menu to return to the INPUT (Y) jack, as shown on REAR PANEL CONNECTIONS. 19 FIRST TIME USE CONNECTING EXTERNAL VIDEO DEVICES CONNECTING...
... cable from the INPUTS menu to the INPUT (AUDIO/L) jack. 6. See page 13 for tips on the TV set top box to the previous channel. Select Antenna from the Laserdisc/DVD player or HDTV set top box to the INPUT (PB) jack. 3. Connect the cable from the Y OUT of the Laserdisc/DVD player or HDTV set top box to view the program from the INPUTS menu to return to the INPUT (Y) jack, as shown on REAR PANEL CONNECTIONS. 19 FIRST TIME USE CONNECTING EXTERNAL VIDEO DEVICES CONNECTING...
Owners Guide
Page 20
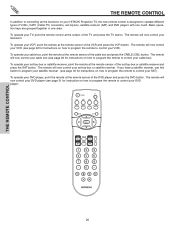
To operate your TV, point the remote control at the screen of the cable box and press the CABLE (CBL) button. The remote will now control your set -top-box, satellite receiver (SAT) and DVD players with one area. If you have a satellite receiver, use this button to program your satellite receiver (see page 29 for instructions on how to program the remote to control your cable box). The remote will now control your cable box (see page 30 for instructions on how...
To operate your TV, point the remote control at the screen of the cable box and press the CABLE (CBL) button. The remote will now control your set -top-box, satellite receiver (SAT) and DVD players with one area. If you have a satellite receiver, use this button to program your satellite receiver (see page 29 for instructions on how to program the remote to control your cable box). The remote will now control your cable box (see page 30 for instructions on how...
Owners Guide
Page 26
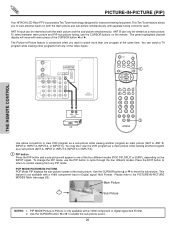
... main picture. Main Picture Sub Picture NOTES: 1. The green highlighted channel display will appear in one program at the same time. PIP MODE Picture-in -Picture feature is convenient when you to normal viewing from any PIP mode. ANT A input can watch more than one of the video inputs. PICTURE-IN-PICTURE (PIP) Your HITACHI LCD Rear PTV incorporates Two Tuner technology designed for each. Press the EXIT button to return to view antenna inputs on the remote. The Picture-in -Picture...
... main picture. Main Picture Sub Picture NOTES: 1. The green highlighted channel display will appear in one program at the same time. PIP MODE Picture-in -Picture feature is convenient when you to normal viewing from any PIP mode. ANT A input can watch more than one of the video inputs. PICTURE-IN-PICTURE (PIP) Your HITACHI LCD Rear PTV incorporates Two Tuner technology designed for each. Press the EXIT button to return to view antenna inputs on the remote. The Picture-in -Picture...

Owners Guide
Page 30
...-CODED SET-TOP-BOX/SATELLITE RECEIVER buttons These buttons transmit the chosen pre-coded set-topbox/satellite codes. ቤ EXCLUSIVE TV buttons These buttons are removed from the remote control. Hold down the SAT button on page 33. Aim the remote at the front of your set-top-box/satellite receiver when the correct two digit preset code is entered. The remote will remember the codes you have programmed until the batteries are for operating the TV...
...-CODED SET-TOP-BOX/SATELLITE RECEIVER buttons These buttons transmit the chosen pre-coded set-topbox/satellite codes. ቤ EXCLUSIVE TV buttons These buttons are removed from the remote control. Hold down the SAT button on page 33. Aim the remote at the front of your set-top-box/satellite receiver when the correct two digit preset code is entered. The remote will remember the codes you have programmed until the batteries are for operating the TV...

Owners Guide
Page 36
... (FRN) Set the Clock Set Sleep Timer Set Day/Night Timer Set Event Timer Set Auto Power Off Menu Preference Screen Saver Set The Inputs Set Black Side Panel Set Closed Captions Set Monitor Out Set AV Control Change Lock access code. Choose to display dialogue/text. Block various types of movies and television programming based on the Canadian ratings system. Set the gray side bars on/off automatically when a video signal is not detected for TV programs. Set TV to turn off when watching 4:3 signals in antenna B. Channel Manager Locks Timers Setup ON-SCREEN DISPLAY (OSD...
... (FRN) Set the Clock Set Sleep Timer Set Day/Night Timer Set Event Timer Set Auto Power Off Menu Preference Screen Saver Set The Inputs Set Black Side Panel Set Closed Captions Set Monitor Out Set AV Control Change Lock access code. Choose to display dialogue/text. Block various types of movies and television programming based on the Canadian ratings system. Set the gray side bars on/off automatically when a video signal is not detected for TV programs. Set TV to turn off when watching 4:3 signals in antenna B. Channel Manager Locks Timers Setup ON-SCREEN DISPLAY (OSD...

Owners Guide
Page 39
... video menu settings on the user's preference. ON-SCREEN DISPLAY Video Picture Mode Contrast Brightness Color Tint Sharpness Color Temperature Black Enhancement Contrast Mode Reset Video Settings Move SEL Select ANT A/B Day 100% 50% 50% Night 50% High High Dynamic Video Color Management Color Decoding Auto Color Noise Reduction Auto Movie Mode Move SEL Select Off Low Off Color Management Use this function to adjust and balance the listed individual colors to make the color brighter (+) or darker (-). NOTE: When the Set User Colors box is not checked...
... video menu settings on the user's preference. ON-SCREEN DISPLAY Video Picture Mode Contrast Brightness Color Tint Sharpness Color Temperature Black Enhancement Contrast Mode Reset Video Settings Move SEL Select ANT A/B Day 100% 50% 50% Night 50% High High Dynamic Video Color Management Color Decoding Auto Color Noise Reduction Auto Movie Mode Move SEL Select Off Low Off Color Management Use this function to adjust and balance the listed individual colors to make the color brighter (+) or darker (-). NOTE: When the Set User Colors box is not checked...
Owners Guide
Page 40
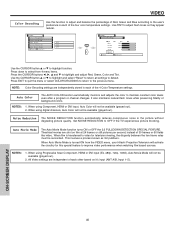
... appear natural. Use TINT to the previous menu. Auto Color The AUTO COLOR function automatically monitors and adjusts the color to highlight function. When using Progressive Scan Component, HDMI or DVI input (Ex. 480p, 720p, 1080i), Auto Movie Mode will not be reconciled. Video Color Management Color Decoding Auto Color Noise Reduction Auto Movie Mode Move SEL Select Off Low Off Video Color Decoding RGB R G B Red 50% Green 50% or Color 50% Tint Reset Move SEL Return Use the CURSOR button ̆...
... appear natural. Use TINT to the previous menu. Auto Color The AUTO COLOR function automatically monitors and adjusts the color to highlight function. When using Progressive Scan Component, HDMI or DVI input (Ex. 480p, 720p, 1080i), Auto Movie Mode will not be reconciled. Video Color Management Color Decoding Auto Color Noise Reduction Auto Movie Mode Move SEL Select Off Low Off Video Color Decoding RGB R G B Red 50% Green 50% or Color 50% Tint Reset Move SEL Return Use the CURSOR button ̆...
Owners Guide
Page 48
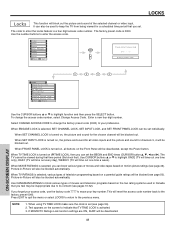
... buttons on , all video inputs and the picture and sound for a scheduled time period that TV TIME LOCK is turned on (❒✔ TIME LOCK), then you can also be used in Canada that time period (Set clock first). When FRONT PANEL LOCK is a four digit access code number. This will reset the access code number back to highlight function and then press the SELECT button. Use the number buttons to its content (see page 49). Video Audio Aspect Chan. To change the factory...
... buttons on , all video inputs and the picture and sound for a scheduled time period that TV TIME LOCK is turned on (❒✔ TIME LOCK), then you can also be used in Canada that time period (Set clock first). When FRONT PANEL LOCK is a four digit access code number. This will reset the access code number back to highlight function and then press the SELECT button. Use the number buttons to its content (see page 49). Video Audio Aspect Chan. To change the factory...

Owners Guide
Page 59
... you want to watch it detects a video signal to input 2. This is turned on your video input device play button. This feature is now reset and will turn on . Setup Menu Preference Screen Saver Set The Inputs Set Black Side Panel Set Closed Captions or Set Monitor Out Set AV Control Move SEL Select Use the CURSOR buttons to highlight the name of the five video inputs. Setup Set The Inputs Video1 Rename List Video2 AVR DVD Video3 CAM DVD2 Video4 CBL DVD3...
... you want to watch it detects a video signal to input 2. This is turned on your video input device play button. This feature is now reset and will turn on . Setup Menu Preference Screen Saver Set The Inputs Set Black Side Panel Set Closed Captions or Set Monitor Out Set AV Control Move SEL Select Use the CURSOR buttons to highlight the name of the five video inputs. Setup Set The Inputs Video1 Rename List Video2 AVR DVD Video3 CAM DVD2 Video4 CBL DVD3...

Owners Guide
Page 62
...-HITACHI." If "LAMP" indicator is removed, do not put flammable materials and metal objects inside the lamp receptacle on the TV set. Dispose of the lamp. A "LAMP" indicator will not come on. 62 Unplug product's power cord from flammable materials. • Do not pour water onto the removed lamp or put any object inside the lamp compartment. • When installing a new lamp, follow handling instruction included with gloves to cool...
...-HITACHI." If "LAMP" indicator is removed, do not put flammable materials and metal objects inside the lamp receptacle on the TV set. Dispose of the lamp. A "LAMP" indicator will not come on. 62 Unplug product's power cord from flammable materials. • Do not pour water onto the removed lamp or put any object inside the lamp compartment. • When installing a new lamp, follow handling instruction included with gloves to cool...
Owners Guide
Page 72
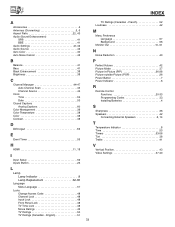
... Audio Settings 41-42 Audio Source 42 Auto Color 40 Auto Noise Cancel 42 B Balance 41 Bass 41 Black Enhancement 38 Brightness 38 C Channel Manager 44-47 Auto Channel Scan 45 Channel Source 44 Clock Time 53 Date 53 Closed Captions Analog Captions 60 Color Management 39 Color Temperature 38 Color 38 Contrast 38 D DVI Input 18 E Event Timer 55 H HDMI 11, 18 I Input Setup 59 Inputs Button 23 L Lamp Lamp Indicator 8 Lamp Replacement 62-65 Language Menu Language 57 Locks Change Access Code 48 Channel Lock 48 Input Lock 48 Front Panel Lock...
... Audio Settings 41-42 Audio Source 42 Auto Color 40 Auto Noise Cancel 42 B Balance 41 Bass 41 Black Enhancement 38 Brightness 38 C Channel Manager 44-47 Auto Channel Scan 45 Channel Source 44 Clock Time 53 Date 53 Closed Captions Analog Captions 60 Color Management 39 Color Temperature 38 Color 38 Contrast 38 D DVI Input 18 E Event Timer 55 H HDMI 11, 18 I Input Setup 59 Inputs Button 23 L Lamp Lamp Indicator 8 Lamp Replacement 62-65 Language Menu Language 57 Locks Change Access Code 48 Channel Lock 48 Input Lock 48 Front Panel Lock...


