Owners Guide
Page 2
...). POWER SOURCE THIS PLASMA TELEVISION IS DESIGNED TO OPERATE ON 120 VOLTS 60Hz, AC CURRENT. CAUTION: Never remove the back cover of the AVC center/display monitor as improper changes or modifications not expressly approved by Hitachi America, Ltd. Plasma television consists of HITACHI Plasma Televisions. REFER SERVICING TO QUALIFIED SERVICE PERSONNEL. CAUTION: Adjust only those controls that are not expressly approved by HITACHI could void the user's authority to HITACHI...
...). POWER SOURCE THIS PLASMA TELEVISION IS DESIGNED TO OPERATE ON 120 VOLTS 60Hz, AC CURRENT. CAUTION: Never remove the back cover of the AVC center/display monitor as improper changes or modifications not expressly approved by Hitachi America, Ltd. Plasma television consists of HITACHI Plasma Televisions. REFER SERVICING TO QUALIFIED SERVICE PERSONNEL. CAUTION: Adjust only those controls that are not expressly approved by HITACHI could void the user's authority to HITACHI...
Owners Guide
Page 3
... capable of antenna-discharge unit, connection to an antenna discharge unit, size of grounding connectors, location of receiving analog basic, digital basic and digital premium cable television programming by your local cable company. • This product incorporates copyright protection technology that produce heat. 9. Dispose of cable entry as power-supply cord or plug is prohibited. 3 patents and other fixed (nonmoving) patterns can cause permanent damage to view encrypted digital programming. Reverse engineering...
... capable of antenna-discharge unit, connection to an antenna discharge unit, size of grounding connectors, location of receiving analog basic, digital basic and digital premium cable television programming by your local cable company. • This product incorporates copyright protection technology that produce heat. 9. Dispose of cable entry as power-supply cord or plug is prohibited. 3 patents and other fixed (nonmoving) patterns can cause permanent damage to view encrypted digital programming. Reverse engineering...
Owners Guide
Page 4
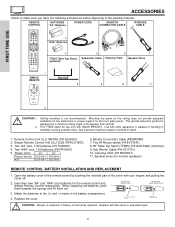
... INSTALLATION AND REPLACEMENT 1. REMOTE CONTROL BATTERIES "AA" Batteries POWER CORD MONITOR CONNECTION CABLE IR MOUSE CABLE 3. "AAA" Batteries 4. See important marking located on bottom of the cover with Hitachi 55HDX61. Replace with other apparatus is incorrectly replaced. CAUTION: 1. 2. Lift up on the ceiling does not provide adequate ventilation for the electronics or proper support for use only with your fingers and pulling the cover off. 2. FIRST TIME USE...
... INSTALLATION AND REPLACEMENT 1. REMOTE CONTROL BATTERIES "AA" Batteries POWER CORD MONITOR CONNECTION CABLE IR MOUSE CABLE 3. "AAA" Batteries 4. See important marking located on bottom of the cover with Hitachi 55HDX61. Replace with other apparatus is incorrectly replaced. CAUTION: 1. 2. Lift up on the ceiling does not provide adequate ventilation for the electronics or proper support for use only with your fingers and pulling the cover off. 2. FIRST TIME USE...
Owners Guide
Page 5
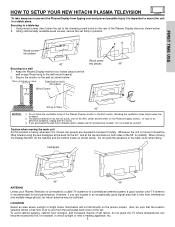
... cords, one on the AVC center and the other on the picture screen. Handgrips 42" 55" ANTENNA Unless your Plasma Television is connected to a cable TV system or to the wall mount bracket. 2. Do not block the ventilation holes of the Plasma Display stand as shown below. However, if you purchased the wall mount bracket option, please ask for example, in position. FIRST TIME USE HOW TO SETUP YOUR NEW HITACHI PLASMA TELEVISION...
... cords, one on the AVC center and the other on the picture screen. Handgrips 42" 55" ANTENNA Unless your Plasma Television is connected to a cable TV system or to the wall mount bracket. 2. Do not block the ventilation holes of the Plasma Display stand as shown below. However, if you purchased the wall mount bracket option, please ask for example, in position. FIRST TIME USE HOW TO SETUP YOUR NEW HITACHI PLASMA TELEVISION...
Owners Guide
Page 6
... wait a little before turning ON again. 6 To see image-like when the picture varied. If the TV's audio output will be connected to a Hi-Fi system's external speakers, the best audio performance will be degraded to such extent that this large screen at point-blank range, a random fine grain may be obtained by placing the speakers equidistant from the plasma display monitor's panel that of the...
... wait a little before turning ON again. 6 To see image-like when the picture varied. If the TV's audio output will be connected to a Hi-Fi system's external speakers, the best audio performance will be degraded to such extent that this large screen at point-blank range, a random fine grain may be obtained by placing the speakers equidistant from the plasma display monitor's panel that of the...
Owners Guide
Page 7
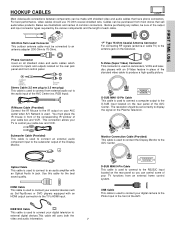
... antenna adapter (300-Ohm to 75-Ohm). You must be set correctly to display the signal on the rear panel so you can control some of your digital television to external digital devices.This cable will carry both the video and audio information. 7 This connection allows your TV to control your external devices such as Set-Top-Boxes or DVD players equipped with shielded video and audio cables that sell audio/video products. Monitor Connection Cable (Provided) This cable is used to connect...
... antenna adapter (300-Ohm to 75-Ohm). You must be set correctly to display the signal on the rear panel so you can control some of your digital television to external digital devices.This cable will carry both the video and audio information. 7 This connection allows your TV to control your external devices such as Set-Top-Boxes or DVD players equipped with shielded video and audio cables that sell audio/video products. Monitor Connection Cable (Provided) This cable is used to connect...
Owners Guide
Page 10
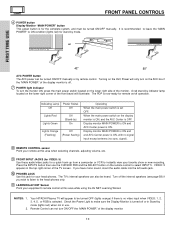
... HITACHI Plasma TV will illuminate. When the main power switch on the remote control to instantly view your head-phones. If you wish to listen to ON condition (lights red) for stand-by ) On Lights Orange Off (Flashing) (Power Saving) Operating When the main power switch is set OFF. FRONT PANEL CONTROLS ቧ POWER button Display Monitor "MAIN POWER" button This power button is for the complete system, and must be turned ON/OFF manually or by remote control. STANDBY (RED) ON (GREEN...
... HITACHI Plasma TV will illuminate. When the main power switch on the remote control to instantly view your head-phones. If you wish to listen to ON condition (lights red) for stand-by ) On Lights Orange Off (Flashing) (Power Saving) Operating When the main power switch is set OFF. FRONT PANEL CONTROLS ቧ POWER button Display Monitor "MAIN POWER" button This power button is for the complete system, and must be turned ON/OFF manually or by remote control. STANDBY (RED) ON (GREEN...
Owners Guide
Page 11
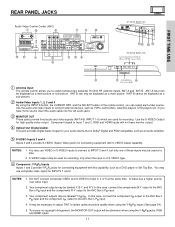
... provides Digital Audio Output for your audio device that is of S-VIDEO type. ቧ Component: Y-PBPR Inputs Inputs 1 and 2 provide Y-PBPR jacks for connecting equipment with S-VIDEO output capability. FIRST TIME USE REAR PANEL JACKS Audio Video Control Center (AVC) ቢ ቯ ቦ ቨቪ ቫ ትታ ብ ቤ ባ ቧ ቭ ቮቩ 42" Monitor Bottom View 55" Monitor Bottom View ቢ Antenna Input The remote control allows you have mono sound, insert the audio cable...
... provides Digital Audio Output for your audio device that is of S-VIDEO type. ቧ Component: Y-PBPR Inputs Inputs 1 and 2 provide Y-PBPR jacks for connecting equipment with S-VIDEO output capability. FIRST TIME USE REAR PANEL JACKS Audio Video Control Center (AVC) ቢ ቯ ቦ ቨቪ ቫ ትታ ብ ቤ ባ ቧ ቭ ቮቩ 42" Monitor Bottom View 55" Monitor Bottom View ቢ Antenna Input The remote control allows you have mono sound, insert the audio cable...
Owners Guide
Page 12
... Because digital television (DTV) signals remain in digital format, HDMI assures that pristine high-definition images retain the highest video quality from your TV On-Screen Display. ተ Subwoofer Out Connect this connection, your Plasma Television's remote control in a single cable. For model 55HDX61, the stand (TTB55) is the next-generation all the way to control basic equipment functions (such as a Digital VCR (D-VHS or Set-Top-Box) by the A/V network feature. HDMI, the HDMI logo...
... Because digital television (DTV) signals remain in digital format, HDMI assures that pristine high-definition images retain the highest video quality from your TV On-Screen Display. ተ Subwoofer Out Connect this connection, your Plasma Television's remote control in a single cable. For model 55HDX61, the stand (TTB55) is the next-generation all the way to control basic equipment functions (such as a Digital VCR (D-VHS or Set-Top-Box) by the A/V network feature. HDMI, the HDMI logo...

Owners Guide
Page 15
... cable from the INPUTS menu to return to show the INPUTS menu. Select Ant A or B from the VIDEO OUT of each component. The following connection diagrams are offered as shown on the model and features of each component for the location of video and audio inputs and outputs. However, you use to connect the VCR, camcorder, laserdisc player, DVD player, or HDTV Set Top Box to the INPUT (VIDEO) jack, as suggestions. Check the owner's manual...
... cable from the INPUTS menu to return to show the INPUTS menu. Select Ant A or B from the VIDEO OUT of each component. The following connection diagrams are offered as shown on the model and features of each component for the location of video and audio inputs and outputs. However, you use to connect the VCR, camcorder, laserdisc player, DVD player, or HDTV Set Top Box to the INPUT (VIDEO) jack, as suggestions. Check the owner's manual...

Owners Guide
Page 18
... TIME USE CONNECTING EXTERNAL VIDEO SOURCES CONNECTING A COMPONENT SOURCE WITH HDMI or DVI CAPABILITY TO INPUT 1 or INPUT 2 1. HDMI is loose. 2. The connected digital output device controls the HDMI interface so proper set top box or DVD player. Press the INPUTS button, then select INPUTS 1 or 2 to prevent illegal copying of uncompressed video to rear panel jacks. It establishes a one-way point-to-point connection for delivery of video contents. 3. Completely insert the connection cord plugs when connecting to a display. 4. Connect the HDMI or DVI to HDMI connection cable...
... TIME USE CONNECTING EXTERNAL VIDEO SOURCES CONNECTING A COMPONENT SOURCE WITH HDMI or DVI CAPABILITY TO INPUT 1 or INPUT 2 1. HDMI is loose. 2. The connected digital output device controls the HDMI interface so proper set top box or DVD player. Press the INPUTS button, then select INPUTS 1 or 2 to prevent illegal copying of uncompressed video to rear panel jacks. It establishes a one-way point-to-point connection for delivery of video contents. 3. Completely insert the connection cord plugs when connecting to a display. 4. Connect the HDMI or DVI to HDMI connection cable...
Owners Guide
Page 32
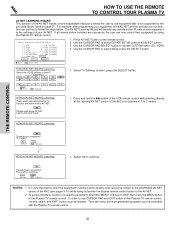
... Receiver ( ) PV Recorder ( ) Cable Box BACK SETUP ( ) Set Top Box ( ) DVD3 (Custom) ( ) VCR3 (Custom) ( ) PVR2 (Custom) ( ) CBL2 (Custom) ( ) STB2 (Custom) List MODIFY 1. Use the CURSOR PAD/SELECT button to learn ? Select TV Softkeys to choose CUSTOM option (Ex. Try again? NO Move YES SEL Select YES HITACHI AV NET WIZARD (Learning) 1. It is not supported by using the Plasma TV remote control. To access the Menu...
... Receiver ( ) PV Recorder ( ) Cable Box BACK SETUP ( ) Set Top Box ( ) DVD3 (Custom) ( ) VCR3 (Custom) ( ) PVR2 (Custom) ( ) CBL2 (Custom) ( ) STB2 (Custom) List MODIFY 1. Use the CURSOR PAD/SELECT button to learn ? Select TV Softkeys to choose CUSTOM option (Ex. Try again? NO Move YES SEL Select YES HITACHI AV NET WIZARD (Learning) 1. It is not supported by using the Plasma TV remote control. To access the Menu...
Owners Guide
Page 38
... any channel to your favorite channel list by CHANNEL WHEEL up (̆) or CHANNEL WHEEL down the Channel (CH) wheel until the displayed channel turns highlighted GREEN to WHITE. Use the CHANNEL SELECTOR buttons to enter one more time, or VOL Up (̆). Channel selection may also be at a volume level 31 or greater, the volume level will display automatically when MUTE/SOFT MUTE is on and Closed Caption is turned on...
... any channel to your favorite channel list by CHANNEL WHEEL up (̆) or CHANNEL WHEEL down the Channel (CH) wheel until the displayed channel turns highlighted GREEN to WHITE. Use the CHANNEL SELECTOR buttons to enter one more time, or VOL Up (̆). Channel selection may also be at a volume level 31 or greater, the volume level will display automatically when MUTE/SOFT MUTE is on and Closed Caption is turned on...
Owners Guide
Page 43
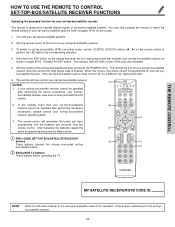
...-CODED SET-TOP-BOX/SATELLITE RECEIVER buttons ባ ቢ These buttons transmit the chosen pre-coded set -top-box/satellite receiver operating guide. 3. After replacing the batteries repeat the entire programming procedure as shown on page 49-50. Hold down the ENT button on the remote control to position the LED light to instruction manual of the set-top-box/satellite receiver for operation of the buttons exclusively for the set -top-box/satellite receiver does not turn...
...-CODED SET-TOP-BOX/SATELLITE RECEIVER buttons ባ ቢ These buttons transmit the chosen pre-coded set -top-box/satellite receiver operating guide. 3. After replacing the batteries repeat the entire programming procedure as shown on page 49-50. Hold down the ENT button on the remote control to position the LED light to instruction manual of the set-top-box/satellite receiver for operation of the buttons exclusively for the set -top-box/satellite receiver does not turn...

Owners Guide
Page 52
... Video Audio Aspect Picture Mode Contrast Brightness Color Tint Sharpness Color Temperature Black Enhancement Contrast Mode Reset Video Settings Color Management Color Decoding Auto Color Noise Reduction Auto Movie Mode Treble Bass Balance SRS TruBass Matrix Surround Audio Source Internal Speakers Auto Noise Cancel Perfect Volume Language Digital Output DRC 4:3 Standard 4:3 Expanded 4:3 Zoom 1 4:3 Zoom 2 16:9 Standard 16:9 Zoom OSD (On-Screen Display) Select between stations. Adjust tint. It also maintains natural flesh tones while preserving fidelity of Red, Green...
... Video Audio Aspect Picture Mode Contrast Brightness Color Tint Sharpness Color Temperature Black Enhancement Contrast Mode Reset Video Settings Color Management Color Decoding Auto Color Noise Reduction Auto Movie Mode Treble Bass Balance SRS TruBass Matrix Surround Audio Source Internal Speakers Auto Noise Cancel Perfect Volume Language Digital Output DRC 4:3 Standard 4:3 Expanded 4:3 Zoom 1 4:3 Zoom 2 16:9 Standard 16:9 Zoom OSD (On-Screen Display) Select between stations. Adjust tint. It also maintains natural flesh tones while preserving fidelity of Red, Green...

Owners Guide
Page 53
... Audio Video Control Center (AVC). Label Video Inputs , VCR, DVD, etc. Set Clock Settings. Set Sleep Timer intervals (30 min. Set the IEEE 1394 function in the rear panel of movies and television programming based on the Canadian ratings system. Power Swivel enabled. Change Lock access code. Block various types of the Channel Manager OSD is installed in stand by. Set Day/Night picture mode settings. OSD (On-Screen Display) Channel Manager Locks Timers Setup Power Swivel Set the Antenna Auto Channel Scan Signal Meter Channel List Change Access Code Engage Lock...
... Audio Video Control Center (AVC). Label Video Inputs , VCR, DVD, etc. Set Clock Settings. Set Sleep Timer intervals (30 min. Set the IEEE 1394 function in the rear panel of movies and television programming based on the Canadian ratings system. Power Swivel enabled. Change Lock access code. Block various types of the Channel Manager OSD is installed in stand by. Set Day/Night picture mode settings. OSD (On-Screen Display) Channel Manager Locks Timers Setup Power Swivel Set the Antenna Auto Channel Scan Signal Meter Channel List Change Access Code Engage Lock...

Owners Guide
Page 56
... Off ON-SCREEN DISPLAY Color Management Use this input to the Day VIDEO mode. Adjust the GAIN settings to make them either deeper or more pure depending on this function to adjust and balance the listed individual colors to the initial conditions as explained above. Video Color Management Color Decoding Auto Color Noise Reduction Auto Movie Mode Move SEL Select Off Low Off Video Color Management Set User Colors Magenta Red Yellow Green Cyan Blue Reset Phase 50...
... Off ON-SCREEN DISPLAY Color Management Use this input to the Day VIDEO mode. Adjust the GAIN settings to make them either deeper or more pure depending on this function to adjust and balance the listed individual colors to the initial conditions as explained above. Video Color Management Color Decoding Auto Color Noise Reduction Auto Movie Mode Move SEL Select Off Low Off Video Color Management Set User Colors Magenta Red Yellow Green Cyan Blue Reset Phase 50...

Owners Guide
Page 75
... STB2 VCR VCR2 VCR3 Use CURSOR PAD then press the SELECT button to quit the menu. ON-SCREEN DISPLAY 75 Depending on received signals, some images and Closed Caption displays may be reset before AUTO LINK is turned on your TV as described above. 2. However, intended operation is turned on (VCR, laserdisc, or DVD) and any remote control button will turn on . Set Black Side Panel The BLACK SIDE PANEL function turns the gray side bars...
... STB2 VCR VCR2 VCR3 Use CURSOR PAD then press the SELECT button to quit the menu. ON-SCREEN DISPLAY 75 Depending on received signals, some images and Closed Caption displays may be reset before AUTO LINK is turned on your TV as described above. 2. However, intended operation is turned on (VCR, laserdisc, or DVD) and any remote control button will turn on . Set Black Side Panel The BLACK SIDE PANEL function turns the gray side bars...
Owners Guide
Page 94
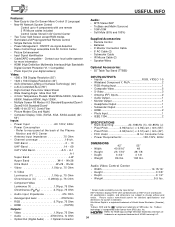
... digital camera) Video: • 1366 x 768 Display Resolution (55") • 1024 x 1024 Display Resolution (42") • ALiS (Alternate Lighting of HDMI Licensing LLC. 94 USEFUL INFO Features: • New Easy-to-Use On-Screen Menu Control (3 Language) • New AV Network System Control Control up to rear panel at the back of the Plasma Monitor and AVC Center • Antenna input impedance 75 Ohm • Channel coverage 191ch. Refer to 4 components with an HDTV Tuner...
... digital camera) Video: • 1366 x 768 Display Resolution (55") • 1024 x 1024 Display Resolution (42") • ALiS (Alternate Lighting of HDMI Licensing LLC. 94 USEFUL INFO Features: • New Easy-to-Use On-Screen Menu Control (3 Language) • New AV Network System Control Control up to rear panel at the back of the Plasma Monitor and AVC Center • Antenna input impedance 75 Ohm • Channel coverage 191ch. Refer to 4 components with an HDTV Tuner...

Owners Guide
Page 97
... Menu Preference Language 72 Background 73 Monitor Out 77 P Perfect Volume 58 Photo Input 34-35 Picture Mode 54 Picture-in-Picture (PIP 39-41 Position (RGB Input) Horizontal 86 Vertical 86 R Remote Control Functions 27-50 Programming Codes 49-50 Installing Batteries 4 R/G/B 25, 79-88 S E Event Timer 70 External Video Source 14-22 F Favorite Channel 38 Freeze 28 H HDMI 18 I Input Setup 74-75 IEEE 1394 20, 36 L Screen Saver 73 Sharpness 55 Speakers 58 Connecting External Speakers...
... Menu Preference Language 72 Background 73 Monitor Out 77 P Perfect Volume 58 Photo Input 34-35 Picture Mode 54 Picture-in-Picture (PIP 39-41 Position (RGB Input) Horizontal 86 Vertical 86 R Remote Control Functions 27-50 Programming Codes 49-50 Installing Batteries 4 R/G/B 25, 79-88 S E Event Timer 70 External Video Source 14-22 F Favorite Channel 38 Freeze 28 H HDMI 18 I Input Setup 74-75 IEEE 1394 20, 36 L Screen Saver 73 Sharpness 55 Speakers 58 Connecting External Speakers...


