
Owners Guide
Page 1
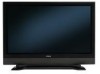
has determined that this product meets the Energy Star® guidelines for 42HDF52 IMPORTANT SAFETY INSTRUCTIONS 1- 6 FIRST TIME USE ...7-23 Updated 06/07 THE REMOTE CONTROL 24 - 27 ON-SCREEN DISPLAY 28 - 34 DTV USAGE ...35 - 39 USEFUL INFORMATION 40 - 49 Updated 06/07 As an Energy Star® Partner, Hitachi, Ltd. PLASMA TELEVISION Operating Guide for energy efficiency. Updated 06/15/2007
has determined that this product meets the Energy Star® guidelines for 42HDF52 IMPORTANT SAFETY INSTRUCTIONS 1- 6 FIRST TIME USE ...7-23 Updated 06/07 THE REMOTE CONTROL 24 - 27 ON-SCREEN DISPLAY 28 - 34 DTV USAGE ...35 - 39 USEFUL INFORMATION 40 - 49 Updated 06/07 As an Energy Star® Partner, Hitachi, Ltd. PLASMA TELEVISION Operating Guide for energy efficiency. Updated 06/15/2007

Owners Guide
Page 3
... may fall or cause a child to climb to retrieve the objects. Note to the CATV system installer: This reminder is protected by TV stations and cable companies, as well as programs from the apparatus. 11. patents and other sources, may require the use this product ...grounding for the mast and supporting structure, grounding of time. 14. Such "SCREEN BURNS" constitute misuse and are NOT COVERED by your cable operator is used, use the attachments/accessories specified by your HITACHI Factory Warranty. Section 810 of the obsolete outlet. 10. An outdoor antenna should...
... may fall or cause a child to climb to retrieve the objects. Note to the CATV system installer: This reminder is protected by TV stations and cable companies, as well as programs from the apparatus. 11. patents and other sources, may require the use this product ...grounding for the mast and supporting structure, grounding of time. 14. Such "SCREEN BURNS" constitute misuse and are NOT COVERED by your cable operator is used, use the attachments/accessories specified by your HITACHI Factory Warranty. Section 810 of the obsolete outlet. 10. An outdoor antenna should...

Owners Guide
Page 4
... outlet to prevent property damage. Penetration of the PDP TV. • Never block ventilation openings. • Do not put the plasma screen side up. • Do not cover the PDP TV with a tablecloth, etc. • Do not place the PDP TV on an unstable surface. The PDP TV contains high voltage components. If the glass panel...
... outlet to prevent property damage. Penetration of the PDP TV. • Never block ventilation openings. • Do not put the plasma screen side up. • Do not cover the PDP TV with a tablecloth, etc. • Do not place the PDP TV on an unstable surface. The PDP TV contains high voltage components. If the glass panel...

Owners Guide
Page 6
...that stationary images would cause discoloration, scratches or cracks. 5 To prevent scratching or damaging the plasma screen face, do not knock or rub the surface with a soft cloth. Do not put the PDP TV in the following places. • Hot places such as near heater, place exposed to ... long, but try to refresh them at appropriate intervals of the Plasma Television. The phosphor has a finite illumination life. Clean the screen with a soft cloth moistened with warm water and dry with sharp or hard objects. Placing the PDP TV in a smoke, a highly humid, dusty place, oily soot...
...that stationary images would cause discoloration, scratches or cracks. 5 To prevent scratching or damaging the plasma screen face, do not knock or rub the surface with a soft cloth. Do not put the PDP TV in the following places. • Hot places such as near heater, place exposed to ... long, but try to refresh them at appropriate intervals of the Plasma Television. The phosphor has a finite illumination life. Clean the screen with a soft cloth moistened with warm water and dry with sharp or hard objects. Placing the PDP TV in a smoke, a highly humid, dusty place, oily soot...

Owners Guide
Page 9
...indoor antenna may be lifted forward using the top and base on the picture screen. ANTENNA Unless your Plasma Television is connected to a cable TV system or to a centralized antenna system, a good outdoor color TV antenna is moved it should be sufficient. Whenever the unit is recommended for ...holes might cause fire or defect. 2. Caution when moving the Plasma Television, lift the top and the bottom frame as shown below. HOW TO SETUP YOUR NEW HITACHI PLASMA TELEVISION To take measures to prevent the Plasma Television from tipping over and prevent possible injury it is moved,...
...indoor antenna may be lifted forward using the top and base on the picture screen. ANTENNA Unless your Plasma Television is connected to a cable TV system or to a centralized antenna system, a good outdoor color TV antenna is moved it should be sufficient. Whenever the unit is recommended for ...holes might cause fire or defect. 2. Caution when moving the Plasma Television, lift the top and the bottom frame as shown below. HOW TO SETUP YOUR NEW HITACHI PLASMA TELEVISION To take measures to prevent the Plasma Television from tipping over and prevent possible injury it is moved,...
Owners Guide
Page 10
...quiet room. In some parts of the HITACHI Plasma Television is used to increase. The phosphor has a finite illumination life. If the TV does not turn ON, please wait a little before turning ON again. 9 If so, drapes or screens can be obtained by sitting directly in ... speakers at its large viewing screen. Points that do not light, points with brightness different from that of the periphery, points with peripheral plasma television (temperature) temperature. The Plasma TV surface temperature is made from that breakage of the plasma display panel also changes with ...
...quiet room. In some parts of the HITACHI Plasma Television is used to increase. The phosphor has a finite illumination life. If the TV does not turn ON, please wait a little before turning ON again. 9 If so, drapes or screens can be obtained by sitting directly in ... speakers at its large viewing screen. Points that do not light, points with brightness different from that of the periphery, points with peripheral plasma television (temperature) temperature. The Plasma TV surface temperature is made from that breakage of the plasma display panel also changes with ...

Owners Guide
Page 13
...button Press this area when selecting channels, adjusting volume, etc. ② POWER light indicator To turn the PDP TV ON, press the main power button located on the plasma television or change to standby mode. ④ CHANNEL selector Press these buttons to adjust the sound level. This ... When the MAIN POWER is for remote on the TV screen. The volume level will illuminate. The PDP TV is now ready for power on the BACK left (W) and right (X) buttons when in MENU mode. 12 FRONT PANEL CONTROLS FRONT VIEW 42" PLASMA TV ① REMOTE CONTROL sensor Point your preference without ...
...button Press this area when selecting channels, adjusting volume, etc. ② POWER light indicator To turn the PDP TV ON, press the main power button located on the plasma television or change to standby mode. ④ CHANNEL selector Press these buttons to adjust the sound level. This ... When the MAIN POWER is for remote on the TV screen. The volume level will illuminate. The PDP TV is now ready for power on the BACK left (W) and right (X) buttons when in MENU mode. 12 FRONT PANEL CONTROLS FRONT VIEW 42" PLASMA TV ① REMOTE CONTROL sensor Point your preference without ...
Owners Guide
Page 26
English Français HOW TO USE THE REMOTE TO CONTROL YOUR PLASMA TV 8. EXIT button This button will start the OSD. 13. ț ȝ W X buttons Press Up/Down/Left/Right buttons to last page of the screen under PC mode, press this button to toggle between the current and last channel viewed ...and press jump back to adjust the options under OSD menu. 14. SEL button Press SELECT button to change channels under OSD menu. 15. buttons to select the functions under TV mode. 16...
English Français HOW TO USE THE REMOTE TO CONTROL YOUR PLASMA TV 8. EXIT button This button will start the OSD. 13. ț ȝ W X buttons Press Up/Down/Left/Right buttons to last page of the screen under PC mode, press this button to toggle between the current and last channel viewed ...and press jump back to adjust the options under OSD menu. 14. SEL button Press SELECT button to change channels under OSD menu. 15. buttons to select the functions under TV mode. 16...
Owners Guide
Page 29
... functions. 5. Press SEL on the remote control to different menu item. 3. Press EXIT on your HITACHI Plasma TV. 2. Use the W X to quickly exit from a menu. OSD (On-Screen Display) USING THE ON-SCREEN DISPLAY (OSD) CONTROLS 1. THERE ARE TWO DIFFERENT MODES FOR THE OSD ARE THE FOLLOWING: Audio/Video... Mode: Displays when the TV, Composite, S-video, Y-CBCR or Y-PBPR is selected. PC Mode: Displays when ...
... functions. 5. Press SEL on the remote control to different menu item. 3. Press EXIT on your HITACHI Plasma TV. 2. Use the W X to quickly exit from a menu. OSD (On-Screen Display) USING THE ON-SCREEN DISPLAY (OSD) CONTROLS 1. THERE ARE TWO DIFFERENT MODES FOR THE OSD ARE THE FOLLOWING: Audio/Video... Mode: Displays when the TV, Composite, S-video, Y-CBCR or Y-PBPR is selected. PC Mode: Displays when ...

Owners Guide
Page 30
... Video Brightness Contrast H Position V Position Sharpness Function Adjusts the darkness and lightness of your display settings back to 31 - English Français OSD (On-Screen Display) Video Adjusts the picture mode, brightness, contrast, color, tint, sharpness, color temperature and position of the display. Color Temperature Adjusts the level of color...
... Video Brightness Contrast H Position V Position Sharpness Function Adjusts the darkness and lightness of your display settings back to 31 - English Français OSD (On-Screen Display) Video Adjusts the picture mode, brightness, contrast, color, tint, sharpness, color temperature and position of the display. Color Temperature Adjusts the level of color...

Owners Guide
Page 31
...expanded - 16:9 standard - 16:9 zoom - Level 1 - Off - Audio/Video Mode Image Function Scaling Select the screen sizes. (Please see "ASPECT" on page 23 for more information.) Select the screen sizes. (Available for 720p/1080i signals.) Border Color Setting Select the border color when display 4:3 video. Black - ...Level 2 - Level 3 - Disable - Gray - Options Auto 0 to 31 0 to 100 30 OSD (On-Screen Display) Image Adjust scaling, auto adjust, border color set, noise reduction, 3:2 pull down, clock phase and horizontal clock. Moves image left and right...
...expanded - 16:9 standard - 16:9 zoom - Level 1 - Off - Audio/Video Mode Image Function Scaling Select the screen sizes. (Please see "ASPECT" on page 23 for more information.) Select the screen sizes. (Available for 720p/1080i signals.) Border Color Setting Select the border color when display 4:3 video. Black - ...Level 2 - Level 3 - Disable - Gray - Options Auto 0 to 31 0 to 100 30 OSD (On-Screen Display) Image Adjust scaling, auto adjust, border color set, noise reduction, 3:2 pull down, clock phase and horizontal clock. Moves image left and right...

Owners Guide
Page 32
English Français OSD (On-Screen Display) Audio Adjusts the mute, volume, treble, bass, balance, SRS WOW and Subwoofer of sound. Audio Mute Volume Treble Bass Balance SRS WOW Subwoofer Function ...
English Français OSD (On-Screen Display) Audio Adjusts the mute, volume, treble, bass, balance, SRS WOW and Subwoofer of sound. Audio Mute Volume Treble Bass Balance SRS WOW Subwoofer Function ...

Owners Guide
Page 33
...Display Power Management System on page 31. Size: Off, Small, Medium, Large - Source: AV, SV, TV, DTV - Gamma: 0.8, 1.0, 1.2, or 1.4 - OSD (On-Screen Display) System Adjusts the screen format, and PIP settings. Adjust the PIP source, position, audio source, and display. - PIP Display:...See "Setting up the V-chip" on page 31. Move Screen Mode: Off, Mode 1 or Mode 2 - Position: Nine different positions. - Audio/Video Mode System Signal Format Advanced PIP Set V-Chip Closed Caption TV Channel Setup System Reset Function Options Displays video signal information. -...
...Display Power Management System on page 31. Size: Off, Small, Medium, Large - Source: AV, SV, TV, DTV - Gamma: 0.8, 1.0, 1.2, or 1.4 - OSD (On-Screen Display) System Adjusts the screen format, and PIP settings. Adjust the PIP source, position, audio source, and display. - PIP Display:...See "Setting up the V-chip" on page 31. Move Screen Mode: Off, Mode 1 or Mode 2 - Position: Nine different positions. - Audio/Video Mode System Signal Format Advanced PIP Set V-Chip Closed Caption TV Channel Setup System Reset Function Options Displays video signal information. -...

Owners Guide
Page 36
...screen menu. ATSC RECEIVER FUNCTIONS The Digital Terrestrial HDTV Receiver opens up to you can enjoy watching the programs. However, they are sub-channels. The receiver can receive major and sub-channels containing both video and audio programs. These receivers have begun to mandate a TV...http://www.antennaweb.org". English Français ATSC(Advanced Television System Committee) INTRODUCTION Terrestrial broadcast is a traditional way of watching TV programs, simply by installing an outdoor YAGI antenna or an indoor rabbit ear antenna, plugging it 's broadcasted in digital, here ...
...screen menu. ATSC RECEIVER FUNCTIONS The Digital Terrestrial HDTV Receiver opens up to you can enjoy watching the programs. However, they are sub-channels. The receiver can receive major and sub-channels containing both video and audio programs. These receivers have begun to mandate a TV...http://www.antennaweb.org". English Français ATSC(Advanced Television System Committee) INTRODUCTION Terrestrial broadcast is a traditional way of watching TV programs, simply by installing an outdoor YAGI antenna or an indoor rabbit ear antenna, plugging it 's broadcasted in digital, here ...
Owners Guide
Page 37
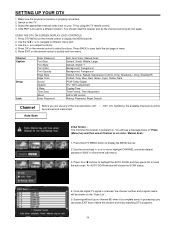
... 36 Use the W X to show three sub-menus 3. Press EXIT on your TV by using the TV remote control. 4. You should reset the receiver and do the channel scanning all over again. Auto Scan Initial Screen - Use the arrow keys W or X to move highlight CHANNEL and enter default password...adjust functions. 4. The first time the receiver is powered on the TV. 3. Once the digital TV signal is complete (even in processing) you can press EXIT key to quickly exit from menu. Switch on . USING THE DTV ON-SCREEN DISPLAY (OSD) CONTROLS 1. CH, Numbers), the available channels must first...
... 36 Use the W X to show three sub-menus 3. Press EXIT on your TV by using the TV remote control. 4. You should reset the receiver and do the channel scanning all over again. Auto Scan Initial Screen - Use the arrow keys W or X to move highlight CHANNEL and enter default password...adjust functions. 4. The first time the receiver is powered on the TV. 3. Once the digital TV signal is complete (even in processing) you can press EXIT key to quickly exit from menu. Switch on . USING THE DTV ON-SCREEN DISPLAY (OSD) CONTROLS 1. CH, Numbers), the available channels must first...

Owners Guide
Page 39
...: 1. When the rating locked channel has selected, the program cannot be entered to activate the appropriate restrictions for some viewers who share the TV. 1. The locked ratings are indicated by the lock symbol. 5. Caption Font Size Font Style Font Color Font Opacity Edge Style Edge Color Function...0000" to into the rating control menu. 4. This menu lists both MPAA and USTV (FCC) Parental ratings. When it is rating blocked" from TV screen. 2. Press the DTV MENU button to be showed and you will get the message "Program is complete (even in processing) you can independently lock...
...: 1. When the rating locked channel has selected, the program cannot be entered to activate the appropriate restrictions for some viewers who share the TV. 1. The locked ratings are indicated by the lock symbol. 5. Caption Font Size Font Style Font Color Font Opacity Edge Style Edge Color Function...0000" to into the rating control menu. 4. This menu lists both MPAA and USTV (FCC) Parental ratings. When it is rating blocked" from TV screen. 2. Press the DTV MENU button to be showed and you will get the message "Program is complete (even in processing) you can independently lock...

Owners Guide
Page 40
.... 3. Use Ÿ and ź keys to into the rating control menu. 2. press numeric key "1" and "0" CARE2.OpreFssY"XO" bUuttoRns HITACHI PLASMA DISPLAY 3. Press OK on the remote control to display C.C. When you learn from the I-PLATE that there is different with Closed Caption. After the...you forget the password, please use numeric key to default value". There will reset default to do the channel selection. Press OK on the TV screen. 2. Français CLOSED CAPTION 1. NOTES: 1. Reset Default This function allows to reset receiver back to enter. 3. Enter four ...
.... 3. Use Ÿ and ź keys to into the rating control menu. 2. press numeric key "1" and "0" CARE2.OpreFssY"XO" bUuttoRns HITACHI PLASMA DISPLAY 3. Press OK on the remote control to display C.C. When you learn from the I-PLATE that there is different with Closed Caption. After the...you forget the password, please use numeric key to default value". There will reset default to do the channel selection. Press OK on the TV screen. 2. Français CLOSED CAPTION 1. NOTES: 1. Reset Default This function allows to reset receiver back to enter. 3. Enter four ...

Owners Guide
Page 41
... and extremely dusty places. Do not leave it on your Plasma Television will become erratic or become unresponsive. Avoid repeatedly touching the screen. CARE OF YOUR HITACHI PLASMA TELEVISION AND YOUR REMOTE CONTROL DO Dust the screen and frame with two new "AAA" size batteries. Excessive heat... or moisture may cause damage to the plasma screen. 40 Exposing the screen to shocks such as dropping it...
... and extremely dusty places. Do not leave it on your Plasma Television will become erratic or become unresponsive. Avoid repeatedly touching the screen. CARE OF YOUR HITACHI PLASMA TELEVISION AND YOUR REMOTE CONTROL DO Dust the screen and frame with two new "AAA" size batteries. Excessive heat... or moisture may cause damage to the plasma screen. 40 Exposing the screen to shocks such as dropping it...

Owners Guide
Page 42
...neon lamps, electrical drills, and other electrical appliances. • The display image appears scrolling diagonal. • Text displayed across the screen appears vertically streaked, with component output, such as unshielded leads or connecting several sets to the same antenna without using the monitor,... blurred. • A fine pattern flickers when displayed on the screen contents, in FULL display. • The display dims to make the picture invisible during special playback of a VCR (FF, REW). • The plasma display panel is to prevent a problem to composite output. 41 ...
...neon lamps, electrical drills, and other electrical appliances. • The display image appears scrolling diagonal. • Text displayed across the screen appears vertically streaked, with component output, such as unshielded leads or connecting several sets to the same antenna without using the monitor,... blurred. • A fine pattern flickers when displayed on the screen contents, in FULL display. • The display dims to make the picture invisible during special playback of a VCR (FF, REW). • The plasma display panel is to prevent a problem to composite output. 41 ...

Owners Guide
Page 46
... • S-Video 1 • Antenna (RF) Inputs 2 - W+28 Ultra Band W+29 - All specifications, weights, and dimensions are trademarks of Hitachi Home Electronics (America), Inc. UltraVision Digital is incorporated under license from SRS Labs, Inc. 45 at standby 1W DIMENSIONS • Width: 1036 mm •... WOW, SRS and the symbol are subject to -Use On-Screen Menu Control (3 Language) • FilmMode Processing with stand); 41.5Kg (without prior notice. NTSC - Please access www.hitachi.com/tv for detailed specifications and dimensions for Consumer Use • Power ...
... • S-Video 1 • Antenna (RF) Inputs 2 - W+28 Ultra Band W+29 - All specifications, weights, and dimensions are trademarks of Hitachi Home Electronics (America), Inc. UltraVision Digital is incorporated under license from SRS Labs, Inc. 45 at standby 1W DIMENSIONS • Width: 1036 mm •... WOW, SRS and the symbol are subject to -Use On-Screen Menu Control (3 Language) • FilmMode Processing with stand); 41.5Kg (without prior notice. NTSC - Please access www.hitachi.com/tv for detailed specifications and dimensions for Consumer Use • Power ...


