User Manual
Page 2
... user to be discovered in your product model. INSERT THE LCD TELEVISION POWER CORD INTO A 120 VOLT 60Hz OUTLET. If the television does not operate properly, unplug the LCD Television and call your HITACHI LCD Television. Safety is intended to alert the user to operate the ...on the quality, performance, and ease of service of the LCD Television. English IMPORTANT SAFETY INSTRUCTIONS SAFETY POINTS YOU SHOULD KNOW ABOUT YOUR HITACHI LCD TELEVISION Our reputation has been built on the apparatus. Home Electronics Division may be of a sufficient magnitude to constitute a risk ...
... user to be discovered in your product model. INSERT THE LCD TELEVISION POWER CORD INTO A 120 VOLT 60Hz OUTLET. If the television does not operate properly, unplug the LCD Television and call your HITACHI LCD Television. Safety is intended to alert the user to operate the ...on the quality, performance, and ease of service of the LCD Television. English IMPORTANT SAFETY INSTRUCTIONS SAFETY POINTS YOU SHOULD KNOW ABOUT YOUR HITACHI LCD TELEVISION Our reputation has been built on the apparatus. Home Electronics Division may be of a sufficient magnitude to constitute a risk ...
User Manual
Page 3
... broadcast by the manufacturer. 17. Reverse engineering or disassembly is used, use the attachments/accessories specified by Macrovision. Protect the power cord from tip-over. 13. For product recycling and disposal information, contact you local government agency or the Electronic Industries Alliance...www.epsc.ca (in wire to an antenna discharge unit, size of grounding connectors, location of cable entry as to call "1-800-HITACHI." Do not defeat the safety purpose of time. 14. Do not install near water. 6. Section 810 of the video program material....
... broadcast by the manufacturer. 17. Reverse engineering or disassembly is used, use the attachments/accessories specified by Macrovision. Protect the power cord from tip-over. 13. For product recycling and disposal information, contact you local government agency or the Electronic Industries Alliance...www.epsc.ca (in wire to an antenna discharge unit, size of grounding connectors, location of cable entry as to call "1-800-HITACHI." Do not defeat the safety purpose of time. 14. Do not install near water. 6. Section 810 of the video program material....
User Manual
Page 4
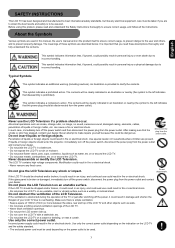
...cables, penetration of liquids or foreign matter, etc. If the ventilation is broken or damaged, immediately turn off the power switch, disconnect the power plug from the power outlet and contact your dealer. About the Symbols Various symbols are described below. After making sure that you are ...and continued use could result in damage and shorten the lifespan of the TV or just after switching off the power switch, disconnect the power plug from the power outlet. If the glass panel is obstructed during the operation of your dealer. • Do not place the...
...cables, penetration of liquids or foreign matter, etc. If the ventilation is broken or damaged, immediately turn off the power switch, disconnect the power plug from the power outlet and contact your dealer. About the Symbols Various symbols are described below. After making sure that you are ...and continued use could result in damage and shorten the lifespan of the TV or just after switching off the power switch, disconnect the power plug from the power outlet. If the glass panel is obstructed during the operation of your dealer. • Do not place the...
User Manual
Page 5
...battery. • Use only the battery specified in fire or personal injury. Be careful in fire or electrical shock. • Do not touch the power cord with a wet hand. • Check that the connecting portion of this could lead to its original position. If the liquid adheres your hand holding...TV with the ground terminal provided at plugs, conveniences receptacles, and the point where they exit from children and pets. Avoid using the enclosed power cord. The battery may explode if not handled properly. • Keep the battery away from the apparatus. • Do not modify the...
...battery. • Use only the battery specified in fire or personal injury. Be careful in fire or electrical shock. • Do not touch the power cord with a wet hand. • Check that the connecting portion of this could lead to its original position. If the liquid adheres your hand holding...TV with the ground terminal provided at plugs, conveniences receptacles, and the point where they exit from children and pets. Avoid using the enclosed power cord. The battery may explode if not handled properly. • Keep the battery away from the apparatus. • Do not modify the...

User Manual
Page 6
...at appropriate intervals of the sun. • A place where the temperature is widely changing. • Places with a cleaning cloth from the power outlet. Please watch the LCD TV in order to move the LCD TV with sharp or hard objects. Do not display images having sharp ... of glass screen. SAFETY INSTRUCTIONS(continued) English Be careful in too dark a room, your eyes by viewing away from the LCD TV from the power outlet. • Installation environment Do not obstruct a ventilation hole. Neglect could result in fire or electrical shock. • Do not place near the...
...at appropriate intervals of the sun. • A place where the temperature is widely changing. • Places with a cleaning cloth from the power outlet. Please watch the LCD TV in order to move the LCD TV with sharp or hard objects. Do not display images having sharp ... of glass screen. SAFETY INSTRUCTIONS(continued) English Be careful in too dark a room, your eyes by viewing away from the LCD TV from the power outlet. • Installation environment Do not obstruct a ventilation hole. Neglect could result in fire or electrical shock. • Do not place near the...
User Manual
Page 7
...the product to the ground. • Precaution during transportation Please pay attention when you transport this . This product is transported. Plug the power cord of any chances with the recommended safety standards for wall, shelf or ceiling mounting as Radio etc.. - Do not physically impact ... - around the LCD TV. Use only with the cart, stand, tripod, bracket, or table specified by turning off and withdraw the power plug before making or changing connections. - to ensure complete safety, always fit the manufacturers approved stand or legs with ground terminal and make...
...the product to the ground. • Precaution during transportation Please pay attention when you transport this . This product is transported. Plug the power cord of any chances with the recommended safety standards for wall, shelf or ceiling mounting as Radio etc.. - Do not physically impact ... - around the LCD TV. Use only with the cart, stand, tripod, bracket, or table specified by turning off and withdraw the power plug before making or changing connections. - to ensure complete safety, always fit the manufacturers approved stand or legs with ground terminal and make...

User Manual
Page 8
... 6. Warranty Card 10.Cleaning Cloth 11.Cable Tie REMOTE CONTROL BATTERY INSTALLATION AND REPLACEMENT 1. Insert two new "AAA" size batteries for the front glass panel. Power Cord 3. Replace the cover. This LCD television product is designed for a maximum tilting angle of explosion if battery is not recommended. Audio/Video Cable 5. CAUTION...
... 6. Warranty Card 10.Cleaning Cloth 11.Cable Tie REMOTE CONTROL BATTERY INSTALLATION AND REPLACEMENT 1. Insert two new "AAA" size batteries for the front glass panel. Power Cord 3. Replace the cover. This LCD television product is designed for a maximum tilting angle of explosion if battery is not recommended. Audio/Video Cable 5. CAUTION...
User Manual
Page 10
... be used to reduce the reflection or the TV can be put into the packing box at least four feet from the side of the HITACHI LCD Television is seen by placing the speakers equidistant from that stationary images would cause "Mura" effect on the front panel might cause damage... on . 13 Operating Operating altitude: 800 to 1,114hPa (6,194ft to -2,484ft). You can see lip motion that might trigger the power protection circuit. English HOW TO SETUP YOUR NEW HITACHI LCD TELEVISION VIEWING The major benefit of the TV, place the surround speakers to the side or behind the viewing area...
... be used to reduce the reflection or the TV can be put into the packing box at least four feet from the side of the HITACHI LCD Television is seen by placing the speakers equidistant from that stationary images would cause "Mura" effect on the front panel might cause damage... on . 13 Operating Operating altitude: 800 to 1,114hPa (6,194ft to -2,484ft). You can see lip motion that might trigger the power protection circuit. English HOW TO SETUP YOUR NEW HITACHI LCD TELEVISION VIEWING The major benefit of the TV, place the surround speakers to the side or behind the viewing area...
User Manual
Page 13
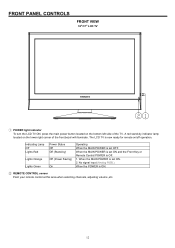
... lamp located on /off operation. No signal input (Analog RGB ). When the MAIN POWER is set ON. 2. FRONT PANEL CONTROLS FRONT VIEW 32"/37" LCD TV ① POWER light indicator To turn the LCD TV ON, press the main power button located on the bottom left side of the front bezel will illuminate.... The LCD TV is ON. ② REMOTE CONTROL sensor Point your remote control at this area when selecting channels, adjusting volume ,etc. 12 When the POWER is now ready for remote on the lower right corner of the TV. A red stand-by ) Off...
... lamp located on /off operation. No signal input (Analog RGB ). When the MAIN POWER is set ON. 2. FRONT PANEL CONTROLS FRONT VIEW 32"/37" LCD TV ① POWER light indicator To turn the LCD TV ON, press the main power button located on the bottom left side of the front bezel will illuminate.... The LCD TV is ON. ② REMOTE CONTROL sensor Point your remote control at this area when selecting channels, adjusting volume ,etc. 12 When the POWER is now ready for remote on the lower right corner of the TV. A red stand-by ) Off...

User Manual
Page 14
... buttons to adjust the sound level. English SIDE PANEL CONTROLS SIDE VIEW 32"/37" LCD TV ③ ④ ⑤ ⑥ ⑦ ③ POWER button This power button is for power on the TV screen. This button also serves as the cursor down (▼) and up (▲) buttons when in MENU mode. ⑤ VOLUME...
... buttons to adjust the sound level. English SIDE PANEL CONTROLS SIDE VIEW 32"/37" LCD TV ③ ④ ⑤ ⑥ ⑦ ③ POWER button This power button is for power on the TV screen. This button also serves as the cursor down (▼) and up (▲) buttons when in MENU mode. ⑤ VOLUME...

User Manual
Page 15
between Main Power button off then on 120VOLTS 60Hz AC current. REAR PANEL MAIN POWER SWITCH & AC INPUT 32"/37" LCD TV ① AC IN input This TV is designed to "ON" condition (lights red) for the complete system, and must be at least 5sec. Note : It is required that there should be turned ON/OFF manually. It is for stand-by mode. Insert the TV power cord into a 120VOLTS 60Hz outlet. ①-1 Main power button: This power button is recommended to leave the "MAIN POWER" to operate on . 14
between Main Power button off then on 120VOLTS 60Hz AC current. REAR PANEL MAIN POWER SWITCH & AC INPUT 32"/37" LCD TV ① AC IN input This TV is designed to "ON" condition (lights red) for the complete system, and must be at least 5sec. Note : It is required that there should be turned ON/OFF manually. It is for stand-by mode. Insert the TV power cord into a 120VOLTS 60Hz outlet. ①-1 Main power button: This power button is recommended to leave the "MAIN POWER" to operate on . 14
User Manual
Page 19
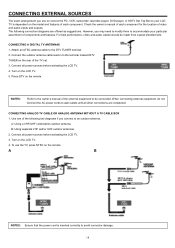
..., you may need to modify them to accommodate your LCD TV is inserted correctly to be made from coaxial shielded wire. Connect all power sources before activating the LCD TV. 4. Turn on the rear of each component for the location of the external equipment to avoid connector...outlets until all other connections are offered as suggestions. B: Using separate VHF and/or UHF outdoor antennas. 2. A B NOTES: Ensure that the power cord is dependent on the model and features of the TV set. 3. The following two diagrams if you connect to your particular assortment of the...
..., you may need to modify them to accommodate your LCD TV is inserted correctly to be made from coaxial shielded wire. Connect all power sources before activating the LCD TV. 4. Turn on the rear of each component for the location of the external equipment to avoid connector...outlets until all other connections are offered as suggestions. B: Using separate VHF and/or UHF outdoor antennas. 2. A B NOTES: Ensure that the power cord is dependent on the model and features of the TV set. 3. The following two diagrams if you connect to your particular assortment of the...

User Manual
Page 20
Connect all power sources before activating the LCD TV. 3. Turn on the LCD TV. 4. Press the button corresponding to the appropriate signal source (Video 1 or Video 2) 19 Connect the HDTV source device using the appropriate cable system. 1. English CONNECTING EXTERNAL SOURCES CONNECTING HDTV SOURCES HDTV input sources, such as a digital cable box, digital satellite receiver, or digital terrestrial receiver box, can be connected as desired, using the appropriate cable pair, in the following order of preference: HDMI cable OR Component cable and audio cable (Video 1 or Video 2) 2.
Connect all power sources before activating the LCD TV. 3. Turn on the LCD TV. 4. Press the button corresponding to the appropriate signal source (Video 1 or Video 2) 19 Connect the HDTV source device using the appropriate cable system. 1. English CONNECTING EXTERNAL SOURCES CONNECTING HDTV SOURCES HDTV input sources, such as a digital cable box, digital satellite receiver, or digital terrestrial receiver box, can be connected as desired, using the appropriate cable pair, in the following order of preference: HDMI cable OR Component cable and audio cable (Video 1 or Video 2) 2.

User Manual
Page 21
Connect all power sources before activating the LCD TV. 3. CONNECTING EXTERNAL SOURCES CONNECTING A TV CABLE BOX OR SATELLITE RECEIVER 1. Turn on the LCD TV. 4. Connect the TV Cable Box or Satellite Receiver device using: Component cable and Audio cable (Video 1 or Video 2) OR S-Video cable and Audio cable (Video 3 or Video 4) OR Composite Video cable and Audio cable (Video 3 or Video 4). 2. Press the button corresponding to the appropriate signal source. (VIDEO1 to 4) 20
Connect all power sources before activating the LCD TV. 3. CONNECTING EXTERNAL SOURCES CONNECTING A TV CABLE BOX OR SATELLITE RECEIVER 1. Turn on the LCD TV. 4. Connect the TV Cable Box or Satellite Receiver device using: Component cable and Audio cable (Video 1 or Video 2) OR S-Video cable and Audio cable (Video 3 or Video 4) OR Composite Video cable and Audio cable (Video 3 or Video 4). 2. Press the button corresponding to the appropriate signal source. (VIDEO1 to 4) 20

User Manual
Page 22
Turn on the LCD TV. 4. Connect all power sources before activating the LCD TV. 3. English CONNECTING EXTERNAL SOURCES CONNECTING A DVD PLAYER 1. Connect the DVD player using: HDMI cable OR Component cable and Audio cable (Video 1 or Video 2) OR S-Video cable and Audio cable (Video 3 or Video 4) OR Composite cable and Audio cable (Video 3 or Video 4). 2. Press the button corresponding to the appropriate signal source. (VIDEO1 to 4) 21
Turn on the LCD TV. 4. Connect all power sources before activating the LCD TV. 3. English CONNECTING EXTERNAL SOURCES CONNECTING A DVD PLAYER 1. Connect the DVD player using: HDMI cable OR Component cable and Audio cable (Video 1 or Video 2) OR S-Video cable and Audio cable (Video 3 or Video 4) OR Composite cable and Audio cable (Video 3 or Video 4). 2. Press the button corresponding to the appropriate signal source. (VIDEO1 to 4) 21

User Manual
Page 23
Connect the VCR player using: S-Video cable and Audio cable (Video 3 or Video 4) OR Composite cable and Audio cable (Video 3 or Video 4). 2. Connect all power sources before activating the LCD TV. 3. Press the button corresponding to the appropriate signal source (VIDEO3 or VIDEO4). 22 CONNECTING EXTERNAL SOURCES CONNECTING A VCR 1. Turn on the LCD TV. 4.
Connect the VCR player using: S-Video cable and Audio cable (Video 3 or Video 4) OR Composite cable and Audio cable (Video 3 or Video 4). 2. Connect all power sources before activating the LCD TV. 3. Press the button corresponding to the appropriate signal source (VIDEO3 or VIDEO4). 22 CONNECTING EXTERNAL SOURCES CONNECTING A VCR 1. Turn on the LCD TV. 4.

User Manual
Page 24
Turn on the A/V receiver. 2. Use an audio cable to connect the LCD's audio output jacks to select Audio. 5. Connect all power sources before activating the LCD TV. 3. Press the MENU to display the menu, then press ▲ ▼ to the line input jacks on the LCD TV. 4. English CONNECTING EXTERNAL SOURCES CONNECTING A AUDIO RECEIVER To improve sound quality, you may want to select On/Off. 23 Press SEL, then press ▲ ▼to select subwoofer and press W X to play the audio of the LCD through your stereo system. 1.
Turn on the A/V receiver. 2. Use an audio cable to connect the LCD's audio output jacks to select Audio. 5. Connect all power sources before activating the LCD TV. 3. Press the MENU to display the menu, then press ▲ ▼ to the line input jacks on the LCD TV. 4. English CONNECTING EXTERNAL SOURCES CONNECTING A AUDIO RECEIVER To improve sound quality, you may want to select On/Off. 23 Press SEL, then press ▲ ▼to select subwoofer and press W X to play the audio of the LCD through your stereo system. 1.

User Manual
Page 25
Press the button corresponding to the appropriate signal source (ANALOG RGB INPUT ) 24 Connect all power sources before activating the LCD TV. 3. Turn on the LCD TV. 4. Connect the PC using: D-Sub cable and 3.5mm Audio cable 2. CONNECTING EXTERNAL SOURCES CONNECTING PC 1.
Press the button corresponding to the appropriate signal source (ANALOG RGB INPUT ) 24 Connect all power sources before activating the LCD TV. 3. Turn on the LCD TV. 4. Connect the PC using: D-Sub cable and 3.5mm Audio cable 2. CONNECTING EXTERNAL SOURCES CONNECTING PC 1.
User Manual
Page 28
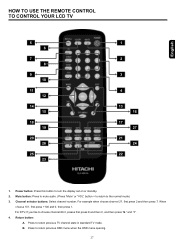
..., If you like to return previous OSD menu when the OSD menu opening. 27 For example when choose channel 27, first press 2 and then press 7. Power button: Press this button to turn the display set on or standby. 2.
..., If you like to return previous OSD menu when the OSD menu opening. 27 For example when choose channel 27, first press 2 and then press 7. Power button: Press this button to turn the display set on or standby. 2.

User Manual
Page 32
... degree. 3. Swivel can not be sure to detach the connecting cable between the TV and the stand. 31 Adjust swivel by cable tie. Put the power cord through the cable clamp which is used during Auto Scan Mode. It could cause a physical injury. It would cause a malfunction. • In the case...
... degree. 3. Swivel can not be sure to detach the connecting cable between the TV and the stand. 31 Adjust swivel by cable tie. Put the power cord through the cable clamp which is used during Auto Scan Mode. It could cause a physical injury. It would cause a malfunction. • In the case...


