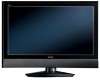
User Manual
Page 2
... user to operate the equipment. CAUTION: Never remove the back cover of the LCD Television. Please fill out your product model. This will enable HITACHI to notify you operate these units. INSERT THE LCD TELEVISION POWER CORD INTO A 120 VOLT 60Hz OUTLET. CAUTION: Adjust only those controls that a safety problem should be discovered in your warranty card and mail it to operate the LCD Television. POWER SOURCE THIS LCD TELEVISION IS DESIGNED TO OPERATE...
... user to operate the equipment. CAUTION: Never remove the back cover of the LCD Television. Please fill out your product model. This will enable HITACHI to notify you operate these units. INSERT THE LCD TELEVISION POWER CORD INTO A 120 VOLT 60Hz OUTLET. CAUTION: Adjust only those controls that a safety problem should be discovered in your warranty card and mail it to operate the LCD Television. POWER SOURCE THIS LCD TELEVISION IS DESIGNED TO OPERATE...
User Manual
Page 3
... has been exposed to qualified service personnel. Protect the power cord from being walked on -demand, a cable operator's enhanced program guide and data-enhanced television services may require prior authorization from the apparatus. 11. Use only with the cart, stand, tripod, bracket, or table specified by TV stations and cable companies, as well as power-supply cord or plug is connected to the receiver be located in accordance with one wider...
... has been exposed to qualified service personnel. Protect the power cord from being walked on -demand, a cable operator's enhanced program guide and data-enhanced television services may require prior authorization from the apparatus. 11. Use only with the cart, stand, tripod, bracket, or table specified by TV stations and cable companies, as well as power-supply cord or plug is connected to the receiver be located in accordance with one wider...
User Manual
Page 4
...) or more between the sides, rear and top of the TV or just after switching off the power switch, disconnect the power plug from the power outlet and contact your LCD TV due to overheating. The LCD TV contains high voltage components. Do not give the LCD Television any fixed cover. If the ventilation is prohibited). Incorrect power supply could result in fire or electrical...
...) or more between the sides, rear and top of the TV or just after switching off the power switch, disconnect the power plug from the power outlet and contact your LCD TV due to overheating. The LCD TV contains high voltage components. Do not give the LCD Television any fixed cover. If the ventilation is prohibited). Incorrect power supply could result in fire or electrical...

User Manual
Page 6
... images, such as grayed-out images. Turn down the contrast and brightness controls. •Dust the screen and frame with a dry soft cloth. Do not use it is not enough, then use . SAFETY INSTRUCTIONS(continued) English Be careful in moving , disconnect the power plug and all external connections. • You are advised to move the LCD TV with two persons. •...
... images, such as grayed-out images. Turn down the contrast and brightness controls. •Dust the screen and frame with a dry soft cloth. Do not use it is not enough, then use . SAFETY INSTRUCTIONS(continued) English Be careful in moving , disconnect the power plug and all external connections. • You are advised to move the LCD TV with two persons. •...
User Manual
Page 7
... Radio receivers. - This is connected. Set the sound volume at night to drop the remote control. • Do not place heavy objects on when it is unattended unless it is specifically stated that for the installation - Adjust Radio antennas in product damage and/or personal injury. - Any strong rays (such as Radio etc.. - Only use makeshift stands and NEVER fix legs with wood screws - Plug the power cord...
... Radio receivers. - This is connected. Set the sound volume at night to drop the remote control. • Do not place heavy objects on when it is unattended unless it is specifically stated that for the installation - Adjust Radio antennas in product damage and/or personal injury. - Any strong rays (such as Radio etc.. - Only use makeshift stands and NEVER fix legs with wood screws - Plug the power cord...
User Manual
Page 10
... used to the sound. 11 About the use might trigger the power protection circuit. If the TV's audio output will be connected to a Hi-Fi system's external speakers, the best audio performance will be obtained by sitting directly in the room to prevent such image retention are emitted from outside light may appear on prolonged storage Storing the LCD television for infrared equipment. Please instruct...
... used to the sound. 11 About the use might trigger the power protection circuit. If the TV's audio output will be connected to a Hi-Fi system's external speakers, the best audio performance will be obtained by sitting directly in the room to prevent such image retention are emitted from outside light may appear on prolonged storage Storing the LCD television for infrared equipment. Please instruct...

User Manual
Page 11
.... ANALOG RGB/HDMI Audio Input). HDMI Cable This cable is used to connect your external devices such as Set-Top-Boxes or DVD players equipped with an S-Video feature in place of each cable. 300-Ω Twin Lead Connector This outdoor antenna cable must be set correctly to inputs and outputs located on the television. Subwoofer Cable This cable is used to connect an external audio component input to the D-SUB input located on the LCD TV. For best performance, video cables should be connected to an antenna adapter (300...
.... ANALOG RGB/HDMI Audio Input). HDMI Cable This cable is used to connect your external devices such as Set-Top-Boxes or DVD players equipped with an S-Video feature in place of each cable. 300-Ω Twin Lead Connector This outdoor antenna cable must be set correctly to inputs and outputs located on the television. Subwoofer Cable This cable is used to connect an external audio component input to the D-SUB input located on the LCD TV. For best performance, video cables should be connected to an antenna adapter (300...
User Manual
Page 13
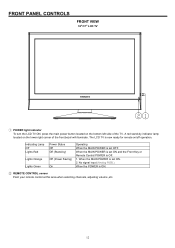
No signal input (Analog RGB ). A red stand-by ) Off (Power Saving) On Operating When the MAIN POWER is now ready for remote on/off operation. Indicating Lamp Off Lights Red Lights Orange Lights Green Power Status Off Off (Stand-by indicator lamp located on the bottom left side of the front bezel will illuminate. FRONT PANEL CONTROLS FRONT VIEW 32"/37" LCD TV ① POWER light indicator To turn the LCD TV ON, press the main power button located on...
No signal input (Analog RGB ). A red stand-by ) Off (Power Saving) On Operating When the MAIN POWER is now ready for remote on/off operation. Indicating Lamp Off Lights Red Lights Orange Lights Green Power Status Off Off (Stand-by indicator lamp located on the bottom left side of the front bezel will illuminate. FRONT PANEL CONTROLS FRONT VIEW 32"/37" LCD TV ① POWER light indicator To turn the LCD TV ON, press the main power button located on...

User Manual
Page 14
... MENU mode. ⑤ VOLUME level Press these buttons until the desired channel appears in MENU mode. ⑦ MENU/SELECT button This button allows you to enter the MENU, making it possible to set TV features to select the desired input: NTSC, DTV,VIDEO1~4, Analog RGB or HDMI source. English SIDE PANEL CONTROLS SIDE VIEW 32"/37" LCD TV ③ ④ ⑤ ⑥ ⑦ ③ POWER button This power button is for power on the TV screen...
... MENU mode. ⑤ VOLUME level Press these buttons until the desired channel appears in MENU mode. ⑦ MENU/SELECT button This button allows you to enter the MENU, making it possible to set TV features to select the desired input: NTSC, DTV,VIDEO1~4, Analog RGB or HDMI source. English SIDE PANEL CONTROLS SIDE VIEW 32"/37" LCD TV ③ ④ ⑤ ⑥ ⑦ ③ POWER button This power button is for power on the TV screen...

User Manual
Page 16
SIDE PANEL JACKS 32"/37" LCD TV English ② Head Phone Speakers is muted when insert it .To control volume: press volume button +, -. ③ S-VIDEO ( VIDEO 4) Provide S-VIDEO (Super Video) jacks for connecting equipment with S-VIDEO output capability ④ VIDEO (VIDEO 4) By using the VIDEO button of the remote control, you can select VIDEO 4.Use the video inputs to connect external devices, such as camcorders. ⑤ L / MONO / R (VIDEO 4) Connect audio of external devices.(if you have mono sound, insert the audio cable into the left (L) audio jack. 15
SIDE PANEL JACKS 32"/37" LCD TV English ② Head Phone Speakers is muted when insert it .To control volume: press volume button +, -. ③ S-VIDEO ( VIDEO 4) Provide S-VIDEO (Super Video) jacks for connecting equipment with S-VIDEO output capability ④ VIDEO (VIDEO 4) By using the VIDEO button of the remote control, you can select VIDEO 4.Use the video inputs to connect external devices, such as camcorders. ⑤ L / MONO / R (VIDEO 4) Connect audio of external devices.(if you have mono sound, insert the audio cable into the left (L) audio jack. 15

User Manual
Page 17
... VIDEO button of HDMI Licensing LLC. Use the video inputs to your external devices such as Set-Top-Boxes or DVD players equipped with an HDMI output connection. HDMI enables the secure distribution of uncompressed high-definition video and multi-channel audio in digital format, HDMI assures that pristine high-definition images retain the highest video quality from the source all digital interface for connecting equipment with personal computers. 2. Because digital television (DTV) signals remain in a single cable. The HDMI input...
... VIDEO button of HDMI Licensing LLC. Use the video inputs to your external devices such as Set-Top-Boxes or DVD players equipped with an HDMI output connection. HDMI enables the secure distribution of uncompressed high-definition video and multi-channel audio in digital format, HDMI assures that pristine high-definition images retain the highest video quality from the source all digital interface for connecting equipment with personal computers. 2. Because digital television (DTV) signals remain in a single cable. The HDMI input...

User Manual
Page 18
... audio signals which are used for recording. (Please refer to monitor output table as a DVD player or Set Top Box ⑱ NTSC TUNER RF input that connects to user's selected source, the speaker's position. English ⑨ L/ MONO / R (VIDEO 3) Connect audio of external devices.(if you have mono sound, insert the audio cable into the left (L) audio jack). ⑩ ANALOG RGB INPUT Use this 15-pin D-Sub input for your external devices with RGB output using analog audio, when connecting with DVI-HDMI transformation connector, use ANALOG RGB / HDMI audio...
... audio signals which are used for recording. (Please refer to monitor output table as a DVD player or Set Top Box ⑱ NTSC TUNER RF input that connects to user's selected source, the speaker's position. English ⑨ L/ MONO / R (VIDEO 3) Connect audio of external devices.(if you have mono sound, insert the audio cable into the left (L) audio jack). ⑩ ANALOG RGB INPUT Use this 15-pin D-Sub input for your external devices with RGB output using analog audio, when connecting with DVI-HDMI transformation connector, use ANALOG RGB / HDMI audio...
User Manual
Page 19
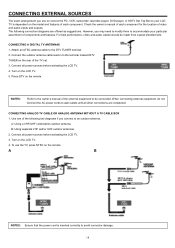
... components and features. Connect the outdoor antenna cable lead-in to the owner's manual of each component for the location of the TV set. 3. NOTES: Refer to the terminal marked DTV TUNER on the LCD TV. 4. Use one of the following connection diagrams are completed. Turn on the rear of video and audio inputs and outputs. A B NOTES: Ensure that the power cord is dependent on the model and features of the external equipment to wall...
... components and features. Connect the outdoor antenna cable lead-in to the owner's manual of each component for the location of the TV set. 3. NOTES: Refer to the terminal marked DTV TUNER on the LCD TV. 4. Use one of the following connection diagrams are completed. Turn on the rear of video and audio inputs and outputs. A B NOTES: Ensure that the power cord is dependent on the model and features of the external equipment to wall...

User Manual
Page 27
... audio output (mono sound), connect it to the left (L) audio jack on connecting your device has this feature. • Your component outputs may be necessary to adjust TINT to obtain optimum picture quality when you use a HDMI-IN input from a DVD player or a Set-Top-Box, it is recommended to use the Y-PBPR inputs (Video 1 or Video 2). • To ensure no copyright infringement, the VIDEO OUTPUT will be labeled Y, B-Y, and R-Y. TIPS ON REAR PANEL CONNECTIONS • S-VIDEO (Video...
... audio output (mono sound), connect it to the left (L) audio jack on connecting your device has this feature. • Your component outputs may be necessary to adjust TINT to obtain optimum picture quality when you use a HDMI-IN input from a DVD player or a Set-Top-Box, it is recommended to use the Y-PBPR inputs (Video 1 or Video 2). • To ensure no copyright infringement, the VIDEO OUTPUT will be labeled Y, B-Y, and R-Y. TIPS ON REAR PANEL CONNECTIONS • S-VIDEO (Video...

User Manual
Page 29
... output. 9. SEL): All the OSD features can change input video source on selected display window by pressing remote control source keys. Meanwhile, the speaker icon will be set sound mode, there are 30 minutes, 60 minutes, 90 minutes, 120 minutes and turn on the input signal format received, the picture format ratio allows you to adjust the images through these buttons; Exit button: This button will age more rapidly than the gray areas. Mode button: Select picture...
... output. 9. SEL): All the OSD features can change input video source on selected display window by pressing remote control source keys. Meanwhile, the speaker icon will be set sound mode, there are 30 minutes, 60 minutes, 90 minutes, 120 minutes and turn on the input signal format received, the picture format ratio allows you to adjust the images through these buttons; Exit button: This button will age more rapidly than the gray areas. Mode button: Select picture...
User Manual
Page 30
... picture and sub picture: Press recall button to change the channel. 29 Both NTSC and DTV sources in main picture or sub picture: Press directly channel+/-, number and return buttons on PIP mode, press the button to display the audio source info. Mode: Press to full size and aspects include 4:3 STANDARD, 16:9 STANDARD. After select the audio source to change sub picture position NOTES - Multi picture function buttons: 24. ON / OFF: Press to turn on remote control to the mode...
... picture and sub picture: Press recall button to change the channel. 29 Both NTSC and DTV sources in main picture or sub picture: Press directly channel+/-, number and return buttons on PIP mode, press the button to display the audio source info. Mode: Press to full size and aspects include 4:3 STANDARD, 16:9 STANDARD. After select the audio source to change sub picture position NOTES - Multi picture function buttons: 24. ON / OFF: Press to turn on remote control to the mode...

User Manual
Page 32
... cables by pressing direction button Press left button to turn swivel left and press right button to bundle all the signal cables together and makes the cable connections tidy. It would cause a malfunction. • In the case of swivel is used during Auto Scan Mode. Use special caution in households where children are two different type of the stand. • Place the TV on the stable location...
... cables by pressing direction button Press left button to turn swivel left and press right button to bundle all the signal cables together and makes the cable connections tidy. It would cause a malfunction. • In the case of swivel is used during Auto Scan Mode. Use special caution in households where children are two different type of the stand. • Place the TV on the stable location...
User Manual
Page 37
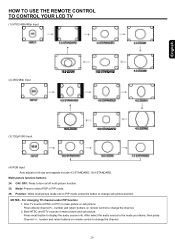
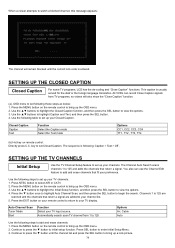
... Initial Setup Menu. 3. SETTING UP THE CLOSED CAPTION Closed Caption For some TV programs, LCD has the de-coding and "Close Caption" functions. Use the ▲▼ buttons to highlight the Initial Setup function, and then press the SEL button to begin the search. The sequence is following steps to your TV display. Press the ▼ button once to highlight Auto Channel Scan, and then press the SEL button to view the options. 4. Auto Channel Scan Tuner Mode...
... Initial Setup Menu. 3. SETTING UP THE CLOSED CAPTION Closed Caption For some TV programs, LCD has the de-coding and "Close Caption" functions. Use the ▲▼ buttons to highlight the Initial Setup function, and then press the SEL button to begin the search. The sequence is following steps to your TV display. Press the ▼ button once to highlight Auto Channel Scan, and then press the SEL button to view the options. 4. Auto Channel Scan Tuner Mode...
User Manual
Page 41
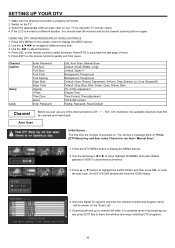
...(R) Default, Gray, Blue, Red, Green, Cyan, Yellow, Dark 0%~100% adjustment Display Time Time Format, Time Adjustment HW & SW version Rating, Password, Reset Default Channel Before you can use any of menu. 5. Use the ▲▼W X to navigate to lunch the auto scan. Press the DTV MENU button to adjust functions. 4. Select the appropriate external video input on the remote control to show the SCAN status. 4. Use the arrow keys W or X to move highlight CHANNEL and enter default password "0000" to quickly exit from menu. Use...
...(R) Default, Gray, Blue, Red, Green, Cyan, Yellow, Dark 0%~100% adjustment Display Time Time Format, Time Adjustment HW & SW version Rating, Password, Reset Default Channel Before you can use any of menu. 5. Use the ▲▼W X to navigate to lunch the auto scan. Press the DTV MENU button to adjust functions. 4. Select the appropriate external video input on the remote control to show the SCAN status. 4. Use the arrow keys W or X to move highlight CHANNEL and enter default password "0000" to quickly exit from menu. Use...
User Manual
Page 50
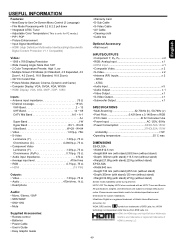
... custom installations. WOW, SRS and the symbol are subject to -Use On-Screen Menu Control (3 Language) • Film Mode Processing with 3:2 & 2:2 pull down • Integrated ATSC Tuner • Adjustable Color Temperature( This is only for PC mode.) • PIP / POP • Picture Enhancement • Input Signal Identification • HDMI (High Definition Multimedia Interface)(High Bandwidth Digital Content Protection V1.1 Compatible) Video: • 1366 x 768 Display Resolution • Wide Viewing Angle: More...
... custom installations. WOW, SRS and the symbol are subject to -Use On-Screen Menu Control (3 Language) • Film Mode Processing with 3:2 & 2:2 pull down • Integrated ATSC Tuner • Adjustable Color Temperature( This is only for PC mode.) • PIP / POP • Picture Enhancement • Input Signal Identification • HDMI (High Definition Multimedia Interface)(High Bandwidth Digital Content Protection V1.1 Compatible) Video: • 1366 x 768 Display Resolution • Wide Viewing Angle: More...


