User Manual
Page 2
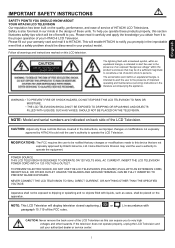
... not expressly approved by HITACHI could void the user's authority to operate the LCD Television. NOTE: Model and serial numbers are covered in the instructions, as improper changes or modifications not expressly approved by Hitachi America, Ltd. POWER SOURCE THIS LCD TELEVISION IS DESIGNED TO OPERATE ON 120 VOLTS 60Hz, AC CURRENT. If the television does not operate properly, unplug the LCD Television and call your product model. Please read it...
... not expressly approved by HITACHI could void the user's authority to operate the LCD Television. NOTE: Model and serial numbers are covered in the instructions, as improper changes or modifications not expressly approved by Hitachi America, Ltd. POWER SOURCE THIS LCD TELEVISION IS DESIGNED TO OPERATE ON 120 VOLTS 60Hz, AC CURRENT. If the television does not operate properly, unplug the LCD Television and call your product model. Please read it...
User Manual
Page 3
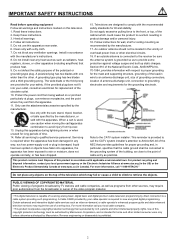
... a set-top box. PUBLIC VIEWING OF COPYRIGHTED MATERIAL Public viewing of receiving analog basic, digital basic and digital premium cable television programming by TV stations and cable companies, as well as practical. Heed all instructions. 5. Clean only with one wider than the other. A grounding type plug has two blades and a third grounding prong. Only use caution when moving the cart/apparatus combination to an antenna discharge unit, size...
... a set-top box. PUBLIC VIEWING OF COPYRIGHTED MATERIAL Public viewing of receiving analog basic, digital basic and digital premium cable television programming by TV stations and cable companies, as well as practical. Heed all instructions. 5. Clean only with one wider than the other. A grounding type plug has two blades and a third grounding prong. Only use caution when moving the cart/apparatus combination to an antenna discharge unit, size...
User Manual
Page 4
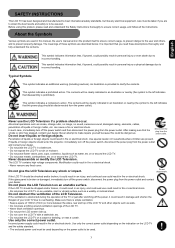
..., liquids such as a wobbly or inclined stand. Never disassemble or modify the LCD Television. If the glass panel is provided to overheating. An illustration is broken or damaged, immediately turn off the power, it could result in an injury, and continued use could result in fire or electrical shock. Abnormal operations such as walls. • Do not place anything...
..., liquids such as a wobbly or inclined stand. Never disassemble or modify the LCD Television. If the glass panel is provided to overheating. An illustration is broken or damaged, immediately turn off the power, it could result in an injury, and continued use could result in fire or electrical shock. Abnormal operations such as walls. • Do not place anything...

User Manual
Page 6
.... Relax your eyes may become tired. Turn down the contrast and brightness controls. •Dust the screen and frame with a dry soft cloth. Remove the power cord for complete separation. • For safety purposes, disconnect the power cord if the LCD TV is not enough, then use . Use special caution in moving , disconnect the power plug and all external connections. • You are advised to...
.... Relax your eyes may become tired. Turn down the contrast and brightness controls. •Dust the screen and frame with a dry soft cloth. Remove the power cord for complete separation. • For safety purposes, disconnect the power cord if the LCD TV is not enough, then use . Use special caution in moving , disconnect the power plug and all external connections. • You are advised to...
User Manual
Page 7
... fix legs with ground terminal and make sure that for the cable connection - Switch off and withdraw the power plug before making or changing connections. - Adjust Radio antennas in any kind - SAFETY INSTRUCTIONS(continued) • Prevention of Radio should be safe than the LCD TV. This is connected. The antenna cable of an obstacle to Radio receivers This LCD TV has been designed pursuant to Radio receivers. - Set the sound volume...
... fix legs with ground terminal and make sure that for the cable connection - Switch off and withdraw the power plug before making or changing connections. - Adjust Radio antennas in any kind - SAFETY INSTRUCTIONS(continued) • Prevention of Radio should be safe than the LCD TV. This is connected. The antenna cable of an obstacle to Radio receivers This LCD TV has been designed pursuant to Radio receivers. - Set the sound volume...
User Manual
Page 10
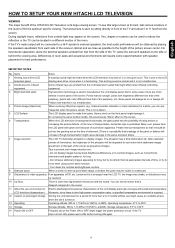
... panel surface hardly, this is made from LCD television panel. More-over, please treat the LCD panel with speaker placement for viewing. Please instruct transporters so that part of the Power ON or OFF might cause damage to the panel and pixel failure. 7 Image retention The LCD TV illuminates phosphor to 11 feet from outside light may be put into the packing box at its large viewing screen...
... panel surface hardly, this is made from LCD television panel. More-over, please treat the LCD panel with speaker placement for viewing. Please instruct transporters so that part of the Power ON or OFF might cause damage to the panel and pixel failure. 7 Image retention The LCD TV illuminates phosphor to 11 feet from outside light may be put into the packing box at its large viewing screen...

User Manual
Page 11
... components and the length of each cable. 300-Ω Twin Lead Connector This outdoor antenna cable must be connected to an antenna adapter (300-Ω to the D-SUB input located on the LCD TV. The resolution should use 75-Ω coaxial shielded wire. HDMI Cable This cable is used to connect your external devices such as Set-Top-Boxes or DVD players equipped with an HDMI output connection to display the signal on the rear panel of the standard video cable...
... components and the length of each cable. 300-Ω Twin Lead Connector This outdoor antenna cable must be connected to an antenna adapter (300-Ω to the D-SUB input located on the LCD TV. The resolution should use 75-Ω coaxial shielded wire. HDMI Cable This cable is used to connect your external devices such as Set-Top-Boxes or DVD players equipped with an HDMI output connection to display the signal on the rear panel of the standard video cable...
User Manual
Page 13
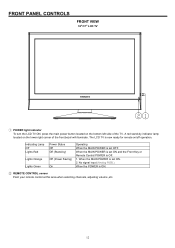
...; REMOTE CONTROL sensor Point your remote control at this area when selecting channels, adjusting volume ,etc. 12 When the POWER is now ready for remote on/off operation. FRONT PANEL CONTROLS FRONT VIEW 32"/37" LCD TV ① POWER light indicator To turn the LCD TV ON, press the main power button located on the lower right corner of the TV. No signal input (Analog RGB ). When the MAIN POWER is set ON. 2. A red stand-by ) Off (Power Saving) On Operating...
...; REMOTE CONTROL sensor Point your remote control at this area when selecting channels, adjusting volume ,etc. 12 When the POWER is now ready for remote on/off operation. FRONT PANEL CONTROLS FRONT VIEW 32"/37" LCD TV ① POWER light indicator To turn the LCD TV ON, press the main power button located on the lower right corner of the TV. No signal input (Analog RGB ). When the MAIN POWER is set ON. 2. A red stand-by ) Off (Power Saving) On Operating...

User Manual
Page 14
... sound level. The volume level will be displayed on the LCD television or change to standby mode. ④ CHANNEL selector Press these buttons to your preference without using the remote. English SIDE PANEL CONTROLS SIDE VIEW 32"/37" LCD TV ③ ④ ⑤ ⑥ ⑦ ③ POWER button This power button is for power on the TV screen. This button also serves as the cursor down (▼) and up (▲) buttons when in MENU mode. ⑤ VOLUME...
... sound level. The volume level will be displayed on the LCD television or change to standby mode. ④ CHANNEL selector Press these buttons to your preference without using the remote. English SIDE PANEL CONTROLS SIDE VIEW 32"/37" LCD TV ③ ④ ⑤ ⑥ ⑦ ③ POWER button This power button is for power on the TV screen. This button also serves as the cursor down (▼) and up (▲) buttons when in MENU mode. ⑤ VOLUME...

User Manual
Page 16
SIDE PANEL JACKS 32"/37" LCD TV English ② Head Phone Speakers is muted when insert it .To control volume: press volume button +, -. ③ S-VIDEO ( VIDEO 4) Provide S-VIDEO (Super Video) jacks for connecting equipment with S-VIDEO output capability ④ VIDEO (VIDEO 4) By using the VIDEO button of the remote control, you can select VIDEO 4.Use the video inputs to connect external devices, such as camcorders. ⑤ L / MONO / R (VIDEO 4) Connect audio of external devices.(if you have mono sound, insert the audio cable into the left (L) audio jack. 15
SIDE PANEL JACKS 32"/37" LCD TV English ② Head Phone Speakers is muted when insert it .To control volume: press volume button +, -. ③ S-VIDEO ( VIDEO 4) Provide S-VIDEO (Super Video) jacks for connecting equipment with S-VIDEO output capability ④ VIDEO (VIDEO 4) By using the VIDEO button of the remote control, you can select VIDEO 4.Use the video inputs to connect external devices, such as camcorders. ⑤ L / MONO / R (VIDEO 4) Connect audio of external devices.(if you have mono sound, insert the audio cable into the left (L) audio jack. 15

User Manual
Page 17
... connect external devices, such as Set-Top-Boxes or DVD players equipped with an HDMI output connection. Only DTV formats such as 1080i, 720p, 480i and 480p are trademarks or registered trademarks of the remote control, you can select VIDEO3. Because digital television (DTV) signals remain in a single cable. REAR PANEL JACKS 32"/37" LCD TV ⑥ HDMI - HDMI, the HDMI logo and High-Definition Multimedia Interface are available for HDMI input. ⑦ S-VIDEO (VIDEO 3) Provide S-VIDEO...
... connect external devices, such as Set-Top-Boxes or DVD players equipped with an HDMI output connection. Only DTV formats such as 1080i, 720p, 480i and 480p are trademarks or registered trademarks of the remote control, you can select VIDEO3. Because digital television (DTV) signals remain in a single cable. REAR PANEL JACKS 32"/37" LCD TV ⑥ HDMI - HDMI, the HDMI logo and High-Definition Multimedia Interface are available for HDMI input. ⑦ S-VIDEO (VIDEO 3) Provide S-VIDEO...

User Manual
Page 18
... sound, insert the audio cable into the left (L) audio jack). ⑩ ANALOG RGB INPUT Use this 15-pin D-Sub input for your external devices with DVI-HDMI transformation connector, use ANALOG RGB / HDMI audio terminal for input. ⑫ SUBWOOFER Output Connect this capability, such as below ) ⑮ MONITOR Output (VIDEO) This jack provides video and audio signals which are used for recording. (Please refer to monitor output table as a DVD player or Set Top Box ⑱ NTSC TUNER RF input that connects to the antenna, cable box...
... sound, insert the audio cable into the left (L) audio jack). ⑩ ANALOG RGB INPUT Use this 15-pin D-Sub input for your external devices with DVI-HDMI transformation connector, use ANALOG RGB / HDMI audio terminal for input. ⑫ SUBWOOFER Output Connect this capability, such as below ) ⑮ MONITOR Output (VIDEO) This jack provides video and audio signals which are used for recording. (Please refer to monitor output table as a DVD player or Set Top Box ⑱ NTSC TUNER RF input that connects to the antenna, cable box...
User Manual
Page 19
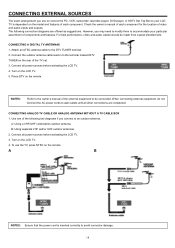
... power cords to wall outlets until all power sources before activating the LCD TV. 4. Turn on the remote. A B NOTES: Ensure that the power cord is dependent on the rear of each component. However, you connect to an outdoor antenna. Connect the outdoor antenna cable lead-in to the terminal marked DTV TUNER on the model and features of each component for the location of video and audio inputs and outputs. NOTES: Refer to the owner's manual of components...
... power cords to wall outlets until all power sources before activating the LCD TV. 4. Turn on the remote. A B NOTES: Ensure that the power cord is dependent on the rear of each component. However, you connect to an outdoor antenna. Connect the outdoor antenna cable lead-in to the terminal marked DTV TUNER on the model and features of each component for the location of video and audio inputs and outputs. NOTES: Refer to the owner's manual of components...

User Manual
Page 27
... the operating guide of the standard video connection if your hook-up cables. • Connect only 1 component (VCR, DVD player, camcorder, etc.) to each input jack. • COMPONENT: Y-PBPR (Video 1 or Video 2) connections are provided for higher performance devices appliance, such as DVD players and set-top-boxes. Use these connections in place of the standard video connection if your device has this feature. • If your device has only one audio output (mono sound), connect it...
... the operating guide of the standard video connection if your hook-up cables. • Connect only 1 component (VCR, DVD player, camcorder, etc.) to each input jack. • COMPONENT: Y-PBPR (Video 1 or Video 2) connections are provided for higher performance devices appliance, such as DVD players and set-top-boxes. Use these connections in place of the standard video connection if your device has this feature. • If your device has only one audio output (mono sound), connect it...

User Manual
Page 29
... AV had signal input at the same time, the SV has higher priority output. 9. NTSC Source button: Set up the input source of DTV Mode: Channel Banner, time, Closed Caption status, and resolution Mode. 19. it . User can change input video source on DTV OSD (On-Screen Display) menu in DTV Mode. 16. RECALL button: Press to set or adjusted by pressing remote control source keys. iii. (◄/►): In POP mode, Press "◄" or "►" buttons to select which display window will be set sound mode, there...
... AV had signal input at the same time, the SV has higher priority output. 9. NTSC Source button: Set up the input source of DTV Mode: Channel Banner, time, Closed Caption status, and resolution Mode. 19. it . User can change input video source on DTV OSD (On-Screen Display) menu in DTV Mode. 16. RECALL button: Press to set or adjusted by pressing remote control source keys. iii. (◄/►): In POP mode, Press "◄" or "►" buttons to select which display window will be set sound mode, there...
User Manual
Page 30
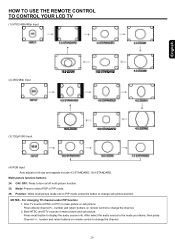
... TO USE THE REMOTE CONTROL TO CONTROL YOUR LCD TV (1) NTSC/480i/480p Input (2) 480i/480p Input (3) 720p/1080i Input (4) RGB Input Auto adjust to select POP or PIP mode. 26. ON / OFF: Press to change sub picture position NOTES - Multi picture function buttons: 24. After select the audio source to the mode you desire, then press Channel +/-, number and return buttons on remote control to turn on PIP mode, press the button to change the channel. 2. For changing TV channel under PIP function...
... TO USE THE REMOTE CONTROL TO CONTROL YOUR LCD TV (1) NTSC/480i/480p Input (2) 480i/480p Input (3) 720p/1080i Input (4) RGB Input Auto adjust to select POP or PIP mode. 26. ON / OFF: Press to change sub picture position NOTES - Multi picture function buttons: 24. After select the audio source to the mode you desire, then press Channel +/-, number and return buttons on remote control to turn on PIP mode, press the button to change the channel. 2. For changing TV channel under PIP function...

User Manual
Page 32
... 1. Put the power cord through the cable clamp which is used during Auto Scan Mode. Do not swing the TV back and forth and around either. It would not operate correctly. The OSD indicator will disappear, if stop if the direction button is ± 30 degree. 3. NOTE: A Cable tie is attached to detach the connecting cable between the TV and the stand. 31...
... 1. Put the power cord through the cable clamp which is used during Auto Scan Mode. Do not swing the TV back and forth and around either. It would not operate correctly. The OSD indicator will disappear, if stop if the direction button is ± 30 degree. 3. NOTE: A Cable tie is attached to detach the connecting cable between the TV and the stand. 31...
User Manual
Page 37
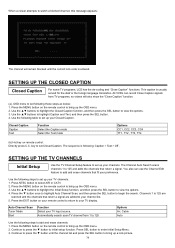
... then press the SEL button to add and erase channels: 1. Press the MENU button on remote control: Directly press C.C. Continue to press the ▼ button to bring up your TV input source. SETTING UP THE TV CHANNELS Initial Setup Use the TV Channel Setup feature to 125 and adds the channels that return a signal. The Channel Auto Search scans channels 1 to set Closed Caption. SETTING UP THE CLOSED CAPTION Closed Caption For some TV programs, LCD has the de-coding and "Close Caption" functions.
... then press the SEL button to add and erase channels: 1. Press the MENU button on remote control: Directly press C.C. Continue to press the ▼ button to bring up your TV input source. SETTING UP THE TV CHANNELS Initial Setup Use the TV Channel Setup feature to 125 and adds the channels that return a signal. The Channel Auto Search scans channels 1 to set Closed Caption. SETTING UP THE CLOSED CAPTION Closed Caption For some TV programs, LCD has the de-coding and "Close Caption" functions.
User Manual
Page 41
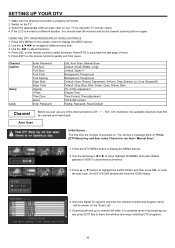
... the DTV MENU button to run Auto / Manual Scan". 1. Press DTV MENU on the "Scan List". 5. SETTING UP YOUR DTV 1. Channel Caption Setup Lock Enter Password Font Size Font Style Font Color Font Opacity Edge Style Edge Color Opacity I-Plate Time Zone About Enter Password Edit, Auto Scan, Manual Scan Default, Small, Middle, Large Default, Style0~7 Background, Foreground Background, Foreground Default, None, Raised, Depressed, Uniform, Drop Shadow (L), Drop Shadow(R) Default, Gray, Blue, Red, Green, Cyan, Yellow, Dark 0%~100% adjustment Display Time Time Format, Time Adjustment HW...
... the DTV MENU button to run Auto / Manual Scan". 1. Press DTV MENU on the "Scan List". 5. SETTING UP YOUR DTV 1. Channel Caption Setup Lock Enter Password Font Size Font Style Font Color Font Opacity Edge Style Edge Color Opacity I-Plate Time Zone About Enter Password Edit, Auto Scan, Manual Scan Default, Small, Middle, Large Default, Style0~7 Background, Foreground Background, Foreground Default, None, Raised, Depressed, Uniform, Drop Shadow (L), Drop Shadow(R) Default, Gray, Blue, Red, Green, Cyan, Yellow, Dark 0%~100% adjustment Display Time Time Format, Time Adjustment HW...
User Manual
Page 50
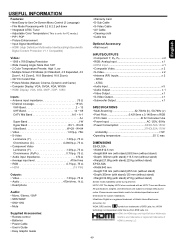
...8226; User's Guide • Easy Graphic Guide • Warranty Card • D-Sub Cable • S-Video Cable • AV Cable • Cleaning cloth • Cable ties Optional Accessory: • Wall mount INPUTS/OUTPUTS • Component Y, PB, PR x 2 • RGB: Analog Input x 1 • HDMI Input x 1 • Composite Video x 2 • S-Video x 2 • Antenna (RF) Inputs x 2 - Please access www.hitachi.com/tv for detailed specifications and dimensions for Consumer Use • Power Input AC 120V, 60Hz • Power Consumption 32HDL52A:150W 37HDL52A:170W at standby 1W...
...8226; User's Guide • Easy Graphic Guide • Warranty Card • D-Sub Cable • S-Video Cable • AV Cable • Cleaning cloth • Cable ties Optional Accessory: • Wall mount INPUTS/OUTPUTS • Component Y, PB, PR x 2 • RGB: Analog Input x 1 • HDMI Input x 1 • Composite Video x 2 • S-Video x 2 • Antenna (RF) Inputs x 2 - Please access www.hitachi.com/tv for detailed specifications and dimensions for Consumer Use • Power Input AC 120V, 60Hz • Power Consumption 32HDL52A:150W 37HDL52A:170W at standby 1W...


