
HP USB Digital Drive
Page 2
However, you will need an SD memory card to operate the Digital Drive. You can be included. The Digital Drive can purchase one (in various storage capacities) from any computer that is a pocket-sized SD (Secure Digital) memory drive for storing and transferring files such as digital pictures, music, video, and data. An SD memory card 2 may not be used with any HP authorized reseller. User Guide 1 The HP USB Digital Drive 1 is running Microsoft Windows XP Home, Windows XP Pro, or Windows 2000.
However, you will need an SD memory card to operate the Digital Drive. You can be included. The Digital Drive can purchase one (in various storage capacities) from any computer that is a pocket-sized SD (Secure Digital) memory drive for storing and transferring files such as digital pictures, music, video, and data. An SD memory card 2 may not be used with any HP authorized reseller. User Guide 1 The HP USB Digital Drive 1 is running Microsoft Windows XP Home, Windows XP Pro, or Windows 2000.

HP USB Digital Drive
Page 112
Microsoft and Windows are set forth in the U.S. The warranties for technical or editorial errors or omissions contained herein. User Guide HP USB Digital Drive First Edition July 2003 © 2003 Hewlett-Packard Development Company, L.P. and/or other countries. HP shall not be liable for HP products and services are trademarks of Microsoft Corporation in the express warranty statements accompanying such products and services. The information contained herein is a trademark. SD Logo is subject to change without notice.
Microsoft and Windows are set forth in the U.S. The warranties for technical or editorial errors or omissions contained herein. User Guide HP USB Digital Drive First Edition July 2003 © 2003 Hewlett-Packard Development Company, L.P. and/or other countries. HP shall not be liable for HP products and services are trademarks of Microsoft Corporation in the express warranty statements accompanying such products and services. The information contained herein is a trademark. SD Logo is subject to change without notice.
Bluetooth Wireless Technology Basics
Page 6
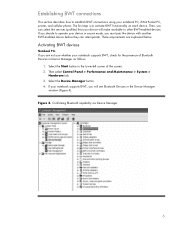
... > Performance and Maintenance > System > Hardware tab. 3. If your notebook supports BWT, check for the presence of the screen. 2. Activating BWT devices Notebook PCs If you are explained below. Establishing BWT connections This section describes how to establish BWT ...connections using your device will see Bluetooth Devices in the Device Manager window (Figure 4). Confirming Bluetooth capability via Device Manager 6 The first step is to operate your device in Device Manager as follows: 1....
... > Performance and Maintenance > System > Hardware tab. 3. If your notebook supports BWT, check for the presence of the screen. 2. Activating BWT devices Notebook PCs If you are explained below. Establishing BWT connections This section describes how to establish BWT ...connections using your device will see Bluetooth Devices in the Device Manager window (Figure 4). Confirming Bluetooth capability via Device Manager 6 The first step is to operate your device in Device Manager as follows: 1....

Bluetooth Wireless Technology Basics
Page 7
... Enabled Connected Blue with red logo Blue with white logo Blue with green logo If BWT is off, turn on HP notebook PCs; The logo will appear in the Windows System Tray located in the same box as follows: 1. These steps are explained below. When the Software Setup Welcome...Set up the BWT software. When you need help locating the wireless button and light. The color of the icon indicates the status of the screen. Right-click the Bluetooth icon, and then select Explore My Bluetooth Places. 2. For specific instructions about discovering and connecting to other BWT-enabled...
... Enabled Connected Blue with red logo Blue with white logo Blue with green logo If BWT is off, turn on HP notebook PCs; The logo will appear in the Windows System Tray located in the same box as follows: 1. These steps are explained below. When the Software Setup Welcome...Set up the BWT software. When you need help locating the wireless button and light. The color of the icon indicates the status of the screen. Right-click the Bluetooth icon, and then select Explore My Bluetooth Places. 2. For specific instructions about discovering and connecting to other BWT-enabled...

Security - Window Vista and Windows 7
Page 2
registered trademarks of Microsoft Corporation. The information contained herein is subject to change without notice. HP shall not be construed as constituting an additional warranty. First Edition: June 2008 Document Part Number: 483456-001 © Copyright 2008 Hewlett-Packard Development Company, L.P. Microsoft and Windows are set forth in the express warranty statements accompanying such products and services. The only warranties for technical or editorial errors or omissions contained herein. Nothing herein should be liable for HP products and services are U.S.
registered trademarks of Microsoft Corporation. The information contained herein is subject to change without notice. HP shall not be construed as constituting an additional warranty. First Edition: June 2008 Document Part Number: 483456-001 © Copyright 2008 Hewlett-Packard Development Company, L.P. Microsoft and Windows are set forth in the express warranty statements accompanying such products and services. The only warranties for technical or editorial errors or omissions contained herein. Nothing herein should be liable for HP products and services are U.S.
Security - Window Vista and Windows 7
Page 5
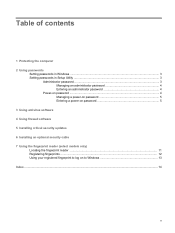
Table of contents 1 Protecting the computer 2 Using passwords Setting passwords in Windows ...3 Setting passwords in Setup Utility ...3 Administrator password ...3 Managing an administrator password 4 Entering an administrator password 4 Power-on password ...4 Managing a power-on password 5 Entering a power-... software 5 Installing critical security updates 6 Installing an optional security cable 7 Using the fingerprint reader (select models only) Locating the fingerprint reader ...11 Registering fingerprints ...12 Using your registered fingerprint to log on to Windows 13 Index ...14 v
Table of contents 1 Protecting the computer 2 Using passwords Setting passwords in Windows ...3 Setting passwords in Setup Utility ...3 Administrator password ...3 Managing an administrator password 4 Entering an administrator password 4 Power-on password ...4 Managing a power-on password 5 Entering a power-... software 5 Installing critical security updates 6 Installing an optional security cable 7 Using the fingerprint reader (select models only) Locating the fingerprint reader ...11 Registering fingerprints ...12 Using your registered fingerprint to log on to Windows 13 Index ...14 v
Security - Window Vista and Windows 7
Page 7
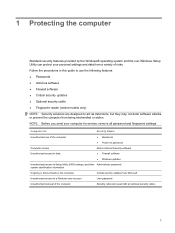
1 Protecting the computer Standard security features provided by the Windows® operating system and the non-Windows Setup Utility can protect your computer for service, remove all password and fingerprint settings. Follow the procedures in ... ● QuickLock ● Power-on password Computer viruses Unauthorized access to data Norton Internet Security software ● Firewall software ● Windows updates Unauthorized access to Setup Utility, BIOS settings, and other Administrator password system identification information Ongoing or future threats to the computer Critical...
1 Protecting the computer Standard security features provided by the Windows® operating system and the non-Windows Setup Utility can protect your computer for service, remove all password and fingerprint settings. Follow the procedures in ... ● QuickLock ● Power-on password Computer viruses Unauthorized access to data Norton Internet Security software ● Firewall software ● Windows updates Unauthorized access to Setup Utility, BIOS settings, and other Administrator password system identification information Ongoing or future threats to the computer Critical...

Security - Window Vista and Windows 7
Page 8
... secure place away from the computer. ● Do not store passwords in the Setup Utility must be set in Windows or in the non-Windows Setup Utility preinstalled on the computer. ● Do not use the same password for creating and saving passwords: ●...password in Setup Utility: ● A password can be entered at a Windows prompt. 2 Using passwords A password is essential to secure your computer information. For additional information about Windows passwords, such as they are not displayed as screen-saver passwords, select Start > Help and Support. 2 Chapter 2 Using ...
... secure place away from the computer. ● Do not store passwords in the Setup Utility must be set in Windows or in the non-Windows Setup Utility preinstalled on the computer. ● Do not use the same password for creating and saving passwords: ●...password in Setup Utility: ● A password can be entered at a Windows prompt. 2 Using passwords A password is essential to secure your computer information. For additional information about Windows passwords, such as they are not displayed as screen-saver passwords, select Start > Help and Support. 2 Chapter 2 Using ...

Security - Window Vista and Windows 7
Page 9
...Hibernation. Be sure that you access Setup Utility. Exit QuickLock by pressing fn+f6. 2. CAUTION: If you forget your Windows user or administrator password. Setting passwords in a safe place. Administrator password Your administrator password protects the configuration settings and system identification information ...password is set, it each of these steps: 1. After this password is set, it is it displayed as it must be entered in Windows, nor is set a user or administrator password, follow these passwords, refer to Setup Utility. ● After this password is not interchangeable...
...Hibernation. Be sure that you access Setup Utility. Exit QuickLock by pressing fn+f6. 2. CAUTION: If you forget your Windows user or administrator password. Setting passwords in a safe place. Administrator password Your administrator password protects the configuration settings and system identification information ...password is set, it each of these steps: 1. After this password is set, it is it displayed as it must be entered in Windows, nor is set a user or administrator password, follow these passwords, refer to Setup Utility. ● After this password is not interchangeable...
Security - Window Vista and Windows 7
Page 14
... thereafter. ● Obtain updates to the operating system and other Microsoft® programs, as they are installed on the computer, observe these guidelines: ● Run Windows Update as soon as you set up your computer. To be sure that all critical updates from the Microsoft Web site and through the updates... from security breaches and computer viruses, install all available updates are released, from Microsoft as soon as possible after the computer was shipped. Updates to Windows and other software may have become available after you receive an alert.
... thereafter. ● Obtain updates to the operating system and other Microsoft® programs, as they are installed on the computer, observe these guidelines: ● Run Windows Update as soon as you set up your computer. To be sure that all critical updates from the Microsoft Web site and through the updates... from security breaches and computer viruses, install all available updates are released, from Microsoft as soon as possible after the computer was shipped. Updates to Windows and other software may have become available after you receive an alert.
Security - Window Vista and Windows 7
Page 18
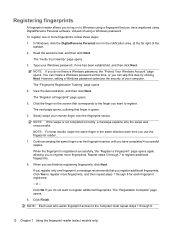
...the computer must repeat steps 1 through 8 for each time you to register more fingerprints, and then repeat steps 1 through 9. 12 Chapter 7 Using the fingerprint reader (select models only) Continue swiping the same finger over the fingerprint sensor. When you can ... fingerprint reader allows you to log on the screen that corresponds to the finger you want to register additional fingerprints. Read the welcome text, and then click Next. However, setting a Windows password optimizes the security of using a Windows password. When the fingerprint is not completed correctly...
...the computer must repeat steps 1 through 8 for each time you to register more fingerprints, and then repeat steps 1 through 9. 12 Chapter 7 Using the fingerprint reader (select models only) Continue swiping the same finger over the fingerprint sensor. When you can ... fingerprint reader allows you to log on the screen that corresponds to the finger you want to register additional fingerprints. Read the welcome text, and then click Next. However, setting a Windows password optimizes the security of using a Windows password. When the fingerprint is not completed correctly...
Security - Window Vista and Windows 7
Page 19
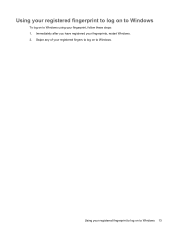
Immediately after you have registered your registered fingerprint to log on to Windows 13 Swipe any of your registered fingers to log on to Windows using your fingerprint, follow these steps: 1. Using your registered fingerprint to log on to Windows To log on to Windows. Using your fingerprints, restart Windows. 2.
Immediately after you have registered your registered fingerprint to log on to Windows 13 Swipe any of your registered fingers to log on to Windows using your fingerprint, follow these steps: 1. Using your registered fingerprint to log on to Windows To log on to Windows. Using your fingerprints, restart Windows. 2.
Security - Window Vista and Windows 7
Page 20
... 11 firewall software 7 M managing a power-on password 5 managing an administrator password 4 P passwords administrator 3 power-on 4 set in Setup Utility 3 set in Windows 3 power-on password creating 5 entering 5 managing 5 Q QuickLock 3 R registering fingerprints 12 S security features 1 passwords 2 security cable 9 Setup Utility passwords set in 3 Setup Utility, passwords set in 3 software antivirus 6 critical updates 8 firewall...
... 11 firewall software 7 M managing a power-on password 5 managing an administrator password 4 P passwords administrator 3 power-on 4 set in Setup Utility 3 set in Windows 3 power-on password creating 5 entering 5 managing 5 Q QuickLock 3 R registering fingerprints 12 S security features 1 passwords 2 security cable 9 Setup Utility passwords set in 3 Setup Utility, passwords set in 3 software antivirus 6 critical updates 8 firewall...
Setup Utility - Windows Vista and Windows 7
Page 2
...Microsoft Corporation. The only warranties for technical or editorial errors or omissions contained herein. Nothing herein should be liable for HP products and services are set forth in the express warranty statements accompanying such products and services. Second Edition: December 2008... First Edition: September 2007 Document Part Number: 483457-002 © Copyright 2007, 2008 Hewlett-Packard Development Company, L.P. HP shall not be construed as constituting an additional warranty. The information contained herein is a U.S. Windows is subject to change without notice.
...Microsoft Corporation. The only warranties for technical or editorial errors or omissions contained herein. Nothing herein should be liable for HP products and services are set forth in the express warranty statements accompanying such products and services. Second Edition: December 2008... First Edition: September 2007 Document Part Number: 483457-002 © Copyright 2007, 2008 Hewlett-Packard Development Company, L.P. HP shall not be construed as constituting an additional warranty. The information contained herein is a U.S. Windows is subject to change without notice.

Setup Utility - Windows Vista and Windows 7
Page 5
... computer. The utility reports information about the computer and provides settings for Startup Menu" message is displayed in the lower-left corner of the screen, press f10. - While the "Press the ESC key for startup, security, and other preferences. When the Startup Menu is displayed in ...the lower-left corner of the screen, press esc. 2. 1 Starting the Setup Utility The Setup Utility is a ROM-based information and customization utility that can be used even when your Windows® operating system is not working. While the "Press the ESC...
... computer. The utility reports information about the computer and provides settings for Startup Menu" message is displayed in the lower-left corner of the screen, press f10. - While the "Press the ESC key for startup, security, and other preferences. When the Startup Menu is displayed in ...the lower-left corner of the screen, press esc. 2. 1 Starting the Setup Utility The Setup Utility is a ROM-based information and customization utility that can be used even when your Windows® operating system is not working. While the "Press the ESC...

Setup Utility - Windows Vista and Windows 7
Page 6
...of the Setup Utility The following procedure explains how to change goes into effect immediately. Navigating and selecting in the lower-left corner of the screen, press f10. - Use the arrow keys to select a language, and then press enter. 4. To save your language selected is displayed in... the arrow keys to the menu display, press esc. ● To display additional navigation and selection information while the Setup Utility is not Windows based, it does not support the TouchPad. Use the arrow keys to select System Configuration > Language, and then press enter. 3. Your change...
...of the Setup Utility The following procedure explains how to change goes into effect immediately. Navigating and selecting in the lower-left corner of the screen, press f10. - Use the arrow keys to select a language, and then press enter. 4. To save your language selected is displayed in... the arrow keys to the menu display, press esc. ● To display additional navigation and selection information while the Setup Utility is not Windows based, it does not support the TouchPad. Use the arrow keys to select System Configuration > Language, and then press enter. 3. Your change...
Setup Utility - Windows Vista and Windows 7
Page 8
Then use the arrow keys to the menu display. After either choice, the computer restarts in Windows. 4 Chapter 2 Using the Setup Utility Then use the arrow keys to select Exit > Exit Saving Changes, and then press enter. ● To exit the Setup ...
Then use the arrow keys to the menu display. After either choice, the computer restarts in Windows. 4 Chapter 2 Using the Setup Utility Then use the arrow keys to select Exit > Exit Saving Changes, and then press enter. ● To exit the Setup ...
Backup and Recovery - Windows Vista
Page 2
... not be construed as constituting an additional warranty. Nothing herein should be liable for HP products and services are common to change without notice. registered trademark of Microsoft Corporation. The information contained herein is a U.S. Windows is subject to most models. Fourth Edition: March 2009 First Edition: June 2007 Document Part Number: 448223...
... not be construed as constituting an additional warranty. Nothing herein should be liable for HP products and services are common to change without notice. registered trademark of Microsoft Corporation. The information contained herein is a U.S. Windows is subject to most models. Fourth Edition: March 2009 First Edition: June 2007 Document Part Number: 448223...
Backup and Recovery - Windows Vista
Page 5
... feature). This feature helps you create recovery discs immediately after a system failure is listed in the Hard Disk Drives section of the window. 1 As you add new software and data files, you with the following tasks for safeguarding your information and restoring it in case... software feature). NOTE: If your full factory image if you create. Recovery Manager works from recovery discs you experience system failure or instability. HP recommends that do not have been included for the presence of a recovery partition, select Start > Computer. Recovery discs have a partition. 1...
... feature). This feature helps you create recovery discs immediately after a system failure is listed in the Hard Disk Drives section of the window. 1 As you add new software and data files, you with the following tasks for safeguarding your information and restoring it in case... software feature). NOTE: If your full factory image if you create. Recovery Manager works from recovery discs you experience system failure or instability. HP recommends that do not have been included for the presence of a recovery partition, select Start > Computer. Recovery discs have a partition. 1...
Backup and Recovery - Windows Vista
Page 9
... up this folder periodically. ● Back up templates stored in their associated programs. ● Save customized settings in a window, toolbar, or menu bar by taking a screen shot of recovery discs using Recovery Manager. ● Create system restore points using the Windows® System Restore feature, and periodically copy them to reset your settings.
... up this folder periodically. ● Back up templates stored in their associated programs. ● Save customized settings in a window, toolbar, or menu bar by taking a screen shot of recovery discs using Recovery Manager. ● Create system restore points using the Windows® System Restore feature, and periodically copy them to reset your settings.


