Administrator Guide
Page 14
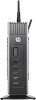
7 Deploying an image using a bootable USB drive On the target thin client, make sure the first boot device in the BIOS is set to a flash drive smaller than that of the original, because the size of a captured image does not necessarily equal the total capacity of ...the same model. To deploy an image with a bootable USB drive created with HP ThinUpdate to deploy an HP thin client image to another HP thin client of the flash drive from which the image was captured. Insert the USB drive, restart the thin client, and...
7 Deploying an image using a bootable USB drive On the target thin client, make sure the first boot device in the BIOS is set to a flash drive smaller than that of the original, because the size of a captured image does not necessarily equal the total capacity of ...the same model. To deploy an image with a bootable USB drive created with HP ThinUpdate to deploy an HP thin client image to another HP thin client of the flash drive from which the image was captured. Insert the USB drive, restart the thin client, and...
Administrator Guide 2
Page 7
NOTE: Some screen data, such as text, might not display correctly. ● If you are using HP True Graphics with a maximum of H.264, which are supported. ● HP t420 Thin Client: Due to its default BIOS configuration, this feature enabled, but for troubleshooting or specific use the Blast protocol to play a video using methods...
NOTE: Some screen data, such as text, might not display correctly. ● If you are using HP True Graphics with a maximum of H.264, which are supported. ● HP t420 Thin Client: Due to its default BIOS configuration, this feature enabled, but for troubleshooting or specific use the Blast protocol to play a video using methods...

Administrator Guide 2
Page 8
... Graphics to 512 MB. TIP: These settings can be configured via HPDM or via the BIOS tools included with HP ThinPro. 4 Chapter 3 Client-side configuration (HP ThinPro) Enabling HP True Graphics for multiple monitors on the HP t420: 1. Set UMA Frame Buffer Size to Force. 4. Restart the thin client and... press F10 to access the BIOS. 2. After these steps are performed, the amount of memory available for multiple monitors on the HP t420 To enable HP True Graphics for graphics is expanded, and HP True Graphics can also be used for two monitors. Select ...
... Graphics to 512 MB. TIP: These settings can be configured via HPDM or via the BIOS tools included with HP ThinPro. 4 Chapter 3 Client-side configuration (HP ThinPro) Enabling HP True Graphics for multiple monitors on the HP t420: 1. Set UMA Frame Buffer Size to Force. 4. Restart the thin client and... press F10 to access the BIOS. 2. After these steps are performed, the amount of memory available for multiple monitors on the HP t420 To enable HP True Graphics for graphics is expanded, and HP True Graphics can also be used for two monitors. Select ...

Administrator Guide 9
Page 30
...number is a well-known protocol, the protocol name also appears. HP Velocity also provides endpoint and per-flow data on latency (see Flow Information operations on page 27), as well as defined in the System BIOS. Product The product name as information about working with flow information, ... flows. For information about local and remote systems. To view flow information, click the Flow Information tab in the HP Velocity Management application. Administrator Guide for Thin Clients | HP Velocity Flow information HP Velocity facilitates end-to-end monitoring of memory in use .
...number is a well-known protocol, the protocol name also appears. HP Velocity also provides endpoint and per-flow data on latency (see Flow Information operations on page 27), as well as defined in the System BIOS. Product The product name as information about working with flow information, ... flows. For information about local and remote systems. To view flow information, click the Flow Information tab in the HP Velocity Management application. Administrator Guide for Thin Clients | HP Velocity Flow information HP Velocity facilitates end-to-end monitoring of memory in use .

Administrator Guide 7
Page 11
Viewing files in the /etc folder 69 Appendix A USB updates ...70 Appendix B BIOS tools ...71 BIOS settings tool ...71 BIOS flashing tool ...71 Appendix C Resizing the flash drive partition ...72 Appendix D Customizing the Smart Zero login screen 73 Customizing the screen background ...73 Common attributes ......
Viewing files in the /etc folder 69 Appendix A USB updates ...70 Appendix B BIOS tools ...71 BIOS settings tool ...71 BIOS flashing tool ...71 Appendix C Resizing the flash drive partition ...72 Appendix D Customizing the Smart Zero login screen 73 Customizing the screen background ...73 Common attributes ......

Administrator Guide 7
Page 14
... guide is divided into the following chapters and appendixes: ● Getting started on page 3-Describes the basic steps to deploy a thin client running HP ThinPro. ● Navigating the interface on page 5-Provides an overview of the different components of the interface. ● Control Panel configurations on page ... 70-Describes how to install add-ons and profile updates from a USB flash drive. ● BIOS tools on page 71-Describes how to view and update BIOS settings and flash a new BIOS version. ● Resizing the flash drive partition on page 72-Describes how to increase the size ...
... guide is divided into the following chapters and appendixes: ● Getting started on page 3-Describes the basic steps to deploy a thin client running HP ThinPro. ● Navigating the interface on page 5-Provides an overview of the different components of the interface. ● Control Panel configurations on page ... 70-Describes how to install add-ons and profile updates from a USB flash drive. ● BIOS tools on page 71-Describes how to view and update BIOS settings and flash a new BIOS version. ● Resizing the flash drive partition on page 72-Describes how to increase the size ...

Administrator Guide 7
Page 19
... tabs Tab Description General Displays information about the network interface, gateway, and DNS settings. Network Displays information about the BIOS, operating system, CPU, and memory. Click Diagnostic to hide the System Information screens. Viewing system information Click the System...9679; DHCP Wireless Leases ● Kernel ● X Server ● Connection Manager The debug level can be requested by HP support for information about the thin client. For more information, see Using system diagnostics to display additional information that might be...
... tabs Tab Description General Displays information about the network interface, gateway, and DNS settings. Network Displays information about the BIOS, operating system, CPU, and memory. Click Diagnostic to hide the System Information screens. Viewing system information Click the System...9679; DHCP Wireless Leases ● Kernel ● X Server ● Connection Manager The debug level can be requested by HP support for information about the thin client. For more information, see Using system diagnostics to display additional information that might be...

Administrator Guide 7
Page 43
... limitations Note the following limitations on monitor layout: ● Currently, HP True Graphics is expanded, and HP True Graphics can also be configured via HPDM or via the BIOS tools included with HP ThinPro (see BIOS settings tool on page 31 for two monitors. TIP: These settings can... Size to 512M After these steps are universal and apply to be used for more information). Enabling HP True Graphics for multiple monitors on the HP t420: 1. Navigate to access the BIOS. 2. Restart the thin client and press F10 to Advanced > Integrated Graphics. 3. These settings are...
... limitations Note the following limitations on monitor layout: ● Currently, HP True Graphics is expanded, and HP True Graphics can also be configured via HPDM or via the BIOS tools included with HP ThinPro (see BIOS settings tool on page 31 for two monitors. TIP: These settings can... Size to 512M After these steps are universal and apply to be used for more information). Enabling HP True Graphics for multiple monitors on the HP t420: 1. Navigate to access the BIOS. 2. Restart the thin client and press F10 to Advanced > Integrated Graphics. 3. These settings are...

Administrator Guide 7
Page 80
...If users are not being prompted to the USB flash drive. 8. This snapshot contains log files from http://www.hp.com. 2. Reimaging thin client firmware 1. This information may be uncompressed before a reboot. Insert the USB flash...sure the time of the thin client is compressed and will boot to change their passwords by HP for example, domain_name.com) when entering the Citrix login credentials. Uncompressing the system diagnostic files ...68 Chapter 13 Troubleshooting Download the image from the BIOS information and the processes active at the time the system diagnostics were run.
...If users are not being prompted to the USB flash drive. 8. This snapshot contains log files from http://www.hp.com. 2. Reimaging thin client firmware 1. This information may be uncompressed before a reboot. Insert the USB flash...sure the time of the thin client is compressed and will boot to change their passwords by HP for example, domain_name.com) when entering the Citrix login credentials. Uncompressing the system diagnostic files ...68 Chapter 13 Troubleshooting Download the image from the BIOS information and the processes active at the time the system diagnostics were run.

Administrator Guide 7
Page 81
... file lists the active processes at http://www.7-zip.org/download.html. 2. Open the newly created folder named Diagnostic and repeat step 3 on the system BIOS and graphics. Using system diagnostics to the home directory. 3. Viewing the system diagnostic files The system diagnostic files are divided into the Commands, /var/log...
... file lists the active processes at http://www.7-zip.org/download.html. 2. Open the newly created folder named Diagnostic and repeat step 3 on the system BIOS and graphics. Using system diagnostics to the home directory. 3. Viewing the system diagnostic files The system diagnostic files are divided into the Commands, /var/log...

Administrator Guide 7
Page 83
... describes the syntax for the BIOS flashing tool. B BIOS tools There are two kinds of BIOS tools for HP ThinPro: ● BIOS settings tool-Used to retrieve or modify BIOS settings ● BIOS flashing tool-Used to the BIOS. Syntax hptc-bios-cfg -G [options] [filename] hptc-bios-cfg -S [options] [filename] hptc-bios-cfg -h Description Retrieves the current BIOS settings and saves them...
... describes the syntax for the BIOS flashing tool. B BIOS tools There are two kinds of BIOS tools for HP ThinPro: ● BIOS settings tool-Used to retrieve or modify BIOS settings ● BIOS flashing tool-Used to the BIOS. Syntax hptc-bios-cfg -G [options] [filename] hptc-bios-cfg -S [options] [filename] hptc-bios-cfg -h Description Retrieves the current BIOS settings and saves them...

Administrator Guide
Page 10
... Uncompressing the system diagnostic files on Windows-based systems ........ 67 Uncompressing the system diagnostic files in the /etc folder 68 Appendix A USB updates ...69 Appendix B BIOS tools ...70 BIOS settings tool ...70 BIOS flashing tool ...70 x
... Uncompressing the system diagnostic files on Windows-based systems ........ 67 Uncompressing the system diagnostic files in the /etc folder 68 Appendix A USB updates ...69 Appendix B BIOS tools ...70 BIOS settings tool ...70 BIOS flashing tool ...70 x

Administrator Guide
Page 14
... guide is divided into the following chapters and appendixes: ● Getting started on page 3-Describes the basic steps to deploy a thin client running HP ThinPro. ● Navigating the interface on page 5-Provides an overview of the different components of the interface. ● Control Panel configurations on page ... 69-Describes how to install add-ons and profile updates from a USB flash drive. ● BIOS tools on page 70-Describes how to view and update BIOS settings and flash a new BIOS version. ● Resizing the flash drive partition on page 71-Describes how to increase the size ...
... guide is divided into the following chapters and appendixes: ● Getting started on page 3-Describes the basic steps to deploy a thin client running HP ThinPro. ● Navigating the interface on page 5-Provides an overview of the different components of the interface. ● Control Panel configurations on page ... 69-Describes how to install add-ons and profile updates from a USB flash drive. ● BIOS tools on page 70-Describes how to view and update BIOS settings and flash a new BIOS version. ● Resizing the flash drive partition on page 71-Describes how to increase the size ...

Administrator Guide
Page 19
... display additional information that might be used to another device on the Software Installed tab. Network Displays information about the BIOS, operating system, CPU, and memory. TIP: You can be requested by HP support for troubleshooting purposes. For more information, see Using system diagnostics to troubleshoot on page 136 for monitoring and...
... display additional information that might be used to another device on the Software Installed tab. Network Displays information about the BIOS, operating system, CPU, and memory. TIP: You can be requested by HP support for troubleshooting purposes. For more information, see Using system diagnostics to troubleshoot on page 136 for monitoring and...

Administrator Guide
Page 79
... expiration 67 Using system diagnostics to troubleshoot System diagnostics take a snapshot of the About this client screen to change their passwords by HP for example, domain_name.com) when entering the Citrix login credentials. Because the system resets log files when it reboots, be requested by...to the USB flash drive. When the reimage process completes, remove the USB flash drive and press Enter. Download the image from the BIOS information and the processes active at the time the system diagnostics were run. Copy all the files from C:\USBBoot to the client. ...
... expiration 67 Using system diagnostics to troubleshoot System diagnostics take a snapshot of the About this client screen to change their passwords by HP for example, domain_name.com) when entering the Citrix login credentials. Because the system resets log files when it reboots, be requested by...to the USB flash drive. When the reimage process completes, remove the USB flash drive and press Enter. Download the image from the BIOS information and the processes active at the time the system diagnostics were run. Copy all the files from C:\USBBoot to the client. ...

Administrator Guide
Page 80
Open the newly created folder named Diagnostic and repeat step 3 on the system BIOS and graphics. Open a terminal and browse to look for Windows at the time the system diagnostics were run. 68 Chapter 13 Troubleshooting Uncompressing the system ...
Open the newly created folder named Diagnostic and repeat step 3 on the system BIOS and graphics. Open a terminal and browse to look for Windows at the time the system diagnostics were run. 68 Chapter 13 Troubleshooting Uncompressing the system ...

Administrator Guide
Page 82
... Appendix B BIOS tools Syntax hptc-bios-flash [options] hptc-bios-flash -h Description Flashes the BIOS with the specified BIOS image. BIOS flashing tool The following table describes the syntax for the BIOS flashing tool. Displays a list of BIOS tools for HP ThinPro: ● BIOS settings tool-Used to retrieve or modify BIOS settings ● BIOS flashing tool-Used to update the BIOS BIOS settings...
... Appendix B BIOS tools Syntax hptc-bios-flash [options] hptc-bios-flash -h Description Flashes the BIOS with the specified BIOS image. BIOS flashing tool The following table describes the syntax for the BIOS flashing tool. Displays a list of BIOS tools for HP ThinPro: ● BIOS settings tool-Used to retrieve or modify BIOS settings ● BIOS flashing tool-Used to update the BIOS BIOS settings...

ThinPro 4.4 Administrator Guide
Page 63
... ● Net tools ● Software information ● System logs General The General tab displays the following information: ● BIOS (Basic Input/Output System) and OS (operating system) ◦ Serial Number ◦ BIOS Version ◦ BIOS Release Date ◦ OS Build ID ◦ OS Kernel Version ● System ◦ Platform ◦ CPU (Central Processing...
... ● Net tools ● Software information ● System logs General The General tab displays the following information: ● BIOS (Basic Input/Output System) and OS (operating system) ◦ Serial Number ◦ BIOS Version ◦ BIOS Release Date ◦ OS Build ID ◦ OS Kernel Version ● System ◦ Platform ◦ CPU (Central Processing...

Troubleshooting Guide t510 Thin Client
Page 5
... Client Options ...14 Installing the USB Device 14 Removing and Replacing the Battery 15 Installing a Secondary Flash Memory Module 17 External Drives ...18 3 BIOS Settings, (F10) Utility ...19 Using the BIOS Settings ...19 Changing BIOS Settings from the repset utility 19 Changing BIOS Settings Using the F10 Utility 20 Setup Utility-System Information 21 v
... Client Options ...14 Installing the USB Device 14 Removing and Replacing the Battery 15 Installing a Secondary Flash Memory Module 17 External Drives ...18 3 BIOS Settings, (F10) Utility ...19 Using the BIOS Settings ...19 Changing BIOS Settings from the repset utility 19 Changing BIOS Settings Using the F10 Utility 20 Setup Utility-System Information 21 v

Troubleshooting Guide t510 Thin Client
Page 6
Setup Utility-Standard CMOS Features 21 Setup Utility-Advanced BIOS Features 21 Setup Utility-Integrated Peripherals 22 Setup Utility-Power Management Setup 23 Setup Utility-Utility Task Actions 23 4 Diagnostics and Troubleshooting ...24 LEDs ...24 ...
Setup Utility-Standard CMOS Features 21 Setup Utility-Advanced BIOS Features 21 Setup Utility-Integrated Peripherals 22 Setup Utility-Power Management Setup 23 Setup Utility-Utility Task Actions 23 4 Diagnostics and Troubleshooting ...24 LEDs ...24 ...


