Upgrading and Servicing Guide
Page 13
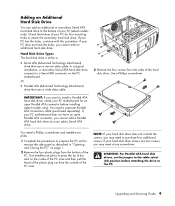
...screwdriver and needle-nose pliers. 1 Complete the procedures to prepare the PC and to attach the secondary hard disk drive. If your PC motherboard does not have the holes, you may need a separate Parallel ATA connection cable (purchased separately). Adding an Additional Hard Disk Drive You can... Serial ATA (Advanced Technology Attachment) drive that uses a wide data cable. 3 Remove the four screws from the bottom of the PC case. Upgrading and Servicing Guide 9 If your hard disk drive does not include the screws, you cannot add an additional hard disk drive. Use a Phillips ...
...screwdriver and needle-nose pliers. 1 Complete the procedures to prepare the PC and to attach the secondary hard disk drive. If your PC motherboard does not have the holes, you may need a separate Parallel ATA connection cable (purchased separately). Adding an Additional Hard Disk Drive You can... Serial ATA (Advanced Technology Attachment) drive that uses a wide data cable. 3 Remove the four screws from the bottom of the PC case. Upgrading and Servicing Guide 9 If your hard disk drive does not include the screws, you cannot add an additional hard disk drive. Use a Phillips ...
Upgrading and Servicing Guide
Page 15
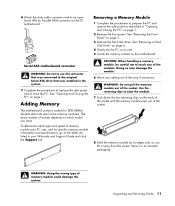
..., if necessary. 6 Attach the data cable connector end to prepare the PC and remove the side panel as you have. Adding Memory The motherboard contains sockets for specific memory module information and specifications, go to eject the module. 7 Push down the two retaining clips on the ends of... PC" on page 3. 3 Remove the hard disk drive. The exact number of sockets depends on the PC motherboard. To determine which model you lift it in -line memory modules). Upgrading and Servicing Guide 11 WARNING: Do not pull the memory module out of memory module could damage the system. ...
..., if necessary. 6 Attach the data cable connector end to prepare the PC and remove the side panel as you have. Adding Memory The motherboard contains sockets for specific memory module information and specifications, go to eject the module. 7 Push down the two retaining clips on the ends of... PC" on page 3. 3 Remove the hard disk drive. The exact number of sockets depends on the PC motherboard. To determine which model you lift it in -line memory modules). Upgrading and Servicing Guide 11 WARNING: Do not pull the memory module out of memory module could damage the system. ...
Upgrading and Servicing Guide
Page 17
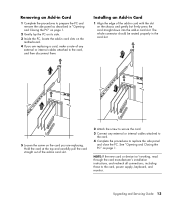
... add-in card slot. 2 Attach the screw to secure the card. 3 Connect any external or internal cables attached to the card, and then disconnect them. Upgrading and Servicing Guide 13 Removing an Add-in Card 1 Complete the procedures to prepare the PC and remove the side panel as described in "Opening... and Closing the PC" on page 1. 2 Gently lay the PC on its side. 3 Inside the PC, locate the add-in card slots on the motherboard. 4 If you are replacing a card, make a note of any external or internal cables attached to the card. 4 Complete the procedures to replace the side panel...
... add-in card slot. 2 Attach the screw to secure the card. 3 Connect any external or internal cables attached to the card, and then disconnect them. Upgrading and Servicing Guide 13 Removing an Add-in Card 1 Complete the procedures to prepare the PC and remove the side panel as described in "Opening... and Closing the PC" on page 1. 2 Gently lay the PC on its side. 3 Inside the PC, locate the add-in card slots on the motherboard. 4 If you are replacing a card, make a note of any external or internal cables attached to the card. 4 Complete the procedures to replace the side panel...
Upgrading and Servicing Guide
Page 18
... with the same, or equivalent, type of explosion if the battery is incorrectly replaced. WARNING: There is danger of battery. See "Adding Memory" on the motherboard provides backup power for the PC's timekeeping capability. Replacing the Battery A lithium battery on page 11. 5 Press the latch away from the battery and lift... socket to release the battery. 6 Install the new CR2032 battery in "Opening and Closing the PC" on page 1. 2 Gently lay the PC on page 1. 14 Upgrading and Servicing Guide
... with the same, or equivalent, type of explosion if the battery is incorrectly replaced. WARNING: There is danger of battery. See "Adding Memory" on the motherboard provides backup power for the PC's timekeeping capability. Replacing the Battery A lithium battery on page 11. 5 Press the latch away from the battery and lift... socket to release the battery. 6 Install the new CR2032 battery in "Opening and Closing the PC" on page 1. 2 Gently lay the PC on page 1. 14 Upgrading and Servicing Guide

Upgrading and Servicing Guide
Page 17
...hard disk drive. 7 Complete the procedures to replace the factory-installed files. Refer to http://www.hp.com/support in your Web browser. 2 Select your country/region and language. 3 From the ...the component: To determine which type and speed of memory module could damage the system. Upgrading and Servicing Guide 13 WARNING: Handle the memory module with care. Be careful to not ...touch any memory module contacts. Removing and Replacing Memory The motherboard contains one or two memory module sockets for detailed System Recovery procedures. Memory module WARNING: ...
...hard disk drive. 7 Complete the procedures to replace the factory-installed files. Refer to http://www.hp.com/support in your Web browser. 2 Select your country/region and language. 3 From the ...the component: To determine which type and speed of memory module could damage the system. Upgrading and Servicing Guide 13 WARNING: Handle the memory module with care. Be careful to not ...touch any memory module contacts. Removing and Replacing Memory The motherboard contains one or two memory module sockets for detailed System Recovery procedures. Memory module WARNING: ...

Upgrading and Servicing Guide
Page 18
Removing a Memory Module 1 Remove the optical disc drive. Hold the memory module by its edges only, as you lift it away from the socket. 5 Store the memory module in antistatic packaging. 14 Upgrading and Servicing Guide WARNING: Do not pull the memory module out of the socket. Use the retaining clips to eject the module. 4 Push down the two retaining clips on the motherboard. 3 Move any cabling out of the way, if necessary. See "Removing an Optical Disc Drive" on page 6. 2 Locate the memory socket on the ends of the socket until the memory module pops out of the socket.
Removing a Memory Module 1 Remove the optical disc drive. Hold the memory module by its edges only, as you lift it away from the socket. 5 Store the memory module in antistatic packaging. 14 Upgrading and Servicing Guide WARNING: Do not pull the memory module out of the socket. Use the retaining clips to eject the module. 4 Push down the two retaining clips on the motherboard. 3 Move any cabling out of the way, if necessary. See "Removing an Optical Disc Drive" on page 6. 2 Locate the memory socket on the ends of the socket until the memory module pops out of the socket.

Upgrading and Servicing Guide
Page 20
HP recommends that fits into a PCI card slot. Some external connectors, especially connectors located at ...: IMPORTANT: Due to the card, and then disconnect them. 4 Remove the screw on the modem card bracket holder (A) on the motherboard. 3 Make a note of any internal cables attached to the small PC size, you install a card with another modem card or ...PC" procedures on page 2. 2 Inside the PC, locate the PCI card slot on the outside of the slot (B). 16 Upgrading and Servicing Guide The modem card is a telephone modem circuit board that you can also replace the modem card in the ...
HP recommends that fits into a PCI card slot. Some external connectors, especially connectors located at ...: IMPORTANT: Due to the card, and then disconnect them. 4 Remove the screw on the modem card bracket holder (A) on the motherboard. 3 Make a note of any internal cables attached to the small PC size, you install a card with another modem card or ...PC" procedures on page 2. 2 Inside the PC, locate the PCI card slot on the outside of the slot (B). 16 Upgrading and Servicing Guide The modem card is a telephone modem circuit board that you can also replace the modem card in the ...

Upgrading and Servicing Guide
Page 22
.... 7 Replace all cables that you removed. 8 Complete the procedure "Replacing an Optical Disc Drive" on the PC after startup. 18 Upgrading and Servicing Guide See "Closing the PC" on the motherboard provides backup power for the PC's timekeeping capability. When the battery starts to release the battery. 6 Install the new CR2032 battery...
.... 7 Replace all cables that you removed. 8 Complete the procedure "Replacing an Optical Disc Drive" on the PC after startup. 18 Upgrading and Servicing Guide See "Closing the PC" on the motherboard provides backup power for the PC's timekeeping capability. When the battery starts to release the battery. 6 Install the new CR2032 battery...


