
Reference Guide
Page 2
...examples contained herein are provided "as allowed under the copyright laws. is prohibited. patents and other rights owners. Reproduction, adaptation, or translation of this manual is prohibited without prior written permission of the programs that is protected by Macrovision Corporation ...Systems Incorporated. Hewlett-Packard Company makes no warranty of any kind with the furnishing, performance, or use of certain U.S. Reproduction, adaptation, or translation of those programs without notice. Use of Adobe Systems Incorporated. Adobe® and Acrobat® are trademarks of this...
...examples contained herein are provided "as allowed under the copyright laws. is prohibited. patents and other rights owners. Reproduction, adaptation, or translation of this manual is prohibited without prior written permission of the programs that is protected by Macrovision Corporation ...Systems Incorporated. Hewlett-Packard Company makes no warranty of any kind with the furnishing, performance, or use of certain U.S. Reproduction, adaptation, or translation of those programs without notice. Use of Adobe Systems Incorporated. Adobe® and Acrobat® are trademarks of this...
Reference Guide
Page 4
...DRIVE AND DESTROY THE MASTER DISKETTES, OR RETURN THE COMPLETE HP PRODUCT AND SOFTWARE FOR A FULL REFUND. COPIES AND ADAPTATIONS. If the COA label does not correspond to your Microsoft operating system is missing, contact your PC. PROCEEDING WITH CONFIGURATION SIGNIFIES YOUR ACCEPTANCE OF THE LICENSE TERMS....SHALL SUPERSEDE ANY OTHER SOFTWARE WARRANTY STATEMENT THAT MAY BE INCLUDED IN THIS HP PRODUCT OR MAY BE FOUND ONLINE. For a PC supplied with your HP reseller for archival purposes or (b) when copying or adaptation is an essential step in the use the software on your screen when...
...DRIVE AND DESTROY THE MASTER DISKETTES, OR RETURN THE COMPLETE HP PRODUCT AND SOFTWARE FOR A FULL REFUND. COPIES AND ADAPTATIONS. If the COA label does not correspond to your Microsoft operating system is missing, contact your PC. PROCEEDING WITH CONFIGURATION SIGNIFIES YOUR ACCEPTANCE OF THE LICENSE TERMS....SHALL SUPERSEDE ANY OTHER SOFTWARE WARRANTY STATEMENT THAT MAY BE INCLUDED IN THIS HP PRODUCT OR MAY BE FOUND ONLINE. For a PC supplied with your HP reseller for archival purposes or (b) when copying or adaptation is an essential step in the use the software on your screen when...
Reference Guide
Page 5
... The product recovery CD-ROM or DVD and/or support utility software may not lease, sublicense the software, or distribute copies or adaptations of the software to do so within thirty (30) days of this Agreement. Customer acknowledges and agrees that he /she does not...any title or ownership of the U.S. Export Administration regulations or other than ownership of HewlettPackard. SUBLICENSING AND DISTRIBUTION. TERMINATION. If your HP product was originally provided. (ii) The use of these terms provided Hewlett-Packard has requested Customer to cure the failure and Customer...
... The product recovery CD-ROM or DVD and/or support utility software may not lease, sublicense the software, or distribute copies or adaptations of the software to do so within thirty (30) days of this Agreement. Customer acknowledges and agrees that he /she does not...any title or ownership of the U.S. Export Administration regulations or other than ownership of HewlettPackard. SUBLICENSING AND DISTRIBUTION. TERMINATION. If your HP product was originally provided. (ii) The use of these terms provided Hewlett-Packard has requested Customer to cure the failure and Customer...
Reference Guide
Page 14
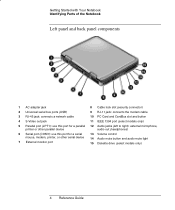
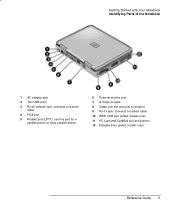
Getting Started with Your Notebook Identifying Parts of the Notebook Left panel and back panel components 1 AC adapter jack 8 Cable lock slot (security connector) 2 Universal serial bus ports (USB) 9 RJ-11 jack: connects the modem cable 3 RJ-45 jack: connects a network cable 10 PC Card and CardBus slot and button 4 S-Video out jack 11 IEEE...
Getting Started with Your Notebook Identifying Parts of the Notebook Left panel and back panel components 1 AC adapter jack 8 Cable lock slot (security connector) 2 Universal serial bus ports (USB) 9 RJ-11 jack: connects the modem cable 3 RJ-45 jack: connects a network cable 10 PC Card and CardBus slot and button 4 S-Video out jack 11 IEEE...
Reference Guide
Page 15
Getting Started with Your Notebook Identifying Parts of the Notebook 1 AC adapter jack 2 Two USB ports 3 RJ-45 network jack: connects a network cable 4 PS/2 port 5 Parallel port (LPT1): use this port for a parallel printer or other parallel device 6 External monitor port 7 S-Video out jack 8 Cable lock slot (security connector) 9 RJ-11 jack: connects a modem cable 10 IEEE 1394 port (select models only) 11 PC Card and CardBus slot and buttons 12 Diskette drive (select models only) Reference Guide 5
Getting Started with Your Notebook Identifying Parts of the Notebook 1 AC adapter jack 2 Two USB ports 3 RJ-45 network jack: connects a network cable 4 PS/2 port 5 Parallel port (LPT1): use this port for a parallel printer or other parallel device 6 External monitor port 7 S-Video out jack 8 Cable lock slot (security connector) 9 RJ-11 jack: connects a modem cable 10 IEEE 1394 port (select models only) 11 PC Card and CardBus slot and buttons 12 Diskette drive (select models only) Reference Guide 5
Reference Guide
Page 18
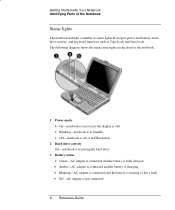
... lights on (even if the display is off) • Blinking-notebook is in Standby • Off-notebook is off or in Hibernation 2 Hard drive activity On-notebook is accessing the hard drive 3 Battery status • Green-AC adapter is connected and the battery is fully charged • Amber-AC... adapter is connected and the battery is charging • Blinking-AC adapter is connected and the battery is missing or ...
... lights on (even if the display is off) • Blinking-notebook is in Standby • Off-notebook is off or in Hibernation 2 Hard drive activity On-notebook is accessing the hard drive 3 Battery status • Green-AC adapter is connected and the battery is fully charged • Amber-AC... adapter is connected and the battery is charging • Blinking-AC adapter is connected and the battery is missing or ...
Reference Guide
Page 20
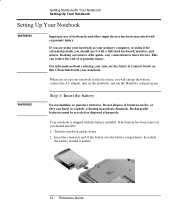
... with your risk, see the Safety & Comfort Guide on the notebook, and run the Windows setup program. If you are using your notebook as your primary computer, or using it for the first time, you will charge the battery, connect the AC adapter, turn on this CD included with a full-sized keyboard, monitor...
... with your risk, see the Safety & Comfort Guide on the notebook, and run the Windows setup program. If you are using your notebook as your primary computer, or using it for the first time, you will charge the battery, connect the AC adapter, turn on this CD included with a full-sized keyboard, monitor...
Reference Guide
Page 21
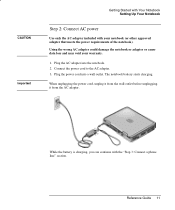
... the wall outlet before unplugging it from the AC adapter. Using the wrong AC adapter could damage the notebook or adapter or cause data loss and may void your notebook (or other approved adapter that meets the power requirements of the notebook). Plug the AC adapter into a wall outlet. The notebook battery starts charging. CAUTION Important Getting Started with...
... the wall outlet before unplugging it from the AC adapter. Using the wrong AC adapter could damage the notebook or adapter or cause data loss and may void your notebook (or other approved adapter that meets the power requirements of the notebook). Plug the AC adapter into a wall outlet. The notebook battery starts charging. CAUTION Important Getting Started with...
Reference Guide
Page 23
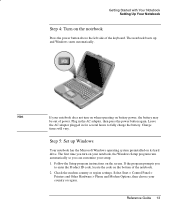
... preinstalled on its hard drive. Leave the AC adapter plugged in the AC adapter, then press the power button again. Hint If your setup. 1. Plug in for several hours to enter the Product ID code, locate the code on the bottom of the notebook. 2. Check the modem country or region settings.... Follow the Setup program instructions on battery power, the battery may be out of the keyboard. Getting Started with Your Notebook Setting Up Your Notebook Step 4: Turn on the notebook Press the power button above the left side of power. The first time you turn on your...
... preinstalled on its hard drive. Leave the AC adapter plugged in the AC adapter, then press the power button again. Hint If your setup. 1. Plug in for several hours to enter the Product ID code, locate the code on the bottom of the notebook. 2. Check the modem country or region settings.... Follow the Setup program instructions on battery power, the battery may be out of the keyboard. Getting Started with Your Notebook Setting Up Your Notebook Step 4: Turn on the notebook Press the power button above the left side of power. The first time you turn on your...
Reference Guide
Page 40
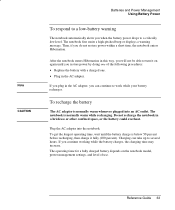
... functions may be disabled. If this happens, you will find on resuming that all your notebook automatically shuts down completely. To resume normal operation, restore power by connecting an AC adapter or installing a charged battery, then shut the notebook off and restart it. You can also enter Hibernation if battery power reaches a critically...
... functions may be disabled. If this happens, you will find on resuming that all your notebook automatically shuts down completely. To resume normal operation, restore power by connecting an AC adapter or installing a charged battery, then shut the notebook off and restart it. You can also enter Hibernation if battery power reaches a critically...
Reference Guide
Page 42
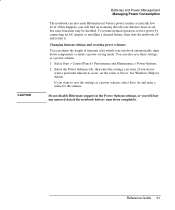
...fully (100 percent). If you plug in this way, you will not be able to several hours. To recharge the battery The AC adapter is normally warm whenever plugged into the notebook. Then, if you continue working while the battery charges, the charging time may increase. Plug the AC... adapter into an AC outlet. If you do not restore power within a short time, the notebook enters Hibernation. Do not recharge the notebook in the AC adapter. To get the longest operating time, wait until you restore power by ...
...fully (100 percent). If you plug in this way, you will not be able to several hours. To recharge the battery The AC adapter is normally warm whenever plugged into the notebook. Then, if you continue working while the battery charges, the charging time may increase. Plug the AC... adapter into an AC outlet. If you do not restore power within a short time, the notebook enters Hibernation. Do not recharge the notebook in the AC adapter. To get the longest operating time, wait until you restore power by ...
Reference Guide
Page 43
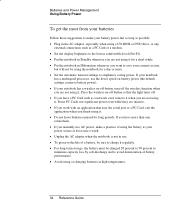
... using it for a short while. • Put the notebook in use AC power, make your battery power last as long as possible: • Plug in the AC adapter, especially when using a CD-ROM or DVD drive, or any external connections such as a PC Card or a modem. • Set the display brightness ...to the lowest comfortable level (Fn+F1). • Put the notebook in Standby whenever you are inactive. • If ...
... using it for a short while. • Put the notebook in use AC power, make your battery power last as long as possible: • Plug in the AC adapter, especially when using a CD-ROM or DVD drive, or any external connections such as a PC Card or a modem. • Set the display brightness ...to the lowest comfortable level (Fn+F1). • Put the notebook in Standby whenever you are inactive. • If ...
Reference Guide
Page 63
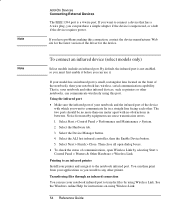
...> Printers & Other Hardware > Wireless Link. The two ports should be no obstructions in a straight line facing each other notebooks, can use your notebook has wireless, serial communication capability. You can cause transmission errors. 1. That is not enabled, so you must first enable it.... Transferring files through an infrared connection You can purchase a simple adapter if the device is a 4-wire port. Then close all open dialog boxes. • To check the status of the notebook), then your notebook infrared port to any other printer. See the Windows online Help for...
...> Printers & Other Hardware > Wireless Link. The two ports should be no obstructions in a straight line facing each other notebooks, can use your notebook has wireless, serial communication capability. You can cause transmission errors. 1. That is not enabled, so you must first enable it.... Transferring files through an infrared connection You can purchase a simple adapter if the device is a 4-wire port. Then close all open dialog boxes. • To check the status of the notebook), then your notebook infrared port to any other printer. See the Windows online Help for...
Reference Guide
Page 64
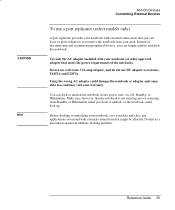
... Guide 55 Do this as a precaution against an unlikely docking problem. Do not use a 60-watt, 3.16-amp adapter, and do not use a port replicator (select models only) A port replicator provides your notebook with external connections that meets the power requirements of disconnecting and reconnecting peripheral devices, you can simply undock and...
... Guide 55 Do this as a precaution against an unlikely docking problem. Do not use a 60-watt, 3.16-amp adapter, and do not use a port replicator (select models only) A port replicator provides your notebook with external connections that meets the power requirements of disconnecting and reconnecting peripheral devices, you can simply undock and...
Reference Guide
Page 65
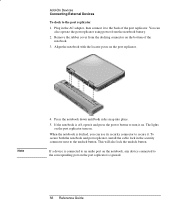
.... Add-On Devices Connecting External Devices To dock to the undock button. If a device is connected to an audio port on the notebook, any device connected to the corresponding port on the port replicator is off, open it and press the power button to the back... of the notebook. 3. Note 4. Remove the rubber cover from the notebook battery. 2. Plug in the security connector next to the port replicator 1. Press the notebook down until both the notebook and port replicator, install the cable lock in the AC adapter, then connect it . When the notebook is docked, you...
.... Add-On Devices Connecting External Devices To dock to the undock button. If a device is connected to an audio port on the notebook, any device connected to the corresponding port on the port replicator is off, open it and press the power button to the back... of the notebook. 3. Note 4. Remove the rubber cover from the notebook battery. 2. Plug in the security connector next to the port replicator 1. Press the notebook down until both the notebook and port replicator, install the cable lock in the AC adapter, then connect it . When the notebook is docked, you...
Reference Guide
Page 67
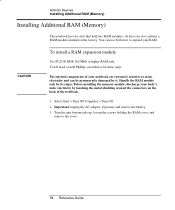
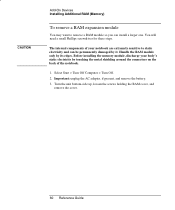
...expansion module Use PC2100 DDR-266 MHz or higher RAM only. The internal components of the notebook. 1. You'll need a small Phillips screwdriver for these steps. Important: unplug the AC adapter, if present, and remove the battery. 3. Before installing the memory module, discharge your ...body's static electricity by touching the metal shielding around the connectors on the back of your notebook are extremely sensitive to expand your RAM....
...expansion module Use PC2100 DDR-266 MHz or higher RAM only. The internal components of the notebook. 1. You'll need a small Phillips screwdriver for these steps. Important: unplug the AC adapter, if present, and remove the battery. 3. Before installing the memory module, discharge your ...body's static electricity by touching the metal shielding around the connectors on the back of your notebook are extremely sensitive to expand your RAM....
Reference Guide
Page 69
... Off. 2. Handle the RAM module only by touching the metal shielding around the connectors on the back of the notebook. 1. You will need a small Phillips screwdriver for these steps. Important: unplug the AC adapter, if present, and remove the battery. 3. The internal components of your body's static electricity by its edges. Turn...
... Off. 2. Handle the RAM module only by touching the metal shielding around the connectors on the back of the notebook. 1. You will need a small Phillips screwdriver for these steps. Important: unplug the AC adapter, if present, and remove the battery. 3. The internal components of your body's static electricity by its edges. Turn...
Reference Guide
Page 71
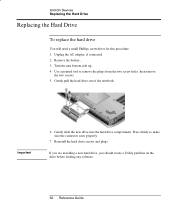
.... 5. Reinstall the hard drive screws and plugs. Remove the battery. 3. Gently pull the hard drive out of the notebook. Gently slide the new drive into the hard drive compartment. Unplug the AC adapter, if connected. 2. Add-On Devices Replacing the Hard Drive Replacing the Hard Drive To replace the hard drive You...
.... 5. Reinstall the hard drive screws and plugs. Remove the battery. 3. Gently pull the hard drive out of the notebook. Gently slide the new drive into the hard drive compartment. Unplug the AC adapter, if connected. 2. Add-On Devices Replacing the Hard Drive Replacing the Hard Drive To replace the hard drive You...

Reference Guide
Page 78
...adapter, then make sure it is coming from elsewhere, such as from the fan or a PC Card drive. If files are corrupted • Open My Computer, select the disk you can format the hard disk and reinstall the original factory software using the QuickRestore System Recovery CD included with your notebook.... Hard drive problems If the notebook hard drive doesn...
...adapter, then make sure it is coming from elsewhere, such as from the fan or a PC Card drive. If files are corrupted • Open My Computer, select the disk you can format the hard disk and reinstall the original factory software using the QuickRestore System Recovery CD included with your notebook.... Hard drive problems If the notebook hard drive doesn...
Reference Guide
Page 81
Troubleshooting and Maintenance Troubleshooting Your Notebook Local area network (LAN) problems If the built-in Control Panel under your network connection properties. 72 Reference Guide Try connecting at a different network station, ... down. If it . If a network connection responds slowly If your network connection uses a proxy server, try disabling another device. You can do this in network adapter doesn't connect to enable it has a conflict, try enabling the option for bypassing the proxy server for a computer. Select Start > Control Panel > Performance and Maintenance...
Troubleshooting and Maintenance Troubleshooting Your Notebook Local area network (LAN) problems If the built-in Control Panel under your network connection properties. 72 Reference Guide Try connecting at a different network station, ... down. If it . If a network connection responds slowly If your network connection uses a proxy server, try disabling another device. You can do this in network adapter doesn't connect to enable it has a conflict, try enabling the option for bypassing the proxy server for a computer. Select Start > Control Panel > Performance and Maintenance...


