User Guide
Page 3
... features 8 Projector at a glance 8 Projector buttons and lights 9 Back panel 10 Remote control 11 Accessories 12 Setting up the projector 13 Positioning the projector 13 Connecting power 15 Connecting a computer 16 Connecting a handheld organizer 17 Connecting a video source 18 Turning the projector on and off 22 Removing the lens cover 22 Turning the projector on 23 Turning the projector off 24 Moving the projector 24 Making basic adjustments 25 Aiming the projector 25 Adjusting the focus and zoom 26 Using the remote control 27 2 Showing...
... features 8 Projector at a glance 8 Projector buttons and lights 9 Back panel 10 Remote control 11 Accessories 12 Setting up the projector 13 Positioning the projector 13 Connecting power 15 Connecting a computer 16 Connecting a handheld organizer 17 Connecting a video source 18 Turning the projector on and off 22 Removing the lens cover 22 Turning the projector on 23 Turning the projector off 24 Moving the projector 24 Making basic adjustments 25 Aiming the projector 25 Adjusting the focus and zoom 26 Using the remote control 27 2 Showing...
User Guide
Page 4
... menu 36 Changing settings using the on-screen menu 36 Quick choice menu 37 Input menu 37 Picture menu 38 Setup menu 39 Help menu 39 4 Maintaining the Projector Performing routine maintenance 41 Getting the projector status 41 Cleaning the projector and lens 41 Replacing the lamp module 42 Replacing the battery in the remote control 44 Upgrading the projector 45 Updating the firmware 45 5 Installing Permanently Installing the projector 47 Choosing cables 47 Installing on a table 47 Installing for rear projection 48 Locking the projector 48 6 Fixing Problems Troubleshooting...
... menu 36 Changing settings using the on-screen menu 36 Quick choice menu 37 Input menu 37 Picture menu 38 Setup menu 39 Help menu 39 4 Maintaining the Projector Performing routine maintenance 41 Getting the projector status 41 Cleaning the projector and lens 41 Replacing the lamp module 42 Replacing the battery in the remote control 44 Upgrading the projector 45 Updating the firmware 45 5 Installing Permanently Installing the projector 47 Choosing cables 47 Installing on a table 47 Installing for rear projection 48 Locking the projector 48 6 Fixing Problems Troubleshooting...
User Guide
Page 9
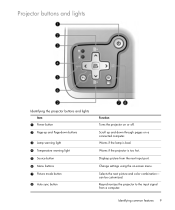
...can be customized. Warns if the lamp is too hot. Selects the next picture and color combination- Identifying common features 9 Change settings using the on-screen menu. Resynchronizes the projector to the input signal from the next input port. Scroll up and Page-down through pages on a connected computer. Projector buttons and lights Identifying the projector buttons and lights Item 1 Power button 2 Page-up and down buttons 3 Lamp warning light 4 Temperature warning light 5 Source button 6 Menu buttons 7 Picture mode button 8 Auto sync button Function Turns the projector on or...
...can be customized. Warns if the lamp is too hot. Selects the next picture and color combination- Identifying common features 9 Change settings using the on-screen menu. Resynchronizes the projector to the input signal from the next input port. Scroll up and Page-down through pages on a connected computer. Projector buttons and lights Identifying the projector buttons and lights Item 1 Power button 2 Page-up and down buttons 3 Lamp warning light 4 Temperature warning light 5 Source button 6 Menu buttons 7 Picture mode button 8 Auto sync button Function Turns the projector on or...

User Guide
Page 29
... turn on and playing video. S Press the source button one or more times-until you see the picture or you can quickly select the correct source. See "Making basic adjustments" on the projector or remote control to select the VGA port. 4. Showing a computer screen 29 This does not affect the video source, which continues playing. 2. See "Connecting a computer" on the screen, you see "Adjusting the picture and sound" on the projector or remote control...
... turn on and playing video. S Press the source button one or more times-until you see the picture or you can quickly select the correct source. See "Making basic adjustments" on the projector or remote control to select the VGA port. 4. Showing a computer screen 29 This does not affect the video source, which continues playing. 2. See "Connecting a computer" on the screen, you see "Adjusting the picture and sound" on the projector or remote control...

User Guide
Page 34
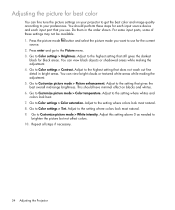
... get the best color and image quality according to Color settings > Tint. For some input ports, some of these steps for each input source device and each input port that does not wash out fine detail in the order shown. Adjust to Customize picture mode > White intensity. Go to Customize picture mode > Picture enhancement. Change the picture adjustments as customize the picture modes. Go to Color settings > Contrast. Go to your projector to get descriptions...
... get the best color and image quality according to Color settings > Tint. For some input ports, some of these steps for each input source device and each input port that does not wash out fine detail in the order shown. Adjust to Customize picture mode > White intensity. Go to Customize picture mode > Picture enhancement. Change the picture adjustments as customize the picture modes. Go to Color settings > Contrast. Go to your projector to get descriptions...

User Guide
Page 38
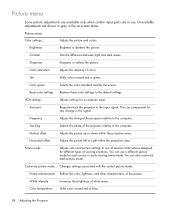
... projection area. Color temperature Shifts color toward red or green. Reset color settings Restores these color settings to the input signal. This can also customize each viewing environment. Adjusts settings for different types of the picture. Tracking Adjusts the phase of colors. White intensity Increases the brightness of the projector relative to the computer. Sharpness Sharpens or softens the picture. Color space Selects the color standard used by the source. Frequency Adjusts the timing of white areas. Horizontal offset Adjusts...
... projection area. Color temperature Shifts color toward red or green. Reset color settings Restores these color settings to the input signal. This can also customize each viewing environment. Adjusts settings for different types of the picture. Tracking Adjusts the phase of colors. White intensity Increases the brightness of the projector relative to the computer. Sharpness Sharpens or softens the picture. Color space Selects the color standard used by the source. Frequency Adjusts the timing of white areas. Horizontal offset Adjusts...
User Guide
Page 39
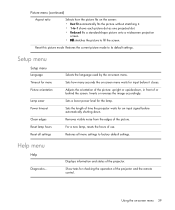
... edges of or behind the screen. Using the on the screen: • Best fit automatically fits the picture without stretching it closes. Setup menu Setup menu Language Timeout for menu Picture orientation Lamp saver Power timeout Clean edges Reset lamp hours Reset all menu settings to its default settings. Help menu Help Diagnostics... Sets the length of time the projector waits for input before automatically shutting down , in front of the picture. Reset this picture mode Restores the current picture mode to factory default settings. Inverts or reverses the...
... edges of or behind the screen. Using the on the screen: • Best fit automatically fits the picture without stretching it closes. Setup menu Setup menu Language Timeout for menu Picture orientation Lamp saver Power timeout Clean edges Reset lamp hours Reset all menu settings to its default settings. Help menu Help Diagnostics... Sets the length of time the projector waits for input before automatically shutting down , in front of the picture. Reset this picture mode Restores the current picture mode to factory default settings. Inverts or reverses the...
User Guide
Page 42
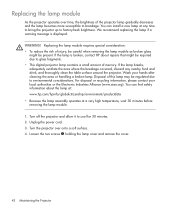
... can install a new lamp at a very high temperature, wait 30 minutes before removing the lamp module. 1. If the lamp breaks, adequately ventilate the area where the breakage occurred, discard any time to bring the projector up to cool for 30 minutes. 2. Loosen the two screws 1 holding the lamp cover and remove the cover. 42 Maintaining the Projector We recommend replacing the lamp if a warning message is broken, contact HP about the lamp...
... can install a new lamp at a very high temperature, wait 30 minutes before removing the lamp module. 1. If the lamp breaks, adequately ventilate the area where the breakage occurred, discard any time to bring the projector up to cool for 30 minutes. 2. Loosen the two screws 1 holding the lamp cover and remove the cover. 42 Maintaining the Projector We recommend replacing the lamp if a warning message is broken, contact HP about the lamp...
User Guide
Page 50
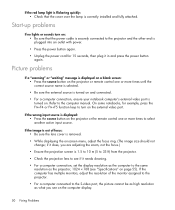
... high resolution as the projector, 1024 × 768 (see "Specifications" on the computer display. 50 Fixing Problems if it does, you see if it in and press the power button again. If the computer has multiple monitors, adjust the resolution of focus: • Be sure the lens cover is turned on -screen menu, adjust the focus ring. (The image size should not change; If the red lamp light is flickering quickly: • Check that the power cable is securely connected...
... high resolution as the projector, 1024 × 768 (see "Specifications" on the computer display. 50 Fixing Problems if it does, you see if it in and press the power button again. If the computer has multiple monitors, adjust the resolution of focus: • Be sure the lens cover is turned on -screen menu, adjust the focus ring. (The image size should not change; If the red lamp light is flickering quickly: • Check that the power cable is securely connected...
User Guide
Page 52
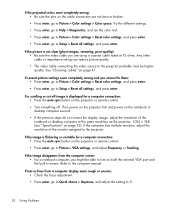
... > Keystone, and adjust the setting to 0. 52 Fixing Problems Refer to the computer manual. If several picture settings seem completely wrong and you might be higher quality. If the image is flickering or unstable for a computer connection: • Press the auto sync button on the projector or remote control. • Turn everything off image is displayed for a computer connection: • Press the auto sync button on the projector or remote control. • Press enter, go to Setup > Reset all settings...
... > Keystone, and adjust the setting to 0. 52 Fixing Problems Refer to the computer manual. If several picture settings seem completely wrong and you might be higher quality. If the image is flickering or unstable for a computer connection: • Press the auto sync button on the projector or remote control. • Turn everything off image is displayed for a computer connection: • Press the auto sync button on the projector or remote control. • Press enter, go to Setup > Reset all settings...
User Guide
Page 63
... picture 31 setup 35 shape of picture 13, 18, 52 R rear projection installation 48 regulatory information 59 remote control buttons 11 installing batteries 44 opening menu 36 troubleshooting 53 using 36 mercury safety 58 moving projector 24 O on 23 presentations, showing 29 Q quality of picture 32 slanted picture 33 sound 31 aiming projector 25 analog video mode compatibility 57 audio adjusting 31 ports 10 troubleshooting 53 B buttons location 9 opening menu 36 C cables choosing 47 connections 18 choosing cables 47 cleaning 5, 41 component-video connecting source...
... picture 31 setup 35 shape of picture 13, 18, 52 R rear projection installation 48 regulatory information 59 remote control buttons 11 installing batteries 44 opening menu 36 troubleshooting 53 using 36 mercury safety 58 moving projector 24 O on 23 presentations, showing 29 Q quality of picture 32 slanted picture 33 sound 31 aiming projector 25 analog video mode compatibility 57 audio adjusting 31 ports 10 troubleshooting 53 B buttons location 9 opening menu 36 C cables choosing 47 connections 18 choosing cables 47 cleaning 5, 41 component-video connecting source...

User Guide
Page 64
... locking cable 48 selecting video source 29 setting up 13 shape, adjusting 32 showing picture 29 showing presentations 29 slanted picture, adjusting 33 specifications 55 S-video connecting source 20 port 10 T table installation 13, 47 troubleshooting audio 53 interruptions 53 picture 50 remote control 53 start-up 50 warning lights 49 turning on and off 22 U updating firmware 45 upgrading projector 45 USB, connecting 16 using remote control 27 V VGA connecting source 16, 17 port 10 video mode compatibility 57 video source, selecting 29 W warning lights location 9 meanings 49 troubleshooting...
... locking cable 48 selecting video source 29 setting up 13 shape, adjusting 32 showing picture 29 showing presentations 29 slanted picture, adjusting 33 specifications 55 S-video connecting source 20 port 10 T table installation 13, 47 troubleshooting audio 53 interruptions 53 picture 50 remote control 53 start-up 50 warning lights 49 turning on and off 22 U updating firmware 45 upgrading projector 45 USB, connecting 16 using remote control 27 V VGA connecting source 16, 17 port 10 video mode compatibility 57 video source, selecting 29 W warning lights location 9 meanings 49 troubleshooting...

User's Guide
Page 3
... features 8 Projector at a glance 8 Projector buttons and lights 9 Back panel 10 Remote control 11 Accessories 12 Setting up the projector 13 Positioning the projector 13 Connecting power 15 Connecting a computer 16 Connecting a handheld organizer 17 Connecting a video source 18 Turning the projector on and off 21 Removing the lens cover 21 Turning the projector on 22 Turning the projector off 23 Moving the projector 23 Making basic adjustments 24 Aiming the projector 24 Adjusting the focus and zoom 25 Using the remote control 26 2 Showing...
... features 8 Projector at a glance 8 Projector buttons and lights 9 Back panel 10 Remote control 11 Accessories 12 Setting up the projector 13 Positioning the projector 13 Connecting power 15 Connecting a computer 16 Connecting a handheld organizer 17 Connecting a video source 18 Turning the projector on and off 21 Removing the lens cover 21 Turning the projector on 22 Turning the projector off 23 Moving the projector 23 Making basic adjustments 24 Aiming the projector 24 Adjusting the focus and zoom 25 Using the remote control 26 2 Showing...

User's Guide
Page 29
... hide button on the projector or remote control to the user documentation provided with your video source does not appear on the screen, you to the projector and turned on and playing video. TIP: If you might have to select the VGA port. 4. If the computer display is turned on . S Press the source button one or more times to turn on , and adjusted. 2 Showing Presentations Showing a computer screen 1. If a different input source is connected...
... hide button on the projector or remote control to the user documentation provided with your video source does not appear on the screen, you to the projector and turned on and playing video. TIP: If you might have to select the VGA port. 4. If the computer display is turned on . S Press the source button one or more times to turn on , and adjusted. 2 Showing Presentations Showing a computer screen 1. If a different input source is connected...
User's Guide
Page 34
... the picture mode button and select the picture mode you use for the current source. 2. You can fine tune the picture settings on blacks and whites. 6. Adjust to your projector to get the best color and image quality according to the setting that does not wash out fine detail in the order shown. Adjust to Color settings > Color saturation. Go to the setting where whites and colors look best. 7. Go to the Picture menu...
... the picture mode button and select the picture mode you use for the current source. 2. You can fine tune the picture settings on blacks and whites. 6. Adjust to your projector to get the best color and image quality according to the setting that does not wash out fine detail in the order shown. Adjust to Color settings > Color saturation. Go to the setting where whites and colors look best. 7. Go to the Picture menu...
User's Guide
Page 38
... any change in the on-screen menu. Vertical offset Adjusts the picture up or down within the projection area. Color temperature Shifts color toward red or green. Brightness Brightens or darkens the picture. Auto-sync Resynchronizes the projector to the default settings. You can also customize each viewing environment. Color saturation Adjusts the intensity of viewing situations. Color space Selects the color standard used by the source. Tint Shifts colors toward red or blue. 38 Adjusting the Projector Picture mode Adjusts color and...
... any change in the on-screen menu. Vertical offset Adjusts the picture up or down within the projection area. Color temperature Shifts color toward red or green. Brightness Brightens or darkens the picture. Auto-sync Resynchronizes the projector to the default settings. You can also customize each viewing environment. Color saturation Adjusts the intensity of viewing situations. Color space Selects the color standard used by the source. Tint Shifts colors toward red or blue. 38 Adjusting the Projector Picture mode Adjusts color and...

User's Guide
Page 39
... a widescreen projection screen. • Fill stretches the picture to fill the screen. Sets a lower power level for checking the operation of time the projector waits for input before automatically shutting down , in front of the projector. Displays information and status of or behind the screen. Sets how many seconds the on -screen menu. Sets the length of the projector and the remote control. Setup menu Setup menu Language Timeout for menu Picture orientation Lamp saver Power timeout Clean edges Reset lamp hours Reset all menu settings to its default settings.
... a widescreen projection screen. • Fill stretches the picture to fill the screen. Sets a lower power level for checking the operation of time the projector waits for input before automatically shutting down , in front of the projector. Displays information and status of or behind the screen. Sets how many seconds the on -screen menu. Sets the length of the projector and the remote control. Setup menu Setup menu Language Timeout for menu Picture orientation Lamp saver Power timeout Clean edges Reset lamp hours Reset all menu settings to its default settings.

User's Guide
Page 50
..., adjust the resolution of focus: • Be sure the lens cover is turned on -screen menu, adjust the focus ring. (The image size should not change; On some notebooks, for 15 seconds, then plug it in and press the power button again. If the wrong input source is displayed: • Press the source button on the projector or the remote control one or more times to turn on the external video port. Start-up problems If no lights or sounds turn on...
..., adjust the resolution of focus: • Be sure the lens cover is turned on -screen menu, adjust the focus ring. (The image size should not change; On some notebooks, for 15 seconds, then plug it in and press the power button again. If the wrong input source is displayed: • Press the source button on the projector or the remote control one or more times to turn on the external video port. Start-up problems If no lights or sounds turn on...

User's Guide
Page 52
... picture quality. • The video cable connecting the video source to the projector probably must be able to the computer manual. Refer to turn on the projector or remote control. • Turn everything off image is flickering or unstable for a computer connection: • Press the auto sync button on both the external VGA port and the built-in screen. If a scrolling or cut-off . If the image is displayed for a computer connection: • Press the auto sync button...
... picture quality. • The video cable connecting the video source to the projector probably must be able to the computer manual. Refer to turn on the projector or remote control. • Turn everything off image is flickering or unstable for a computer connection: • Press the auto sync button on both the external VGA port and the built-in screen. If a scrolling or cut-off . If the image is displayed for a computer connection: • Press the auto sync button...
User's Guide
Page 63
... security locking cable 48 selecting video source 29 setting up 13 shape, adjusting 32 showing picture 29 showing presentations 29 slanted picture, adjusting 33 specifications 55 S-video connecting source 20 port 10 T table installation 13, 47 troubleshooting interruptions 53 picture 50 remote control 53 start-up 50 warning lights 49 turning on and off 21 U updating firmware 45 upgrading projector 45 USB, connecting 16 using remote control 26 V VGA connecting source 16, 17 port 10 video mode compatibility 57 video source, selecting 29 W warning lights location 9 meanings 49 troubleshooting 49...
... security locking cable 48 selecting video source 29 setting up 13 shape, adjusting 32 showing picture 29 showing presentations 29 slanted picture, adjusting 33 specifications 55 S-video connecting source 20 port 10 T table installation 13, 47 troubleshooting interruptions 53 picture 50 remote control 53 start-up 50 warning lights 49 turning on and off 21 U updating firmware 45 upgrading projector 45 USB, connecting 16 using remote control 26 V VGA connecting source 16, 17 port 10 video mode compatibility 57 video source, selecting 29 W warning lights location 9 meanings 49 troubleshooting 49...

