Product Information
Page 1
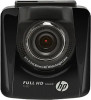
... detect these events and trigger Emergency Video Recording mode. Car Camcorder f500 The HP Car Camcorder f500 is a great companion for easy installation and assures the camera is always ready. Once installed, the f500 automatically begins recording when the vehicle starts and powers down when the vehicle is turned off. Small Size with no need to retrieve for replay. wide angle lens to capture all the critical elements with...
... detect these events and trigger Emergency Video Recording mode. Car Camcorder f500 The HP Car Camcorder f500 is a great companion for easy installation and assures the camera is always ready. Once installed, the f500 automatically begins recording when the vehicle starts and powers down when the vehicle is turned off. Small Size with no need to retrieve for replay. wide angle lens to capture all the critical elements with...
Product Information
Page 2
...) Note: Class 6 speed SDHC cards or greater required for technical or editorial errors or omissions contained herein. Chinese / T. Actual product image may vary from date of their respective holders. Car Camcorder f500 SPECIFICATIONS Display Dimensions Sensor Type Effective Pixels Video Resolutions Video Format Still Image Resolution Still Image Format ISO Sensitivity G-Sensor Lens Specifications Microphone On Screen Languages Storage Media Connections Power Dimensions Weight Box Contents Minimum System Requirements Warranty 2.4 inch LCD Color Panel (TFT), 112K...
...) Note: Class 6 speed SDHC cards or greater required for technical or editorial errors or omissions contained herein. Chinese / T. Actual product image may vary from date of their respective holders. Car Camcorder f500 SPECIFICATIONS Display Dimensions Sensor Type Effective Pixels Video Resolutions Video Format Still Image Resolution Still Image Format ISO Sensitivity G-Sensor Lens Specifications Microphone On Screen Languages Storage Media Connections Power Dimensions Weight Box Contents Minimum System Requirements Warranty 2.4 inch LCD Color Panel (TFT), 112K...
User Manual
Page 2
... Guide 3 FCC Statement 3 WEEE Notice 3 CE Regulatory Notice 4 Notes on Installation 4 Caution 5 1 Introduction 6 1.1 Features 6 1.2 Package Contents 6 1.3 Product Overview 7 2 Getting Started 8 2.1 Inserting the Memory Card 8 2.2 Installing in Vehicles 9 2.2.1 Mount to Windshield 9 2.2.2 Adjust the camcorder position 10 2.3 Connecting to Power 11 2.4 Powering the Camcorder On / Off 12 2.4.1 Auto Power On/Off 12 2.4.2 Manual Power On/Off 12 2.5 Initial Settings 13 2.5.1 Set Automatic Recording 13 2.5.2 Set the Date and Time 13 3 Using the Camcorder 14 3.1 Recording Videos...
... Guide 3 FCC Statement 3 WEEE Notice 3 CE Regulatory Notice 4 Notes on Installation 4 Caution 5 1 Introduction 6 1.1 Features 6 1.2 Package Contents 6 1.3 Product Overview 7 2 Getting Started 8 2.1 Inserting the Memory Card 8 2.2 Installing in Vehicles 9 2.2.1 Mount to Windshield 9 2.2.2 Adjust the camcorder position 10 2.3 Connecting to Power 11 2.4 Powering the Camcorder On / Off 12 2.4.1 Auto Power On/Off 12 2.4.2 Manual Power On/Off 12 2.5 Initial Settings 13 2.5.1 Set Automatic Recording 13 2.5.2 Set the Date and Time 13 3 Using the Camcorder 14 3.1 Recording Videos...

User Manual
Page 3
3.1.4 The Recording Screen 16 3.1.5 Taking Photographs 17 3.2 Playback Videos and Photos 18 3.2.1 Playing Videos 19 3.2.2 Viewing Photos 19 3.2.3 The Playback Screen 20 3.2.4 Deleting Files 21 4 Adjusting the Settings 22 4.1 Using the Menu 22 4.2 Menu Tree 23 5 Installing the Software 26 6 Specifications 27 2
3.1.4 The Recording Screen 16 3.1.5 Taking Photographs 17 3.2 Playback Videos and Photos 18 3.2.1 Playing Videos 19 3.2.2 Viewing Photos 19 3.2.3 The Playback Screen 20 3.2.4 Deleting Files 21 4 Adjusting the Settings 22 4.1 Using the Menu 22 4.2 Menu Tree 23 5 Installing the Software 26 6 Specifications 27 2
User Manual
Page 4
... radiate radio frequency energy and, if not installed and used in a particular installation. Operation is connected. • Consult the dealer or an experienced radio/TV technician for help to conserve natural resources and ensure that may not cause harmful interference, and (2) this document is for a Class B digital camcorder, pursuant to change the technical specifications without prior notice. For more of...
... radiate radio frequency energy and, if not installed and used in a particular installation. Operation is connected. • Consult the dealer or an experienced radio/TV technician for help to conserve natural resources and ensure that may not cause harmful interference, and (2) this document is for a Class B digital camcorder, pursuant to change the technical specifications without prior notice. For more of...
User Manual
Page 5
... window. Do not touch the lens with your required driving view. 2. Doing so may be left on a regular basis. 4. the Restriction of The Use of Radio and Telecom camcorder (1995/5/EC); Install the camcorder near the rear-view mirror to eco-design requirements for standby and off mode electric power consumption of electrical and electronic household and office equipment, and the Directive...
... window. Do not touch the lens with your required driving view. 2. Doing so may be left on a regular basis. 4. the Restriction of The Use of Radio and Telecom camcorder (1995/5/EC); Install the camcorder near the rear-view mirror to eco-design requirements for standby and off mode electric power consumption of electrical and electronic household and office equipment, and the Directive...
User Manual
Page 6
... manually operate the camcorder while driving. Due to open flames can cause explosion. They are for the loss of any data/content during operation. Before you start using the Car Camcorder it is NOT responsible for your product warranty. Set up time and date accurately before you agree to the influence of this product. The values displayed in this camcorder. Never short-circuit the battery...
... manually operate the camcorder while driving. Due to open flames can cause explosion. They are for the loss of any data/content during operation. Before you start using the Car Camcorder it is NOT responsible for your product warranty. Set up time and date accurately before you agree to the influence of this product. The values displayed in this camcorder. Never short-circuit the battery...
User Manual
Page 7
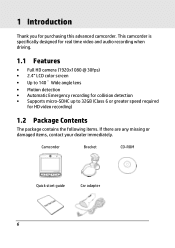
This camcorder is specifically designed for real time video and audio recording when driving. 1.1 Features • Full HD camera (1920x1080 @ 30fps) • 2.4" LCD color screen • Up to 140 ゚ Wide angle lens • Motion detection • Automatic Emergency recording for collision detection • Supports micro-SDHC up to 32GB (Class 6 or greater speed required for purchasing this advanced camcorder. 1 Introduction Thank you for HD video recording) 1.2 Package Contents The...
This camcorder is specifically designed for real time video and audio recording when driving. 1.1 Features • Full HD camera (1920x1080 @ 30fps) • 2.4" LCD color screen • Up to 140 ゚ Wide angle lens • Motion detection • Automatic Emergency recording for collision detection • Supports micro-SDHC up to 32GB (Class 6 or greater speed required for purchasing this advanced camcorder. 1 Introduction Thank you for HD video recording) 1.2 Package Contents The...

User Manual
Page 8
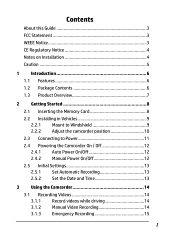
Item 1 Bracket Socket 2 Power Button 3 Memory Card Slot 4 USB Connector 5 HD(Mini HDMI) Connector 6 Back Button ( ) 7 LCD Panel No. Item 8 Up Button ( ) 9 Down Button ( ) 10 Enter Button ( ) 11 Wide Angle Lens 12 Microphone 13 Speaker Note: To operate the camcorder, press the corresponding buttons (6,8,9,10) according to guide icons shown the screen. 7 1.3 Product Overview Top and Bottom Views 1 6 Side (Left and Right) Views Front View 7 8 9 10 Rear View 2 4 11 13 3 5 12 No.
Item 1 Bracket Socket 2 Power Button 3 Memory Card Slot 4 USB Connector 5 HD(Mini HDMI) Connector 6 Back Button ( ) 7 LCD Panel No. Item 8 Up Button ( ) 9 Down Button ( ) 10 Enter Button ( ) 11 Wide Angle Lens 12 Microphone 13 Speaker Note: To operate the camcorder, press the corresponding buttons (6,8,9,10) according to guide icons shown the screen. 7 1.3 Product Overview Top and Bottom Views 1 6 Side (Left and Right) Views Front View 7 8 9 10 Rear View 2 4 11 13 3 5 12 No.
User Manual
Page 14
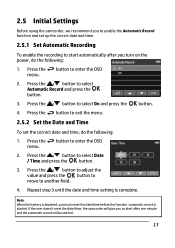
... adjust the value and press the button to move to select Automatic Record and press the button. 3. Press the menu. 2.5 Initial Settings Before using the camcorder, we recommend you to enable the Automatic Record function and set the correct date and time, do the following : 1. button to enter the OSD 2. If the user doesn't reset the date/time, the camcorder will give you an alert after you turn on the power...
... adjust the value and press the button to move to select Automatic Record and press the button. 3. Press the menu. 2.5 Initial Settings Before using the camcorder, we recommend you to enable the Automatic Record function and set the correct date and time, do the following : 1. button to enter the OSD 2. If the user doesn't reset the date/time, the camcorder will give you an alert after you turn on the power...
User Manual
Page 15
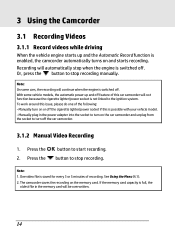
... camcorder saves the recording on and starts recording. button to stop recording. See Using the Menu (4.1). 2. Note: On some vehicle models, the automatic power up and the Automatic Record function is saved for every 3 or 5 minutes of recording. Recording will continue when the engine is possible with your vehicle model. - Manually plug in the memory card will not function because the cigarette lighter/power socket is switched off . One video file is enabled, the camcorder automatically turns on...
... camcorder saves the recording on and starts recording. button to stop recording. See Using the Menu (4.1). 2. Note: On some vehicle models, the automatic power up and the Automatic Record function is saved for every 3 or 5 minutes of recording. Recording will continue when the engine is possible with your vehicle model. - Manually plug in the memory card will not function because the cigarette lighter/power socket is switched off . One video file is enabled, the camcorder automatically turns on...

User Manual
Page 16
... function is enabled and a collision is detected, the camcorder will be protected to avoid being overwritten. A 4 GB memory card can save up to 5 emergency video files, and 8 GB (or above) memory card can save up on the upper left corner of "Emergency files are full" will pop up to begin emergency recording mode. The "Emergency" message will be displayed immediately on the screen when the emergency recording files...
... function is enabled and a collision is detected, the camcorder will be protected to avoid being overwritten. A 4 GB memory card can save up to 5 emergency video files, and 8 GB (or above) memory card can save up on the upper left corner of "Emergency files are full" will pop up to begin emergency recording mode. The "Emergency" message will be displayed immediately on the screen when the emergency recording files...

User Manual
Page 17
... enable "Voice Record". 3 Date and time Indicates the current recording date and time. 4 Guide icon (Menu) Press the button to stop the recording. 16 3.1.4 The Recording Screen 6 1 7 2 8 3 9 4 10 5 No. button to switch to Playback 6 Resolution Indicates the current video resolution. 7 Battery Indicates the estimated remaining battery power or if it is being charged. 8 Prompt : reset of date / time Prompt : NOT reset of date / time 9 Guide icon (Stop) Press the button to enter the OSD menu. 5 Guide icon Press the (Playback) mode. Indicates sound will not...
... enable "Voice Record". 3 Date and time Indicates the current recording date and time. 4 Guide icon (Menu) Press the button to stop the recording. 16 3.1.4 The Recording Screen 6 1 7 2 8 3 9 4 10 5 No. button to switch to Playback 6 Resolution Indicates the current video resolution. 7 Battery Indicates the estimated remaining battery power or if it is being charged. 8 Prompt : reset of date / time Prompt : NOT reset of date / time 9 Guide icon (Stop) Press the button to enter the OSD menu. 5 Guide icon Press the (Playback) mode. Indicates sound will not...
User Manual
Page 18
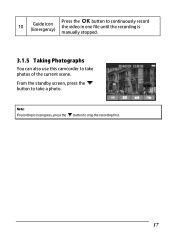
Note: If recording is manually stopped. 3.1.5 Taking Photographs You can also use this camcorder to take a photo. 10 Guide icon (Emergency) Press the button to continuously record the video in one file until the recording is in progress, press the button to stop the recording first. 17 From the standby screen, press the button to take photos of the current scene.
Note: If recording is manually stopped. 3.1.5 Taking Photographs You can also use this camcorder to take a photo. 10 Guide icon (Emergency) Press the button to continuously record the video in one file until the recording is in progress, press the button to stop the recording first. 17 From the standby screen, press the button to take photos of the current scene.

User Manual
Page 20
.... 3.2.2 Viewing Photos To view photos, do the following : 1. 3.2.1 Playing Videos To play the video. 6. If recording is in full screen. 19 Press the / button to browse for the desired video file and press the button to enter the OSD menu. 3. Press the / button to stop recording. 2. If recording is in progress, press the button to view the file in progress, press the button to select Picture and press the button. 5. Press the / button to pause the playback. Press...
.... 3.2.2 Viewing Photos To view photos, do the following : 1. 3.2.1 Playing Videos To play the video. 6. If recording is in full screen. 19 Press the / button to browse for the desired video file and press the button to enter the OSD menu. 3. Press the / button to stop recording. 2. If recording is in progress, press the button to view the file in progress, press the button to select Picture and press the button. 5. Press the / button to pause the playback. Press...

User Manual
Page 21
3.2.3 The Playback Screen Video Playback Screen 1 7 6 Photo Playback Screen 7 2 3 4 5 2 3 4 No. button to return to file selection 3 Guide icon Press the button to view the previous (Previous) video/photo. 4 Guide icon (Next) Press the button to view the next video/photo. 5 Guide icon (Pause) Press the button to pause the video playback. 6 Duration Indicates the elapse time. 7 Battery Indicates the estimated remaining battery power. 20 Item Description 1 Date and time Indicates the recorded date and time. 2 Guide icon Press the (Back) display.
3.2.3 The Playback Screen Video Playback Screen 1 7 6 Photo Playback Screen 7 2 3 4 5 2 3 4 No. button to return to file selection 3 Guide icon Press the button to view the previous (Previous) video/photo. 4 Guide icon (Next) Press the button to view the next video/photo. 5 Guide icon (Pause) Press the button to pause the video playback. 6 Duration Indicates the elapse time. 7 Battery Indicates the estimated remaining battery power. 20 Item Description 1 Date and time Indicates the recorded date and time. 2 Guide icon Press the (Back) display.
User Manual
Page 24
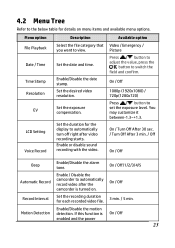
... camcorder to view. Set the date and time. Set the duration for the display to the below table for each recorded video file. 3 min. / 5 min. Enable or disable sound recording with the video. You may customize it between-1.3~+1.3. Motion Detection Enable/Disable the motion detection. 4.2 Menu Tree Refer to automatically turn off right after the camcorder is enabled and the power On / Off 23 On / Off 1080p (1920x1080) / 720p(1280x720) Press / button...
... camcorder to view. Set the date and time. Set the duration for the display to the below table for each recorded video file. 3 min. / 5 min. Enable or disable sound recording with the video. You may customize it between-1.3~+1.3. Motion Detection Enable/Disable the motion detection. 4.2 Menu Tree Refer to automatically turn off right after the camcorder is enabled and the power On / Off 23 On / Off 1080p (1920x1080) / 720p(1280x720) Press / button...

User Manual
Page 25
... / Disable the collision detection. Set the on the screen. Delete the file(s) Warning: Once a file is deleted, it On / Off English Deutsch / Français / Italiano / Español / Português / Türkçe Video / Emergency / Picture Under motion detection mode, the camcorder will automatically trigger the emergency recording feature. Menu option Collision Detection Description button is pressed, the system alert message, "Press OK Key to Power off...
... / Disable the collision detection. Set the on the screen. Delete the file(s) Warning: Once a file is deleted, it On / Off English Deutsch / Français / Italiano / Español / Português / Türkçe Video / Emergency / Picture Under motion detection mode, the camcorder will automatically trigger the emergency recording feature. Menu option Collision Detection Description button is pressed, the system alert message, "Press OK Key to Power off...

User Manual
Page 26
Available option Yes / No Yes / No 25 Menu option Format Default Description CANNOT be restored or recovered. Format the memory card Warning: Once the memory card is formatted, ALL content on the micro SD card will be deleted and CANNOT be restored or recovered. Reset all options to the default settings.
Available option Yes / No Yes / No 25 Menu option Format Default Description CANNOT be restored or recovered. Format the memory card Warning: Once the memory card is formatted, ALL content on the micro SD card will be deleted and CANNOT be restored or recovered. Reset all options to the default settings.

User Manual
Page 28
...) Shutter G-Sensor ISO White Balance Microphone Speaker Resolution: 2M (1920 x 1080) Format: DCF (JPEG, Exif: 2.2) Electronic shutter Auto:1/2 ~1/2000 sec. 3-Axis G-Force sensor Auto Auto Yes Yes Interface Mini USB, Mini C Type HDMI Battery Built-in 470mAH Li-polymer rechargeable (This battery is NOT replaceable) 27 6 Specifications Item Description Image sensor Effective pixels Storage media LCD display Lens Focus range Movie Clip 1/3" CMOS sensor 1920 (H) x 1080 (V) Supports Micro SDHC, up to 32GB class 6 or above 2.4" LCD color...
...) Shutter G-Sensor ISO White Balance Microphone Speaker Resolution: 2M (1920 x 1080) Format: DCF (JPEG, Exif: 2.2) Electronic shutter Auto:1/2 ~1/2000 sec. 3-Axis G-Force sensor Auto Auto Yes Yes Interface Mini USB, Mini C Type HDMI Battery Built-in 470mAH Li-polymer rechargeable (This battery is NOT replaceable) 27 6 Specifications Item Description Image sensor Effective pixels Storage media LCD display Lens Focus range Movie Clip 1/3" CMOS sensor 1920 (H) x 1080 (V) Supports Micro SDHC, up to 32GB class 6 or above 2.4" LCD color...


