HP ep7112 - Home Cinema Digital Projector Research
Related Manual Pages


Similar Questions

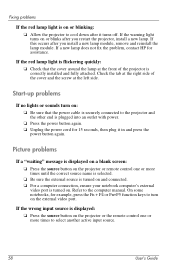
Won't Stay On And Red Light Constantly Flashing
My projector bulb won't stay on. When I press the start button the bulb lights but after a few secon...
My projector bulb won't stay on. When I press the start button the bulb lights but after a few secon...
(Posted by gricedave1 7 years ago)

Password Required For Hp Vp6200 Digital Projector
After a long time of unused of the projector, I tried to operate it, but a password of 4 digits requ...
After a long time of unused of the projector, I tried to operate it, but a password of 4 digits requ...
(Posted by smarta666 7 years ago)

How Do You Callibrate The Color Wheel In An Hp Ep9010 Instant Cinema Projector?
(Posted by woodmiller2002 10 years ago)

My Hp Digital Projector Mp3222,
Theinternal fans are not working without lamp. what is wrong with my projector or is normal when the...
Theinternal fans are not working without lamp. what is wrong with my projector or is normal when the...
(Posted by boydanny90 11 years ago)
