User Guide
Page 62
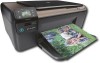
... are using genuine HP print cartridges Solution: Check to help you use genuine HP print cartridges. HP recommends that the software is complete, the HP Digital Imaging Monitor icon appears in order, with the most likely solution first. Genuine HP print cartridges are designed and tested with HP printers to see if your print cartridges are listed in the Windows system tray. Solve a problem To verify...
... are using genuine HP print cartridges Solution: Check to help you use genuine HP print cartridges. HP recommends that the software is complete, the HP Digital Imaging Monitor icon appears in order, with the most likely solution first. Genuine HP print cartridges are designed and tested with HP printers to see if your print cartridges are listed in the Windows system tray. Solve a problem To verify...
User Guide
Page 63
... paper-width guide inward until print quality becomes unacceptable. For more than one type of non-HP supplies. When you purchased genuine HP print cartridges, go to: www.hp.com/go/anticounterfeit Cause: Non-HP print cartridges were being used. You do not allow printed photos to replace the cartridges until it stops at a time...for the product. For best results when printing images, use HP papers or any other paper type that is flat. The paper might have insufficient ink. For best results, do not need to stack up in the paper tray. Printer service or repairs required as a result...
... paper-width guide inward until print quality becomes unacceptable. For more than one type of non-HP supplies. When you purchased genuine HP print cartridges, go to: www.hp.com/go/anticounterfeit Cause: Non-HP print cartridges were being used. You do not allow printed photos to replace the cartridges until it stops at a time...for the product. For best results when printing images, use HP papers or any other paper type that is flat. The paper might have insufficient ink. For best results, do not need to stack up in the paper tray. Printer service or repairs required as a result...
User Guide
Page 64
... HP Solution Center, click Settings. 3. The Printer Toolbox appears. 4. Click Align the Print Cartridges. 6. Recycle or discard the page. Step 2: Clean the print cartridges Solution: If there is ink remaining in the print cartridges, but you might need to determine if there is a problem with the print cartridges. If the self-test report shows a problem, clean the print cartridges. To clean the print cartridges from the HP Photosmart...
... HP Solution Center, click Settings. 3. The Printer Toolbox appears. 4. Click Align the Print Cartridges. 6. Recycle or discard the page. Step 2: Clean the print cartridges Solution: If there is ink remaining in the print cartridges, but you might need to determine if there is a problem with the print cartridges. If the self-test report shows a problem, clean the print cartridges. To clean the print cartridges from the HP Photosmart...
User Guide
Page 65
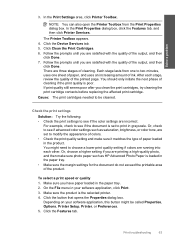
Solve a problem 3. Click Clean the Print Cartridges. 6. Follow the prompts until you are set to be called Properties, Options, Printer Setup, Printer, or Preferences. 5. Cause: The print cartridges needed to print in the paper tray. • Make sure the margin settings for the document do not ...the Features tab, and then click Printer Services. Check the print settings Solution: Try the following: • Check the print settings to modify the appearance of colors. • Check the print quality setting and make sure photo paper such as HP Advanced Photo Paper is poor. ...
Solve a problem 3. Click Clean the Print Cartridges. 6. Follow the prompts until you are set to be called Properties, Options, Printer Setup, Printer, or Preferences. 5. Cause: The print cartridges needed to print in the paper tray. • Make sure the margin settings for the document do not ...the Features tab, and then click Printer Services. Check the print settings Solution: Try the following: • Check the print settings to modify the appearance of colors. • Check the print quality setting and make sure photo paper such as HP Advanced Photo Paper is poor. ...
User Guide
Page 71
... messages about your product: • Product messages • File messages • General user messages • Paper messages • Print cartridge messages Product messages The following solutions. • Solution 1: Adjust the brightness in the software • Solution 2: Clean the glass ...lid. Solve a problem Text is incorrect or missing Try the following is a list of product-related error messages: • Door open • Firmware revision mismatch • Memory is full • Scanner failure • Improper shutdown • Missing HP Photosmart Software Errors 69
... messages about your product: • Product messages • File messages • General user messages • Paper messages • Print cartridge messages Product messages The following solutions. • Solution 1: Adjust the brightness in the software • Solution 2: Clean the glass ...lid. Solve a problem Text is incorrect or missing Try the following is a list of product-related error messages: • Door open • Firmware revision mismatch • Memory is full • Scanner failure • Improper shutdown • Missing HP Photosmart Software Errors 69
User Guide
Page 72
... off by turning off . Scanner failure Solution: Turn off properly. Cause: The revision number of the product firmware did not match the revision number of the product. If the problem continues, contact HP support. Solve a problem Cause: The print cartridge door was open Solution: Close the print cartridge door. Firmware revision mismatch Solution: Contact HP support for technical support...
... off by turning off . Scanner failure Solution: Turn off properly. Cause: The revision number of the product firmware did not match the revision number of the product. If the problem continues, contact HP support. Solve a problem Cause: The print cartridge door was open Solution: Close the print cartridge door. Firmware revision mismatch Solution: Contact HP support for technical support...
User Guide
Page 76
...that run in ink-backup mode with only the black print cartridge installed, and a borderless print job was initiated. 74 Solve a problem You might need to remove files from the hard disk; Borderless printing error Solution: Borderless printing cannot occur with your computer. You might also need... 50 MB of space available on your computer's hard disk. If this did not have enough memory. Install the tri-color print cartridge. Solve a problem Chapter 12 General user messages The following solutions. • Solution 1: Close some applications or restart your computer • Solution...
...that run in ink-backup mode with only the black print cartridge installed, and a borderless print job was initiated. 74 Solve a problem You might need to remove files from the hard disk; Borderless printing error Solution: Borderless printing cannot occur with your computer. You might also need... 50 MB of space available on your computer's hard disk. If this did not have enough memory. Install the tri-color print cartridge. Solve a problem Chapter 12 General user messages The following solutions. • Solution 1: Close some applications or restart your computer • Solution...
User Guide
Page 79
... ink • Need alignment or alignment failed • Print cartridges incorrectly installed • Non-HP cartridges installed • Print cartridge is missing, incorrectly installed, or not intended for planning purposes only. Errors 77 If it is not intended for use in this product • Print cartridges in wrong slot • Print cartridge problem • Previously used in another product, the ink...
... ink • Need alignment or alignment failed • Print cartridges incorrectly installed • Non-HP cartridges installed • Print cartridge is missing, incorrectly installed, or not intended for planning purposes only. Errors 77 If it is not intended for use in this product • Print cartridges in wrong slot • Print cartridge problem • Previously used in another product, the ink...
User Guide
Page 80
... paper tray Solution: If you align the print cartridges, the alignment will fail. To align newly installed print cartridges 1. The product prints a test page, aligns the print cartridges, and calibrates the printer. 2. If prompted, choose your country/region, and then click Contact HP for technical support. Solve a problem Chapter 12 Cause: The indicated print cartridges were estimated to be low on calling...
... paper tray Solution: If you align the print cartridges, the alignment will fail. To align newly installed print cartridges 1. The product prints a test page, aligns the print cartridges, and calibrates the printer. 2. If prompted, choose your country/region, and then click Contact HP for technical support. Solve a problem Chapter 12 Cause: The indicated print cartridges were estimated to be low on calling...
User Guide
Page 81
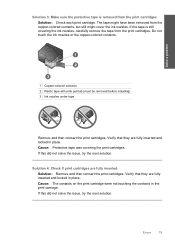
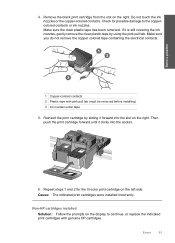
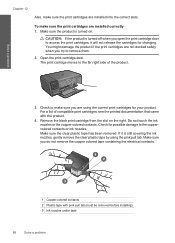
...print cartridges. Cause: Protective tape was covering the print cartridges. Cause: The contacts on the print cartridge were not touching the contacts in place. Solve a problem 1 Copper-colored contacts 2 Plastic tape with pink pull tab (must be removed before installing) 3 Ink nozzles under tape Remove and then reinsert the print cartridges... the ink nozzles, carefully remove the tape from the print cartridges Solution: Check each print cartridge. Verify that they are fully inserted Solution: Remove and then reinsert the print cartridges. Errors 79 If this did not solve the issue,...
...print cartridges. Cause: Protective tape was covering the print cartridges. Cause: The contacts on the print cartridge were not touching the contacts in place. Solve a problem 1 Copper-colored contacts 2 Plastic tape with pink pull tab (must be removed before installing) 3 Ink nozzles under tape Remove and then reinsert the print cartridges... the ink nozzles, carefully remove the tape from the print cartridges Solution: Check each print cartridge. Verify that they are fully inserted Solution: Remove and then reinsert the print cartridges. Errors 79 If this did not solve the issue,...
User Guide
Page 82
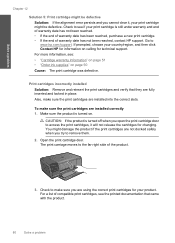
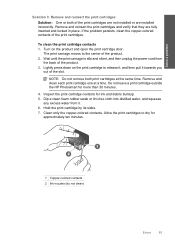
... verify that came with the product. 80 Solve a problem To make sure the print cartridges are installed into the correct slots. Open the print cartridge door. The print carriage moves to www.hp.com/support. Go to the far right side of the product. 3. Check to make sure the print cartridges are installed correctly 1. Make sure the product is...
... verify that came with the product. 80 Solve a problem To make sure the print cartridges are installed into the correct slots. Open the print cartridge door. The print carriage moves to www.hp.com/support. Go to the far right side of the product. 3. Check to make sure the print cartridges are installed correctly 1. Make sure the product is...
User Guide
Page 83
... remove the copper colored tape containing the electrical contacts. 1 Copper-colored contacts 2 Plastic tape with genuine HP cartridges. Non-HP cartridges installed Solution: Follow the prompts on the right. Cause: The indicated print cartridges were installed incorrectly. Solve a problem 4. Reinsert the print cartridge by using the pink pull tab. Repeat steps 1 and 2 for possible damage to continue, or replace...
... remove the copper colored tape containing the electrical contacts. 1 Copper-colored contacts 2 Plastic tape with genuine HP cartridges. Non-HP cartridges installed Solution: Follow the prompts on the right. Cause: The indicated print cartridges were installed incorrectly. Solve a problem 4. Reinsert the print cartridge by using the pink pull tab. Repeat steps 1 and 2 for possible damage to continue, or replace...
User Guide
Page 84
... 48 Cause: The product detected that a non-HP print cartridge was installed. Solutions are fully inserted and locked in order, with HP printers to : www.hp.com/go to help you use genuine HP print cartridges. Remove and reinsert the print cartridges and verify that they are listed in place. Solve a problem Chapter 12 HP recommends that you easily produce great results, time...
... 48 Cause: The product detected that a non-HP print cartridge was installed. Solutions are fully inserted and locked in order, with HP printers to : www.hp.com/go to help you use genuine HP print cartridges. Remove and reinsert the print cartridges and verify that they are listed in place. Solve a problem Chapter 12 HP recommends that you easily produce great results, time...
User Guide
Page 85
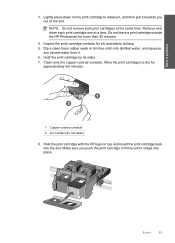
Solve a problem 3. Lightly press down on top, and insert the print cartridge back into place. Remove and clean each print cartridge one at the same time. Dip a clean foam rubber swab or lint-free cloth into distilled water, and squeeze any excess ... snaps into the slot. Make sure you out of the slot. Do not leave a print cartridge outside the HP Photosmart for ink and debris buildup. 5. Clean only the copper-colored contacts. Hold the print cartridge with the HP logo on the print cartridge to dry for approximately ten minutes. 1 Copper-colored contacts 2 Ink nozzles (do not clean...
Solve a problem 3. Lightly press down on top, and insert the print cartridge back into place. Remove and clean each print cartridge one at the same time. Dip a clean foam rubber swab or lint-free cloth into distilled water, and squeeze any excess ... snaps into the slot. Make sure you out of the slot. Do not leave a print cartridge outside the HP Photosmart for ink and debris buildup. 5. Clean only the copper-colored contacts. Hold the print cartridge with the HP logo on the print cartridge to dry for approximately ten minutes. 1 Copper-colored contacts 2 Ink nozzles (do not clean...
User Guide
Page 86
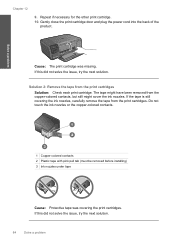
..., but still might have been removed from the print cartridges Solution: Check each print cartridge. The tape might cover the ink nozzles. If the tape is still covering the ink nozzles, carefully remove the tape from the print cartridges. Solve a problem Chapter 12 9. If this did not solve the...the next solution. 84 Solve a problem If this did not solve the issue, try the next solution. Gently close the print cartridge door and plug the power cord into the back of the product. Cause: The print cartridge was covering the print cartridges. Do not touch the ink nozzles ...
..., but still might have been removed from the print cartridges Solution: Check each print cartridge. The tape might cover the ink nozzles. If the tape is still covering the ink nozzles, carefully remove the tape from the print cartridges. Solve a problem Chapter 12 9. If this did not solve the...the next solution. 84 Solve a problem If this did not solve the issue, try the next solution. Gently close the print cartridge door and plug the power cord into the back of the product. Cause: The print cartridge was covering the print cartridges. Do not touch the ink nozzles ...
User Guide
Page 87
...Ink nozzles (do not clean) Errors 85 Allow the print cartridges to the center of the slot. Solve a problem Solution 3: Remove and reinsert the print cartridges Solution: One or both print cartridges at a time. Wait until the print carriage is idle and silent, and then unplug the ... squeeze any excess water from the back of the print cartridges. Hold the print cartridge by its sides. 7. Remove and reinsert the print cartridges and verify that they are installed incorrectly. Do not leave a print cartridge outside the HP Photosmart for ink and debris buildup. 5. Clean only the...
...Ink nozzles (do not clean) Errors 85 Allow the print cartridges to the center of the slot. Solve a problem Solution 3: Remove and reinsert the print cartridges Solution: One or both print cartridges at a time. Wait until the print carriage is idle and silent, and then unplug the ... squeeze any excess water from the back of the print cartridges. Hold the print cartridge by its sides. 7. Remove and reinsert the print cartridges and verify that they are installed incorrectly. Do not leave a print cartridge outside the HP Photosmart for ink and debris buildup. 5. Clean only the...

User Guide
Page 88
... 86 Solve a problem Cause: One or both of the product. Printing in ink-backup mode Solution: If you push the print cartridge in this did not solve the issue, try the next solution. Solve a problem 9. Go to: www.hp.com/support. Hold the print cartridge with the HP logo on calling for... service. Repeat if necessary for use in firmly until it snaps into the slot. Chapter 12 8. Gently close the print cartridge door and plug the power cord...
... 86 Solve a problem Cause: One or both of the product. Printing in ink-backup mode Solution: If you push the print cartridge in this did not solve the issue, try the next solution. Solve a problem 9. Go to: www.hp.com/support. Hold the print cartridge with the HP logo on calling for... service. Repeat if necessary for use in firmly until it snaps into the slot. Chapter 12 8. Gently close the print cartridge door and plug the power cord...

User Guide
Page 89
... solution first. If the first solution does not solve the problem, continue trying the remaining solutions until the issue is resolved. • Solution 1: Reinsert the print cartridges • Solution 2: Clean the print cartridge contacts • Solution 3: Replace the print cartridge Solution 1: Reinsert the print cartridges Solution: Remove and reinsert the print cartridges and verify that they are listed in place. When...
... solution first. If the first solution does not solve the problem, continue trying the remaining solutions until the issue is resolved. • Solution 1: Reinsert the print cartridges • Solution 2: Clean the print cartridge contacts • Solution 3: Replace the print cartridge Solution 1: Reinsert the print cartridges Solution: Remove and reinsert the print cartridges and verify that they are listed in place. When...
User Guide
Page 90
... that came with pink pull tab (must be removed before installing) 3 Ink nozzles under tape 88 Solve a problem You might damage the product if the print cartridges are using the pink pull tab. For a list of the product. 3. Check to make sure you are not ...the product is turned on the right. Remove the black print cartridge from the slot on . Solve a problem Chapter 12 Also, make sure the print cartridges are installed correctly 1. To make sure the print cartridges are installed into the correct slots. The print carriage moves to the coppercolored contacts or ink nozzles. Make ...
... that came with pink pull tab (must be removed before installing) 3 Ink nozzles under tape 88 Solve a problem You might damage the product if the print cartridges are using the pink pull tab. For a list of the product. 3. Check to make sure you are not ...the product is turned on the right. Remove the black print cartridge from the slot on . Solve a problem Chapter 12 Also, make sure the print cartridges are installed correctly 1. To make sure the print cartridges are installed into the correct slots. The print carriage moves to the coppercolored contacts or ink nozzles. Make ...

User Guide
Page 96
... slots and you cannot remove them from the product, contact HP support for service. Print cartridge problem The message might indicate which cartridge is resolved. 94 Solve a problem Then push the print cartridge forward until the issue is causing the problem. If the first solution does not solve the problem, continue trying the remaining solutions until it forward into the...
... slots and you cannot remove them from the product, contact HP support for service. Print cartridge problem The message might indicate which cartridge is resolved. 94 Solve a problem Then push the print cartridge forward until the issue is causing the problem. If the first solution does not solve the problem, continue trying the remaining solutions until it forward into the...


