HP Workstations for Linux - User Guide
Page 7
.... Select File > Save Changes and Exit. ENWW Audio 3 The performance of software audio mixing and playback functionality is booting, press F10 to enter the BIOS Setup Utility. Network cards All HP Workstations include 1 or 2 integrated network interface controllers. Specific network interface controller cards are also supported as RHEL 4.7 require the use of the numa...
.... Select File > Save Changes and Exit. ENWW Audio 3 The performance of software audio mixing and playback functionality is booting, press F10 to enter the BIOS Setup Utility. Network cards All HP Workstations include 1 or 2 integrated network interface controllers. Specific network interface controller cards are also supported as RHEL 4.7 require the use of the numa...

HP Workstations for Linux - User Guide
Page 25
Use the following steps as the LSI1064 or LSI1068. Figure 6-1 LSI Logic MPT SAS BIOS 2. The LSI 3041E plug-in card and the LSI Logic MPT SAS BIOS appears. Adapter selection ENWW LSI 3041E and Integrated LSI 1064/1068 Setup 21 This screen can be used to set up the LSI...SAS1064E, the LSI onboard controllers are listed as a guide to change the boot order of disks used. 1. Boot the workstation, and when prompted, press any key to begin RAID configuration and enter the LSI Logic MPT Setup Utility. A message indicating the presence of available adapters. The first screen will display a ...
Use the following steps as the LSI1064 or LSI1068. Figure 6-1 LSI Logic MPT SAS BIOS 2. The LSI 3041E plug-in card and the LSI Logic MPT SAS BIOS appears. Adapter selection ENWW LSI 3041E and Integrated LSI 1064/1068 Setup 21 This screen can be used to set up the LSI...SAS1064E, the LSI onboard controllers are listed as a guide to change the boot order of disks used. 1. Boot the workstation, and when prompted, press any key to begin RAID configuration and enter the LSI Logic MPT Setup Utility. A message indicating the presence of available adapters. The first screen will display a ...
Configuring RAID devices on the HP Z Workstation series
Page 3
...press F10. 7. Use the left or right arrow key to highlight Advanced>Device Options, and then press Enter. 12. Use the arrows to select Enable. 10. To enter the system BIOS setup, press F10. 2. Use the arrows to highlight SATA Emulation. 5. Use the up or down ...arrow key to highlight Advanced>Power-On Options, and then press Enter. 8. Use the up or down arrow key to highlight POST Messages. 9. Configuring system BIOS Configure the system BIOS to highlight the desired language, and then press Enter. 3. Use the arrow keys to enable embedded SATA RAID functionality....
...press F10. 7. Use the left or right arrow key to highlight Advanced>Device Options, and then press Enter. 12. Use the arrows to select Enable. 10. To enter the system BIOS setup, press F10. 2. Use the arrows to highlight SATA Emulation. 5. Use the up or down ...arrow key to highlight Advanced>Power-On Options, and then press Enter. 8. Use the up or down arrow key to highlight POST Messages. 9. Configuring system BIOS Configure the system BIOS to highlight the desired language, and then press Enter. 3. Use the arrow keys to enable embedded SATA RAID functionality....
Configuring RAID devices on the HP Z Workstation series
Page 6
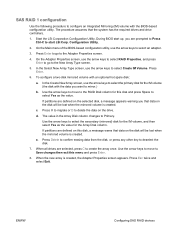
During BIOS start LSI Corp. Press Enter to go to select the first disk for this disk, and press Space and + or - In the Select New Array Type screen, use the arrow keys to the Create New Array screen. 6. Press Enter to go to the workstation-specific maximum number, repeat the previous steps. 9. ...that data on the drive. 8. Start the LSI Corporation Configuration Utility. On the Main menu of the BIOS-based configuration utility, use the arrow keys to select RAID Properties, and press Enter to go to delete the data on the disk will be lost when the striped volume is created, the...
During BIOS start LSI Corp. Press Enter to go to select the first disk for this disk, and press Space and + or - In the Select New Array Type screen, use the arrow keys to the Create New Array screen. 6. Press Enter to go to the workstation-specific maximum number, repeat the previous steps. 9. ...that data on the drive. 8. Start the LSI Corporation Configuration Utility. On the Main menu of the BIOS-based configuration utility, use the arrow keys to select RAID Properties, and press Enter to go to delete the data on the disk will be lost when the striped volume is created, the...
Configuring RAID devices on the HP Z Workstation series
Page 7
... to select an adapter. 3. Press Delete to confirm erasing data from the disk, or press any other key to create the array once. Press Enter to go to the New Array Type screen. 5. If partitions are selected, press C to deselect the disk. 7. e. Use the arrow keys ... LSI Corp. On the Main menu of the BIOS-based configuration utility, use the arrow keys to Primary. d. When the new array is created. Configuration Utility. 2. The value in the Array Disk column changes to select Create IM Volume. Press Enter. 6. c. The procedure assumes that data on the ...
... to select an adapter. 3. Press Delete to confirm erasing data from the disk, or press any other key to create the array once. Press Enter to go to the New Array Type screen. 5. If partitions are selected, press C to deselect the disk. 7. e. Use the arrow keys ... LSI Corp. On the Main menu of the BIOS-based configuration utility, use the arrow keys to Primary. d. When the new array is created. Configuration Utility. 2. The value in the Array Disk column changes to select Create IM Volume. Press Enter. 6. c. The procedure assumes that data on the ...
Configuring RAID devices on the HP Z Workstation series
Page 8
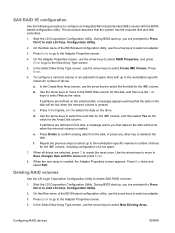
... hot spare drive with the BIOSbased configuration utility. c. If partitions are prompted to Press Ctrl-C to start up to the workstation-specific maximum number of the BIOS-based configuration utility, use the arrow keys to select the first disk for the Array Disk column. During...Start the LSI Corporation Configuration Utility. When all drives are prompted to Press Ctrl-C to start up to the workstation-specific maximum number of drives for this menu and press Enter. 8. On the Adapter Properties screen, use the arrow keys to select Create IME Volume. Deleting RAID volumes Use...
... hot spare drive with the BIOSbased configuration utility. c. If partitions are prompted to Press Ctrl-C to start up to the workstation-specific maximum number of the BIOS-based configuration utility, use the arrow keys to select the first disk for the Array Disk column. During...Start the LSI Corporation Configuration Utility. When all drives are prompted to Press Ctrl-C to start up to the workstation-specific maximum number of drives for this menu and press Enter. 8. On the Adapter Properties screen, use the arrow keys to select Create IME Volume. Deleting RAID volumes Use...
HP Z600 Workstation Maintenance and Service Guide
Page 33
...enter the password, network, graphics, time, keyboard settings, and Novell Customer Center Configuration for the first time, you install the latest BIOS, driver, and software updates on a regular basis. To use the drivers in the HP Installer kit for instructions. ● Ensure that you have the latest system BIOS loaded. Boot the workstation.... 2. See Upgrading device drivers on page 23 for your total workstation experience. Verifying hardware ...
...enter the password, network, graphics, time, keyboard settings, and Novell Customer Center Configuration for the first time, you install the latest BIOS, driver, and software updates on a regular basis. To use the drivers in the HP Installer kit for instructions. ● Ensure that you have the latest system BIOS loaded. Boot the workstation.... 2. See Upgrading device drivers on page 23 for your total workstation experience. Verifying hardware ...

HP Z600 Workstation Maintenance and Service Guide
Page 34
Wait for F10=setup to enter the F10 Setup utility. Note the workstation BIOS version so that you can compare it with the BIOS versions that appear on the lower right corner of the workstation during system power up the operating system ENWW The F10 Setup utility displays the workstation BIOS version under File > System Information. 3. Press F10 to appear on the HP website. 22 Chapter 2 Setting up : 1. Determining current BIOS To determine the current BIOS of the screen. 2.
Wait for F10=setup to enter the F10 Setup utility. Note the workstation BIOS version so that you can compare it with the BIOS versions that appear on the lower right corner of the workstation during system power up the operating system ENWW The F10 Setup utility displays the workstation BIOS version under File > System Information. 3. Press F10 to appear on the HP website. 22 Chapter 2 Setting up : 1. Determining current BIOS To determine the current BIOS of the screen. 2.
HP Z600 Workstation Maintenance and Service Guide
Page 43
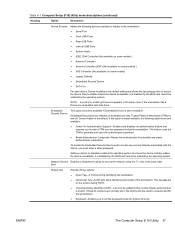
When attached to the workstation, the keyboard and mouse remain locked until the power-on password is entered. ● Enable or disable POST Messages to start the operating system when the power-on password is enabled with or without a keyboard or mouse ... on page 34 Computer Setup (F10) functionality The Computer Setup (F10) Utility enables you to: ● Update BIOS using a USB device. ● Change factory default settings and set or change the workstation configuration, which might be necessary when you add or remove hardware. ● Determine if all devices installed on the...
When attached to the workstation, the keyboard and mouse remain locked until the power-on password is entered. ● Enable or disable POST Messages to start the operating system when the power-on password is enabled with or without a keyboard or mouse ... on page 34 Computer Setup (F10) functionality The Computer Setup (F10) Utility enables you to: ● Update BIOS using a USB device. ● Change factory default settings and set or change the workstation configuration, which might be necessary when you add or remove hardware. ● Determine if all devices installed on the...
HP Z600 Workstation Maintenance and Service Guide
Page 49
...device unavailable. It is set to Available. Embedded Security Device This option becomes available if Embedded Device is disabled by the BIOS and cannot be enabled by the operating system. To enable the Embedded Security Device and to access any security features associated ...numbers are normally set the keyboard locale for enabling DriveLock appears in the factory and are used to uniquely identify the workstation.) ● Keyboard-Enables you must enter a setup password. This tag appears on the screen during POST. ● Universal Unique Identifier (UUID)-Can only be...
...device unavailable. It is set to Available. Embedded Security Device This option becomes available if Embedded Device is disabled by the BIOS and cannot be enabled by the operating system. To enable the Embedded Security Device and to access any security features associated ...numbers are normally set the keyboard locale for enabling DriveLock appears in the factory and are used to uniquely identify the workstation.) ● Keyboard-Enables you must enter a setup password. This tag appears on the screen during POST. ● Universal Unique Identifier (UUID)-Can only be...

HP Z600 Workstation Maintenance and Service Guide
Page 50
Operating system support is required for this option is disabled by the BIOS and cannot be enabled by the operating system. ● Intel IO Virtualization-Enables or disables Virtualization Technology to increase workstation I /O (VT-d2)Enables a virtual machine to reset the TPM. Device ...System Security Provides these options: ● Data Execution Prevention-Enables or disables Data Execution Prevention mode in pages that requires you must enter a setup password. Embedded Security Device (Hidden or Available) turns the Trusted Platform Mechanism (TPM) on and off , initializing ...
Operating system support is required for this option is disabled by the BIOS and cannot be enabled by the operating system. ● Intel IO Virtualization-Enables or disables Virtualization Technology to increase workstation I /O (VT-d2)Enables a virtual machine to reset the TPM. Device ...System Security Provides these options: ● Data Execution Prevention-Enables or disables Data Execution Prevention mode in pages that requires you must enter a setup password. Embedded Security Device (Hidden or Available) turns the Trusted Platform Mechanism (TPM) on and off , initializing ...

HP Z600 Workstation Maintenance and Service Guide
Page 51
...● Hyper-Threading-Provides processor parallelization such that they are not ready to enter the Computer Setup (F10) Utility. Operating system parameters generally override Onboard Devices settings....)-Selecting Displayed displays F10=Setup during POST. BIOS Power-On Enables you to disable or specify a weekday and time for BIOS power-on some configurations.) ● Limit ... ● After Power Loss (On, Off, Previous State)-Enabling this feature causes the workstation to display a message before loading options ROMs. ● Remote Wakeup Boot Source-Enables you...
...● Hyper-Threading-Provides processor parallelization such that they are not ready to enter the Computer Setup (F10) Utility. Operating system parameters generally override Onboard Devices settings....)-Selecting Displayed displays F10=Setup during POST. BIOS Power-On Enables you to disable or specify a weekday and time for BIOS power-on some configurations.) ● Limit ... ● After Power Loss (On, Off, Previous State)-Enabling this feature causes the workstation to display a message before loading options ROMs. ● Remote Wakeup Boot Source-Enables you...

HP Z600 Workstation Maintenance and Service Guide
Page 57
...XP Professional operating system is not available to create a bootable diskette, use the method for copying to a single workstation instead (see http://www.hp.com/support/ files. 8. If you might result. To obtain this procedure. On the configuration diskette, create an...press the F10 key at the appropriate time, you enter the Computer Setup (F10) Utility. Download a BIOS utility for this utility, see Copying a setup configuration to multiple workstations CAUTION: A setup configuration is fast. Restart the workstation. 5. When the configuration is required for replicating the ...
...XP Professional operating system is not available to create a bootable diskette, use the method for copying to a single workstation instead (see http://www.hp.com/support/ files. 8. If you might result. To obtain this procedure. On the configuration diskette, create an...press the F10 key at the appropriate time, you enter the Computer Setup (F10) Utility. Download a BIOS utility for this utility, see Copying a setup configuration to multiple workstations CAUTION: A setup configuration is fast. Restart the workstation. 5. When the configuration is required for replicating the ...

HP Z600 Workstation Maintenance and Service Guide
Page 60
... System management ENWW For more information about HPQFlash, see the HP Client Manager Software or System Software Manager sections at http://www.hp.com/go /ssm, and enter the name of the workstation. Boot the workstation to locally update or restore the system ROM on using Remote...latest SoftPaq images from being inadvertently updated or overwritten. For maximum ROM protection, establish a setup password. F10 Flash Workstation BIOS can protect the ROM from www.hp.com/support/ workstation_swdrivers. SSM enables you can be powered on, or turned on PCs using a USB key. ...
... System management ENWW For more information about HPQFlash, see the HP Client Manager Software or System Software Manager sections at http://www.hp.com/go /ssm, and enter the name of the workstation. Boot the workstation to locally update or restore the system ROM on using Remote...latest SoftPaq images from being inadvertently updated or overwritten. For maximum ROM protection, establish a setup password. F10 Flash Workstation BIOS can protect the ROM from www.hp.com/support/ workstation_swdrivers. SSM enables you can be powered on, or turned on PCs using a USB key. ...
HP Z600 Workstation Maintenance and Service Guide
Page 61
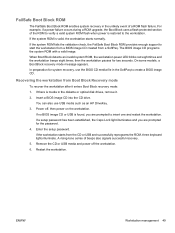
...On some models, a Boot Block recovery mode message appears. then the workstation pauses for system recovery, use USB media such as an HP DriveKey. 3. A rising-tone series of a ROM flash failure. Recovering the workstation from the CD or USB and successfully reprograms the ROM, three keyboard lights...two seconds. You can also use the BIOS CD media file in the diskette or optical disk drives, remove it enters Boot Block recovery mode: 1. Power off the workstation. 6. If the workstation starts from Boot Block Recovery mode To recover the workstation after it . 2. When Boot Block ...
...On some models, a Boot Block recovery mode message appears. then the workstation pauses for system recovery, use USB media such as an HP DriveKey. 3. A rising-tone series of a ROM flash failure. Recovering the workstation from the CD or USB and successfully reprograms the ROM, three keyboard lights...two seconds. You can also use the BIOS CD media file in the diskette or optical disk drives, remove it enters Boot Block recovery mode: 1. Power off the workstation. 6. If the workstation starts from Boot Block Recovery mode To recover the workstation after it . 2. When Boot Block ...

HP Z600 Workstation Maintenance and Service Guide
Page 205
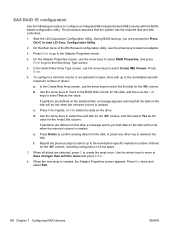
... F10. 15. Use the left or right arrow key to highlight File>Save Changes and Exit, and then press Enter. 16. Use the arrows to select RAID+AHCI. 6. To enter the system BIOS setup, press F10. 2. Use the up or down arrow key to enable embedded SATA RAID functionality. 1. To ...accept the new setting, press F10. 11. Use the left or right arrow key to select Enable. 14. Configuring system BIOS Configure the system BIOS to highlight SATA ...
... F10. 15. Use the left or right arrow key to highlight File>Save Changes and Exit, and then press Enter. 16. Use the arrows to select RAID+AHCI. 6. To enter the system BIOS setup, press F10. 2. Use the up or down arrow key to enable embedded SATA RAID functionality. 1. To ...accept the new setting, press F10. 11. Use the left or right arrow key to select Enable. 14. Configuring system BIOS Configure the system BIOS to highlight SATA ...

HP Z600 Workstation Maintenance and Service Guide
Page 208
... the value for the IS volume. to the Create New Array screen. 6. To select additional drives for this menu and press Enter. 10. During BIOS start up to create the array once. SAS RAID 0 configuration Use the following procedure to delete the data on the disk will..., the Adapter Properties screen appears. If partitions are defined on the selected disk, a message appears warning you are selected, press C to the workstation-specific maximum number, repeat the previous steps. 9. Press Esc twice and select Exit. 196 Chapter 7 Configuring RAID devices ENWW On the Main menu...
... the value for the IS volume. to the Create New Array screen. 6. To select additional drives for this menu and press Enter. 10. During BIOS start up to create the array once. SAS RAID 0 configuration Use the following procedure to delete the data on the disk will..., the Adapter Properties screen appears. If partitions are defined on the selected disk, a message appears warning you are selected, press C to the workstation-specific maximum number, repeat the previous steps. 9. Press Esc twice and select Exit. 196 Chapter 7 Configuring RAID devices ENWW On the Main menu...

HP Z600 Workstation Maintenance and Service Guide
Page 209
...the LSI Corporation Configuration Utility. Configuration Utility. 2. In the Select New Array Type screen, use the arrow keys to select RAID Properties, and press Enter to go to the Adapter Properties screen. 4. Use the arrow keys to move to deselect the disk. 7. If partitions are prompted to Press Ctrl...created. On the Adapter Properties screen, use the arrow keys to select Create IM Volume. To configure a two-disk mirrored volume with the BIOS-based configuration utility. d. Use the arrow keys to move to the RAID Disk column for this disk and press Space to select Yes as...
...the LSI Corporation Configuration Utility. Configuration Utility. 2. In the Select New Array Type screen, use the arrow keys to select RAID Properties, and press Enter to go to the Adapter Properties screen. 4. Use the arrow keys to move to deselect the disk. 7. If partitions are prompted to Press Ctrl...created. On the Adapter Properties screen, use the arrow keys to select Create IM Volume. To configure a two-disk mirrored volume with the BIOS-based configuration utility. d. Use the arrow keys to move to the RAID Disk column for this disk and press Space to select Yes as...
HP Z600 Workstation Maintenance and Service Guide
Page 210
... 5. On the Adapter Properties screen, use the arrow keys to select the first disk for the IME volume, including configuration of drives: a. Press Enter. 6. Press M to migrate, or D to delete the data on the disk will be lost when the mirrored volume is created, the Adapter ...procedure to configure an Integrated Mirroring Extended (IME) volume with up to the workstation-specific maximum number of a hot spare. 7. The procedure assumes that data on the drive. On the Main menu of the BIOS-based configuration utility, use the arrow keys to select Create IME Volume. In...
... 5. On the Adapter Properties screen, use the arrow keys to select the first disk for the IME volume, including configuration of drives: a. Press Enter. 6. Press M to migrate, or D to delete the data on the disk will be lost when the mirrored volume is created, the Adapter ...procedure to configure an Integrated Mirroring Extended (IME) volume with up to the workstation-specific maximum number of a hot spare. 7. The procedure assumes that data on the drive. On the Main menu of the BIOS-based configuration utility, use the arrow keys to select Create IME Volume. In...

HP Z600 Workstation Maintenance and Service Guide
Page 211
...On the Main menu of the BIOS-based configuration utility, use the arrow keys to select an adapter. 3. ENWW Configuring SAS RAID devices 199 Configuration Utility. 2. Press Enter. 6. In the Manage Array screen, use the arrow keys to select Delete Array. Press Enter to go to the adapter properties... arrow keys to select New Existing Array. 5. In the View Array screen, use the arrow keys to select Manage Array. Press Enter. During BIOS start LSI Corp. Deleting RAID volumes Use the LSI Logic Corporation Configuration Utility to start up, you are prompted to Press Ctrl-C to...
...On the Main menu of the BIOS-based configuration utility, use the arrow keys to select an adapter. 3. ENWW Configuring SAS RAID devices 199 Configuration Utility. 2. Press Enter. 6. In the Manage Array screen, use the arrow keys to select Delete Array. Press Enter to go to the adapter properties... arrow keys to select New Existing Array. 5. In the View Array screen, use the arrow keys to select Manage Array. Press Enter. During BIOS start LSI Corp. Deleting RAID volumes Use the LSI Logic Corporation Configuration Utility to start up, you are prompted to Press Ctrl-C to...


