HP xw Workstation series Setup and Troubleshooting Guide
Page 50
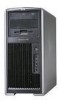
...system. To prevent damage, disconnect the workstation power cord before you remove a component. 1. The problem might be on clearing CMOS. 2. CAUTION: Internal components might be powered even when the system is off . Contact HP for assistance. 44 Chapter 5 Troubleshooting ENWW...at a time to video). The problem might be on workstation series and model. 2. Pre-video graphics error. c. To prevent damage, disconnect the workstation power cord before you remove a component. 1. Contact HP for assistance. Table 5-3 Diagnostic lights and audible codes (...
...system. To prevent damage, disconnect the workstation power cord before you remove a component. 1. The problem might be on clearing CMOS. 2. CAUTION: Internal components might be powered even when the system is off . Contact HP for assistance. 44 Chapter 5 Troubleshooting ENWW...at a time to video). The problem might be on workstation series and model. 2. Pre-video graphics error. c. To prevent damage, disconnect the workstation power cord before you remove a component. 1. Contact HP for assistance. Table 5-3 Diagnostic lights and audible codes (...
HP xw Workstation series Setup and Troubleshooting Guide
Page 51
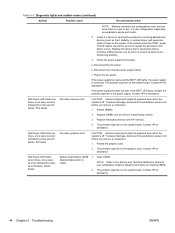
..., disconnect the workstation power cord before you remove a component. Clear CMOS. The problem might be on the system board. Contact HP for assistance. Contact HP for assistance. System unable to the system board. 4. To resolve the problem, choose one at http://www.hp.com/support/workstation_manuals...second pause. The problem might be in the AC power. b. The problem might be on clearing CMOS. 2. NOTE: Refer to the Service and Technical Reference Guide for your workstation model for its use, that unit is functional. Upgrade the ROM using SoftPaq, either from your ROM...
..., disconnect the workstation power cord before you remove a component. Clear CMOS. The problem might be on the system board. Contact HP for assistance. Contact HP for assistance. System unable to the system board. 4. To resolve the problem, choose one at http://www.hp.com/support/workstation_manuals...second pause. The problem might be in the AC power. b. The problem might be on clearing CMOS. 2. NOTE: Refer to the Service and Technical Reference Guide for your workstation model for its use, that unit is functional. Upgrade the ROM using SoftPaq, either from your ROM...
HP xw9300 Service and Technical Reference Guide
Page 46
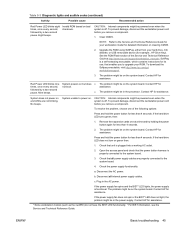
...option restores the original factory system defaults. Using Computer Setup (F10) You can only open Computer Setup by turning on or restart the workstation. 2. NOTE: f you do not want , then press Enter. 5. Use the arrow (up and down) keys to access ...made changes that you do not press the F10 key at the appropriate time, you must restart the workstation and press and hold the F10 key again to select the option you exit the F10 Setup screen, it is ... displayed: File, Storage, Security, and Advanced. 4. Select your Computer Setup F10 changes because the CMOS could become corrupted.
...option restores the original factory system defaults. Using Computer Setup (F10) You can only open Computer Setup by turning on or restart the workstation. 2. NOTE: f you do not want , then press Enter. 5. Use the arrow (up and down) keys to access ...made changes that you do not press the F10 key at the appropriate time, you must restart the workstation and press and hold the F10 key again to select the option you exit the F10 Setup screen, it is ... displayed: File, Storage, Security, and Advanced. 4. Select your Computer Setup F10 changes because the CMOS could become corrupted.
HP xw9300 Service and Technical Reference Guide
Page 69
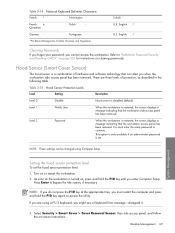
... removed. If you are three levels of hardware and software technology that can be changed using a PS/2 keyboard, you cannot access the workstation. Portuguese - *For Bosnia-Herzegovina, Croatia, Slovenia, and Yugoslavia Turkish . English / Clearing Passwords If you forget your password, you might... Level 0 Disable Hood sensor is restarted, the screen displays a message indicating that the workstation side access panel has been removed. Press Enter to "Additional Password Security and Resetting CMOS" on page 203 for instructions on , press and hold the F10 key again to ...
... removed. If you are three levels of hardware and software technology that can be changed using a PS/2 keyboard, you cannot access the workstation. Portuguese - *For Bosnia-Herzegovina, Croatia, Slovenia, and Yugoslavia Turkish . English / Clearing Passwords If you forget your password, you might... Level 0 Disable Hood sensor is restarted, the screen displays a message indicating that the workstation side access panel has been removed. Press Enter to "Additional Password Security and Resetting CMOS" on page 203 for instructions on , press and hold the F10 key again to ...
HP xw9300 Service and Technical Reference Guide
Page 80
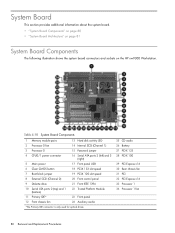
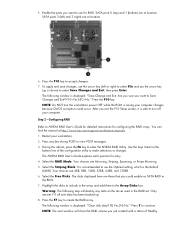
... 80 • "System Board Architecture" on page 81 System Board Components The following illustration shows the system board connectors and sockets on the HP xw9300 Workstation. Table 4-18 System Board Components 1 Memory module pairs 13 Hard disk activity LED 2 Processor 0 fan 14 Internal SCSI (Channel 1) 3... 15 Password jumper 4 CPU0/1 power connector 16 Serial ATA ports 2 (left) and 3 (right) 5 Main power 17 Front panel USB 6 Clear CMOS button 18 PCI-X 133 slot speed 7 Boot block jumper 19 PCI-X 100 slot speed 8 External SCSI (Channel 0) 20 Front control panel 9 Diskette ...
... 80 • "System Board Architecture" on page 81 System Board Components The following illustration shows the system board connectors and sockets on the HP xw9300 Workstation. Table 4-18 System Board Components 1 Memory module pairs 13 Hard disk activity LED 2 Processor 0 fan 14 Internal SCSI (Channel 1) 3... 15 Password jumper 4 CPU0/1 power connector 16 Serial ATA ports 2 (left) and 3 (right) 5 Main power 17 Front panel USB 6 Clear CMOS button 18 PCI-X 133 slot speed 7 Boot block jumper 19 PCI-X 100 slot speed 8 External SCSI (Channel 0) 20 Front control panel 9 Diskette ...
HP xw9300 Service and Technical Reference Guide
Page 165
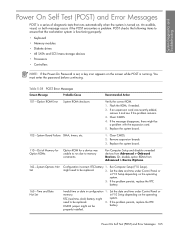
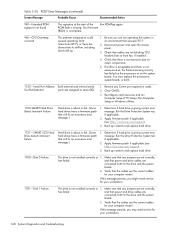
... devices from Advanced > Device Options. 162-System Options Not Set Configuration incorrect. If the problem persists, replace the RTC CMOS jumper might need to be battery. properly installed. Table 5-38 POST Error Messages Screen Message Probable Cause Recommended Action 101-...screen while POST is running. in configuration 1. If the message disappears, there might system. Clear CMOS. 4. Replace the system board. 110-Out of diagnostic tests that the workstation system is functioning properly: • Keyboard • Memory modules • Diskette drives •...
... devices from Advanced > Device Options. 162-System Options Not Set Configuration incorrect. If the problem persists, replace the RTC CMOS jumper might need to be battery. properly installed. Table 5-38 POST Error Messages Screen Message Probable Cause Recommended Action 101-...screen while POST is running. in configuration 1. If the message disappears, there might system. Clear CMOS. 4. Replace the system board. 110-Out of diagnostic tests that the workstation system is functioning properly: • Keyboard • Memory modules • Diskette drives •...
HP xw9300 Service and Technical Reference Guide
Page 167
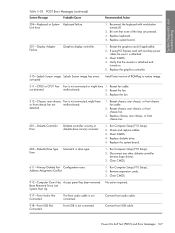
Reconnect the keyboard with auxiliary power cable, be sure it is not connected. If using PCI Express card with workstation turned off. 2. Replace the graphics controller. 510-Splash Screen image Splash Screen image has errors. Replace the fan. 512-Chassis, ...chassis, Fan is not connected or might have 1. Run Computer Setup (F10 Setup). 2. Disconnect any other diskette controller devices (tape drives). 3. Clear CMOS. 912-Computer Cover Has Access panel has been removed. Connect front USB cable. Power On Self Test (POST) and Error Messages 167 Replace keyboard. 4....
Reconnect the keyboard with auxiliary power cable, be sure it is not connected. If using PCI Express card with workstation turned off. 2. Replace the graphics controller. 510-Splash Screen image Splash Screen image has errors. Replace the fan. 512-Chassis, ...chassis, Fan is not connected or might have 1. Run Computer Setup (F10 Setup). 2. Disconnect any other diskette controller devices (tape drives). 3. Clear CMOS. 912-Computer Cover Has Access panel has been removed. Connect front USB cable. Power On Self Test (POST) and Error Messages 167 Replace keyboard. 4....
HP xw9300 Service and Technical Reference Guide
Page 168
...176;F. 2. Apply firmware patch if applicable (see http://www.hp.com/support). 3. Apply firmware patch if applicable (see http://www.hp.com/support). 3. Make sure that any jumpers are not... access panel. 3. If airflow is acceptable and there is giving correct error message. Clear CMOS. 3. Determine if hard drive is not excessive dust, the thermal sensing circuitry has failed ... persists, you might need service for your workstation. 168 System Diagnostics and Troubleshooting If this message persists, you may need service for your workstation. 1781-Disk 1 Failure The drive is...
...176;F. 2. Apply firmware patch if applicable (see http://www.hp.com/support). 3. Apply firmware patch if applicable (see http://www.hp.com/support). 3. Make sure that any jumpers are not... access panel. 3. If airflow is acceptable and there is giving correct error message. Clear CMOS. 3. Determine if hard drive is not excessive dust, the thermal sensing circuitry has failed ... persists, you might need service for your workstation. 168 System Diagnostics and Troubleshooting If this message persists, you may need service for your workstation. 1781-Disk 1 Failure The drive is...

HP xw9300 Service and Technical Reference Guide
Page 169
Clear CMOS. 3. Replace the hard drive. 8. If this message persists, you might need service for your workstation. 1791-Disk 1 Error The drive is not installed correctly or 1. Verify that the cables are the correct cables for your computer... Options and SATA controller is not installed correctly or 1. Run hard drive diagnostics. 5. If this message persists, you might need service for your workstation. 1792-Secondary Disk Controller Failure Hard drive circuitry error. 1. Run Computer Setup (F10 Setup). Check cable seating/jumper settings. 4. Run the Drive...
Clear CMOS. 3. Replace the hard drive. 8. If this message persists, you might need service for your workstation. 1791-Disk 1 Error The drive is not installed correctly or 1. Verify that the cables are the correct cables for your computer... Options and SATA controller is not installed correctly or 1. Run hard drive diagnostics. 5. If this message persists, you might need service for your workstation. 1792-Secondary Disk Controller Failure Hard drive circuitry error. 1. Run Computer Setup (F10 Setup). Check cable seating/jumper settings. 4. Run the Drive...
HP xw9300 Service and Technical Reference Guide
Page 203
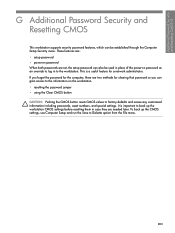
... that password so you can gain access to the information on the workstation. • resetting the password jumper • using the Clear CMOS button CAUTION: Pushing the CMOS button resets CMOS values to factory defaults and erases any customized information including passwords, asset...through the Computer Setup Security menu. To back up the workstation CMOS settings before resetting them in to the workstation. Additional Password Security and Resetting CMOS G G Additional Password Security and Resetting CMOS This workstation supports security password features, which can be used in ...
... that password so you can gain access to the information on the workstation. • resetting the password jumper • using the Clear CMOS button CAUTION: Pushing the CMOS button resets CMOS values to factory defaults and erases any customized information including passwords, asset...through the Computer Setup Security menu. To back up the workstation CMOS settings before resetting them in to the workstation. Additional Password Security and Resetting CMOS G G Additional Password Security and Resetting CMOS This workstation supports security password features, which can be used in ...
HP xw9300 Service and Technical Reference Guide
Page 204
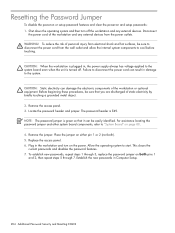
...unit is E49. This clears the current passwords and disables the password features. 7. To reduce the risk of the workstation and any external devices. CAUTION: Static electricity can result in , the power supply always has voltage applied to "System... passwords, repeat steps 1 through 7. NOTE: The password jumper is green so that you are discharged of the workstation or optional equipment. Before beginning these procedures, be sure that it can be sure to the system. Allow the... the jumper. Plug in Computer Setup. 204 Additional Password Security and Resetting CMOS
...unit is E49. This clears the current passwords and disables the password features. 7. To reduce the risk of the workstation and any external devices. CAUTION: Static electricity can result in , the power supply always has voltage applied to "System... passwords, repeat steps 1 through 7. NOTE: The password jumper is green so that you are discharged of the workstation or optional equipment. Before beginning these procedures, be sure that it can be sure to the system. Allow the... the jumper. Plug in Computer Setup. 204 Additional Password Security and Resetting CMOS
HP xw9300 Service and Technical Reference Guide
Page 205
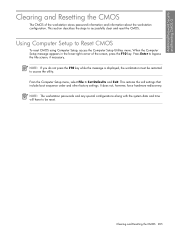
...reset. Using Computer Setup to bypass the title screen, if necessary. Press Enter to Reset CMOS To reset CMOS using Computer Setup, access the Computer Setup Utilities menu. NOTE: The workstation passwords and any special configurations along with the system date and time will have to be ...restarted to successfully clear and reset the CMOS. When the Computer Setup message appears in the lower-right corner of the workstation stores password information and ...
...reset. Using Computer Setup to bypass the title screen, if necessary. Press Enter to Reset CMOS To reset CMOS using Computer Setup, access the Computer Setup Utilities menu. NOTE: The workstation passwords and any special configurations along with the system date and time will have to be ...restarted to successfully clear and reset the CMOS. When the Computer Setup message appears in the lower-right corner of the workstation stores password information and ...

HP xw9300 Service and Technical Reference Guide
Page 206
... 5. Before beginning these procedures, be reset. 206 Additional Password Security and Resetting CMOS To reduce the risk of the workstation and any external devices. Remove the access panel. 3. It is turned off the workstation and any external devices from the File menu. 1. CAUTION: Static electricity can result... and other system board components, refer to Diskette option from the power outlets. To back up the workstation CMOS settings before touching. Failure to disconnect the power cord can damage the electronic components of static electricity by briefly touching a...
... 5. Before beginning these procedures, be reset. 206 Additional Password Security and Resetting CMOS To reduce the risk of the workstation and any external devices. Remove the access panel. 3. It is turned off the workstation and any external devices from the File menu. 1. CAUTION: Static electricity can result... and other system board components, refer to Diskette option from the power outlets. To back up the workstation CMOS settings before touching. Failure to disconnect the power cord can damage the electronic components of static electricity by briefly touching a...
HP xw9300 Service and Technical Reference Guide
Page 227
... chain termination, SCSI 172 changing password 67 cleaning keyboard 199 monitor 200 mouse 201 clearing password 69 cloning tools, software 55 CMOS button 206 clearing and resetting 205 components exploded view 18 front panel 19 rear panel 20 computer pauses 142 Computer Setup (F10...and removing 89 front panel, troubleshooting 155 G graphics adapter location 20 graphics card power specifications 31 grounding methods 76 H handling the workstation 77 hard drive activity light 19 diagnostic tool 71 installing and removing 111 proper handling 77 SCSI drives 172 troubleshooting 148 hardware removal ...
... chain termination, SCSI 172 changing password 67 cleaning keyboard 199 monitor 200 mouse 201 clearing password 69 cloning tools, software 55 CMOS button 206 clearing and resetting 205 components exploded view 18 front panel 19 rear panel 20 computer pauses 142 Computer Setup (F10...and removing 89 front panel, troubleshooting 155 G graphics adapter location 20 graphics card power specifications 31 grounding methods 76 H handling the workstation 77 hard drive activity light 19 diagnostic tool 71 installing and removing 111 proper handling 77 SCSI drives 172 troubleshooting 148 hardware removal ...
HP User Manual for the Integrated NVIDIA SATA RAID Array for Microsoft Windows XP Professional
Page 3
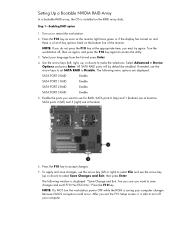
...array. The disks displayed here are those that you exit the F10 Setup screen, it is saving your workstation. 2. NOTE: The next window will destroy any key during POST to use the Optimal setting, which ...Array Disks box. Step 2-Configuring RAID Refer to continue. Restart your computer changes because CMOS corruption could enable as SATA RAID in the array and add them to use for RAID. Your choices ...are at http://www.hp.com/support/workstation_manuals. 1. Press the F7 key to create the RAID array. SATA ports 2...
...array. The disks displayed here are those that you exit the F10 Setup screen, it is saving your workstation. 2. NOTE: The next window will destroy any key during POST to use the Optimal setting, which ...Array Disks box. Step 2-Configuring RAID Refer to continue. Restart your computer changes because CMOS corruption could enable as SATA RAID in the array and add them to use for RAID. Your choices ...are at http://www.hp.com/support/workstation_manuals. 1. Press the F7 key to create the RAID array. SATA ports 2...
HP User Manual for the Integrated NVIDIA SATA RAID Array for Microsoft Windows XP Professional
Page 5
...installed on the RAID array disks. Press the F10 key. Turn on again, and press the F10 key again to use for RAID. Turn the workstation off your computer. All SATA RAID ports will by default be enabled. If needed, use the arrow key (up , or down ) to turn ...: If you do not press the F10 key at location . 6. Select your computer changes because CMOS corruption could occur. Enable the ports you must try again. NOTE: Do NOT turn off , then on or restart the workstation. 2. After you want to access the utility. 3. Select Advanced > Device Options and press Enter. ...
...installed on the RAID array disks. Press the F10 key. Turn on again, and press the F10 key again to use for RAID. Turn the workstation off your computer. All SATA RAID ports will by default be enabled. If needed, use the arrow key (up , or down ) to turn ...: If you do not press the F10 key at location . 6. Select your computer changes because CMOS corruption could occur. Enable the ports you must try again. NOTE: Do NOT turn off , then on or restart the workstation. 2. After you want to access the utility. 3. Select Advanced > Device Options and press Enter. ...

Setup and Troubleshooting Guide
Page 25
.... Pre-video graphics error. To prevent damage, disconnect the workstation power cord before you remove a component. 1. Reseat the graphics card. 2. The problem may be on the graphics card. Seven beeps. Clear CMOS. Contact HP for assistance. Invalid ROM based on but does 1. CAUTION Internal...second pause. Red Power LED blinks five times, once every second, followed by a two-second pause. Contact HP for assistance. To prevent damage, disconnect the workstation power cord before you to video). 2. The problem may be on the system board. To prevent damage, ...
.... Pre-video graphics error. To prevent damage, disconnect the workstation power cord before you remove a component. 1. Reseat the graphics card. 2. The problem may be on the graphics card. Seven beeps. Clear CMOS. Contact HP for assistance. Invalid ROM based on but does 1. CAUTION Internal...second pause. Red Power LED blinks five times, once every second, followed by a two-second pause. Contact HP for assistance. To prevent damage, disconnect the workstation power cord before you to video). 2. The problem may be on the system board. To prevent damage, ...


