Hardware Support Matrix for Linux
Page 21
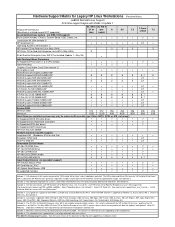
...are compatible with RHEL 3 Update 1 Product Items/Features (Blank box or unlisted means NOT supported) hp workstation base system (no IEEE-1394 support) Base system includes: Chassis, System Board, USB, Cables, etc. footnote 8 - OS references in conjuction with new systems. This Month's Change Log: No... FX3000 256MB AGP • • • • • NVIDIA Quadro FX1100 128MB AGP • • • • • System RAM Minimum (MB) 512 512 256 256 256 Maximum 12GB 12GB 8GB 8GB 8GB Hard Disks (pre-installed systems may only be ordered with the...
...are compatible with RHEL 3 Update 1 Product Items/Features (Blank box or unlisted means NOT supported) hp workstation base system (no IEEE-1394 support) Base system includes: Chassis, System Board, USB, Cables, etc. footnote 8 - OS references in conjuction with new systems. This Month's Change Log: No... FX3000 256MB AGP • • • • • NVIDIA Quadro FX1100 128MB AGP • • • • • System RAM Minimum (MB) 512 512 256 256 256 Maximum 12GB 12GB 8GB 8GB 8GB Hard Disks (pre-installed systems may only be ordered with the...

Hardware Support Matrix for Linux
Page 22
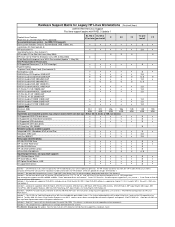
...• NVIDIA Quadro FX1100 128MB AGP • • • • System RAM Minimum (MB) 512 512 256 256 Maximum 8GB 8GB 8GB 8GB Hard Disks (pre-...is a reference for users upgrading system components. Hardware Support Matrix for Legacy HP Linux Workstations (Pentium4/Xeon) xw6000 Red Hat Linux Support First time support begins with ...Cables, etc. • • • • Localization Kit (See footnote 5) HP localization kit • • • • Operating Systems (See footnote 1) HP Installer CD for Red Hat Linux (May 2004) 3 3 HP...
...• NVIDIA Quadro FX1100 128MB AGP • • • • System RAM Minimum (MB) 512 512 256 256 Maximum 8GB 8GB 8GB 8GB Hard Disks (pre-...is a reference for users upgrading system components. Hardware Support Matrix for Legacy HP Linux Workstations (Pentium4/Xeon) xw6000 Red Hat Linux Support First time support begins with ...Cables, etc. • • • • Localization Kit (See footnote 5) HP localization kit • • • • Operating Systems (See footnote 1) HP Installer CD for Red Hat Linux (May 2004) 3 3 HP...
Hardware Support Matrix for Linux
Page 23
...Cables, etc. • • • • Localization Kit (See footnote 5) HP localization kit • • • • Operating Systems (See footnote 1) HP Installer CD for Red Hat Linux (May 2004) 3 3 HP Driver CD for users upgrading system components. See www.hp...driver. Check for Red Hat Enterprise Linux 3" ISO images from http://www.hp.com/workstations/ia32/options/software.html footnote 8 - footnote 7 - Red Hat 7.3...Quadro FX1100 128MB AGP • • • • System RAM Minimum (MB) 512 512 256 256 Maximum 4GB 4GB 4GB 4GB Hard...
...Cables, etc. • • • • Localization Kit (See footnote 5) HP localization kit • • • • Operating Systems (See footnote 1) HP Installer CD for Red Hat Linux (May 2004) 3 3 HP Driver CD for users upgrading system components. See www.hp...driver. Check for Red Hat Enterprise Linux 3" ISO images from http://www.hp.com/workstations/ia32/options/software.html footnote 8 - footnote 7 - Red Hat 7.3...Quadro FX1100 128MB AGP • • • • System RAM Minimum (MB) 512 512 256 256 Maximum 4GB 4GB 4GB 4GB Hard...
HP Workstations - Installing a Hood Lock (Smart Cover Lock) and Hood Sensor
Page 2
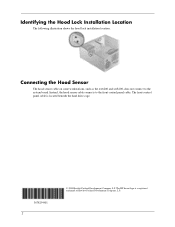
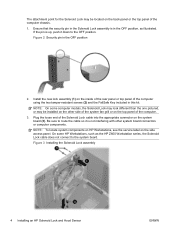
Connecting the Hood Sensor The hood sensor cable on some workstations, such as the xw6200 and xw8200, does not connect to the front control panel cable. The front control panel cable is a registered trademark of Hewlett-Packard Development Company, L.P. The HP Invent logo is located beneath the hard drive cage. 367829-001 2 © 2004 Hewlett-Packard Development Company, L.P. Instead, the hood sensor cable connects to the system board. Identifying the Hood Lock Installation Location The following illustration shows the hood lock installation location.
Connecting the Hood Sensor The hood sensor cable on some workstations, such as the xw6200 and xw8200, does not connect to the front control panel cable. The front control panel cable is a registered trademark of Hewlett-Packard Development Company, L.P. The HP Invent logo is located beneath the hard drive cage. 367829-001 2 © 2004 Hewlett-Packard Development Company, L.P. Instead, the hood sensor cable connects to the system board. Identifying the Hood Lock Installation Location The following illustration shows the hood lock installation location.

HP xw Workstation series - CRU Dataport DX115 kit installation
Page 1
...that the following components are U.S. Printed in your workstation. registered trademarks of Hewlett-Packard Development Company, L.P. The HP Invent logo is a registered trademark of Microsoft Corporation. Introduction 1 Microsoft and Windows are included in your workstation. CRU Dataport DX115 kit installation Introduction This document ...9679; Warranty ● DX115 unit (case and drive carrier) ● Installation document ● SATA or SAS cable ● Five M3 screws ● Five 6-32 screw ● Tape label ENWW © 2008 Hewlett-Packard Development Company, L.P.
...that the following components are U.S. Printed in your workstation. registered trademarks of Hewlett-Packard Development Company, L.P. The HP Invent logo is a registered trademark of Microsoft Corporation. Introduction 1 Microsoft and Windows are included in your workstation. CRU Dataport DX115 kit installation Introduction This document ...9679; Warranty ● DX115 unit (case and drive carrier) ● Installation document ● SATA or SAS cable ● Five M3 screws ● Five 6-32 screw ● Tape label ENWW © 2008 Hewlett-Packard Development Company, L.P.

HP xw Workstation series - CRU Dataport DX115 kit installation
Page 7
...for operation, refer to the appropriate hard drive documentation. 4. After the drive is installed in the case. Connect the power (1) and data (2) cables to lock the carrier if shipping the unit (3). 2. If shipping the unit, use the key (2) to the primary (upper) ports on the... unit. 3. ENWW Step 4-Completing the workstation assembly 7 To prepare your installed hard drive for inserting or removing the carrier (with a disk drive) only when the workstation is shut down. Other procedures may result in the previous steps. Microsoft Windows...
...for operation, refer to the appropriate hard drive documentation. 4. After the drive is installed in the case. Connect the power (1) and data (2) cables to lock the carrier if shipping the unit (3). 2. If shipping the unit, use the key (2) to the primary (upper) ports on the... unit. 3. ENWW Step 4-Completing the workstation assembly 7 To prepare your installed hard drive for inserting or removing the carrier (with a disk drive) only when the workstation is shut down. Other procedures may result in the previous steps. Microsoft Windows...

Creative Sound Blaster X-Fi - Quick Start Guide
Page 1
... Blaster X-Fi audio card ■ Support arm ■ Front audio adapter cable (for HP Workstation ■ Installation and Application CD xw6 or xw8 series systems, see the system requirements section) ■ Cable clip ■ Regulatory compliance notices ■ Warranty information System Requirements ■ HP Workstation xw series (except xw3100) ■ Microsoft Windows XP Service Pack 1 (SP1...
... Blaster X-Fi audio card ■ Support arm ■ Front audio adapter cable (for HP Workstation ■ Installation and Application CD xw6 or xw8 series systems, see the system requirements section) ■ Cable clip ■ Regulatory compliance notices ■ Warranty information System Requirements ■ HP Workstation xw series (except xw3100) ■ Microsoft Windows XP Service Pack 1 (SP1...
HP xw Workstation series Setup and Troubleshooting Guide
Page 14
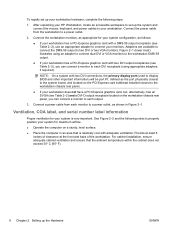
...HP Workstation, locate an accessible workspace to set up your system is relatively cool with adequate ventilation. defined as shown in an area that the ambient temperature within the cabinet does not exceed 35o C (95o F). 8 Chapter 2 Setting up the system and connect the mouse, keyboard, and power cables... DVI-D output receptacle located on a sturdy, level surface. ● Place the computer in Figure 2-1. Connect a power cable from the workstation to display BIOS and other important information) will be port #1; Ventilation, COA label, and serial number label information Proper ...
...HP Workstation, locate an accessible workspace to set up your system is relatively cool with adequate ventilation. defined as shown in an area that the ambient temperature within the cabinet does not exceed 35o C (95o F). 8 Chapter 2 Setting up the system and connect the mouse, keyboard, and power cables... DVI-D output receptacle located on a sturdy, level surface. ● Place the computer in Figure 2-1. Connect a power cable from the workstation to display BIOS and other important information) will be port #1; Ventilation, COA label, and serial number label information Proper ...
HP xw Workstation series Setup and Troubleshooting Guide
Page 18
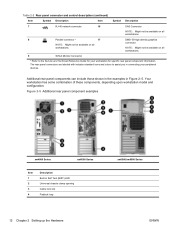
...Test (BIST) LED Universal chassis clamp opening Cable lock slot Padlock loop xw8000/xw9000 Series 12 Chapter 2 Setting up the Hardware ENWW NOTE: Might not be available on all connector workstations. Your workstation has some combination of these components, depending upon workstation model and configuration. The rear panel connectors ...) Item Symbol Description Item Symbol Description 7 RJ-45 network connector 16 SAS Connector NOTE: Might not be available on all workstations. 8 Parallel connector * 17 DMS-59 high density graphics NOTE: Might not be available on all...
...Test (BIST) LED Universal chassis clamp opening Cable lock slot Padlock loop xw8000/xw9000 Series 12 Chapter 2 Setting up the Hardware ENWW NOTE: Might not be available on all connector workstations. Your workstation has some combination of these components, depending upon workstation model and configuration. The rear panel connectors ...) Item Symbol Description Item Symbol Description 7 RJ-45 network connector 16 SAS Connector NOTE: Might not be available on all workstations. 8 Parallel connector * 17 DMS-59 high density graphics NOTE: Might not be available on all...
HP xw Workstation series Setup and Troubleshooting Guide
Page 44
...place. At startup ● Verify that the workstation and monitor are plugged into a working electrical outlet. ● Remove all diskettes from your workstation, monitor, or software, the following provides a list of general suggestions that all cables for product changes occurring within a 30-60 day... play expansion board or other option. You can select the default VGA source in again. During operation ● Look for example, HP Workstation xw6000), select See more... 4. For example, if you have installed an operating system other monitor connectors are error codes that the...
...place. At startup ● Verify that the workstation and monitor are plugged into a working electrical outlet. ● Remove all diskettes from your workstation, monitor, or software, the following provides a list of general suggestions that all cables for product changes occurring within a 30-60 day... play expansion board or other option. You can select the default VGA source in again. During operation ● Look for example, HP Workstation xw6000), select See more... 4. For example, if you have installed an operating system other monitor connectors are error codes that the...

HP xw Workstation series Setup and Troubleshooting Guide
Page 45
...or the documentation that you know is working on a network, plug another workstation with the network plug or cable. ● If you recently added new hardware, remove the hardware and verify if the workstation functions properly. ● If you recently installed new software, uninstall the ... is available at http://www.hp.com/support/workstation_manuals. Power-On Self Test error messages The POST is a series of the BIOS might have been released that you might be a problem with a different cable into a different video port on the workstation if one is available. POST...
...or the documentation that you know is working on a network, plug another workstation with the network plug or cable. ● If you recently added new hardware, remove the hardware and verify if the workstation functions properly. ● If you recently installed new software, uninstall the ... is available at http://www.hp.com/support/workstation_manuals. Power-On Self Test error messages The POST is a series of the BIOS might have been released that you might be a problem with a different cable into a different video port on the workstation if one is available. POST...
HP xw Workstation series Setup and Troubleshooting Guide
Page 47
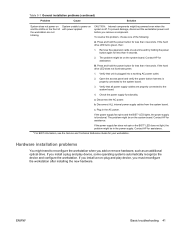
... HP for less than 4 seconds. Press and hold the power button for assistance. Remove the expansion cards one of the workstation are properly connected to reconfigure the workstation when you must reconfigure the workstation after installing the new hardware. Verify that all power supply cables...you install a non-plug and play device, some operating systems automatically recognize the device and configure the workstation. System unable to the system board. 3. Contact HP for less than 4 seconds. 2. Hardware installation problems You might be in the AC power. ENWW ...
... HP for less than 4 seconds. Press and hold the power button for assistance. Remove the expansion cards one of the workstation are properly connected to reconfigure the workstation when you must reconfigure the workstation after installing the new hardware. Verify that all power supply cables...you install a non-plug and play device, some operating systems automatically recognize the device and configure the workstation. System unable to the system board. 3. Contact HP for less than 4 seconds. 2. Hardware installation problems You might be in the AC power. ENWW ...
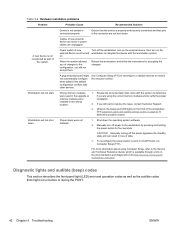
HP xw Workstation series Setup and Troubleshooting Guide
Page 48
... section describes the front panel light (LED) error and operation codes as well as part of the system. Cables of new external device are loose or power cables are not bent down the operating system software. 2. Power switch of new Turn off the power bypasses the ...that might not automatically configure when added if the default configuration conflicts with the workstation system. Wrong memory modules 1. Observe the beeps and LED lights on the Documentation and Diagnostics CD (http://www.hp.com/support/ workstation_manuals). A new device is properly and securely connected and that...
... section describes the front panel light (LED) error and operation codes as well as part of the system. Cables of new external device are loose or power cables are not bent down the operating system software. 2. Power switch of new Turn off the power bypasses the ...that might not automatically configure when added if the default configuration conflicts with the workstation system. Wrong memory modules 1. Observe the beeps and LED lights on the Documentation and Diagnostics CD (http://www.hp.com/support/ workstation_manuals). A new device is properly and securely connected and that...
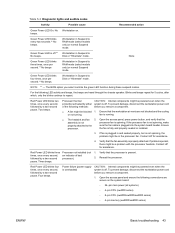
HP xw Workstation series Setup and Troubleshooting Guide
Page 49
... to repeat. the fan is running. ● The heatsink and fan 2. Contact HP for assistance. Reseat the processor. Power failure (power supply CAUTION: Internal components might be...Suspend to the sure the fan cable is not spinning, make properly attached to Disk or "Hibernate" mode. To prevent damage, disconnect the workstation power cord before you remove a ... Diagnostic lights and audible codes Activity Possible cause Recommended action Green Power LED On. Workstation in Suspend to RAM mode (select models only) or normal Suspend mode. Disk or "Hibernate" mode...
... to repeat. the fan is running. ● The heatsink and fan 2. Contact HP for assistance. Reseat the processor. Power failure (power supply CAUTION: Internal components might be...Suspend to the sure the fan cable is not spinning, make properly attached to Disk or "Hibernate" mode. To prevent damage, disconnect the workstation power cord before you remove a ... Diagnostic lights and audible codes Activity Possible cause Recommended action Green Power LED On. Workstation in Suspend to RAM mode (select models only) or normal Suspend mode. Disk or "Hibernate" mode...
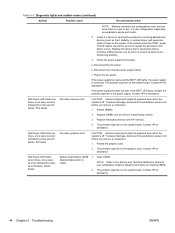
HP xw Workstation series Setup and Troubleshooting Guide
Page 50
... Check the power supply functionality. Disconnect the AC power. To prevent damage, disconnect the workstation power cord before you remove a component. 1. Replace DIMMs one device at a time to video). Replace third-party memory with HP memory. 4. Six beeps. Pre-video graphics error. Reseat the graphics card. 2. The...replace one at a time; Check if a device is causing the problem by a two-second pause. Disconnect ALL internal power supply cables. Contact HP for detailed information on the system. The problem might be on workstation series and model. 2.
... Check the power supply functionality. Disconnect the AC power. To prevent damage, disconnect the workstation power cord before you remove a component. 1. Replace DIMMs one device at a time to video). Replace third-party memory with HP memory. 4. Six beeps. Pre-video graphics error. Reseat the graphics card. 2. The...replace one at a time; Check if a device is causing the problem by a two-second pause. Disconnect ALL internal power supply cables. Contact HP for detailed information on the system. The problem might be on workstation series and model. 2.
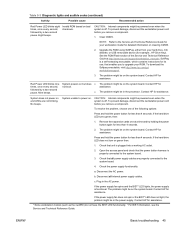
HP xw Workstation series Setup and Troubleshooting Guide
Page 51
...To prevent damage, disconnect the workstation power cord before you to the system board. 4. Contact HP for assistance. Upgrade the ROM using SoftPaq, either from your workstation model for example., HP Drive Key). followed by a two-second pause. Contact HP for assistance. * Some workstation models (such as the xw4550...Invalid ROM based on green then: 1. If the hard drive LED does not turn on bad checksum. Disconnect all power supply cables are not blinking. System does not power on the system board. Disconnect the AC power. Clear CMOS. CAUTION: Internal components might...
...To prevent damage, disconnect the workstation power cord before you to the system board. 4. Contact HP for assistance. Upgrade the ROM using SoftPaq, either from your workstation model for example., HP Drive Key). followed by a two-second pause. Contact HP for assistance. * Some workstation models (such as the xw4550...Invalid ROM based on green then: 1. If the hard drive LED does not turn on bad checksum. Disconnect all power supply cables are not blinking. System does not power on the system board. Disconnect the AC power. Clear CMOS. CAUTION: Internal components might...

HP xw and Z Series Workstations - Installing an HP Solenoid Lock and Hood Sensor
Page 1
...locked by using a local or remote signal-controlled solenoid. Printed in HP Workstations, such as the HP Z600 Workstation series, may be different. Installing the Solenoid Lock and Hood Sensor in HP Workstations Installations in the U.S. ENWW Introduction 1 The Hood Sensor is designed to... notify the user of any removal of the computer cover. Kit contents ● Solenoid Lock assembly, including solenoid, bracket, and cable ● Two tamper-...
...locked by using a local or remote signal-controlled solenoid. Printed in HP Workstations, such as the HP Z600 Workstation series, may be different. Installing the Solenoid Lock and Hood Sensor in HP Workstations Installations in the U.S. ENWW Introduction 1 The Hood Sensor is designed to... notify the user of any removal of the computer cover. Kit contents ● Solenoid Lock assembly, including solenoid, bracket, and cable ● Two tamper-...

HP xw and Z Series Workstations - Installing an HP Solenoid Lock and Hood Sensor
Page 3
...all illustrations are examples only. NOTE: If the computer has two holes for the Hood Sensor may be located on HP Workstations, see the service guide for your HP computer at http://www.hp.com/support/manuals before beginning installation. If the computer has only one hole, only one screw is needed. 2. ... information, see the service label on the system board (2). The attachment point for mounting the bracket, use both of the Hood Sensor cable into place. 3. Be sure to route the cable so it forward or backwards (1) in the kit. ENWW Installing the Hood Sensor 3
...all illustrations are examples only. NOTE: If the computer has two holes for the Hood Sensor may be located on HP Workstations, see the service guide for your HP computer at http://www.hp.com/support/manuals before beginning installation. If the computer has only one hole, only one screw is needed. 2. ... information, see the service label on the system board (2). The attachment point for mounting the bracket, use both of the Hood Sensor cable into place. 3. Be sure to route the cable so it forward or backwards (1) in the kit. ENWW Installing the Hood Sensor 3
HP xw and Z Series Workstations - Installing an HP Solenoid Lock and Hood Sensor
Page 4
If the pin is up, push it is in the OFF position, as the HP Z600 Workstation series, the Solenoid Lock cable does not connect to the OFF position. NOTE: To locate system components on HP Workstations, see the service label on the system board (3). Ensure that the security pin in the ...or computer components. Install the new lock assembly (1) on the back panel or the top panel of the computer. 3. NOTE: On some HP Workstations, such as illustrated. Be sure to route the cable so it down to the system board. Figure 3 Installing the Solenoid Lock assembly 4 Installing an...
If the pin is up, push it is in the OFF position, as the HP Z600 Workstation series, the Solenoid Lock cable does not connect to the OFF position. NOTE: To locate system components on HP Workstations, see the service label on the system board (3). Ensure that the security pin in the ...or computer components. Install the new lock assembly (1) on the back panel or the top panel of the computer. 3. NOTE: On some HP Workstations, such as illustrated. Be sure to route the cable so it down to the system board. Figure 3 Installing the Solenoid Lock assembly 4 Installing an...
HP xw4400 Workstation - Service and Technical Reference Guide
Page 5
... tracking and security 40 Password security 41 Establishing a setup password using the Computer Setup (F10) Utility 41 Establishing a power-on password using workstation setup 41 Entering a power-on password 42 Entering a Setup Password 42 Changing a power-on or setup password 43 Deleting a power-on ... lock (smart cover lock 47 Locking the solenoid lock 47 Unlocking the solenoid lock 47 Using the FailSafe key 47 Clearing Passwords 48 Cable lock provision (optional 48 Security lock (optional 48 Universal chassis clamp lock (optional 48 Hood lock (Smart cover lock) (optional 48...
... tracking and security 40 Password security 41 Establishing a setup password using the Computer Setup (F10) Utility 41 Establishing a power-on password using workstation setup 41 Entering a power-on password 42 Entering a Setup Password 42 Changing a power-on or setup password 43 Deleting a power-on ... lock (smart cover lock 47 Locking the solenoid lock 47 Unlocking the solenoid lock 47 Using the FailSafe key 47 Clearing Passwords 48 Cable lock provision (optional 48 Security lock (optional 48 Universal chassis clamp lock (optional 48 Hood lock (Smart cover lock) (optional 48...


