
HP w20 / w22 LCD Monitor - User's Guide
Page 10
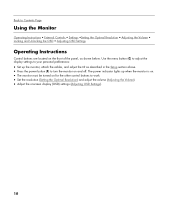
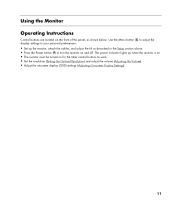
...as shown below. Back to Contents Page Using the Monitor Operating Instructions • External Controls • Settings •Setting the Optimal Resolution • Adjusting the Volume • Locking and Unlocking the OSD • Adjusting OSD Settings Operating Instructions Control buttons are located on for...the Volume). • Adjust the onscreen display (OSD) settings (Adjusting OSD Settings). 10 Use the menu button (C) to adjust the display settings to your personal preferences: • Set up when the monitor is on. • The monitor must be turned on the front of the panel...
...as shown below. Back to Contents Page Using the Monitor Operating Instructions • External Controls • Settings •Setting the Optimal Resolution • Adjusting the Volume • Locking and Unlocking the OSD • Adjusting OSD Settings Operating Instructions Control buttons are located on for...the Volume). • Adjust the onscreen display (OSD) settings (Adjusting OSD Settings). 10 Use the menu button (C) to adjust the display settings to your personal preferences: • Set up when the monitor is on. • The monitor must be turned on the front of the panel...
HP w20 / w22 LCD Monitor - User's Guide
Page 11
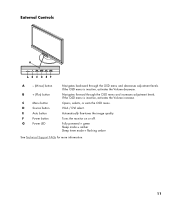
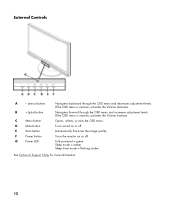
Opens, selects, or exits the OSD menu. VGA / DVI select. If the OSD menu is inactive, activates the Volume increase. If the OSD menu is inactive, activates the Volume decrease. Navigates forward through the OSD menu and decreases adjustment levels. Automatically fine-tunes the image quality...) button C Menu button D Source button E Auto button F Power button G Power LED Navigates backward through the OSD menu and increases adjustment levels. Turns the monitor on or off. Fully powered = green Sleep mode = amber Sleep timer mode = flashing amber See Technical Support ...
Opens, selects, or exits the OSD menu. VGA / DVI select. If the OSD menu is inactive, activates the Volume increase. If the OSD menu is inactive, activates the Volume decrease. Navigates forward through the OSD menu and decreases adjustment levels. Automatically fine-tunes the image quality...) button C Menu button D Source button E Auto button F Power button G Power LED Navigates backward through the OSD menu and increases adjustment levels. Turns the monitor on or off. Fully powered = green Sleep mode = amber Sleep timer mode = flashing amber See Technical Support ...
HP w20 / w22 LCD Monitor - User's Guide
Page 12
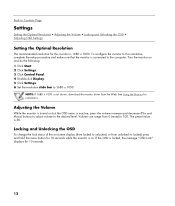
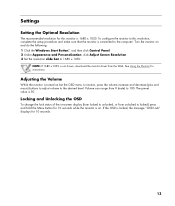
...from locked to unlocked, or from the Web. If the OSD is not shown, download the monitor driver from unlocked to locked) press and hold the menu button for instructions. See Using the Monitor for 10 seconds while the monitor is inactive, press the volume increase and decrease (Plus ...and Minus) buttons to adjust volume to the computer. Adjusting the Volume While the monitor is turned on but the OSD menu is on and do the following: 1 Click Start. 2 Click Settings. 3 Click Control Panel. 4 Double-click Display. 5 Click Settings...
...from locked to unlocked, or from the Web. If the OSD is not shown, download the monitor driver from unlocked to locked) press and hold the menu button for instructions. See Using the Monitor for 10 seconds while the monitor is inactive, press the volume increase and decrease (Plus ...and Minus) buttons to adjust volume to the computer. Adjusting the Volume While the monitor is turned on but the OSD menu is on and do the following: 1 Click Start. 2 Click Settings. 3 Click Control Panel. 4 Double-click Display. 5 Click Settings...
HP w20 / w22 LCD Monitor - User's Guide
Page 13
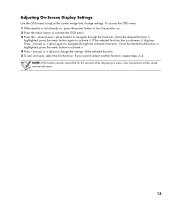
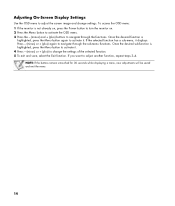
... and save, select the Exit function. Once the desired function is not already on, press the power button to turn the monitor on. 2 Press the menu button to activate the OSD menu. 3 Press the - (minus) and + (plus ) to navigate through the functions. If the selected function has a sub-menu, ...it . If you want to activate it displays. To access the OSD menu: 1 If the monitor is highlighted, press the menu button again to adjust another function, repeat steps 3-4. Adjusting On-Screen Display Settings Use the...
... and save, select the Exit function. Once the desired function is not already on, press the power button to turn the monitor on. 2 Press the menu button to activate the OSD menu. 3 Press the - (minus) and + (plus ) to navigate through the functions. If the selected function has a sub-menu, ...it . If you want to activate it displays. To access the OSD menu: 1 If the monitor is highlighted, press the menu button again to adjust another function, repeat steps 3-4. Adjusting On-Screen Display Settings Use the...

HP w20 / w22 LCD Monitor - User's Guide
Page 14
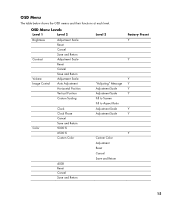
OSD Menu Levels Level 1 Brightness Contrast Volume Image Control Level 2 Adjustment Scale Reset Cancel Save and Return Adjustment Scale Reset Cancel Save and Return Adjustment Scale ... Adjustment Scale Adjustment Scale Fill to Screen Fill to Aspect Ratio Adjustment Scale Adjustment Scale Custom Color Adjustment Cancel Save and Return Factory Preset Y Y Y Y Y Y Y Y Y 14 OSD Menu The table below shows the OSD menus and their functions at each level.
OSD Menu Levels Level 1 Brightness Contrast Volume Image Control Level 2 Adjustment Scale Reset Cancel Save and Return Adjustment Scale Reset Cancel Save and Return Adjustment Scale ... Adjustment Scale Adjustment Scale Fill to Screen Fill to Aspect Ratio Adjustment Scale Adjustment Scale Custom Color Adjustment Cancel Save and Return Factory Preset Y Y Y Y Y Y Y Y Y 14 OSD Menu The table below shows the OSD menus and their functions at each level.

HP w20 / w22 LCD Monitor - User's Guide
Page 15
DVI Adjustment Scale Adjustment Scale Adjustment Scale Factory Preset English Y Y Y Y Y Y Y Y Y Y 15 VGA Digital - OSD Menu Levels (continued) Level 1 Language Management Level 2 Deutsch Simplified Chinese Japanese English Español Français Italiano Nederlands Cancel... Saver Power On Recall Mode Display Power-On Status Display DDC/CI Support Sleep Timer Default Video Input OSD Control Information Factory Reset Exit Cancel Save and Return Horizontal OSD Position Vertical OSD Position OSD Timeout Cancel Save and Return Yes No Level 3 On / Off Selection On / Off Selection On ...
DVI Adjustment Scale Adjustment Scale Adjustment Scale Factory Preset English Y Y Y Y Y Y Y Y Y Y 15 VGA Digital - OSD Menu Levels (continued) Level 1 Language Management Level 2 Deutsch Simplified Chinese Japanese English Español Français Italiano Nederlands Cancel... Saver Power On Recall Mode Display Power-On Status Display DDC/CI Support Sleep Timer Default Video Input OSD Control Information Factory Reset Exit Cancel Save and Return Horizontal OSD Position Vertical OSD Position OSD Timeout Cancel Save and Return Yes No Level 3 On / Off Selection On / Off Selection On ...
HP v220 LCD Monitor User's Guide
Page 11
... for the other control buttons to your personal preferences: • Set up when the monitor is on. • The monitor must be turned on and off. The power indicator lights up the monitor, attach the cables, and adjust the tilt as shown below. Use the Menu button (C) to ...adjust the display settings to work. • Set the resolution (Setting the Optimal Resolution) and adjust the volume (Adjusting the Volume). • Adjust the onscreen display (OSD) settings (Adjusting...
... for the other control buttons to your personal preferences: • Set up when the monitor is on. • The monitor must be turned on and off. The power indicator lights up the monitor, attach the cables, and adjust the tilt as shown below. Use the Menu button (C) to ...adjust the display settings to work. • Set the resolution (Setting the Optimal Resolution) and adjust the volume (Adjusting the Volume). • Adjust the onscreen display (OSD) settings (Adjusting...
HP v220 LCD Monitor User's Guide
Page 12
... A - (minus) button B + (plus) button C Menu button D Mute button E Auto button F Power button G Power LED Navigates backward through the OSD menu and increases adjustment levels. Opens, selects, or exits the OSD menu. Turns the monitor on or off . Fully powered = green Sleep mode = amber Sleep timer mode = flashing amber See Technical Support FAQs for...
... A - (minus) button B + (plus) button C Menu button D Mute button E Auto button F Power button G Power LED Navigates backward through the OSD menu and increases adjustment levels. Opens, selects, or exits the OSD menu. Turns the monitor on or off . Fully powered = green Sleep mode = amber Sleep timer mode = flashing amber See Technical Support FAQs for...
HP v220 LCD Monitor User's Guide
Page 13
...display (from locked to unlocked, or from unlocked to locked) press and hold the Menu button for 10 seconds. 13 Turn the monitor on but the OSD menu is inactive, press the volume increase and decrease (plus and minus) buttons to adjust volume to the computer. Volume can range... procedure and make sure that the monitor is 1680 x 1050. Locking and Unlocking the OSD To change the lock status of the on . To configure the monitor to this monitor is connected to the desired level. Adjusting the Volume While the monitor is not shown, download the monitor driver from 0 (mute) to 1680...
...display (from locked to unlocked, or from unlocked to locked) press and hold the Menu button for 10 seconds. 13 Turn the monitor on but the OSD menu is inactive, press the volume increase and decrease (plus and minus) buttons to adjust volume to the computer. Volume can range... procedure and make sure that the monitor is 1680 x 1050. Locking and Unlocking the OSD To change the lock status of the on . To configure the monitor to this monitor is connected to the desired level. Adjusting the Volume While the monitor is not shown, download the monitor driver from 0 (mute) to 1680...
HP v220 LCD Monitor User's Guide
Page 14
... selected function has a sub-menu, it . Once the desired function is not already on, press the Power button to turn the monitor on. 2 Press the Menu button to activate the OSD menu. 3 Press the - (minus) and + (plus) buttons to change settings. If you want to adjust the screen image and change the.... NOTE: If the buttons remain untouched for 30 seconds while displaying a menu, new adjustments will be saved and exit the menu. 14 To access the OSD menu: 1 If the monitor is highlighted, press the Menu button again to navigate through the functions.
... selected function has a sub-menu, it . Once the desired function is not already on, press the Power button to turn the monitor on. 2 Press the Menu button to activate the OSD menu. 3 Press the - (minus) and + (plus) buttons to change settings. If you want to adjust the screen image and change the.... NOTE: If the buttons remain untouched for 30 seconds while displaying a menu, new adjustments will be saved and exit the menu. 14 To access the OSD menu: 1 If the monitor is highlighted, press the Menu button again to navigate through the functions.
HP v220 LCD Monitor User's Guide
Page 15
... and their functions at each level. OSD Menu Levels Level 1 Level 2 Brightness Adjustment Scale Reset Contrast Volume Cancel Save and Return Adjustment Scale Reset Cancel Save and Return Adjustment Scale Image Control ...
... and their functions at each level. OSD Menu Levels Level 1 Level 2 Brightness Adjustment Scale Reset Contrast Volume Cancel Save and Return Adjustment Scale Reset Cancel Save and Return Adjustment Scale Image Control ...

HP v220 LCD Monitor User's Guide
Page 16
... Save and Return Power Saver Power On Recall Mode Display Power-On Status Display DDC/CI Support Sleep Timer Cancel Save and Return OSD Control Horizontal OSD Position Vertical OSD Position OSD Timeout Information Factory Reset Cancel Save and Return Yes No Exit Level 3 Factory Preset English On / Off Selection On / Off Selection On...
... Save and Return Power Saver Power On Recall Mode Display Power-On Status Display DDC/CI Support Sleep Timer Cancel Save and Return OSD Control Horizontal OSD Position Vertical OSD Position OSD Timeout Information Factory Reset Cancel Save and Return Yes No Exit Level 3 Factory Preset English On / Off Selection On / Off Selection On...
User's Guide w2228h, 2229h w2448h, w2448hc, w2558hc LCD Display
Page 6
...Panel Controls ...4-3 Using the Onscreen Display (OSD) ...4-4 OSD Menu Selections ...4-4 Selecting Video Input Connectors ...4-8 Identifying Monitor Conditions ...4-8 Adjusting Screen Quality ...4-8 Optimizing ...LCD settings for DPF 5-8 Restoring factory default...5-8 6 Preparing the Monitor for Shipping Folding the Monitor ...6-1 A Troubleshooting Solving Common Problems ...A-1 Getting Support from hp.com ...A-3 Preparing to Call Technical Support ...A-3 Locating the Rating Label...A-3 B Technical Specifications HP LCD Monitors ...B-1 Preset Video and High-Definition Modes B-3 LCD Monitor...
...Panel Controls ...4-3 Using the Onscreen Display (OSD) ...4-4 OSD Menu Selections ...4-4 Selecting Video Input Connectors ...4-8 Identifying Monitor Conditions ...4-8 Adjusting Screen Quality ...4-8 Optimizing ...LCD settings for DPF 5-8 Restoring factory default...5-8 6 Preparing the Monitor for Shipping Folding the Monitor ...6-1 A Troubleshooting Solving Common Problems ...A-1 Getting Support from hp.com ...A-3 Preparing to Call Technical Support ...A-3 Locating the Rating Label...A-3 B Technical Specifications HP LCD Monitors ...B-1 Preset Video and High-Definition Modes B-3 LCD Monitor...
User's Guide w2228h, 2229h w2448h, w2448hc, w2558hc LCD Display
Page 9
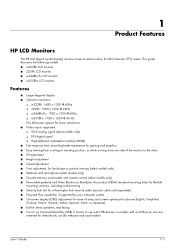
1 Product Features HP LCD Monitors The HP LCD (liquid crystal display) monitors have an active matrix, thin-film transistor (TFT) screen. User's Guide 1-1 This guide discusses the following models: ■ w2228h LCD monitor ■ 2229h LCD monitor ■ w2448h/hc LCD monitor ■ w2558hc LCD monitor Features ■ Large diagonal display ■ Optimum resolution: ❏...■ Plug and Play capability, if supported by your computer system ■ On-screen display (OSD) adjustments for webcam and card reader). In models with six USB ports, two are reserved for internal-only use...
1 Product Features HP LCD Monitors The HP LCD (liquid crystal display) monitors have an active matrix, thin-film transistor (TFT) screen. User's Guide 1-1 This guide discusses the following models: ■ w2228h LCD monitor ■ 2229h LCD monitor ■ w2448h/hc LCD monitor ■ w2558hc LCD monitor Features ■ Large diagonal display ■ Optimum resolution: ❏...■ Plug and Play capability, if supported by your computer system ■ On-screen display (OSD) adjustments for webcam and card reader). In models with six USB ports, two are reserved for internal-only use...
User's Guide w2228h, 2229h w2448h, w2448hc, w2558hc LCD Display
Page 26
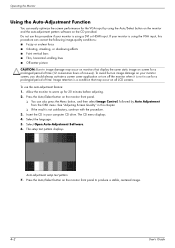
...-adjustment pattern software on screen for 20 minutes before adjusting. 2. Allow the monitor to produce a stable, centered image. 4-2 User's Guide Insert the CD in image damage may occur on monitors that may occur on all LCD screens. To avoid burn-in use the auto-adjustment feature: 1. The CD... You can easily optimize the screen performance for the VGA input by Auto Adjustment from the OSD menu. Press the Auto/Select button on your computer CD drive. Do not use ). If your monitor is using a DVI or HDMI input. Image retention is not satisfactory, continue with the ...
...-adjustment pattern software on screen for 20 minutes before adjusting. 2. Allow the monitor to produce a stable, centered image. 4-2 User's Guide Insert the CD in image damage may occur on monitors that may occur on all LCD screens. To avoid burn-in use the auto-adjustment feature: 1. The CD... You can easily optimize the screen performance for the VGA input by Auto Adjustment from the OSD menu. Press the Auto/Select button on your computer CD drive. Do not use ). If your monitor is using a DVI or HDMI input. Image retention is not satisfactory, continue with the ...
User's Guide w2228h, 2229h w2448h, w2448hc, w2558hc LCD Display
Page 27
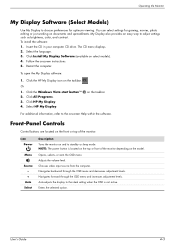
... to the onscreen Help within the software. Restart the computer. To open the My Display software: 1. Select HP My Display. on the taskbar. Navigates backward through the OSD menu and increases adjustment levels. Operating the Monitor My Display Software (Select Models) Use My Display to choose preferences for gaming, movies, photo editing or...
... to the onscreen Help within the software. Restart the computer. To open the My Display software: 1. Select HP My Display. on the taskbar. Navigates backward through the OSD menu and increases adjustment levels. Operating the Monitor My Display Software (Select Models) Use My Display to choose preferences for gaming, movies, photo editing or...
User's Guide w2228h, 2229h w2448h, w2448hc, w2558hc LCD Display
Page 28
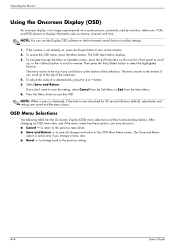
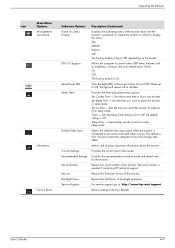
... may choose to save all changes and return to exit the OSD. To navigate through the Main or Sub-Menu menu, press the + (Plus) button on the monitor. 2. Select Save and Return. After changing an OSD menu item, and if the menu screen has these options, ... display is an image superimposed on a screen picture, commonly used by monitors, televisions, VCRs, and DVD players to select the highlighted function. The OSD Main Menu displays. 3. OSD Menu Selections The following table lists the On-Screen Display (OSD) menu selections and their functional descriptions. to change a menu item. ...
... may choose to save all changes and return to exit the OSD. To navigate through the Main or Sub-Menu menu, press the + (Plus) button on the monitor. 2. Select Save and Return. After changing an OSD menu item, and if the menu screen has these options, ... display is an image superimposed on a screen picture, commonly used by monitors, televisions, VCRs, and DVD players to select the highlighted function. The OSD Main Menu displays. 3. OSD Menu Selections The following table lists the On-Screen Display (OSD) menu selections and their functional descriptions. to change a menu item. ...
User's Guide w2228h, 2229h w2448h, w2448hc, w2558hc LCD Display
Page 29
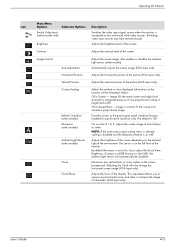
...adjustment allows you adjust the Quick View, Brightness, Contrast, or sRGB functions in the OSD, the ambient light sensor will be disabled. Adjusts the brightness of the screen depending on the monitor will automatically be formatted. Adjusts the vertical position of the environment. Operating the...Ambient Light Sensor (select models) Clock Clock Phase Description Switches the video input signal source when the monitor is set to On. Adjusts the horizontal position of the monitor. The sensor is Off. Also enables or disables the ambient light sensor (select models). Fill to...
...adjustment allows you adjust the Quick View, Brightness, Contrast, or sRGB functions in the OSD, the ambient light sensor will be disabled. Adjusts the brightness of the screen depending on the monitor will automatically be formatted. Adjusts the vertical position of the environment. Operating the...Ambient Light Sensor (select models) Clock Clock Phase Description Switches the video input signal source when the monitor is set to On. Adjusts the horizontal position of the monitor. The sensor is Off. Also enables or disables the ambient light sensor (select models). Fill to...
User's Guide w2228h, 2229h w2448h, w2448hc, w2558hc LCD Display
Page 30
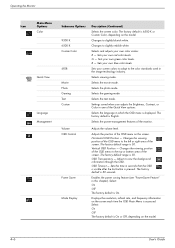
...Selects the movie mode. Changes the viewing position of the screen. B - Selects the gaming mode. Vertical OSD Position - Adjust to the top or bottom area of the monitor. Adjusts the volume level. The factory default is 50. The factory default is On or Off, depending... on the screen. Selects the text mode. Operating the Monitor Icon Main Menu Options Color Quick View Language Management Submenu Options 9300 K 6500 K Custom Color sRGB Movie Photo Gaming Text Custom Volume OSD Control Power Saver Mode Display Description (Continued) Selects the screen color...
...Selects the movie mode. Changes the viewing position of the screen. B - Selects the gaming mode. Vertical OSD Position - Adjust to the top or bottom area of the monitor. Adjusts the volume level. The factory default is 50. The factory default is On or Off, depending... on the screen. Selects the text mode. Operating the Monitor Icon Main Menu Options Color Quick View Language Management Submenu Options 9300 K 6500 K Custom Color sRGB Movie Photo Gaming Text Custom Volume OSD Control Power Saver Mode Display Description (Continued) Selects the screen color...
User's Guide w2228h, 2229h w2448h, w2448hc, w2558hc LCD Display
Page 31
...Sets the current time in the power button On and Off. Immediately sets the monitor to control some OSD menu features such as brightness, contrast, and color temperature. Selects and displays important information about the monitor. User's Guide 4-7 Select the location to which to wake up from sleep...Provides the timer-adjustment menu options: Set Current Time - Set on Time - Selects the default video input signal when the monitor is needed if contacting HP technical support. Sets the Sleep Timer feature On or Off; the default setting is DVI. The default is Off. Reports ...
...Sets the current time in the power button On and Off. Immediately sets the monitor to control some OSD menu features such as brightness, contrast, and color temperature. Selects and displays important information about the monitor. User's Guide 4-7 Select the location to which to wake up from sleep...Provides the timer-adjustment menu options: Set Current Time - Set on Time - Selects the default video input signal when the monitor is needed if contacting HP technical support. Sets the Sleep Timer feature On or Off; the default setting is DVI. The default is Off. Reports ...


