Getting Started Guide
Page 10
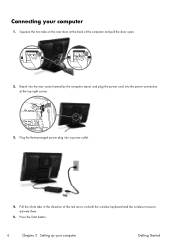
Sub IR out in the direction of the computer and pull the door open. 2. Plug the three-pronged power plug into the power connection at the back of the red arrow on the rear door at the top right corner. Press the Start button. 6 Chapter 3 Setting up your computer 1. Connecting your computer Getting Started Reach into the rear cavity framed by the computer stand, and plug the power cord into a power outlet. 4. Pull the white tabs in LAN 3. Squeeze the two tabs on both the wireless keyboard and the wireless mouse to activate them. 5.
Sub IR out in the direction of the computer and pull the door open. 2. Plug the three-pronged power plug into the power connection at the back of the red arrow on the rear door at the top right corner. Press the Start button. 6 Chapter 3 Setting up your computer 1. Connecting your computer Getting Started Reach into the rear cavity framed by the computer stand, and plug the power cord into a power outlet. 4. Pull the white tabs in LAN 3. Squeeze the two tabs on both the wireless keyboard and the wireless mouse to activate them. 5.
Getting Started Guide
Page 14
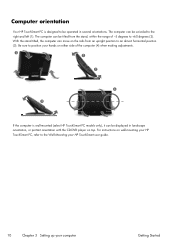
... portrait orientation with the CD-DVD player on top. For instructions on wall-mounting your HP TouchSmart PC, refer to the Wall-Mounting your HP TouchSmart user guide. 10 Chapter 3 Setting up your hands on the rails from the stand, within the range of the computer (4) when making adjustments. 3 2 4 3 If the computer is designed to...
... portrait orientation with the CD-DVD player on top. For instructions on wall-mounting your HP TouchSmart PC, refer to the Wall-Mounting your HP TouchSmart user guide. 10 Chapter 3 Setting up your hands on the rails from the stand, within the range of the computer (4) when making adjustments. 3 2 4 3 If the computer is designed to...
User Guide
Page 3
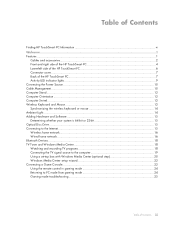
... vi Welcome ...1 Features ...1 Cables and accessories...2 Front and right side of the HP TouchSmart PC 4 Lower-left side of the HP TouchSmart PC 6 Connector cover...7 Back of the HP TouchSmart PC 7 Activity LED indicator lights...9 Connecting the Power Source ...10 Cable Management...10 Computer Stand ...12 Computer Orientation ...12 Computer Swivel...13 Wireless Keyboard and Mouse...13...
... vi Welcome ...1 Features ...1 Cables and accessories...2 Front and right side of the HP TouchSmart PC 4 Lower-left side of the HP TouchSmart PC 6 Connector cover...7 Back of the HP TouchSmart PC 7 Activity LED indicator lights...9 Connecting the Power Source ...10 Cable Management...10 Computer Stand ...12 Computer Orientation ...12 Computer Swivel...13 Wireless Keyboard and Mouse...13...

User Guide
Page 14
...models only) other video device. H TV In (TV tuner models only) Connect your surround sound digital (SPDIF Out) speakers. L Computer stand Slide the stand for using a wireless keyboard and mouse. only) J Stereo Audio In (TV Connect audio for A/V input from a video camera, or...keyboard Preinstalled receiver for stability and best viewing angle. This is HDMI-compatible, connect to the Internet through the notch in the computer stand. 8 User Guide (Features may vary by model) B HDMI port (game console models only) If your source models only) (...
...models only) other video device. H TV In (TV tuner models only) Connect your surround sound digital (SPDIF Out) speakers. L Computer stand Slide the stand for using a wireless keyboard and mouse. only) J Stereo Audio In (TV Connect audio for A/V input from a video camera, or...keyboard Preinstalled receiver for stability and best viewing angle. This is HDMI-compatible, connect to the Internet through the notch in the computer stand. 8 User Guide (Features may vary by model) B HDMI port (game console models only) If your source models only) (...
User Guide
Page 16
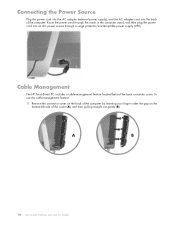
... supply), and the AC adapter cord into an AC power source through the notch in the computer stand, and then plug the power cord into the back of the computer by model) Cable Management The HP TouchSmart PC includes a cable-management feature located behind the back connector cover. To use the cable-management...
... supply), and the AC adapter cord into an AC power source through the notch in the computer stand, and then plug the power cord into the back of the computer by model) Cable Management The HP TouchSmart PC includes a cable-management feature located behind the back connector cover. To use the cable-management...

User Guide
Page 17
D Welcome 11 Then, route the cables through the cable routing clip (C), and out from the back of the stand (D). 2 Route your cables through the open area between the plastic plate and the bottom of the computer. C 3 Replace the connector cover by aligning the hooks on the right edge of the cover with the slots on the computer, and then pressing it until it snaps into place.
D Welcome 11 Then, route the cables through the cable routing clip (C), and out from the back of the stand (D). 2 Route your cables through the open area between the plastic plate and the bottom of the computer. C 3 Replace the connector cover by aligning the hooks on the right edge of the cover with the slots on the computer, and then pressing it until it snaps into place.

User Guide
Page 18
... (Features may result in place as you want to change the angle of the HP TouchSmart PC, hold each side of the computer is designed to be unstable and could fall over. Computer Stand The HP TouchSmart PC is shipped with the display in landscape orientation, not portrait (B), or laid ...horizontal (C). the stand stays in place) to the hardware components. CAUTION: The computer stand stays in damage to an angle of between 5...
... (Features may result in place as you want to change the angle of the HP TouchSmart PC, hold each side of the computer is designed to be unstable and could fall over. Computer Stand The HP TouchSmart PC is shipped with the display in landscape orientation, not portrait (B), or laid ...horizontal (C). the stand stays in place) to the hardware components. CAUTION: The computer stand stays in damage to an angle of between 5...

User Guide
Page 73
...features 4 using 18 Blu-ray drive location 6 brightness, screen 29 Browser tile 39 button A/V source 23, 24 Ambient Light 6 computer Power/Sleep 5 HP TouchSmart 5 C cable management 10 router clip 8 routing clip 11 Calendar tile 49 camera distance from 46 position 46 Canvas tile 42 carpal tunnel syndrome 32 ... 16 composite audio/visual ports 23 mode 23 video adapter 20 computer connecting the IR emitter 21 light 14 recycling old hardware 33 stand 8 stand, adjusting the angle 12 conference calls 48 connecting game console 22 Internet 15 powered speakers 26 printer 28 speakers 26 to network 16...
...features 4 using 18 Blu-ray drive location 6 brightness, screen 29 Browser tile 39 button A/V source 23, 24 Ambient Light 6 computer Power/Sleep 5 HP TouchSmart 5 C cable management 10 router clip 8 routing clip 11 Calendar tile 49 camera distance from 46 position 46 Canvas tile 42 carpal tunnel syndrome 32 ... 16 composite audio/visual ports 23 mode 23 video adapter 20 computer connecting the IR emitter 21 light 14 recycling old hardware 33 stand 8 stand, adjusting the angle 12 conference calls 48 connecting game console 22 Internet 15 powered speakers 26 printer 28 speakers 26 to network 16...
