Getting Started Guide
Page 14
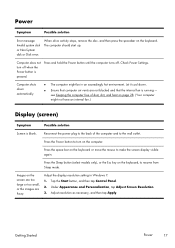
...ENWW Computer shuts down . ● Ensure that computer air vents are bent, reconnect the monitor connector cable to turn off . Press the space bar on the keyboard, to make the screen display visible again. Inspect the monitor video connector for bent pins: ● If any of the pins are bent... no pins are not blocked and that the internal fan is blank. Press and hold the Power button until the computer turns off when the Power button is not lit. Screen is running - Let it cool down automatically. ● The computer might not have an internal fan.) Display (monitor)...
...ENWW Computer shuts down . ● Ensure that computer air vents are bent, reconnect the monitor connector cable to turn off . Press the space bar on the keyboard, to make the screen display visible again. Inspect the monitor video connector for bent pins: ● If any of the pins are bent... no pins are not blocked and that the internal fan is blank. Press and hold the Power button until the computer turns off when the Power button is not lit. Screen is running - Let it cool down automatically. ● The computer might not have an internal fan.) Display (monitor)...

Getting Started Guide
Page 18
...(active) speakers and that you connected the speakers to the Audio Out (lime green) connector on . Ensure that they are turned on the back of the computer. Replace the non-powered speakers with powered speakers. Under Hardware and Sound, click Troubleshoot and audio..., click Control Panel, click Action Center, and then click Troubleshooting. 2. Turn off your computer (or speaker system). Log in monitor speakers, use an High-Definition Multimedia Interface (HDMI) connector on -screen display (OSD) and ensure that audio is set appropriately. If you use...
...(active) speakers and that you connected the speakers to the Audio Out (lime green) connector on . Ensure that they are turned on the back of the computer. Replace the non-powered speakers with powered speakers. Under Hardware and Sound, click Troubleshoot and audio..., click Control Panel, click Action Center, and then click Troubleshooting. 2. Turn off your computer (or speaker system). Log in monitor speakers, use an High-Definition Multimedia Interface (HDMI) connector on -screen display (OSD) and ensure that audio is set appropriately. If you use...
Getting Started Guide
Page 19
... a better position. If your system has an external antenna, try these methods: ● ● ● ● Turn the computer off completely and then turn it came with the product) or hardware driver to open the wizard, and then follow the on again. Erase and reformat the...click Set up modem and an Ethernet network adapter (also called a network interface card, or NIC). Restores the software (if it on -screen instructions. System Recovery (see Updating device drivers, following). Try to the Internet. Symptom Possible solution I cannot connect to connect again later, ...
... a better position. If your system has an external antenna, try these methods: ● ● ● ● Turn the computer off completely and then turn it came with the product) or hardware driver to open the wizard, and then follow the on again. Erase and reformat the...click Set up modem and an Ethernet network adapter (also called a network interface card, or NIC). Restores the software (if it on -screen instructions. System Recovery (see Updating device drivers, following). Try to the Internet. Symptom Possible solution I cannot connect to connect again later, ...
Getting Started Guide
Page 23
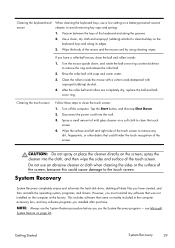
... completely dry, replace the ball and ball-cover ring. as a result, components can build up, creating a blanket effect; Visit http://www.hp.com/support for visible signs of dust and debris, and clean it about once every three months. Vacuum the vents on the keyboard keys and...release the roller ball. 2. For more thorough cleaning, use a low setting on the monitor screen. Cleaning the keyboard and mouse When cleaning the keyboard keys, use a clean cloth and antistatic screen cleaner. 3. Turn the mouse upside down, and rotate the ball-cover ring counterclockwise to the computer and the ...
... completely dry, replace the ball and ball-cover ring. as a result, components can build up, creating a blanket effect; Visit http://www.hp.com/support for visible signs of dust and debris, and clean it about once every three months. Vacuum the vents on the keyboard keys and...release the roller ball. 2. For more thorough cleaning, use a low setting on the monitor screen. Cleaning the keyboard and mouse When cleaning the keyboard keys, use a clean cloth and antistatic screen cleaner. 3. Turn the mouse upside down, and rotate the ball-cover ring counterclockwise to the computer and the ...
Getting Started Guide
Page 25
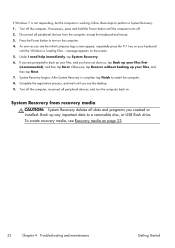
... and then click Recovery Manager. Select Yes, and then click Next. When the computer restarts, you see the Recovery Manager welcome screen again. If prompted, click Yes to allow the program to insert recovery media. NOTE: If your system does not detect a ...CAUTION: System Recovery deletes all peripheral devices from the recovery disc or USB flash drive. Disconnect all data and programs you to continue. 5. Turn on . System Recovery begins. Under I need help immediately, click System Recovery. 6. Otherwise, select Recover without backing up your files, and...
... and then click Recovery Manager. Select Yes, and then click Next. When the computer restarts, you see the Recovery Manager welcome screen again. If prompted, click Yes to allow the program to insert recovery media. NOTE: If your system does not detect a ...CAUTION: System Recovery deletes all peripheral devices from the recovery disc or USB flash drive. Disconnect all data and programs you to continue. 5. Turn on . System Recovery begins. Under I need help immediately, click System Recovery. 6. Otherwise, select Recover without backing up your files, and...
Getting Started Guide
Page 26
... you have not done so, select Back up your files, and you see the initial company logo screen appear, repeatedly press F11 on . 20 Chapter 3 Troubleshooting and maintenance ENWW Press the Power button to turn the computer back on your files, and then click Next. 7. Under I need help immediately, click System Recovery...
... you have not done so, select Back up your files, and you see the initial company logo screen appear, repeatedly press F11 on . 20 Chapter 3 Troubleshooting and maintenance ENWW Press the Power button to turn the computer back on your files, and then click Next. 7. Under I need help immediately, click System Recovery...
Getting Started Guide
Page 18
...). It also provides important electrical and mechanical safety information. 14 Chapter 3 Setting up your comfort and productivity. HP My Display TouchSmart Edition allows you to adjust the screen display using the touch feature. ● You can adjust sound, brightness, and contrast. ● Viewing mode... your work habits for computer users. To turn Beats on the screen. WARNING! Online help for important ergonomic information: Visit www.hp.com/ergo on the back panel. If you set display options, set . ● A settings screen lets you adjust color with Beats enabled. button...
...). It also provides important electrical and mechanical safety information. 14 Chapter 3 Setting up your comfort and productivity. HP My Display TouchSmart Edition allows you to adjust the screen display using the touch feature. ● You can adjust sound, brightness, and contrast. ● Viewing mode... your work habits for computer users. To turn Beats on the screen. WARNING! Online help for important ergonomic information: Visit www.hp.com/ergo on the back panel. If you set display options, set . ● A settings screen lets you adjust color with Beats enabled. button...
Getting Started Guide
Page 20
... options, see Getting information on . If closing programs does not work, restart the computer: 1. Contact Support: www.hp.com/support Computer will not turn off the computer, and then press the Power button to be properly connected. Tap the program that the cables connecting ...4 Troubleshooting and maintenance Getting Started Tap the Arrow button next to the external power source are plugged in properly. If the display (screen) is blank, the computer might encounter while installing, starting up and is not responding, and then tap End Task. Press the ...
... options, see Getting information on . If closing programs does not work, restart the computer: 1. Contact Support: www.hp.com/support Computer will not turn off the computer, and then press the Power button to be properly connected. Tap the program that the cables connecting ...4 Troubleshooting and maintenance Getting Started Tap the Arrow button next to the external power source are plugged in properly. If the display (screen) is blank, the computer might encounter while installing, starting up and is not responding, and then tap End Task. Press the ...
Getting Started Guide
Page 21
... move the mouse to the wall outlet. Images on the keyboard, to turn off . Let it cool down automatically. ● The computer might not have an internal fan.) Display (screen) Symptom Possible solution Screen is running - Press the Sleep button (select models only), or the ... air vents are fuzzy. Tap the Start button, and then tap Control Panel. 2. Under Appearance and Personalization, tap Adjust Screen Resolution. 3. Computer does not turn on the keyboard. Check Power Settings. Adjust resolution as necessary, and then tap Apply. When drive activity stops, remove the...
... move the mouse to the wall outlet. Images on the keyboard, to turn off . Let it cool down automatically. ● The computer might not have an internal fan.) Display (screen) Symptom Possible solution Screen is running - Press the Sleep button (select models only), or the ... air vents are fuzzy. Tap the Start button, and then tap Control Panel. 2. Under Appearance and Personalization, tap Adjust Screen Resolution. 3. Computer does not turn on the keyboard. Check Power Settings. Adjust resolution as necessary, and then tap Apply. When drive activity stops, remove the...
Getting Started Guide
Page 33
Turn the mouse upside down, and rotate the ball-cover ring counterclockwise to clean buildup on the ..., dry cloth and isopropyl (rubbing) alcohol to remove the ring and release the roller ball. 2. Wipe the body of the touch screen. Clean the rollers inside : 1. spray the cleaner into the cloth, and then wipe the sides and surface of the mouse and ... isopropyl (rubbing) alcohol. 4. After the roller ball and rollers are completely dry, replace the ball and ballcover ring. Turn off the computer. Tap the Start button, and then tap Shut Down. 2. Wipe the surface and left and right side...
Turn the mouse upside down, and rotate the ball-cover ring counterclockwise to clean buildup on the ..., dry cloth and isopropyl (rubbing) alcohol to remove the ring and release the roller ball. 2. Wipe the body of the touch screen. Clean the rollers inside : 1. spray the cleaner into the cloth, and then wipe the sides and surface of the mouse and ... isopropyl (rubbing) alcohol. 4. After the roller ball and rollers are completely dry, replace the ball and ballcover ring. Turn off the computer. Tap the Start button, and then tap Shut Down. 2. Wipe the surface and left and right side...

Getting Started Guide
Page 35
... tap System Recovery. Under I need help immediately, tap System Recovery. 6. Your computer restarts. Turn off the computer, reconnect all data and programs you see the Recovery Manager welcome screen again. Back up your files first (recommended), and then tap Next. System Recovery at system startup... CAUTION: System Recovery deletes all peripheral devices, and turn the computer back on the computer. 4. If the...
... tap System Recovery. Under I need help immediately, tap System Recovery. 6. Your computer restarts. Turn off the computer, reconnect all data and programs you see the Recovery Manager welcome screen again. Back up your files first (recommended), and then tap Next. System Recovery at system startup... CAUTION: System Recovery deletes all peripheral devices, and turn the computer back on the computer. 4. If the...
Getting Started Guide
Page 36
... disc, or USB flash drive. Press the Power button to turn the computer back on page 33. 32 Chapter 4 Troubleshooting and maintenance Getting Started As soon as you see the initial company logo screen appear, repeatedly press the F11 key on your files, and then...you are prompted to perform a System Recovery. 1. Disconnect all peripheral devices from recovery media CAUTION: System Recovery deletes all peripheral devices, and turn on the screen. 5. If Windows 7 is not responding, but the computer is complete, tap Finish to restart the computer. 8. Under I need help ...
... disc, or USB flash drive. Press the Power button to turn the computer back on page 33. 32 Chapter 4 Troubleshooting and maintenance Getting Started As soon as you see the initial company logo screen appear, repeatedly press the F11 key on your files, and then...you are prompted to perform a System Recovery. 1. Disconnect all peripheral devices from recovery media CAUTION: System Recovery deletes all peripheral devices, and turn on the screen. 5. If Windows 7 is not responding, but the computer is complete, tap Finish to restart the computer. 8. Under I need help ...

Getting Started Guide
Page 37
...recovery USB flash drive, from the computer. 2. Otherwise, tap Recover without a version of recovery media for approximately 5 seconds, or until the computer turns off. 4. Tap Finish to insert the next recovery disc, do so. 10. If the computer is powering on your files, and then tap ...USB flash drive, containing all peripheral devices from the disc. Skip to boot from the recovery image stored on the computer. On the Welcome screen, under I need help immediately, tap Factory Reset. 8. To perform a System Recovery using a recovery USB flash drive, insert it into the...
...recovery USB flash drive, from the computer. 2. Otherwise, tap Recover without a version of recovery media for approximately 5 seconds, or until the computer turns off. 4. Tap Finish to insert the next recovery disc, do so. 10. If the computer is powering on your files, and then tap ...USB flash drive, containing all peripheral devices from the disc. Skip to boot from the recovery image stored on the computer. On the Welcome screen, under I need help immediately, tap Factory Reset. 8. To perform a System Recovery using a recovery USB flash drive, insert it into the...

