Hardware Reference Guide: HP t5145/t5540/t5545/t5630 Thin Clients
Page 18
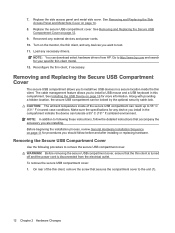
... cable management feature allows you install in a secure location inside of the thin client, remove the screw that secures the compartment cover to the unit (1). 12 Chapter 2 Hardware Changes See Removing and Replacing the Side Access Panel and Metal Side Cover on the monitor, the thin client, and any device you to http://www.hp.com and search for any devices you are installing. Reconnect any necessary drivers. Make sure the specifications for your specific thin client model. 12. Before removing...
... cable management feature allows you install in a secure location inside of the thin client, remove the screw that secures the compartment cover to the unit (1). 12 Chapter 2 Hardware Changes See Removing and Replacing the Side Access Panel and Metal Side Cover on the monitor, the thin client, and any device you to http://www.hp.com and search for any devices you are installing. Reconnect any necessary drivers. Make sure the specifications for your specific thin client model. 12. Before removing...

Hardware Reference Guide: HP t5145/t5540/t5545/t5630 Thin Clients
Page 38
... keyboard function keys 9 layout 8 Windows logo key 9 L line-out audio location 5 lock, cable, slot location 4 M management solutions 2 metal side cover removing 14 replacing 15 microphone connector location 3 mounting holes, VESA 5 mounting options on back of monitor stand 24 on wall 24 under desk 24 with flat panel on wall 24 mounting thin client 22 mouse functions 9 N non-supported orientations in a drawer 29 under a monitor 29 O options installing 11 supported 11 USB device 16 orientation horizontal 5 vertical 6 P parallel connector 5 power button location 3 power connector location 5 32...
... keyboard function keys 9 layout 8 Windows logo key 9 L line-out audio location 5 lock, cable, slot location 4 M management solutions 2 metal side cover removing 14 replacing 15 microphone connector location 3 mounting holes, VESA 5 mounting options on back of monitor stand 24 on wall 24 under desk 24 with flat panel on wall 24 mounting thin client 22 mouse functions 9 N non-supported orientations in a drawer 29 under a monitor 29 O options installing 11 supported 11 USB device 16 orientation horizontal 5 vertical 6 P parallel connector 5 power button location 3 power connector location 5 32...

HP Device Manager User Manual
Page 9
... Time and Timeout 183 Write Filter Policy Setting 185 Task Settings ...186 Status Walker Configuration ...187 Authentication Management ...188 Key Management ...188 Gateway Access Control 191 Report Management ...193 Adding a Report Template 193 Importing a Report Plug-in File 197 Generating a Report Using a Report Template 198 Template Plugin Management ...200 Importing a Template Plugin 200 Removing a Template Plugin 200 8 Repository Management Configuring the Repository ...201 Creating an FTP...
... Time and Timeout 183 Write Filter Policy Setting 185 Task Settings ...186 Status Walker Configuration ...187 Authentication Management ...188 Key Management ...188 Gateway Access Control 191 Report Management ...193 Adding a Report Template 193 Importing a Report Plug-in File 197 Generating a Report Using a Report Template 198 Template Plugin Management ...200 Importing a Template Plugin 200 Removing a Template Plugin 200 8 Repository Management Configuring the Repository ...201 Creating an FTP...

HP Device Manager User Manual
Page 243
Error Codes 233 14020612 Put resume error. 14020622 Set port error. 14020632 Unknown. 14020712 FileException unknown Exception. 14020722 File does not exist. 14020732 No more free disk space. 14020742 Write forbidden. 14020752 Create forbidden. 14020762 Read forbidden. 14020772 Create directory forbidden. 14020782 File seek forbidden. 14020792 Combine path error. 14020812 MFC initialization failed. 14020822 Invalid parameter number. 14020832 Failed to retrieve...
Error Codes 233 14020612 Put resume error. 14020622 Set port error. 14020632 Unknown. 14020712 FileException unknown Exception. 14020722 File does not exist. 14020732 No more free disk space. 14020742 Write forbidden. 14020752 Create forbidden. 14020762 Read forbidden. 14020772 Create directory forbidden. 14020782 File seek forbidden. 14020792 Combine path error. 14020812 MFC initialization failed. 14020822 Invalid parameter number. 14020832 Failed to retrieve...

HP Device Manager User Manual
Page 249
... Unknown FTP error. -1303 Failure looking for remote file or low space on local drive. -1305 Failure looking for replace.exe. -1401 Unknown FTP Error. -1402 File or Directory not found. -1403 Failed to get file. -1404 Failed to receive reply from server. -1405 Failed to set FTP mode PASV. -1406 Server reply is invalid. -1407 Failed to change current working directory. -1408...
... Unknown FTP error. -1303 Failure looking for remote file or low space on local drive. -1305 Failure looking for replace.exe. -1401 Unknown FTP Error. -1402 File or Directory not found. -1403 Failed to get file. -1404 Failed to receive reply from server. -1405 Failed to set FTP mode PASV. -1406 Server reply is invalid. -1407 Failed to change current working directory. -1408...

HP Device Manager User Manual
Page 254
... image management 130 importing 176 selecting for templates 177 repository management add element 206 requirements FTP 10 network 10 result template, opening 85 router, configuring for PXE 29 rules applying tasks 86 automatic 86 S security authentication management 188 filter 65 gateway access control 191 key management 188 user authentication 166 server management 2 settings applying 97 changing file and registry 143 cloning 95 configuring display 101 configuring Firefox 108 configuring Internet Explorer 107 configuring keyboard...
... image management 130 importing 176 selecting for templates 177 repository management add element 206 requirements FTP 10 network 10 result template, opening 85 router, configuring for PXE 29 rules applying tasks 86 automatic 86 S security authentication management 188 filter 65 gateway access control 191 key management 188 user authentication 166 server management 2 settings applying 97 changing file and registry 143 cloning 95 configuring display 101 configuring Firefox 108 configuring Internet Explorer 107 configuring keyboard...

HP Device Manager User Manual
Page 255
... 3 terms used in manual 6 time, configuring settings 103 timeout 183 toolbar, console 46 tools menu, management console 43 troubleshooting 5 view authentication key 190 management console menu 43 W walking with IP list 40 with IP range 38 write filter policy setting 185 U UDP ports required 10 uninstalling Device Manager 31 updating agent version 157 authentication key 188 images 140 user management 159 users adding 159 assigning to groups 160, 164 authentication 166 changing password 161...
... 3 terms used in manual 6 time, configuring settings 103 timeout 183 toolbar, console 46 tools menu, management console 43 troubleshooting 5 view authentication key 190 management console menu 43 W walking with IP list 40 with IP range 38 write filter policy setting 185 U UDP ports required 10 uninstalling Device Manager 31 updating agent version 157 authentication key 188 images 140 user management 159 users adding 159 assigning to groups 160, 164 authentication 166 changing password 161...

TeemTalk 7.0 User Manual
Page 228
... character set codepage to use. The available settings depend on the fonts installed. 212 Setup Options There are separate entries for displaying characters. If they have been changed by the System Administrator. Font Factory default: Courier New This enables you wish to restore the default settings, click the Defaults button at the end of the Codepage and Character Set using the following options. National Codepage Settings Factory default: User Defined This specifies the type of...
... character set codepage to use. The available settings depend on the fonts installed. 212 Setup Options There are separate entries for displaying characters. If they have been changed by the System Administrator. Font Factory default: Courier New This enables you wish to restore the default settings, click the Defaults button at the end of the Codepage and Character Set using the following options. National Codepage Settings Factory default: User Defined This specifies the type of...

TeemTalk 7.0 User Manual
Page 234
...are started before a previous session has negotiated an acceptable device name, it is a hexadecimal value. In this Telnet session. IBM 5250 Display Emulation DEVNAME This enables you to enter the name of the device which the server will ...access the counter simultaneously and not all possible names will be tried by entering %s after the device name. the device name is sent twice in use TEST2. This should not cause a problem 218 Setup Options In the latter case the same name is already in succession to indicate to this case TEST1, TEST2, ... To automatically assign a new device...
...are started before a previous session has negotiated an acceptable device name, it is a hexadecimal value. In this Telnet session. IBM 5250 Display Emulation DEVNAME This enables you to enter the name of the device which the server will ...access the counter simultaneously and not all possible names will be tried by entering %s after the device name. the device name is sent twice in use TEST2. This should not cause a problem 218 Setup Options In the latter case the same name is already in succession to indicate to this case TEST1, TEST2, ... To automatically assign a new device...
TeemTalk 7.0 User Manual
Page 249
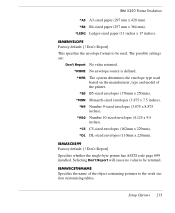
... x 220mm). IBMENVELOPE Factory default: [! Selecting Don't Report will cause no value to be returned. Don't Report] Specifies whether the single-byte printer has ASCII code page 899 installed. Don't Report] This specifies the envelope format to be used based on the manufacturer, type and model of the object containing pointers to the work station customizing tables. IBMASCII899 Factory default: [! Setup Options 233
... x 220mm). IBMENVELOPE Factory default: [! Selecting Don't Report will cause no value to be returned. Don't Report] Specifies whether the single-byte printer has ASCII code page 899 installed. Don't Report] This specifies the envelope format to be used based on the manufacturer, type and model of the object containing pointers to the work station customizing tables. IBMASCII899 Factory default: [! Setup Options 233
TeemTalk 7.0 User Manual
Page 330
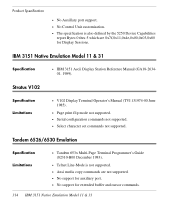
...'s Guide (82310-B00 December 1983). • Telnet Line-Mode is also defined by the 5250 Device Capabilities report Bytes 0 thru 5 which are not supported. • No support for auxiliary port. • No support for Display Sessions. Stratus V102 Specification Limitations • V102 Display Terminal Operator's Manual (TVI 131974-00 June 1985). • Page print flip mode not supported. • Serial configuration commands not supported. • Select character set...
...'s Guide (82310-B00 December 1983). • Telnet Line-Mode is also defined by the 5250 Device Capabilities report Bytes 0 thru 5 which are not supported. • No support for auxiliary port. • No support for Display Sessions. Stratus V102 Specification Limitations • V102 Display Terminal Operator's Manual (TVI 131974-00 June 1985). • Page print flip mode not supported. • Serial configuration commands not supported. • Select character set...
HP Virtual Desktop Infrastructure with Citrix XenDesktop Getting Started Guide
Page 7
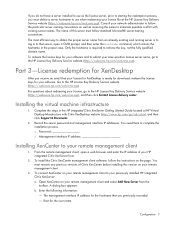
... a server hostname to use when redeeming your license file at HP Virtual Desktop Infrastructure with existing server names. Installing the virtual machine infrastructure 1. To connect XenCenter on the page. The name of this version on your remote management client and select Add New Server from an already existing and running server is required to retrieve the key, not the fully qualified domain name. o Password o Management interface IP address Installing XenCenter...
... a server hostname to use when redeeming your license file at HP Virtual Desktop Infrastructure with existing server names. Installing the virtual machine infrastructure 1. To connect XenCenter on the page. The name of this version on your remote management client and select Add New Server from an already existing and running server is required to retrieve the key, not the fully qualified domain name. o Password o Management interface IP address Installing XenCenter...
HP Virtual Desktop Infrastructure with Citrix XenDesktop Getting Started Guide
Page 11
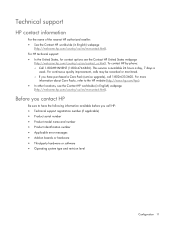
....html). For more information about Care Packs, refer to have the following information available before you have purchased a Care Pack (service upgrade), call HP: • Technical support registration number (if applicable) • Product serial number • Product model name and number • Product identification number • Applicable error messages • Add-on boards or hardware • Third-party hardware or software • Operating system type and revision level Configuration 11
....html). For more information about Care Packs, refer to have the following information available before you have purchased a Care Pack (service upgrade), call HP: • Technical support registration number (if applicable) • Product serial number • Product model name and number • Product identification number • Applicable error messages • Add-on boards or hardware • Third-party hardware or software • Operating system type and revision level Configuration 11
HP Image Manager 5.0: Quick Setup Guide
Page 27
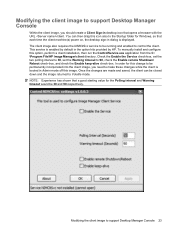
... and 90 respectively. Modifying the client image to support Desktop Manager Console Within the client image, you need to make these changes while the client is booted in Admin mode off this image. The client image also requires the NIMCltSvc service to control the client. NOTE: Experience has shown that opens a browser with the URL /client. In order for this option, perform a client installation, then run the ControlService.exe application from the C: \Program File\HP Image Manager\client directory.
... and 90 respectively. Modifying the client image to support Desktop Manager Console Within the client image, you need to make these changes while the client is booted in Admin mode off this image. The client image also requires the NIMCltSvc service to control the client. NOTE: Experience has shown that opens a browser with the URL /client. In order for this option, perform a client installation, then run the ControlService.exe application from the C: \Program File\HP Image Manager\client directory.

Troubleshooting Guide: HP t5630, t5545, t5145, and t5540 Thin Clients
Page 35
... of BIOS defaults designed for a diagnosis. A checksum error may have caused this may press Esc to skip the full memory test. Beep Codes If there are no hard drives are pressed during POST. CMOS checksum error - For information on replacing the battery, refer to skip memory test Hard Disk Install Failure Keyboard error or no longer functional. Press ESC to Removing and Replacing the Battery on page 48. For phone numbers of an HP Call Center near...
... of BIOS defaults designed for a diagnosis. A checksum error may have caused this may press Esc to skip the full memory test. Beep Codes If there are no hard drives are pressed during POST. CMOS checksum error - For information on replacing the battery, refer to skip memory test Hard Disk Install Failure Keyboard error or no longer functional. Press ESC to Removing and Replacing the Battery on page 48. For phone numbers of an HP Call Center near...
Troubleshooting Guide: HP t5630, t5545, t5145, and t5540 Thin Clients
Page 36
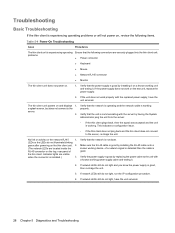
... working. Make sure the RJ-45 cable is communicating with a known working properly. If network LEDs still do not light, run the IP configuration procedure. 6. Verify that the network is operating and the network cable is not down. LEDs or the LEDs do not light, have the unit serviced. If network LEDs still do not illuminate blinking green after powering on the thin client unit. 2. (The network LEDs are located inside the RJ-45 connector on the test unit, replace...
... working. Make sure the RJ-45 cable is communicating with a known working properly. If network LEDs still do not light, run the IP configuration procedure. 6. Verify that the network is operating and the network cable is not down. LEDs or the LEDs do not light, have the unit serviced. If network LEDs still do not illuminate blinking green after powering on the thin client unit. 2. (The network LEDs are located inside the RJ-45 connector on the test unit, replace...
Troubleshooting Guide: HP t5630, t5545, t5145, and t5540 Thin Clients
Page 69
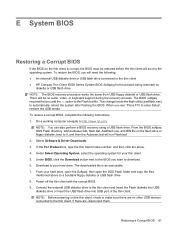
... USB flash drive. 8. Restoring a Corrupt BIOS 61 Power off the thin client with the corrupt BIOS. 9. NOTE: Before powering on the thin client, check to enter Setup", remove the USB media. To restore the BIOS, you see "Press F10 to make sure there are , disconnect them. The BIOS softpaq requires that you want to the operating system. Connect the external USB diskette drive to automatically reboot the system after flashing the BIOS. If there are no audio, video, or keyboard support during the recovery...
... USB flash drive. 8. Restoring a Corrupt BIOS 61 Power off the thin client with the corrupt BIOS. 9. NOTE: Before powering on the thin client, check to enter Setup", remove the USB media. To restore the BIOS, you see "Press F10 to make sure there are , disconnect them. The BIOS softpaq requires that you want to the operating system. Connect the external USB diskette drive to automatically reboot the system after flashing the BIOS. If there are no audio, video, or keyboard support during the recovery...
Troubleshooting Guide: HP t5630, t5545, t5145, and t5540 Thin Clients
Page 70
... on to reboot the computer during the upgrade process 62 Appendix E System BIOS To determine the BIOS family, version, and date on the thin client, press F10 during the recovery process. At power on, the BIOS is automatically restored from the HP Web site at: http://www.hp.com/, select Software and Driver Downloads, and then enter the model number of your thin client. The tools and appropriate BIOS images are contained...
... on to reboot the computer during the upgrade process 62 Appendix E System BIOS To determine the BIOS family, version, and date on the thin client, press F10 during the recovery process. At power on, the BIOS is automatically restored from the HP Web site at: http://www.hp.com/, select Software and Driver Downloads, and then enter the model number of your thin client. The tools and appropriate BIOS images are contained...
Troubleshooting Guide: HP t5630, t5545, t5145, and t5540 Thin Clients
Page 72
...B basic troubleshooting 28 battery, replacing 13 beep codes 27 BIOS restoring 61 updating 62 BIOS settings 20 C cable lock slot location 3 cable routing slot 4 cautions ambient temperature 8 HP Quick Release 17 mounting thin client 19 static electricity 7 changing BIOS settings in the repset utility 20 using the F10 utility 21 components front panel 2 rear panel 4 top 3 configuring a PXE server 54 configuring Remote Installation Services 55 D description 1 diagnostics and troubleshooting 25 dimensions 51 diskette drive 14 diskless troubleshooting 29 download hardware drivers 8 DVI-D connector...
...B basic troubleshooting 28 battery, replacing 13 beep codes 27 BIOS restoring 61 updating 62 BIOS settings 20 C cable lock slot location 3 cable routing slot 4 cautions ambient temperature 8 HP Quick Release 17 mounting thin client 19 static electricity 7 changing BIOS settings in the repset utility 20 using the F10 utility 21 components front panel 2 rear panel 4 top 3 configuring a PXE server 54 configuring Remote Installation Services 55 D description 1 diagnostics and troubleshooting 25 dimensions 51 diskette drive 14 diskless troubleshooting 29 download hardware drivers 8 DVI-D connector...
Troubleshooting Guide: HP t5630, t5545, t5145, and t5540 Thin Clients
Page 73
... side cover 11 secure USB compartment cover 9 side access panel 11 restore 53 restoring a corrupt BIOS 61 restoring the flash image 48 RIS menu 56 RJ-45 connector location 4 rubber feet, installing 4 S secure cable routing slot 4 secure USB compartment location 2, 3 ports 3 removing cover 8 replacing cover 9 security cable routing slot 12 USB devices 12 serial connector location 4 serial number location 2 setting user permissions on the Active Directory Server 55 Setup Utility Advanced BIOS Features 22 Integrated Peripherals 23 Main Menu 21 Power Management Setup 24 Standard CMOS features...
... side cover 11 secure USB compartment cover 9 side access panel 11 restore 53 restoring a corrupt BIOS 61 restoring the flash image 48 RIS menu 56 RJ-45 connector location 4 rubber feet, installing 4 S secure cable routing slot 4 secure USB compartment location 2, 3 ports 3 removing cover 8 replacing cover 9 security cable routing slot 12 USB devices 12 serial connector location 4 serial number location 2 setting user permissions on the Active Directory Server 55 Setup Utility Advanced BIOS Features 22 Integrated Peripherals 23 Main Menu 21 Power Management Setup 24 Standard CMOS features...


