
HP Notebook Hard Drives & Solid State Drives Identifying, Preventing, Diagnosing and Recovering from Drive Failures Care and Mai
Page 6
... driver HP offers the Intel Matrix Storage Manager driver for notebook PC models that provides up to 150MB/sec transfer rate for disk traffic, and provides link power management with Intel® Application Accelerator drivers. Procedures for adding SATA drivers to RIS (Remote Installation Service) installation points include: Adding SATA drivers to installation CDs, building an image, and switching to SATA AHCI mode Using Sysprep with Serial ATA hard disk drives...
... driver HP offers the Intel Matrix Storage Manager driver for notebook PC models that provides up to 150MB/sec transfer rate for disk traffic, and provides link power management with Intel® Application Accelerator drivers. Procedures for adding SATA drivers to RIS (Remote Installation Service) installation points include: Adding SATA drivers to installation CDs, building an image, and switching to SATA AHCI mode Using Sysprep with Serial ATA hard disk drives...
HP Notebook Hard Drives & Solid State Drives Identifying, Preventing, Diagnosing and Recovering from Drive Failures Care and Mai
Page 7
... viruses. Whenever possible, adjust the power management settings (power schemes) in the Control Panel to permit the hard drive to have the latest BIOS, firmware, and driver enhancements for your HP Business Notebook, refer to align logical sectors (OS) with physical sectors (disk media). however, this limitation, the industry is moving Advanced Format drives with Older Operating Systems It is important to turn off when it is unused...
... viruses. Whenever possible, adjust the power management settings (power schemes) in the Control Panel to permit the hard drive to have the latest BIOS, firmware, and driver enhancements for your HP Business Notebook, refer to align logical sectors (OS) with physical sectors (disk media). however, this limitation, the industry is moving Advanced Format drives with Older Operating Systems It is important to turn off when it is unused...

User Guide
Page 4
Encrypt your computer ...13 9 Backing up and recovering your data ...15 Updating apps, widgets, and the operating system 15 Backing up and resetting ...15 Resetting factory data ...15 Starting up using the recovery menu 16 Updating the system using an OTA (over-the-air) update 16 Updating the system using a file-based update 16 10 Using storage ...17 Accessing tablet storage using a USB cable (select models only 17 Accessing external SD cards or USB drives 17 Unmounting/disconnecting external SD cards or USB drives 17 11 More HP resources ...18 iv
Encrypt your computer ...13 9 Backing up and recovering your data ...15 Updating apps, widgets, and the operating system 15 Backing up and resetting ...15 Resetting factory data ...15 Starting up using the recovery menu 16 Updating the system using an OTA (over-the-air) update 16 Updating the system using a file-based update 16 10 Using storage ...17 Accessing tablet storage using a USB cable (select models only 17 Accessing external SD cards or USB drives 17 Unmounting/disconnecting external SD cards or USB drives 17 11 More HP resources ...18 iv
User Guide
Page 5
... Physical Keyboard, touch Set up a keyboard layout or input method for your region: a. NOTE: When you can use this email address for charging the tablet. 2. If you have a Google account, follow these instructions: NOTE: For basic operating instructions, see the printed Setup Instructions poster included in the box with your computer, you may need to create one now. Follow the on-screen instructions to turn on...
... Physical Keyboard, touch Set up a keyboard layout or input method for your region: a. NOTE: When you can use this email address for charging the tablet. 2. If you have a Google account, follow these instructions: NOTE: For basic operating instructions, see the printed Setup Instructions poster included in the box with your computer, you may need to create one now. Follow the on-screen instructions to turn on...
User Guide
Page 6
... release instructions, see the printed Setup Instructions poster included in the box with your computer. ● To open Quick Settings, and then touch one or more keywords. Type one or more . Swipe down from the upper right corner of the screen to easily access Wi-Fi settings, manage display brightness, open a specific setting. 2 Chapter 2 Using Android features Using the on-screen keyboard and voice search NOTE: To view the on -screen keyboard, touch the...
... release instructions, see the printed Setup Instructions poster included in the box with your computer. ● To open Quick Settings, and then touch one or more keywords. Type one or more . Swipe down from the upper right corner of the screen to easily access Wi-Fi settings, manage display brightness, open a specific setting. 2 Chapter 2 Using Android features Using the on-screen keyboard and voice search NOTE: To view the on -screen keyboard, touch the...
User Guide
Page 7
...'t need to worry about spaces because they're added automatically for you want to type, and lift it after each letter, use Gesture Typing to input a word without lifting your finger over the letters you . Using Screen Magnification Users with visual impairments can enter full-screen magnification by triple-tapping the screen. Touch the All apps icon, and then touch Settings. 2. Under System, touch Accessibility...
...'t need to worry about spaces because they're added automatically for you want to type, and lift it after each letter, use Gesture Typing to input a word without lifting your finger over the letters you . Using Screen Magnification Users with visual impairments can enter full-screen magnification by triple-tapping the screen. Touch the All apps icon, and then touch Settings. 2. Under System, touch Accessibility...
User Guide
Page 8
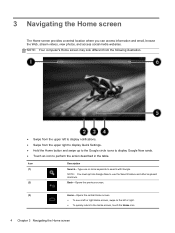
... left or right. ● To quickly return to use the Search feature and other keyboard shortcuts. Icon (1) (2) Description Search-Type one or more keywords to perform the action described in the table. 3 Navigating the Home screen The Home screen provides a central location where you can access information and email, browse the Web, stream videos, view photos, and access social media websites.
... left or right. ● To quickly return to use the Search feature and other keyboard shortcuts. Icon (1) (2) Description Search-Type one or more keywords to perform the action described in the table. 3 Navigating the Home screen The Home screen provides a central location where you can access information and email, browse the Web, stream videos, view photos, and access social media websites.
User Guide
Page 10
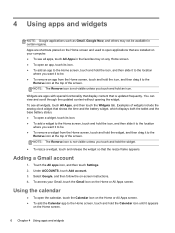
... -screen instructions. 4. You can view and scroll through the updated content without opening the widget. Select Google, and then follow the on the Home screen and used to open an app, touch its icon. ● To add a widget to the Home screen, touch and hold the icon, and then slide it to the location where you want it to be. ● To remove...
... -screen instructions. 4. You can view and scroll through the updated content without opening the widget. Select Google, and then follow the on the Home screen and used to open an app, touch its icon. ● To add a widget to the Home screen, touch and hold the icon, and then slide it to the location where you want it to be. ● To remove...

User Guide
Page 14
... a Bluetooth device, such as a headset, keyboard, or mouse with your computer. 1. Connect to the Internet. 1. Type the security key, if required, and then touch Connect. Connect to pair the device. Touch the device, and follow the on-screen instructions to Bluetooth® You can connect to a wireless network Browse the Web, read your device name to make it is turned on Bluetooth, and then touch Bluetooth. 4. Touch your email, or perform other online activities. To connect to all nearby Bluetooth devices. 5.
... a Bluetooth device, such as a headset, keyboard, or mouse with your computer. 1. Connect to the Internet. 1. Type the security key, if required, and then touch Connect. Connect to pair the device. Touch the device, and follow the on-screen instructions to Bluetooth® You can connect to a wireless network Browse the Web, read your device name to make it is turned on Bluetooth, and then touch Bluetooth. 4. Touch your email, or perform other online activities. To connect to all nearby Bluetooth devices. 5.
User Guide
Page 15
... your system configuration. ◦ Sound-Adjust Volumes and Default notification, and enable or disable Touch sounds and Screen lock sound. ◦ DTS Sound+-Enable or disable DTS Sound+, and select Music, Movie, or Voice. ◦ Display-Adjust Brightness, Wallpaper, Sleep, and Font size. ◦ HDMI-Adjust 3D Stereoscopic output using an HDMI connection. ◦ Storage-View available space in computer memory and SD™ card memory. ◦ Battery-View battery charge percentage and battery usage by various features. ◦ Apps -View downloaded apps...
... your system configuration. ◦ Sound-Adjust Volumes and Default notification, and enable or disable Touch sounds and Screen lock sound. ◦ DTS Sound+-Enable or disable DTS Sound+, and select Music, Movie, or Voice. ◦ Display-Adjust Brightness, Wallpaper, Sleep, and Font size. ◦ HDMI-Adjust 3D Stereoscopic output using an HDMI connection. ◦ Storage-View available space in computer memory and SD™ card memory. ◦ Battery-View battery charge percentage and battery usage by various features. ◦ Apps -View downloaded apps...
User Guide
Page 16
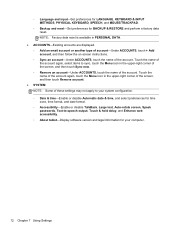
... 7 Using Settings ◦ Language and input-Set preferences for LANGUAGE, KEYBOARD & INPUT METHODS, PHYSICAL KEYBOARD, SPEECH, and MOUSE/TRACKPAD. ◦ Backup and reset-Set preferences for time zone, time format, and date format. ◦ Accessibility-Enable or disable TalkBack, Large text, Auto-rotate screen, Speak passwords, Text-to sync, touch the Menu icon in PERSONAL DATA. ● ACCOUNTS-Existing accounts are displayed. ◦ Add an email account or another type...
... 7 Using Settings ◦ Language and input-Set preferences for LANGUAGE, KEYBOARD & INPUT METHODS, PHYSICAL KEYBOARD, SPEECH, and MOUSE/TRACKPAD. ◦ Backup and reset-Set preferences for time zone, time format, and date format. ◦ Accessibility-Enable or disable TalkBack, Large text, Auto-rotate screen, Speak passwords, Text-to sync, touch the Menu icon in PERSONAL DATA. ● ACCOUNTS-Existing accounts are displayed. ◦ Add an email account or another type...
User Guide
Page 17
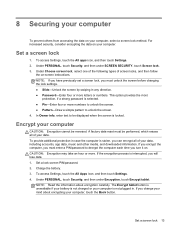
... lose data. 1. Under PERSONAL, touch Security, and then under SCREEN SECURITY, touch Screen lock. 3. If you can encrypt all of your data. In Owner info, enter text to unlock the screen. 4. Encrypt your computer, touch the Back button. A factory data reset must unlock the screen before changing the lock settings. ● Slide-Unlock the screen by swiping in any direction. ● Password-Enter four or more letters or numbers. To provide additional protection...
... lose data. 1. Under PERSONAL, touch Security, and then under SCREEN SECURITY, touch Screen lock. 3. If you can encrypt all of your data. In Owner info, enter text to unlock the screen. 4. Encrypt your computer, touch the Back button. A factory data reset must unlock the screen before changing the lock settings. ● Slide-Unlock the screen by swiping in any direction. ● Password-Enter four or more letters or numbers. To provide additional protection...
User Guide
Page 19
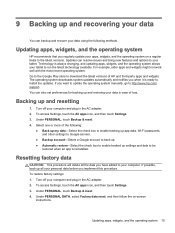
... the data you have added to be restored when an app is ready to http://www.hp.com/ support. To access Settings, touch the All apps icon, and then touch Settings. 3. Resetting factory data CAUTION: This procedure will delete all your personal data before you want to update the operating system manually, go to install the updates. Under PERSONAL, touch Backup & reset. 4. Select one or more of the...
... the data you have added to be restored when an app is ready to http://www.hp.com/ support. To access Settings, touch the All apps icon, and then touch Settings. 3. Resetting factory data CAUTION: This procedure will delete all your personal data before you want to update the operating system manually, go to install the updates. Under PERSONAL, touch Backup & reset. 4. Select one or more of the...

User Guide
Page 20
... recovery by directly accessing the Recovery menu. 1. Move the volume up and volume down key to highlight wipe data/factory reset, and then press the power button to confirm the selection. 4. The system may reboot as updates are applied. Select Apply update from http://www.hp.com. 3. To access Settings, touch the All Apps icon, and then touch Settings. 4. Updating the system using an OTA (over-the-air) update 1. Updating the system using a file-based update 1. Turn...
... recovery by directly accessing the Recovery menu. 1. Move the volume up and volume down key to highlight wipe data/factory reset, and then press the power button to confirm the selection. 4. The system may reboot as updates are applied. Select Apply update from http://www.hp.com. 3. To access Settings, touch the All Apps icon, and then touch Settings. 4. Updating the system using an OTA (over-the-air) update 1. Updating the system using a file-based update 1. Turn...
User Guide
Page 21
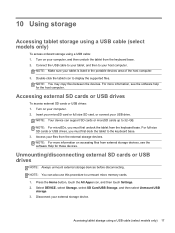
... first undock the tablet from external storage devices, see the software help for those devices. Unmounting/disconnecting external SD cards or USB drives NOTE: Always unmount external storage devices before disconnecting. Disconnect your host computer. Connect the USB cable to your tablet, and then to display the supported files. 10 Using storage Accessing tablet storage using a USB cable (select models only) To access onboard storage using a USB cable (select models only) 17 NOTE: Make sure your files from...
... first undock the tablet from external storage devices, see the software help for those devices. Unmounting/disconnecting external SD cards or USB drives NOTE: Always unmount external storage devices before disconnecting. Disconnect your host computer. Connect the USB cable to your tablet, and then to display the supported files. 10 Using storage Accessing tablet storage using a USB cable (select models only) To access onboard storage using a USB cable (select models only) 17 NOTE: Make sure your files from...
HP SlateBook 10 x2 PC Maintenance and Service Guide
Page 7
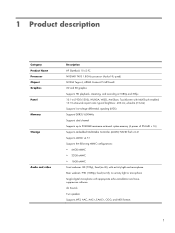
... maximum on-board system memory (4 pieces of 256-MB × 16) Supports embedded MultiMedia Controller (eMMC) NAND flash v4.41 Supports eMMC v4.51 Supports the following eMMC configurations: ● 64GB eMMC ● 32GB eMMC ● 16GB eMMC Front webcam: HD (720p), fixed (no tilt), with activity light and microphone Rear webcam: FHD (1080p), fixed (no tilt), no activity light or microphone Single digital microphone with MultiTouch enabled; 16:10 ultra...
... maximum on-board system memory (4 pieces of 256-MB × 16) Supports embedded MultiMedia Controller (eMMC) NAND flash v4.41 Supports eMMC v4.51 Supports the following eMMC configurations: ● 64GB eMMC ● 32GB eMMC ● 16GB eMMC Front webcam: HD (720p), fixed (no tilt), with activity light and microphone Rear webcam: FHD (1080p), fixed (no tilt), no activity light or microphone Single digital microphone with MultiTouch enabled; 16:10 ultra...

HP SlateBook 10 x2 PC Maintenance and Service Guide
Page 26
... unplugging the power cord from the tablet. Disconnect all external devices from the tablet. 3. Display enclosure Description In royal blue finish In smoke silver finish In snow white finish Spare part number 728137-001 728135-001 728136-001 Before disassembling the tablet, follow this chapter should only be removed, replaced, and/or loosened when servicing the tablet. Removal and replacement procedures Tablet...
... unplugging the power cord from the tablet. Disconnect all external devices from the tablet. 3. Display enclosure Description In royal blue finish In smoke silver finish In snow white finish Spare part number 728137-001 728135-001 728136-001 Before disassembling the tablet, follow this chapter should only be removed, replaced, and/or loosened when servicing the tablet. Removal and replacement procedures Tablet...
HP SlateBook 10 x2 PC Maintenance and Service Guide
Page 42
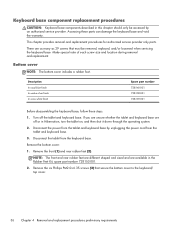
..., spare part number 728153-001. 2. Turn off or in Hibernation, turn the tablet on, and then shut it down through the operating system. 2. Remove the bottom cover: 1. Keyboard base component replacement procedures CAUTION: Keyboard base components described in this chapter should only be removed, replaced, and/or loosened when servicing the keyboard base. Remove the six Phillips PM2.0×6.35 screws (3) that must be accessed by...
..., spare part number 728153-001. 2. Turn off or in Hibernation, turn the tablet on, and then shut it down through the operating system. 2. Remove the bottom cover: 1. Keyboard base component replacement procedures CAUTION: Keyboard base components described in this chapter should only be removed, replaced, and/or loosened when servicing the keyboard base. Remove the six Phillips PM2.0×6.35 screws (3) that must be accessed by...
HP SlateBook 10 x2 PC Maintenance and Service Guide
Page 52
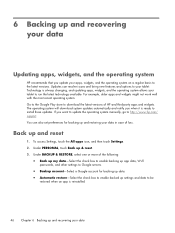
... be restored when an app is ready to http://www.hp.com/ support. If you want to update the operating system manually, go to install these updates. Back up & reset. 3. The operating system will download system updates automatically and notify you when it is reinstalled. 46 Chapter 6 Backing up and recovering your tablet. To access Settings, touch the All apps icon, and then touch Settings. 2. 6 Backing up and recovering...
... be restored when an app is ready to http://www.hp.com/ support. If you want to update the operating system manually, go to install these updates. Back up & reset. 3. The operating system will download system updates automatically and notify you when it is reinstalled. 46 Chapter 6 Backing up and recovering your tablet. To access Settings, touch the All apps icon, and then touch Settings. 2. 6 Backing up and recovering...
HP SlateBook 10 x2 PC Maintenance and Service Guide
Page 58
... USB 5 power button 4 power button board removal 26 spare part number 8, 13, 26 power connector 5 power cord set requirements 48 spare part numbers 12 power requirements, product description 2 processor, product description 1 product description audio 1 chipset 1 display panel 1 external media cards 2 graphics 1 memory 1 microphone 1 operating system 3 ports 2 power requirements 2 processors 1 product name 1 sensors 2 serviceability 3 storage 1 video 1 wireless 2 product name 1 R rear webcam location 4 removal 21 spare part number 8, 14, 21 recent apps key 5 Rubber Feet Kit, spare part number...
... USB 5 power button 4 power button board removal 26 spare part number 8, 13, 26 power connector 5 power cord set requirements 48 spare part numbers 12 power requirements, product description 2 processor, product description 1 product description audio 1 chipset 1 display panel 1 external media cards 2 graphics 1 memory 1 microphone 1 operating system 3 ports 2 power requirements 2 processors 1 product name 1 sensors 2 serviceability 3 storage 1 video 1 wireless 2 product name 1 R rear webcam location 4 removal 21 spare part number 8, 14, 21 recent apps key 5 Rubber Feet Kit, spare part number...


