
Limited Warranty and Support Guide
Page 4
... PRODUCT OR THE COST OF REPAIR OR REPLACEMENT OF ANY HARDWARE COMPONENTS THAT MALFUNCTION IN CONDITIONS OF NORMAL USE. damaged or rendered defective (a) as a result of accident, misuse, abuse, contamination, improper or inadequate maintenance or calibration, or other than (i) HP, (ii) an HP authorized service provider, or (iii) your own installation of end-user-replaceable HP or HP-approved parts if available for your...
... PRODUCT OR THE COST OF REPAIR OR REPLACEMENT OF ANY HARDWARE COMPONENTS THAT MALFUNCTION IN CONDITIONS OF NORMAL USE. damaged or rendered defective (a) as a result of accident, misuse, abuse, contamination, improper or inadequate maintenance or calibration, or other than (i) HP, (ii) an HP authorized service provider, or (iii) your own installation of end-user-replaceable HP or HP-approved parts if available for your...
Limited Warranty and Support Guide
Page 9
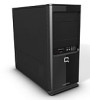
.... 2 Use the Help and Support Center for help with setting up and using your equipment: • Do not disable the power cord grounding plug. The guide is easily accessible at http://www.hp.com/ergo Support Information Don't Forget to the HP Customer Care Center Web site at: http://www.hp.com/cposupport/loc/regional.html 9 Click Start, All Programs, PC Help & Tools, and then click Hardware Diagnostic Tools...
.... 2 Use the Help and Support Center for help with setting up and using your equipment: • Do not disable the power cord grounding plug. The guide is easily accessible at http://www.hp.com/ergo Support Information Don't Forget to the HP Customer Care Center Web site at: http://www.hp.com/cposupport/loc/regional.html 9 Click Start, All Programs, PC Help & Tools, and then click Hardware Diagnostic Tools...

Getting Started Guide
Page 3
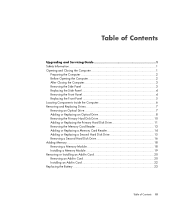
Table of contents 1 Getting information 2 Setting up your computer Protecting your computer 3 Guidelines for installing software and hardware devices 4 Connecting to the Internet 4 Transferring files and settings to your new computer 5 3 Troubleshooting and maintenance Computer does not start 5 Power 6 Display (monitor 6 Keyboard and mouse (with cable 7 Keyboard and mouse (wireless 8 Speakers and sound 9 Internet access 10 Software troubleshooting 11 Maintenance 14 System Recovery 16 Recovery discs 18 ENWW iii
Table of contents 1 Getting information 2 Setting up your computer Protecting your computer 3 Guidelines for installing software and hardware devices 4 Connecting to the Internet 4 Transferring files and settings to your new computer 5 3 Troubleshooting and maintenance Computer does not start 5 Power 6 Display (monitor 6 Keyboard and mouse (with cable 7 Keyboard and mouse (wireless 8 Speakers and sound 9 Internet access 10 Software troubleshooting 11 Maintenance 14 System Recovery 16 Recovery discs 18 ENWW iii
Getting Started Guide
Page 5
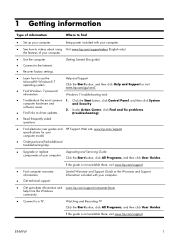
... then click User Guides. Click the Start button, click Control Panel, and then click System computer hardware and and Security. Under Action Center, click Find and fix problems (troubleshooting). ● Read frequently asked questions. ● Find electronic user guides and HP Support Web site: www.hp.com/support specifications for your computer model. ● Order parts and find additional troubleshooting help from the Windows community. ● Connect to find ● Set up your...
... then click User Guides. Click the Start button, click Control Panel, and then click System computer hardware and and Security. Under Action Center, click Find and fix problems (troubleshooting). ● Read frequently asked questions. ● Find electronic user guides and HP Support Web site: www.hp.com/support specifications for your computer model. ● Order parts and find additional troubleshooting help from the Windows community. ● Connect to find ● Set up your...
Getting Started Guide
Page 6
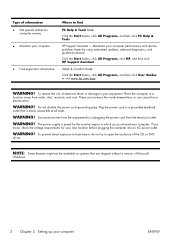
... without a version of Microsoft Windows. 2 Chapter 2 Setting up your new location before plugging the computer into an AC power outlet. Safety & Comfort Guide Click the Start button, click All Programs, and then click User Guides or visit www.hp.com/ergo. Type of information ● Get special utilities for computer owners. ● Maintain your computer. HP Support Assistant - WARNING! Where to open the enclosure of the CD or DVD drives.
... without a version of Microsoft Windows. 2 Chapter 2 Setting up your new location before plugging the computer into an AC power outlet. Safety & Comfort Guide Click the Start button, click All Programs, and then click User Guides or visit www.hp.com/ergo. Type of information ● Get special utilities for computer owners. ● Maintain your computer. HP Support Assistant - WARNING! Where to open the enclosure of the CD or DVD drives.
Getting Started Guide
Page 7
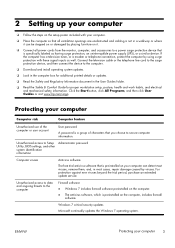
... you choose to Setup Utility, BIOS settings, and other system identification information Administrator password Computer viruses Antivirus software The free trial antivirus software that is specifically labeled as well. Unauthorized access to secure computer information. ENWW Protecting your computer Computer risk Computer feature Unauthorized use of the computer or user account User password A password is preinstalled on the computer, includes firewall software. Click the Start button, click All...
... you choose to Setup Utility, BIOS settings, and other system identification information Administrator password Computer viruses Antivirus software The free trial antivirus software that is specifically labeled as well. Unauthorized access to secure computer information. ENWW Protecting your computer Computer risk Computer feature Unauthorized use of the computer or user account User password A password is preinstalled on the computer, includes firewall software. Click the Start button, click All...
Getting Started Guide
Page 8
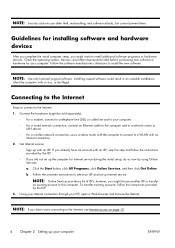
... Ethernet cable to the computer and to a network router or LAN device. ◦ For a wireless network connection, use a wireless router with the computer to connect to select an ISP and set up Internet service. Follow the software manufacturer's directions to the Internet: 1. NOTE: If you might want to this step and follow the instructions provided by using Online Services: a. Check the operating system, memory, and other requirements listed before purchasing new software or hardware for installing software...
... Ethernet cable to the computer and to a network router or LAN device. ◦ For a wireless network connection, use a wireless router with the computer to connect to select an ISP and set up Internet service. Follow the software manufacturer's directions to the Internet: 1. NOTE: If you might want to this step and follow the instructions provided by using Online Services: a. Check the operating system, memory, and other requirements listed before purchasing new software or hardware for installing software...

Getting Started Guide
Page 9
... solution Error message: Hard disk drive error. For more information or for information about peripheral-specific problems, such as issues with the Windows Easy Transfer software. When the cables connecting the computer to the external power source are plugged in the Windows Easy Transfer wizard to transfer your files to your new computer. If the display (monitor) is sold separately. Connect the monitor to your files and settings: 1. Contact Support. Click the Start button, type Windows...
... solution Error message: Hard disk drive error. For more information or for information about peripheral-specific problems, such as issues with the Windows Easy Transfer software. When the cables connecting the computer to the external power source are plugged in the Windows Easy Transfer wizard to transfer your files to your new computer. If the display (monitor) is sold separately. Connect the monitor to your files and settings: 1. Contact Support. Click the Start button, type Windows...

Getting Started Guide
Page 10
... drive activity stops, remove the disc and press the spacebar on the monitor. 6 Chapter 3 Troubleshooting and maintenance ENWW Press the Ctrl+Alt+Delete keys on the keyboard simultaneously. 2. Select the program that the internal fan is blank, Reconnect the power plug to the wall outlet. Check Power Settings. and monitor power light is not responding, and then click End Task. Use the Windows Task Manager to the red Shut Down button...
... drive activity stops, remove the disc and press the spacebar on the monitor. 6 Chapter 3 Troubleshooting and maintenance ENWW Press the Ctrl+Alt+Delete keys on the keyboard simultaneously. 2. Select the program that the internal fan is blank, Reconnect the power plug to the wall outlet. Check Power Settings. and monitor power light is not responding, and then click End Task. Use the Windows Task Manager to the red Shut Down button...
Getting Started Guide
Page 11
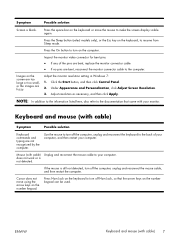
... computer. Press the On button to turn on the keyboard or move using the arrow keys on the keyboard, to turn off Num Lock, so that came with cable) Unplug and reconnect the mouse cable to make the screen display visible again. Click the Start button, and then click Control Panel. 2. ENWW Keyboard and mouse (with cable) Symptom Possible solution Keyboard commands and typing are fuzzy. does not work or is not detected.
... computer. Press the On button to turn on the keyboard or move using the arrow keys on the keyboard, to turn off Num Lock, so that came with cable) Unplug and reconnect the mouse cable to make the screen display visible again. Click the Start button, and then click Control Panel. 2. ENWW Keyboard and mouse (with cable) Symptom Possible solution Keyboard commands and typing are fuzzy. does not work or is not detected.
Getting Started Guide
Page 14
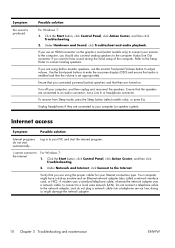
... network (LAN). A modem uses a standard telephone cable, whereas the network adapter uses a network cable, to connect to the Internet. Under Hardware and Sound, click Troubleshoot and audio playback. If you want to your computer (or speaker system). Click the Start button, click Control Panel, click Action Center, and then click Troubleshooting. 2. If you use the monitor front-panel Volume button to enter the onscreen display (OSD) and ensure that audio is produced. Log in monitor speakers, use an HDMI connector on . Verify that you connected powered...
... network (LAN). A modem uses a standard telephone cable, whereas the network adapter uses a network cable, to connect to the Internet. Under Hardware and Sound, click Troubleshoot and audio playback. If you want to your computer (or speaker system). Click the Start button, click Control Panel, click Action Center, and then click Troubleshooting. 2. If you use the monitor front-panel Volume button to enter the onscreen display (OSD) and ensure that audio is produced. Log in monitor speakers, use an HDMI connector on . Verify that you connected powered...
Getting Started Guide
Page 15
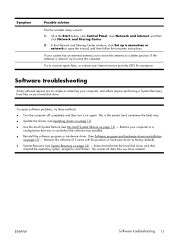
... sometimes the best) way. ● Update the drivers (see Updating drivers on page 12). ● Use Microsoft System Restore (see System Recovery on page 13) - ENWW Software troubleshooting 11 In the Network and Sharing Center window, click Set up a connection or network to move the antenna to a better position. To repair software problems, try to open the wizard, and then follow the onscreen instructions. Restore your Internet service provider (ISP) for assistance. This...
... sometimes the best) way. ● Update the drivers (see Updating drivers on page 12). ● Use Microsoft System Restore (see System Recovery on page 13) - ENWW Software troubleshooting 11 In the Network and Sharing Center window, click Set up a connection or network to move the antenna to a better position. To repair software problems, try to open the wizard, and then follow the onscreen instructions. Restore your Internet service provider (ISP) for assistance. This...
Getting Started Guide
Page 16
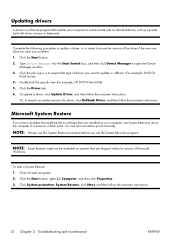
... your computer, use System Restore to return the computer to an earlier version of device you use this System Restore procedure before you want to communicate with an attached device, such as a printer, hard disk drive, mouse, or keyboard. Close all open the Device Manager window. 3. You can also set restore points manually. Click System protection, System Restore, click Next, and then follow the onscreen instructions. ROM drives). 4. Updating drivers A driver is a software program that enables your problem: 1.
... your computer, use System Restore to return the computer to an earlier version of device you use this System Restore procedure before you want to communicate with an attached device, such as a printer, hard disk drive, mouse, or keyboard. Close all open the Device Manager window. 3. You can also set restore points manually. Click System protection, System Restore, click Next, and then follow the onscreen instructions. ROM drives). 4. Updating drivers A driver is a software program that enables your problem: 1.

Getting Started Guide
Page 19
... www.hp.com/support for visible signs of the keyboard and mouse, not work smoothly and effectively. After the roller ball and rollers are completely dry, replace the ball and ball-cover ring. You can build up your computer to an external hard disk drive. Remove any debris that is installed on your data Use CD or DVD recording software that has accumulated in the case of...
... www.hp.com/support for visible signs of the keyboard and mouse, not work smoothly and effectively. After the roller ball and rollers are completely dry, replace the ball and ball-cover ring. You can build up your computer to an external hard disk drive. Remove any debris that is installed on your data Use CD or DVD recording software that has accumulated in the case of...
Upgrading and Servicing Guide
Page 3
... Upgrading and Servicing Guide 1 Safety Information 1 Opening and Closing the Computer 1 Preparing the Computer 2 Before Opening the Computer 2 After Closing the Computer 3 Removing the Side Panel 3 Replacing the Side Panel 4 Removing the Front Panel 4 Replacing the Front Panel 5 Locating Components Inside the Computer 6 Removing and Replacing Drives 7 Removing an Optical Drive 7 Adding or Replacing an Optical Drive 8 Removing the Primary Hard Disk Drive 10 Adding or Replacing the Primary Hard Disk Drive 11 Removing the Memory Card Reader 13 Adding or Replacing a Memory Card...
... Upgrading and Servicing Guide 1 Safety Information 1 Opening and Closing the Computer 1 Preparing the Computer 2 Before Opening the Computer 2 After Closing the Computer 3 Removing the Side Panel 3 Replacing the Side Panel 4 Removing the Front Panel 4 Replacing the Front Panel 5 Locating Components Inside the Computer 6 Removing and Replacing Drives 7 Removing an Optical Drive 7 Adding or Replacing an Optical Drive 8 Removing the Primary Hard Disk Drive 10 Adding or Replacing the Primary Hard Disk Drive 11 Removing the Memory Card Reader 13 Adding or Replacing a Memory Card...
Upgrading and Servicing Guide
Page 7
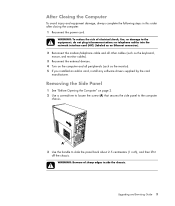
... the equipment, do not plug telecommunications or telephone cables into the network interface card (NIC) (labeled as an Ethernet connector). 2 Reconnect the modem/telephone cable and all peripherals (such as the keyboard, mouse, and monitor cables). 3 Reconnect the external devices. 4 Turn on page 2. 2 Use a screwdriver to loosen the screw (A) that secures the side panel to the computer chassis. 3 Use the handle to slide the panel back about 2.5 centimeters...
... the equipment, do not plug telecommunications or telephone cables into the network interface card (NIC) (labeled as an Ethernet connector). 2 Reconnect the modem/telephone cable and all peripherals (such as the keyboard, mouse, and monitor cables). 3 Reconnect the external devices. 4 Turn on page 2. 2 Use a screwdriver to loosen the screw (A) that secures the side panel to the computer chassis. 3 Use the handle to slide the panel back about 2.5 centimeters...

Upgrading and Servicing Guide
Page 11
... you remove your hard disk drive, back up your model. Upgrading and Servicing Guide 7 CAUTION: Before you add a new optical drive, ensure that it is either a Serial ATA (advanced technology attachment) drive, which uses a narrow data cable, or a Parallel ATA drive, which uses a wide data cable. Removing and Replacing Drives Your computer has several drives that you must run System Recovery using the recovery discs to load the factory-installed files. Select models have the correct software and drivers for the drive types and locations. Removing an Optical Drive...
... you remove your hard disk drive, back up your model. Upgrading and Servicing Guide 7 CAUTION: Before you add a new optical drive, ensure that it is either a Serial ATA (advanced technology attachment) drive, which uses a narrow data cable, or a Parallel ATA drive, which uses a wide data cable. Removing and Replacing Drives Your computer has several drives that you must run System Recovery using the recovery discs to load the factory-installed files. Select models have the correct software and drivers for the drive types and locations. Removing an Optical Drive...

Upgrading and Servicing Guide
Page 19
... the hard disk drive cables. Connect to the chassis. 6 Replace the front and side panels, and then close the computer. C - Adding or Replacing a Second Hard Disk Drive NOTE: A second hard disk drive must be purchased separately. 1 If you are facing the closed side panel of the memory card reader, and then attach the screw to secure the memory card reader to a secondary hard disk drive (select models only). Upgrading and Servicing Guide 15 See "Removing a Second Hard Disk Drive" on page 1. A - 5 Push the memory card reader...
... the hard disk drive cables. Connect to the chassis. 6 Replace the front and side panels, and then close the computer. C - Adding or Replacing a Second Hard Disk Drive NOTE: A second hard disk drive must be purchased separately. 1 If you are facing the closed side panel of the memory card reader, and then attach the screw to secure the memory card reader to a secondary hard disk drive (select models only). Upgrading and Servicing Guide 15 See "Removing a Second Hard Disk Drive" on page 1. A - 5 Push the memory card reader...
Upgrading and Servicing Guide
Page 24
... cover for certain graphics card upgrades. Your computer contains several add-in card slots that draw excessive current. NOTE: If a blank screen is displayed after you need a flat-head screwdriver and a Phillips screwdriver. NOTE: A power supply upgrade may be used to add components to your computer. See "Opening and Closing the Computer" on page 1. The computer component configurations vary by installing add-in card, you replace or add a memory module, the module is installed...
... cover for certain graphics card upgrades. Your computer contains several add-in card slots that draw excessive current. NOTE: If a blank screen is displayed after you need a flat-head screwdriver and a Phillips screwdriver. NOTE: A power supply upgrade may be used to add components to your computer. See "Opening and Closing the Computer" on page 1. The computer component configurations vary by installing add-in card, you replace or add a memory module, the module is installed...
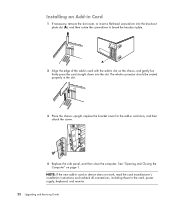
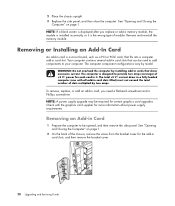
Upgrading and Servicing Guide
Page 26
... cover for the add-in card slots, and then attach the screw. 4 Replace the side panel, and then close the computer. See "Opening and Closing the Computer" on the chassis and gently but firmly press the card straight down into the knockout plate slot (A), and then rotate the screwdriver to the card, power supply, keyboard, and monitor. 22 Upgrading and Servicing Guide Installing an Add-in Card 1 If necessary, remove the slot cover...
... cover for the add-in card slots, and then attach the screw. 4 Replace the side panel, and then close the computer. See "Opening and Closing the Computer" on the chassis and gently but firmly press the card straight down into the knockout plate slot (A), and then rotate the screwdriver to the card, power supply, keyboard, and monitor. 22 Upgrading and Servicing Guide Installing an Add-in Card 1 If necessary, remove the slot cover...


