
Hardware Reference Guide (2nd Edition)
Page 38
... the drive cage until it locks into the 3.5-inch Drive Bay 2-28 www.hp.com Hardware Reference Guide See "Removing an Optical Drive or Diskette Drive" for instructions on removing an optical drive and installing a bezel blank. ✎ If replacing a diskette drive, the guide screws (front and rear) will line up on... is installed.There are aligned with the front J-slots. Continue to slide the drive all the way back until the front screws are not enough power supply connectors to support this configuration.Doing so could result in damage to the computer.
... the drive cage until it locks into the 3.5-inch Drive Bay 2-28 www.hp.com Hardware Reference Guide See "Removing an Optical Drive or Diskette Drive" for instructions on removing an optical drive and installing a bezel blank. ✎ If replacing a diskette drive, the guide screws (front and rear) will line up on... is installed.There are aligned with the front J-slots. Continue to slide the drive all the way back until the front screws are not enough power supply connectors to support this configuration.Doing so could result in damage to the computer.

Getting Started (3rd Edition)
Page 19
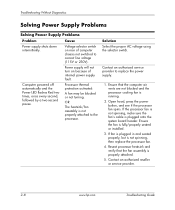
... 4 seconds. Open hood and check that both power supply cables are not flashing. Getting Started www.hp.com 15 Getting Started Solving General Problems (Continued) Problem System does not power on and the LEDs on your region. 2. Check that the power button harness is set to the system board. 3. Replace the system board. If the hard drive LED does...
... 4 seconds. Open hood and check that both power supply cables are not flashing. Getting Started www.hp.com 15 Getting Started Solving General Problems (Continued) Problem System does not power on and the LEDs on your region. 2. Check that the power button harness is set to the system board. 3. Replace the system board. If the hard drive LED does...

Getting Started (3rd Edition)
Page 20
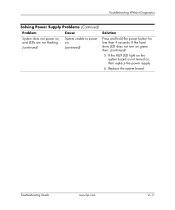
cont. Cause System unable to see if the AUX LED on the system board is not turned on . If it is turned on . If the AUX LED on the system board is turned on , then replace the power supply. 6. Check to power on , then replace the power button harness. 5. Solution 4. Getting Started Solving General Problems (Continued) Problem System does not power on and the LEDs on the front of the computer are not flashing. Replace the system board. 16 www.hp.com Getting Started cont.
cont. Cause System unable to see if the AUX LED on the system board is not turned on . If it is turned on . If the AUX LED on the system board is turned on , then replace the power supply. 6. Check to power on , then replace the power button harness. 5. Solution 4. Getting Started Solving General Problems (Continued) Problem System does not power on and the LEDs on the front of the computer are not flashing. Replace the system board. 16 www.hp.com Getting Started cont.

Getting Started (3rd Edition)
Page 28
... a time to ensure all devices are functioning properly. 4. Power on the system. Replace the system board. 24 www.hp.com Getting Started If the system enters the POST, then power off and replace one at a time and repeat this procedure until failure occurs. Replace the power supply. 5. Check if a device is overloaded). Replace the device that is causing the failure. Beeps None...
... a time to ensure all devices are functioning properly. 4. Power on the system. Replace the system board. 24 www.hp.com Getting Started If the system enters the POST, then power off and replace one at a time and repeat this procedure until failure occurs. Replace the power supply. 5. Check if a device is overloaded). Replace the device that is causing the failure. Beeps None...

Getting Started (3rd Edition)
Page 31
... the rear of the power supply, is set to power on and LEDs are not flashing. Remove the expansion cards one at a time until the AUX LED on the system board turns on your region. 2. Getting Started www.hp.com 27 Beeps None Possible Cause System unable to the appropriate voltage. Replace the system board. Getting Started Diagnostic...
... the rear of the power supply, is set to power on and LEDs are not flashing. Remove the expansion cards one at a time until the AUX LED on the system board turns on your region. 2. Getting Started www.hp.com 27 Beeps None Possible Cause System unable to the appropriate voltage. Replace the system board. Getting Started Diagnostic...
Getting Started (3rd Edition)
Page 32
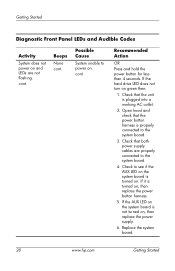
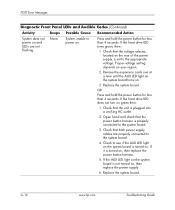
.... 3. cont. Check that the unit is plugged into a working AC outlet. 2. Beeps None cont. cont. Replace the system board. 28 www.hp.com Getting Started Getting Started Diagnostic Front Panel LEDs and Audible Codes Activity System does not power on and LEDs are properly connected to the system board. 4. Check that both power supply cables are not flashing.
.... 3. cont. Check that the unit is plugged into a working AC outlet. 2. Beeps None cont. cont. Replace the system board. 28 www.hp.com Getting Started Getting Started Diagnostic Front Panel LEDs and Audible Codes Activity System does not power on and LEDs are properly connected to the system board. 4. Check that both power supply cables are not flashing.

HP Point of Sale System rp5000 Illustrated Parts Map, 4th Edition
Page 1
...Sale System rp5000 Illustrated Parts Map Small Form Factor Chassis © 2003, 2004, 2006 Hewlett-Packard Development Company, L.P. The information in electronic products. In this document is subject to change without tray) 323090-001*⌧ 398778-001 3 Powered...replacement part. HP shall not be construed as is subject to 'RoHS legislation' means requirements of the unit. *Directive 2002/95/EC restricts the use with 337069-001 or 289574-001*⌧ 398879-001) 407306-001 +Not shown *See Requirement below System Unit 1 Chassis assembly 2 Power supply.... HP Point of...
...Sale System rp5000 Illustrated Parts Map Small Form Factor Chassis © 2003, 2004, 2006 Hewlett-Packard Development Company, L.P. The information in electronic products. In this document is subject to change without tray) 323090-001*⌧ 398778-001 3 Powered...replacement part. HP shall not be construed as is subject to 'RoHS legislation' means requirements of the unit. *Directive 2002/95/EC restricts the use with 337069-001 or 289574-001*⌧ 398879-001) 407306-001 +Not shown *See Requirement below System Unit 1 Chassis assembly 2 Power supply.... HP Point of...

HP Point of Sale System rp5000 Illustrated Parts Map, 4th Edition
Page 2
...to pins 1-2. 5. If it is, it . 5. After 60 seconds, move the jumper back to clear the CMOS memory using jumper JBAT 1. Replace the access panel. 6. Locate the header and jumper labeled JPWD1. 4. Plug in network mode time - May be configured for either 0V or +5V... Scroll Lock Green Blink On in sequence, one at a Keyboard locked in the computer and turn power off Power Supply failure CPU thermal shutdown CPU not installed Power supply overload ( crow bar) No memory No graphics System board failure (detected prior to reflash ROM. N, C, SL * Insert valid ROMPaq diskette in order...
...to pins 1-2. 5. If it is, it . 5. After 60 seconds, move the jumper back to clear the CMOS memory using jumper JBAT 1. Replace the access panel. 6. Locate the header and jumper labeled JPWD1. 4. Plug in network mode time - May be configured for either 0V or +5V... Scroll Lock Green Blink On in sequence, one at a Keyboard locked in the computer and turn power off Power Supply failure CPU thermal shutdown CPU not installed Power supply overload ( crow bar) No memory No graphics System board failure (detected prior to reflash ROM. N, C, SL * Insert valid ROMPaq diskette in order...

Troubleshooting Guide (2nd Edition)
Page 23
... the system board turns on green then: 1. OR Press and hold the power button for less than 4 seconds. Troubleshooting Guide www.hp.com 2-7 If the hard drive LED does not turn on . 3. Check that the power button harness is not turned on , then replace the power button harness. 5. If it is turned on , then replace the power supply. 6. Open...
... the system board turns on green then: 1. OR Press and hold the power button for less than 4 seconds. Troubleshooting Guide www.hp.com 2-7 If the hard drive LED does not turn on . 3. Check that the power button harness is not turned on , then replace the power button harness. 5. If it is turned on , then replace the power supply. 6. Open...
Troubleshooting Guide (2nd Edition)
Page 24
... replace the processor fan. 4. If the processor fan is not spinning, make sure the fan's cable is running. 2. Voltage selector switch on because of computer chassis not switched to correct line voltage (115V or 230V). Power supply will not turn on rear of internal power supply fault. Contact an authorized reseller or service provider. 2-8 www.hp...
... replace the processor fan. 4. If the processor fan is not spinning, make sure the fan's cable is running. 2. Voltage selector switch on because of computer chassis not switched to correct line voltage (115V or 230V). Power supply will not turn on rear of internal power supply fault. Contact an authorized reseller or service provider. 2-8 www.hp...

Troubleshooting Guide (2nd Edition)
Page 25
... adding devices one device at a time to replace the power supply. 5. Check if a device is overloaded). 1. Proper voltage setting depends on the system board. 3. Replace the device that the voltage selector, located on the system. Troubleshooting Guide www.hp.com 2-9 Troubleshooting Without Diagnostics Solving Power Supply Problems (Continued) Problem Cause Solution Power LED flashes Red four times, once every second...
... adding devices one device at a time to replace the power supply. 5. Check if a device is overloaded). 1. Proper voltage setting depends on the system board. 3. Replace the device that the voltage selector, located on the system. Troubleshooting Guide www.hp.com 2-9 Troubleshooting Without Diagnostics Solving Power Supply Problems (Continued) Problem Cause Solution Power LED flashes Red four times, once every second...

Troubleshooting Guide (2nd Edition)
Page 26
... does not turn on , then replace the power button harness. 2-10 www.hp.com Troubleshooting Guide Open hood and check that the voltage selector, located on the rear of the power supply, is turned on. Check to the system board. 3. Troubleshooting Without Diagnostics Solving Power Supply Problems (Continued) Problem Cause Solution System does not power on and LEDs are properly...
... does not turn on , then replace the power button harness. 2-10 www.hp.com Troubleshooting Guide Open hood and check that the voltage selector, located on the rear of the power supply, is turned on. Check to the system board. 3. Troubleshooting Without Diagnostics Solving Power Supply Problems (Continued) Problem Cause Solution System does not power on and LEDs are properly...
Troubleshooting Guide (2nd Edition)
Page 27
Troubleshooting Guide www.hp.com 2-11 If the hard drive LED does not turn on . (continued) Press and hold the power button for less than 4 seconds. Replace the system board. Troubleshooting Without Diagnostics Solving Power Supply Problems (Continued) Problem Cause Solution System does not power on and LEDs are not flashing. (continued) System unable to power on green then: (continued) 5. If the AUX LED light on the system board is not turned on, then replace the power supply. 6.
Troubleshooting Guide www.hp.com 2-11 If the hard drive LED does not turn on . (continued) Press and hold the power button for less than 4 seconds. Replace the system board. Troubleshooting Without Diagnostics Solving Power Supply Problems (Continued) Problem Cause Solution System does not power on and LEDs are not flashing. (continued) System unable to power on green then: (continued) 5. If the AUX LED light on the system board is not turned on, then replace the power supply. 6.

Troubleshooting Guide (2nd Edition)
Page 68
... Power failure (power supply is seated into the connector on the system. 2. Power on the rear of the power supply, is causing the problem by a two-second pause. Reseat DIMMs. Power on the system board. 3. Open the hood and ensure the 4-wire power supply cable is overloaded). 1. Proper voltage setting depends on your region. 2. Replace the power supply. 5. Pre-video memory error 1. Replace the system board...
... Power failure (power supply is seated into the connector on the system. 2. Power on the rear of the power supply, is causing the problem by a two-second pause. Reseat DIMMs. Power on the system board. 3. Open the hood and ensure the 4-wire power supply cable is overloaded). 1. Proper voltage setting depends on your region. 2. Replace the power supply. 5. Pre-video memory error 1. Replace the system board...
Troubleshooting Guide (2nd Edition)
Page 70
... the rear of the power supply, is plugged into a working AC outlet. 2. Replace the system board. Remove the expansion cards one at a time until the AUX LED light on the system board turns on your region. 2. If the AUX LED light on the system board is turned on . Replace the system board. A-16 www.hp.com Troubleshooting Guide Press...
... the rear of the power supply, is plugged into a working AC outlet. 2. Replace the system board. Remove the expansion cards one at a time until the AUX LED light on the system board turns on your region. 2. If the AUX LED light on the system board is turned on . Replace the system board. A-16 www.hp.com Troubleshooting Guide Press...

Troubleshooting Guide (2nd Edition)
Page 72
...system board even when the unit is green and labeled JPWD1 so that you are discharged of the computer or optional equipment. Reconnect the external equipment. Failure to disconnect the power cord can result in , the power supply always has voltage applied to disconnect the power... cord from electrical shock and/or hot surfaces, be easily identified. Replace the computer cover or access panel. 7. B-2 www.hp.com Troubleshooting Guide Remove the jumper from the power outlet. 2....
...system board even when the unit is green and labeled JPWD1 so that you are discharged of the computer or optional equipment. Reconnect the external equipment. Failure to disconnect the power cord can result in , the power supply always has voltage applied to disconnect the power... cord from electrical shock and/or hot surfaces, be easily identified. Replace the computer cover or access panel. 7. B-2 www.hp.com Troubleshooting Guide Remove the jumper from the power outlet. 2....

Troubleshooting Guide (2nd Edition)
Page 73
...power supply always has voltage applied to the system board even when the unit is turned off the computer and any other external equipment connected to the computer. Å WARNING: To reduce the risk of static electricity by briefly touching a grounded metal object. Troubleshooting Guide www.hp...Disconnect the keyboard, monitor, and any external devices, and disconnect the power cord from the system to the Computer Setup (F10) Utility Guide on pins 1 and 2, then repeat steps 6 through 4, replace the password jumper on the Documentation CD for more information. Establish the...
...power supply always has voltage applied to the system board even when the unit is turned off the computer and any other external equipment connected to the computer. Å WARNING: To reduce the risk of static electricity by briefly touching a grounded metal object. Troubleshooting Guide www.hp...Disconnect the keyboard, monitor, and any external devices, and disconnect the power cord from the system to the Computer Setup (F10) Utility Guide on pins 1 and 2, then repeat steps 6 through 4, replace the password jumper on the Documentation CD for more information. Establish the...


