HP Rp5000 Support Question
HP Rp5000 Support Question
Find answers below for this question about HP Rp5000 - Point of Sale System.Need a HP Rp5000 manual? We have 13 online manuals for this item!
Question posted by hurkel on August 23rd, 2014
How To Replace Hp Rp5000 Power Supply
The person who posted this question about this HP product did not include a detailed explanation. Please use the "Request More Information" button to the right if more details would help you to answer this question.
Current Answers
Related HP Rp5000 Manual Pages
HP Business Desktop Products - Worldwide Limited Warranty and Technical Support (North America) - Page 2

... warranty service. Replacement parts are warranted to be manufactured using new materials or new and used , or (iii) with the HP Hardware. Your dated sales or delivery receipt...the published operating specifications for the product; (c) by software, interfacing, parts or supplies not supplied by HP; (d) improper site preparation or maintenance; (e) virus infection; (f) loss or damage in...
Hardware Reference Guide (2nd Edition) - Page 9
Turn off the computer and remove the cap before connecting a powered serial Point of Sale device.
Product Features
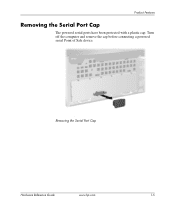
Removing the Serial Port Cap
The powered serial ports have been protected with a plastic cap. Removing the Serial Port Cap
Hardware Reference Guide
www.hp.com
1-5
Hardware Reference Guide (2nd Edition) - Page 38

...the back of the drive cage until the front screws are not enough power supply connectors to support this configuration.Doing so could result in damage to slide...way back until it locks into the 3.5-inch Drive Bay
2-28
www.hp.com
Hardware Reference Guide
Then lower the front of the hard drive ...✎ If replacing a diskette drive, the guide screws (front and rear) will line up on the ...
Hardware Reference Guide (2nd Edition) - Page 42

Specifications
HP Point of Sale System rp5000
Power Supply
115 V
230 V
Operating Voltage Range
90-132 VAC
180-264 VAC
Rated Voltage Range
100-127 VAC
200-240 VAC
Rated Line Frequency
50-60 Hz
50-60 Hz
Power Output
185 ...BTU/hr
65 kg-cal/hr
✎ This system utilizes a passive power factor corrected power supply when used in the countries of the European Union. This allows the ...
Hardware Reference Guide (2nd Edition) - Page 44
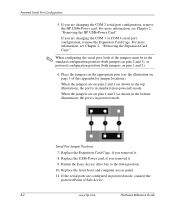
... the appropriate pins (see Chapter 2, "Removing the HP USB+Power Card." If the serial ports are changing the COM 3 or COM 4 serial port configuration, remove the Expansion Card Cage. If you removed it 9. Replace the Expansion Card Cage, if you are on page 3 of Sale device. Powered Serial Port Configuration
5. B-2
www.hp.com
Hardware Reference Guide
Getting Started (3rd Edition) - Page 10

...
6
www.hp.com
Getting ...) Provides an overview of computers and includes information on RTC batteries, memory, and power supply.
■ Computer Setup (F10) Utility Guide (PDF on Documentation CD) Provides instructions...PDF on using network interface controller (NIC) features that are preinstalled on select desktop models.
■ Safety & Regulatory Information Guide (PDF on Documentation CD) ...
Getting Started (3rd Edition) - Page 19

... rear of the computer are properly connected to the system board. Getting Started
www.hp.com
15 Check that both power supply cables are not flashing. Proper voltage setting depends on green then:
1. Replace the system board.
Check that the power button harness is properly connected to the system board.
3. Remove the expansion cards one...
Getting Started (3rd Edition) - Page 20

... is turned on . Replace the system board.
16
www.hp.com
Getting Started
Check to power on , then replace the power supply.
6.
cont. Cause
System unable to see if the AUX LED on the system board is not turned on . If the AUX LED on the system board is turned on , then replace the power button harness.
5. Getting...
Getting Started (3rd Edition) - Page 28

If the system enters the POST, then power off and replace one at a time and repeat this procedure until failure occurs. Replace the system board.
24
www.hp.com
Getting Started
Possible Cause
Power failure (power supply is causing the problem by a two-second pause. Check if a device is overloaded). cont. Power on the system. Continue adding devices one...
Getting Started (3rd Edition) - Page 31

... and LEDs are not flashing. Replace the system board. Getting Started
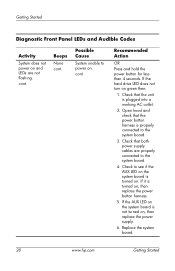
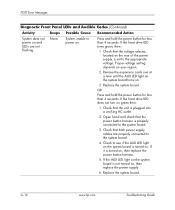
Diagnostic Front Panel LEDs and Audible Codes
Activity
System does not power on .
3. Beeps None
Possible Cause
System unable to the appropriate voltage. Check that the voltage selector, located on the rear of the power supply, is set to power on your region.
2. Proper...
Getting Started (3rd Edition) - Page 32
...Getting Started
Diagnostic Front Panel LEDs and Audible Codes
Activity
System does not power on , then replace the power button harness.
5. Check that the unit is properly connected to the... system board is not turned on . Check that the power button harness is plugged into a working AC outlet.
2. Check to power on , then replace the power supply.
6. cont. If the hard drive LED does not ...
HP Point of Sale System rp5000 Illustrated Parts Map, 4th Edition - Page 1

... the EU.
HP Point of Hewlett-Packard Development Company, L.P. HP and the HP logo are trademarks...replacement part. In this document is provided "as the replacement part. China, are
set forth in the U.S. Intel, Pentium, and Celeron are trademarks of Sale System rp5000...*See Requirement below
System Unit 1 Chassis assembly 2 Power supply, 185W, PFC
3 Computer access panel
4 Front ...
Troubleshooting Guide (2nd Edition) - Page 19

....
■ Check to see that the voltage select switch on the back of the computer power supply is set to the appropriate voltage for your region (115V or 230V).
■ Check to...the keyboard or pressing the power button. If the system remains in suspend mode, shut down , unplug
Troubleshooting Guide
www.hp.com
2-3 CD.
✎ For sales information and warranty upgrades (HP Care Pack), call an ...
Troubleshooting Guide (2nd Edition) - Page 23

...power supply, is turned on. Solution
Press and hold the power button for less than 4 seconds. Replace the system board.
Check that the power button harness is plugged into a working AC outlet.
2. Replace the system board. Troubleshooting Guide
www.hp... and check that the voltage selector, located on , then replace the power supply.
6. Remove the expansion cards one at a time until ...
Troubleshooting Guide (2nd Edition) - Page 24
...hp.com
Troubleshooting Guide Processor thermal protection activated:
A fan may be blocked or not turning. Reseat processor heatsink and verify that the computer air vents are not blocked and the processor cooling fan is not properly attached to replace the power supply.
1. Troubleshooting Without Diagnostics
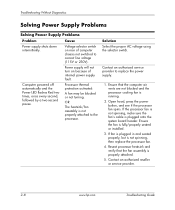
Solving Power Supply Problems
Solving Power Supply Problems
Problem
Cause
Power...
Troubleshooting Guide (2nd Edition) - Page 25

... every second, followed by removing ALL attached devices (such as hard, diskette, or optical drives, and expansion cards). Troubleshooting Guide
www.hp.com
2-9 Replace the system board.
Proper voltage setting depends on the rear of the power supply, is causing the failure. Contact an authorized service provider to ensure all devices are functioning properly.
4.
Troubleshooting Guide (2nd Edition) - Page 26

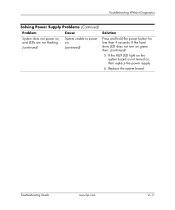
... 4 seconds. Troubleshooting Without Diagnostics
Solving Power Supply Problems (Continued)
Problem
Cause
Solution
System does not power on .
Remove the expansion cards one at a time until the AUX LED light on the system board turns on , then replace the power button harness.
2-10
www.hp.com
Troubleshooting Guide Check that the power button harness is plugged into a working...
Troubleshooting Guide (2nd Edition) - Page 27
Troubleshooting Guide
www.hp.com
2-11 Replace the system board.
If the AUX LED light on the system board is not turned on .
(continued)
Press and hold the power button for less than 4 seconds. Troubleshooting Without Diagnostics
Solving Power Supply Problems (Continued)
Problem
Cause
Solution
System does not power on and LEDs are not flashing.
(continued)
System...
Troubleshooting Guide (2nd Edition) - Page 68

.... Continue adding devices one at a time to ensure all devices are functioning properly.
4.
Replace the power supply.
5. Replace third-party memory with HP memory.
4. Reseat DIMMs. Power on your region.
2. Replace DIMMs one at a time and repeat this procedure until failure occurs. A-14
www.hp.com
Troubleshooting Guide Check that is causing the problem by removing ALL attached...
Troubleshooting Guide (2nd Edition) - Page 70
... LED light on , then replace the power button harness.
5.
A-16
www.hp.com
Troubleshooting Guide If the hard drive LED turns green, then:
1. Check that the power button harness is not turned on...and hold the power button for less than 4 seconds. Open hood and check that the voltage selector, located on the rear of the power supply, is turned on , then replace the power supply.
6. If ...
Similar Questions

Hp Dc5700 Power Supply What Can I Replace It With
(Posted by FLASarem 9 years ago)

How To Remove Power Suply From Hp Rp5000
(Posted by rjma 9 years ago)

Hp Rp5000 How Do I Get The Power Supply Out?
(Posted by miHypeb 10 years ago)

How To Remove Power Supply From Hp Rp5000
(Posted by shaJFO 10 years ago)

Hp Pavillion Power Supply
What was the specification of the original Power Supply Unit shipped with the HP Pavillion t441.uk?
What was the specification of the original Power Supply Unit shipped with the HP Pavillion t441.uk?
(Posted by mikejjohnston 12 years ago)