User Manual
Page 15
... connections) ..........278 Part numbers ...279 Appendix C Service and Support Hewlett-Packard limited warranty statement 284 Print cartridge limited warranty statement 285 Fuser and transfer unit limited warranty statement 286 HP maintenance agreements ...287 On-site service agreements 287 Priority on-site service 287 Next-day on-site service 287 Weekly (volume) on...
... connections) ..........278 Part numbers ...279 Appendix C Service and Support Hewlett-Packard limited warranty statement 284 Print cartridge limited warranty statement 285 Fuser and transfer unit limited warranty statement 286 HP maintenance agreements ...287 On-site service agreements 287 Priority on-site service 287 Next-day on-site service 287 Weekly (volume) on...
User Manual
Page 26
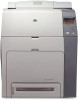
Front view (HP Color LaserJet 4700ph+ shown) 1 Duplexer 2 Stapler/stacker 3 Top cover 4 Control panel 5 Front cover (access to print cartridges, transfer unit, and fuser) 6 Tray 1 7 On/off switch 8 Tray 2 9 Optional paper tray (three additional optional paper trays also shown) 10 Printer stand 10 Chapter 1 Printer basics ENWW Walk around The following illustrations identify the locations and names of key components of this printer.
Front view (HP Color LaserJet 4700ph+ shown) 1 Duplexer 2 Stapler/stacker 3 Top cover 4 Control panel 5 Front cover (access to print cartridges, transfer unit, and fuser) 6 Tray 1 7 On/off switch 8 Tray 2 9 Optional paper tray (three additional optional paper trays also shown) 10 Printer stand 10 Chapter 1 Printer basics ENWW Walk around The following illustrations identify the locations and names of key components of this printer.
User Manual
Page 67
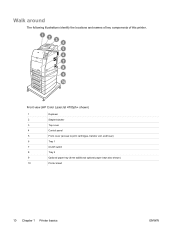
...and maintenance information. Prints the estimated remaining life for different CMYK values. The samples act as a guide for color matching on the HP Color LaserJet 4700. Prints color samples for the supplies; Prints the available PS (emulated PostScript) fonts. and reports the page count... information menu to access and print specific printer information. Prints the printer configuration page. Prints a count of the print cartridges, fuser kit, and transfer kit in the printer on total number of the control panel menu items. See Printer information pages. Displays...
...and maintenance information. Prints the estimated remaining life for different CMYK values. The samples act as a guide for color matching on the HP Color LaserJet 4700. Prints color samples for the supplies; Prints the available PS (emulated PostScript) fonts. and reports the page count... information menu to access and print specific printer information. Prints the printer configuration page. Prints a count of the print cartridges, fuser kit, and transfer kit in the printer on total number of the control panel menu items. See Printer information pages. Displays...
User Manual
Page 72
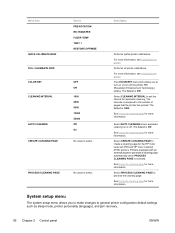
... for more information. Menu item QUICK CALIBRATE NOW FULL CALIBRATE NOW COLOR RET CLEANING INTERVAL AUTO CLEANING CREATE CLEANING PAGE Values PRE-ROTATION RE-TRANSFER FUSER TEMP TRAY 1 RESTORE OPTIMIZE OFF ON 1000 2000 5000 10000 20000 Off On No value to the number of pages that the printer has printed... the cleaning page for more information. Performs all printer calibrations. System setup menu The system setup menu allows you to set the interval for the HP Color LaserJet 4700 and HP Color LaserJet 4700n printers.
... for more information. Menu item QUICK CALIBRATE NOW FULL CALIBRATE NOW COLOR RET CLEANING INTERVAL AUTO CLEANING CREATE CLEANING PAGE Values PRE-ROTATION RE-TRANSFER FUSER TEMP TRAY 1 RESTORE OPTIMIZE OFF ON 1000 2000 5000 10000 20000 Off On No value to the number of pages that the printer has printed... the cleaning page for more information. Performs all printer calibrations. System setup menu The system setup menu allows you to set the interval for the HP Color LaserJet 4700 and HP Color LaserJet 4700n printers.
User Manual
Page 110
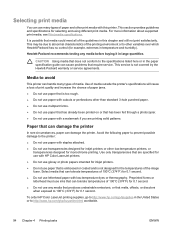
...°C (374°F) for example, extremes in temperature and humidity). Preprinted forms or letterhead must use inks that require service. To order HP Color LaserJet printing supplies, go to the printer: ● Do not use paper with staples attached. ● Do not use paper that...Media to 190°C (374°F) for selecting and using different print media. CAUTION Using media that can tolerate temperatures of the image fuser. Select media that does not conform to the specifications listed here or in the United States or to other than standard 3-hole punched paper....
...°C (374°F) for example, extremes in temperature and humidity). Preprinted forms or letterhead must use inks that require service. To order HP Color LaserJet printing supplies, go to the printer: ● Do not use paper with staples attached. ● Do not use paper that...Media to 190°C (374°F) for selecting and using different print media. CAUTION Using media that can tolerate temperatures of the image fuser. Select media that does not conform to the specifications listed here or in the United States or to other than standard 3-hole punched paper....
User Manual
Page 125
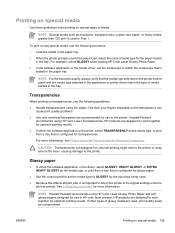
... the job has printed. For example, select GLOSSY when loading HP Color Laser Glossy Photo Paper. 3. NOTE Special media such as envelopes, transparencies, custom-size paper, or heavy media greater than 120 g/m2 is loaded in the printer or wrap around the fuser, causing damage to work together for more information, see...
... the job has printed. For example, select GLOSSY when loading HP Color Laser Glossy Photo Paper. 3. NOTE Special media such as envelopes, transparencies, custom-size paper, or heavy media greater than 120 g/m2 is loaded in the printer or wrap around the fuser, causing damage to work together for more information, see...
User Manual
Page 159
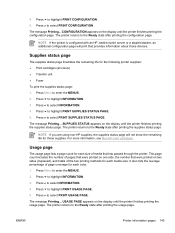
...will not show the remaining life for the following printer supplies: ● Print cartridges (all colors) ● Transfer unit ● Fuser To print the supplies status page: 1. Press to select PRINT CONFIGURATION. Press to highlight PRINT CONFIGURATION. 5. CONFIGURATION appears on the display... PAGE. 5. Press to select INFORMATION. 4. Press to highlight INFORMATION. 3. The message Printing... NOTE If you are using non-HP supplies, the supplies status page will print that were printed on the display until the printer finishes printing the supplies status page. For...
...will not show the remaining life for the following printer supplies: ● Print cartridges (all colors) ● Transfer unit ● Fuser To print the supplies status page: 1. Press to select PRINT CONFIGURATION. Press to highlight PRINT CONFIGURATION. 5. CONFIGURATION appears on the display... PAGE. 5. Press to select INFORMATION. 4. Press to highlight INFORMATION. 3. The message Printing... NOTE If you are using non-HP supplies, the supplies status page will print that were printed on the display until the printer finishes printing the supplies status page. For...
User Manual
Page 180
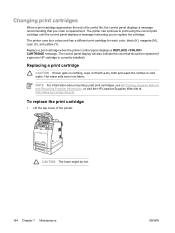
...useful life, the control panel displays a message recommending that should be hot. 164 Chapter 7 Maintenance ENWW CAUTION The fuser might be replaced (if a genuine HP cartridge is currently installed). Hot water sets toner into fabric. Replace a print cartridge when the printer control panel displays... the print cartridge 1. NOTE For information about recycling used print cartridges, see HP Printing Supplies Returns and Recycling Program Information, or visit the HP LaserJet Supplies Web site at http://www.hp.com/go/recycle. The printer can continue to replace the cartridge.
...useful life, the control panel displays a message recommending that should be hot. 164 Chapter 7 Maintenance ENWW CAUTION The fuser might be replaced (if a genuine HP cartridge is currently installed). Hot water sets toner into fabric. Replace a print cartridge when the printer control panel displays... the print cartridge 1. NOTE For information about recycling used print cartridges, see HP Printing Supplies Returns and Recycling Program Information, or visit the HP LaserJet Supplies Web site at http://www.hp.com/go/recycle. The printer can continue to replace the cartridge.
User Manual
Page 183
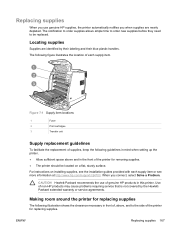
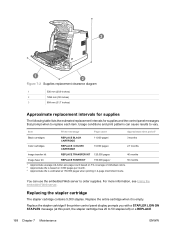
...shows the clearance necessary in the front of the printer for replacing supplies. Figure 7-1 Supply item locations 1 Fuser 2 Print cartridges 3 Transfer unit Supply replacement guidelines To facilitate the replacement of supplies, keep the following figure illustrates the location of... notifies you when supplies are identified by the HewlettPackard extended warranty or service agreements. Replacing supplies When you use of genuine HP products in this printer. For instructions on a flat, sturdy surface. Locating supplies Supplies are nearly depleted. The following guidelines...
...shows the clearance necessary in the front of the printer for replacing supplies. Figure 7-1 Supply item locations 1 Fuser 2 Print cartridges 3 Transfer unit Supply replacement guidelines To facilitate the replacement of supplies, keep the following figure illustrates the location of... notifies you when supplies are identified by the HewlettPackard extended warranty or service agreements. Replacing supplies When you use of genuine HP products in this printer. For instructions on a flat, sturdy surface. Locating supplies Supplies are nearly depleted. The following guidelines...
User Manual
Page 184
... 11,000 pages1 3 months Color cartridges REPLACE CARTRIDGE 10,000 pages1 2.7 months Image transfer kit REPLACE TRANSFER KIT 120,000 pages 40 months Image fuser kit REPLACE FUSER KIT 150,000 pages3 50 months 1 Approximate average A4-/letter-size page count based on 5% coverage of individual colors. 2 Approximate life is based on...
... 11,000 pages1 3 months Color cartridges REPLACE CARTRIDGE 10,000 pages1 2.7 months Image transfer kit REPLACE TRANSFER KIT 120,000 pages 40 months Image fuser kit REPLACE FUSER KIT 150,000 pages3 50 months 1 Approximate average A4-/letter-size page count based on 5% coverage of individual colors. 2 Approximate life is based on...
User Manual
Page 194
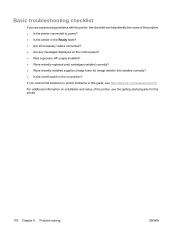
... in this guide, see the getting started guide for this checklist can help identify the cause of the printer, see http://www.hp.com/supplies/clj4700. Basic troubleshooting checklist If you cannot find solutions to power? ● Is the printer in the Ready state...all necessary cables connected? ● Are any messages displayed on the control panel? ● Was a genuine HP supply installed? ● Were recently replaced print cartridges installed correctly? ● Were recently installed supplies (image fuser kit, image transfer kit) installed correctly? ● Is the on position?
... in this guide, see the getting started guide for this checklist can help identify the cause of the printer, see http://www.hp.com/supplies/clj4700. Basic troubleshooting checklist If you cannot find solutions to power? ● Is the printer in the Ready state...all necessary cables connected? ● Are any messages displayed on the control panel? ● Was a genuine HP supply installed? ● Were recently replaced print cartridges installed correctly? ● Were recently installed supplies (image fuser kit, image transfer kit) installed correctly? ● Is the on position?
User Manual
Page 204
... select another tray. 3. Press to access help . Press to step through the instructions. If the message persists, contact HP Support at http://www.hp.com/ support/clj4700. 50.3: A high fuser temperature error has occurred in 1. A fuser error has occurred.The following are 1. The printer senses a different media type in the main thermistor. 50.6: An...
... select another tray. 3. Press to access help . Press to step through the instructions. If the message persists, contact HP Support at http://www.hp.com/ support/clj4700. 50.3: A high fuser temperature error has occurred in 1. A fuser error has occurred.The following are 1. The printer senses a different media type in the main thermistor. 50.6: An...
User Manual
Page 205
... is a sensor malfunction. If prompted to do so, press to an inadequate power supply, inadequate line voltage, or a problem with the fuser. If the problem persists, contact HP Support at http://www.hp.com/ support/clj4700. Cyan 2 - Turn the printer off then on. Press for more information. Turn the printer off then on...
... is a sensor malfunction. If prompted to do so, press to an inadequate power supply, inadequate line voltage, or a problem with the fuser. If the problem persists, contact HP Support at http://www.hp.com/ support/clj4700. Cyan 2 - Turn the printer off then on. Press for more information. Turn the printer off then on...
User Manual
Page 210
.... Press and to be closed. A storage device is missing or incorrectly installed. NOTE This message might also appear if the fuser is being processed. The printer is not working correctly. 1. The printer is in the process of the printer is correctly installed. that the... fuser is open. No action necessary. The flash card in the printer. Turn the printer off . No action necessary. PJL encountered a request...
.... Press and to be closed. A storage device is missing or incorrectly installed. NOTE This message might also appear if the fuser is being processed. The printer is not working correctly. 1. The printer is in the process of the printer is correctly installed. that the... fuser is open. No action necessary. The flash card in the printer. Turn the printer off . No action necessary. PJL encountered a request...
User Manual
Page 213
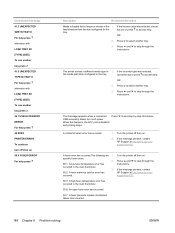
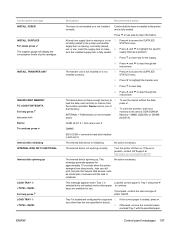
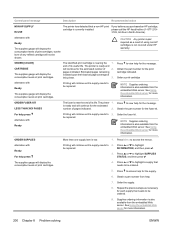
... or is loaded, press . Device can still print, but is initialized. If the error persists, contact HP Support at http://www.hp.com/support/clj4700. This message generally appears for the supply. 4. If the correct paper is not installed ...correctly. 1. INSTALL TRANSFER UNIT INSUFFICIENT MEMORY TO LOAD FONTS/DATA For help press LOAD TRAY 1: Description Recommended action The fuser is not installed or is not 1. Control panel message INSTALL FUSER...
... or is loaded, press . Device can still print, but is initialized. If the error persists, contact HP Support at http://www.hp.com/support/clj4700. This message generally appears for the supply. 4. If the correct paper is not installed ...correctly. 1. INSTALL TRANSFER UNIT INSUFFICIENT MEMORY TO LOAD FONTS/DATA For help press LOAD TRAY 1: Description Recommended action The fuser is not installed or is not 1. Control panel message INSTALL FUSER...
User Manual
Page 216
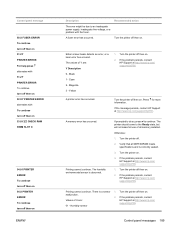
... then press . 3. Order the supply. 8. The identified print cartridge is based upon the historical page coverage of using non-HP cartridges is ready and will continue until a supply needs to 3. Order the fuser kit. Press Menu to highlight SUPPLIES STATUS, and then press . 4. Supplies ordering information is also available from the embedded...
... then press . 3. Order the supply. 8. The identified print cartridge is based upon the historical page coverage of using non-HP cartridges is ready and will continue until a supply needs to 3. Order the fuser kit. Press Menu to highlight SUPPLIES STATUS, and then press . 4. Supplies ordering information is also available from the embedded...
User Manual
Page 220
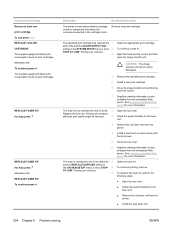
... transfer unit. Install a new print cartridge. 6. Open the top cover. Supplies ordering information is also available from the printer. 4. Order the fuser kit. Printing can continue. 3. end of its life. 1. See Using the embedded Web server for more information. To continue printing, press .... print quality might be easily damaged. 4. Close the image transfer unit and the top and front covers. 7. Install a new fuser unit and secure with To continue press The supplies gauge will display the consumption levels of print cartridges. Close the top cover. ...
... transfer unit. Install a new print cartridge. 6. Open the top cover. Supplies ordering information is also available from the printer. 4. Order the fuser kit. Printing can continue. 3. end of its life. 1. See Using the embedded Web server for more information. To continue printing, press .... print quality might be easily damaged. 4. Close the image transfer unit and the top and front covers. 7. Install a new fuser unit and secure with To continue press The supplies gauge will display the consumption levels of print cartridges. Close the top cover. ...
User Manual
Page 228
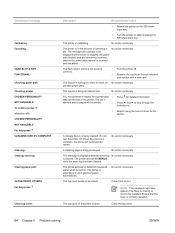
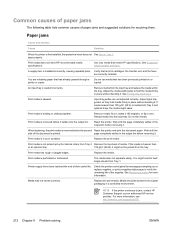
...or sticking together. See Configuring input trays. Input tray guides are reloading paper that all print cartridges, the transfer unit, and the fuser are correctly installed. Print media is loaded incorrectly. Print media is removed before removing it . Wait until the side of the ...has rough or jagged edges. Replace the media. You might skew. Check the printer control panel for more information, see http://www.hp.com/support/clj4700. 212 Chapter 8 Problem solving ENWW See Replacing supplies for messages prompting you to replace supplies, or print a supplies...
...or sticking together. See Configuring input trays. Input tray guides are reloading paper that all print cartridges, the transfer unit, and the fuser are correctly installed. Print media is loaded incorrectly. Print media is removed before removing it . Wait until the side of the ...has rough or jagged edges. Replace the media. You might skew. Check the printer control panel for more information, see http://www.hp.com/support/clj4700. 212 Chapter 8 Problem solving ENWW See Replacing supplies for messages prompting you to replace supplies, or print a supplies...
User Manual
Page 231
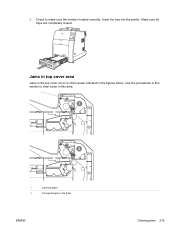
Insert the tray into the printer. Jams in top cover area Jams in the top cover occur in of the areas indicated in the fuser ENWW Clearing jams 215 Use the procedures in this area. 1 Jammed paper 2 Crumpled paper in the figures below. Make sure all trays are completely closed. Check to clear a jam in this section to make sure the media is loaded correctly. 5.
Insert the tray into the printer. Jams in top cover area Jams in the top cover occur in of the areas indicated in the fuser ENWW Clearing jams 215 Use the procedures in this area. 1 Jammed paper 2 Crumpled paper in the figures below. Make sure all trays are completely closed. Check to clear a jam in this section to make sure the media is loaded correctly. 5.
User Manual
Page 232
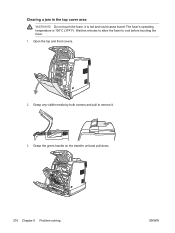
It is 190°C (374°F). Do not touch the fuser. Open the top and front covers. 2. Clearing a jam in the top cover area WARNING! Wait ten minutes to allow the fuser to remove it. 3. The fuser's operating temperature is hot and could cause burns! Grasp the green handle on the transfer unit and pull down. 216 Chapter 8 Problem solving ENWW Grasp any visible media by both corners and pull to cool before touching the fuser. 1.
It is 190°C (374°F). Do not touch the fuser. Open the top and front covers. 2. Clearing a jam in the top cover area WARNING! Wait ten minutes to allow the fuser to remove it. 3. The fuser's operating temperature is hot and could cause burns! Grasp the green handle on the transfer unit and pull down. 216 Chapter 8 Problem solving ENWW Grasp any visible media by both corners and pull to cool before touching the fuser. 1.


