
End User License Agreement
Page 2
... Software Product and user documentation are owned by HP or its affiliates may collect and use technical information you may no longer use a Software Product identified as an upgrade, you must first be used for your HP Product, whether in this EULA. 5. floppy disk, CD or DVD) or an equivalent solution delivered in any other form, may not reverse engineer, decompile, or disassemble the Software...
... Software Product and user documentation are owned by HP or its affiliates may collect and use technical information you may no longer use a Software Product identified as an upgrade, you must first be used for your HP Product, whether in this EULA. 5. floppy disk, CD or DVD) or an equivalent solution delivered in any other form, may not reverse engineer, decompile, or disassemble the Software...
Support Telephone Numbers
Page 27
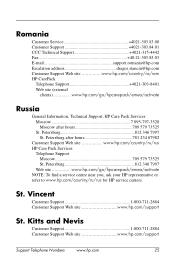
...-303.83.03 E-mail support.romania@hp.com Escalation address dragos.stanciu@hp.com Customer Support Web site www.hp.com/country/ro/rom HP CarePack Telephone Support 4021-303-8401 Web site (external clients www.hp.com/go /hpcarepack/emea/activate NOTE: To find a service centre near you, ask your HP representative or refer to www.hp.com/country/ru/rus for HP service centers.
...-303.83.03 E-mail support.romania@hp.com Escalation address dragos.stanciu@hp.com Customer Support Web site www.hp.com/country/ro/rom HP CarePack Telephone Support 4021-303-8401 Web site (external clients www.hp.com/go /hpcarepack/emea/activate NOTE: To find a service centre near you, ask your HP representative or refer to www.hp.com/country/ru/rus for HP service centers.
Getting Started Guide
Page 7
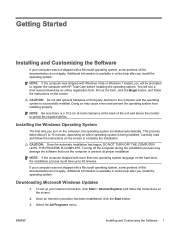
... a brief movie followed by an online registration form. Once an Internet connection has been established, click the Start button. 3. Fill out the form, click the Begin button, and follow the instructions on the screen. Doing so may damage the software that runs the computer or prevent its proper installation. Carefully read and follow the instructions on which operating system is a 10.2-cm (4-inch) clearance...
... a brief movie followed by an online registration form. Once an Internet connection has been established, click the Start button. 3. Fill out the form, click the Begin button, and follow the instructions on the screen. Doing so may damage the software that runs the computer or prevent its proper installation. Carefully read and follow the instructions on which operating system is a 10.2-cm (4-inch) clearance...
Getting Started Guide
Page 8
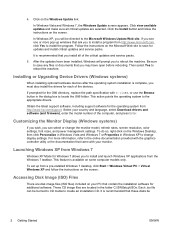
... the operating system from http://www.hp.com/support. For more pop-up from the Windows 7 taskbar. Accessing Disk Image (ISO) Files There are disk image files (ISO files) included on your monitor. Follow the instructions on the Windows Desktop, then click Personalize in Windows Vista and Windows 7 or Properties in Windows XP to the appropriate drivers. Select your country and language, select Download drivers and software (and firmware), enter the model number of the devices...
... the operating system from http://www.hp.com/support. For more pop-up from the Windows 7 taskbar. Accessing Disk Image (ISO) Files There are disk image files (ISO files) included on your monitor. Follow the instructions on the Windows Desktop, then click Personalize in Windows Vista and Windows 7 or Properties in Windows XP to the appropriate drivers. Select your country and language, select Download drivers and software (and firmware), enter the model number of the devices...
Getting Started Guide
Page 9
... the Software 3 used to the Customer Support Center. The Survey tab is included on your region see http://www.hp.com/support/contactHP. From the Survey tab, there is optional but recommended after installing or connecting a new device. The information in order to several categories of information about the hardware configuration of the computer and perform hardware diagnostic tests on making backup copies of your PC. The software and image...
... the Software 3 used to the Customer Support Center. The Survey tab is included on your region see http://www.hp.com/support/contactHP. From the Survey tab, there is optional but recommended after installing or connecting a new device. The information in order to several categories of information about the hardware configuration of the computer and perform hardware diagnostic tests on making backup copies of your PC. The software and image...
Getting Started Guide
Page 11
... RTC batteries, memory, and power supply. ● Maintenance and Service Guide (English only)-Provides information on parts removal and replacement, troubleshooting, Desktop Management, setup utilities, safety, routine care, connector pin assignments, POST error messages, diagnostic indicator lights and error codes. ● Safety & Regulatory Information Guide-Provides safety and regulatory information that ensures compliance with the computer, try the appropriate solutions below to try to the system board. NOTE: The Drive Protection System (DPS) Self-Test software is...
... RTC batteries, memory, and power supply. ● Maintenance and Service Guide (English only)-Provides information on parts removal and replacement, troubleshooting, Desktop Management, setup utilities, safety, routine care, connector pin assignments, POST error messages, diagnostic indicator lights and error codes. ● Safety & Regulatory Information Guide-Provides safety and regulatory information that ensures compliance with the computer, try the appropriate solutions below to try to the system board. NOTE: The Drive Protection System (DPS) Self-Test software is...
Getting Started Guide
Page 12
... computer to the Safe Mode to the Maintenance and Service Guide (English only) for details. ● If the screen is blank, plug the monitor into a different video port on the computer if one is functioning properly. ● If you need to the comprehensive Maintenance and Service Guide (English only) for technical assistance, be a problem with the network plug or cable. ● If you recently added new hardware, remove the hardware and see if...
... computer to the Safe Mode to the Maintenance and Service Guide (English only) for details. ● If the screen is blank, plug the monitor into a different video port on the computer if one is functioning properly. ● If you need to the comprehensive Maintenance and Service Guide (English only) for technical assistance, be a problem with the network plug or cable. ● If you recently added new hardware, remove the hardware and see if...

Getting Started Guide
Page 13
... boot, the other than the factory-installed operating system, check to be the default input source in Computer Setup. If the system beeps, then the keyboard should be operating correctly. ● Check all the needed device drivers have installed an operating system other monitor connectors are disabled and if the monitor is supported on the system. ● If the system has multiple video sources (embedded, PCI, or PCI-Express adapters) installed (embedded video on some models...
... boot, the other than the factory-installed operating system, check to be the default input source in Computer Setup. If the system beeps, then the keyboard should be operating correctly. ● Check all the needed device drivers have installed an operating system other monitor connectors are disabled and if the monitor is supported on the system. ● If the system has multiple video sources (embedded, PCI, or PCI-Express adapters) installed (embedded video on some models...
Getting Started Guide
Page 14
... installed after purchase. 8 Getting Started ENWW Interpreting POST Diagnostic Front Panel LEDs and Audible Codes If you want to software that are shipped without a version of Microsoft Windows. To add restore points manually: 1. Under Protection Settings, select the disk for which you see the Maintenance and Service Guide (English only) for interpretation and recommended action. System Recovery System Recovery completely erases and reformats the hard disk drive, deleting all open programs. 2. Restore and Recovery...
... installed after purchase. 8 Getting Started ENWW Interpreting POST Diagnostic Front Panel LEDs and Audible Codes If you want to software that are shipped without a version of Microsoft Windows. To add restore points manually: 1. Under Protection Settings, select the disk for which you see the Maintenance and Service Guide (English only) for interpretation and recommended action. System Recovery System Recovery completely erases and reformats the hard disk drive, deleting all open programs. 2. Restore and Recovery...
Getting Started Guide
Page 17
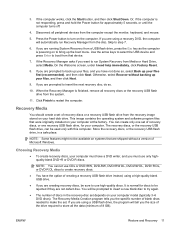
... Factory Reset. 8. When the Recovery Manager is powering on to bring up the boot menu. Click Finish to turn on your computer. The recovery discs, or the recovery USB flash drive, can create only one recovery USB flash drive, for your hard disk drive. The Recovery Media Creation program tells you are prompted to boot from Media or Hard Drive, select Media. Disconnect all peripheral devices from the disc. If you the specific number of recovery discs or a recovery USB flash drive from the system. 11. Use the arrow keys...
... Factory Reset. 8. When the Recovery Manager is powering on to bring up the boot menu. Click Finish to turn on your computer. The recovery discs, or the recovery USB flash drive, can create only one recovery USB flash drive, for your hard disk drive. The Recovery Media Creation program tells you are prompted to boot from Media or Hard Drive, select Media. Disconnect all peripheral devices from the disc. If you the specific number of recovery discs or a recovery USB flash drive from the system. 11. Use the arrow keys...
Getting Started Guide
Page 18
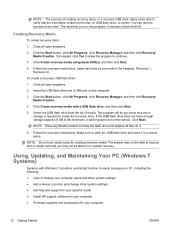
... boot up from the list of creating recovery discs, or a recovery USB drive, takes some time to verify that the information written on the computer. 3. Click Create recovery media using blank DVD(s), and then click Next. 4. Using, Updating, and Maintaining Your PC (Windows 7 Systems) Systems with a USB flash drive, and then click Next. 5. Click the Start button, click All Programs, click Recovery Manager, and then click Recovery Media Creation. The program will let you make...
... boot up from the list of creating recovery discs, or a recovery USB drive, takes some time to verify that the information written on the computer. 3. Click Create recovery media using blank DVD(s), and then click Next. 4. Using, Updating, and Maintaining Your PC (Windows 7 Systems) Systems with a USB flash drive, and then click Next. 5. Click the Start button, click All Programs, click Recovery Manager, and then click Recovery Media Creation. The program will let you make...

Illustrated Parts and Service Map - HP Pro 2110 Small Form Factor PC
Page 1
... technical or editorial errors or omissions contained herein. Illustrated Parts & Service Map HP Pro 2110 Business PC Small Form Factor Chassis © 2010 Hewlett-Packard Development Company, L.P. S. Key Specifications Processor Type RAM Type Maximum RAM Supported Expansion Slots Graphics Adapter Chipset Drive Support I /O audio assembly 2 Power switch/LED assembly * SATA optical drive cable with latch, 11 inch (280 mm) * SATA hard drive cable with LightScribe 2 TB hard drive, 7200 rpm 2 TB hard drive, 5400 rpm 1.5 TB hard drive, 7200 rpm 1.5 TB hard drive, 5400 rpm 1 TB hard drive...
... technical or editorial errors or omissions contained herein. Illustrated Parts & Service Map HP Pro 2110 Business PC Small Form Factor Chassis © 2010 Hewlett-Packard Development Company, L.P. S. Key Specifications Processor Type RAM Type Maximum RAM Supported Expansion Slots Graphics Adapter Chipset Drive Support I /O audio assembly 2 Power switch/LED assembly * SATA optical drive cable with latch, 11 inch (280 mm) * SATA hard drive cable with LightScribe 2 TB hard drive, 7200 rpm 2 TB hard drive, 5400 rpm 1.5 TB hard drive, 7200 rpm 1.5 TB hard drive, 5400 rpm 1 TB hard drive...

Illustrated Parts and Service Map - HP Pro 2110 Small Form Factor PC
Page 2
... SATA optical drive PS2 PS/2 connectors CMOS CMOS header PWRCPU CPU power connector SATA4 2nd SATA hard drive CPUFAN CPU/heat sink fan connector FRNT_USB1 1st USB connector PROCESSOR Processor slot MEDIA Media card reader connector CHFAN1 System fan connector PAR Parallel port connector DIMM1 Memory socket 1 COMB 2nd serial port connector DIMM2 Memory socket 2 PCI2 PCI slot 2 PSWD Password header PCI1 PCI slot 1 FLPY Floppy drive connector SPKR Speaker connector IDE IDE connector FRNT_AUD Front panel connector PWR Main power connector HP Pro 2110 Illustrated...
... SATA optical drive PS2 PS/2 connectors CMOS CMOS header PWRCPU CPU power connector SATA4 2nd SATA hard drive CPUFAN CPU/heat sink fan connector FRNT_USB1 1st USB connector PROCESSOR Processor slot MEDIA Media card reader connector CHFAN1 System fan connector PAR Parallel port connector DIMM1 Memory socket 1 COMB 2nd serial port connector DIMM2 Memory socket 2 PCI2 PCI slot 2 PSWD Password header PCI1 PCI slot 1 FLPY Floppy drive connector SPKR Speaker connector IDE IDE connector FRNT_AUD Front panel connector PWR Main power connector HP Pro 2110 Illustrated...

Illustrated Parts and Service Map - HP Pro 2110 Small Form Factor PC
Page 3
... BIOS to disable/enable the chassis intrusion function Warning and clear the intrusion warning. Check the type of showing the F11 Recovery prompt message on screen) to do so during POST. Replace the system board. 5 short beeps followed by a three second pause No graphics card installed or graphics card initialization failed. If the screen prompt opportunity is imminent. Onboard FDC Controller Disable/enable the diskette drive controller. Onboard LAN Boot ROM Disable/enable the boot ROM of attached hard drive devices (USB HDD...
... BIOS to disable/enable the chassis intrusion function Warning and clear the intrusion warning. Check the type of showing the F11 Recovery prompt message on screen) to do so during POST. Replace the system board. 5 short beeps followed by a three second pause No graphics card installed or graphics card initialization failed. If the screen prompt opportunity is imminent. Onboard FDC Controller Disable/enable the diskette drive controller. Onboard LAN Boot ROM Disable/enable the boot ROM of attached hard drive devices (USB HDD...

User Guide - HP ProtectTools
Page 7
... ...41 Using a key sequence to initiate shredding 41 Using the File Sanitizer icon 42 Manually shredding one asset 42 Manually shredding all selected items 42 Manually activating free space bleaching 43 Aborting a shred or free space bleaching operation 43 Viewing the log files ...43 9 Device Access Manager for HP ProtectTools 44 Starting background service ...44 Simple configuration ...44 Device class configuration (advanced 45 Adding a user or a group 45 Removing a user or a group...
... ...41 Using a key sequence to initiate shredding 41 Using the File Sanitizer icon 42 Manually shredding one asset 42 Manually shredding all selected items 42 Manually activating free space bleaching 43 Aborting a shred or free space bleaching operation 43 Viewing the log files ...43 9 Device Access Manager for HP ProtectTools 44 Starting background service ...44 Simple configuration ...44 Device class configuration (advanced 45 Adding a user or a group 45 Removing a user or a group...
User Guide - HP ProtectTools
Page 10
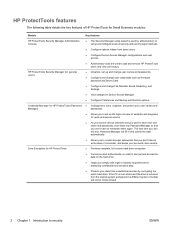
... the PC is ever stolen and the drive is removed from basic users. ● Configure Device Access Manager configurations and user access. ● Administrator tools are used to add and remove HP ProtectTools users and view user status. ● Organize, set up and change user names and passwords. ● Configure and change user credentials such as Windows password and Smart Card. ● Configure and change File Sanitizer Shred, Bleaching, and Settings. ● View settings for Device Access Manager. ● Configure Preferences and Backup and Restore options. ●...
... the PC is ever stolen and the drive is removed from basic users. ● Configure Device Access Manager configurations and user access. ● Administrator tools are used to add and remove HP ProtectTools users and view user status. ● Organize, set up and change user names and passwords. ● Configure and change user credentials such as Windows password and Smart Card. ● Configure and change File Sanitizer Shred, Bleaching, and Settings. ● View settings for Device Access Manager. ● Configure Preferences and Backup and Restore options. ●...

User Guide - HP ProtectTools
Page 25
... Windows Start menu: ▲ In Windows, click Start, click All Programs, and then click HP ProtectTools Security Manager. See Device class configuration (advanced) on site and has been given computer access to review sensitive financial data; 3 Benefits of security issues, including the following feature helps restrict access to data: Device Access Manager for Small Business Security Software To access HP ProtectTools Security Manager from internal or external locations ● Creating strong password policies Restricting access...
... Windows Start menu: ▲ In Windows, click Start, click All Programs, and then click HP ProtectTools Security Manager. See Device class configuration (advanced) on site and has been given computer access to review sensitive financial data; 3 Benefits of security issues, including the following feature helps restrict access to data: Device Access Manager for Small Business Security Software To access HP ProtectTools Security Manager from internal or external locations ● Creating strong password policies Restricting access...
User Guide - HP ProtectTools
Page 40
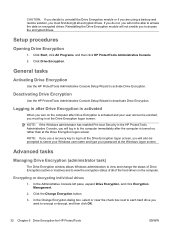
... your Windows user name and type your user account is turned on the computer. Logging in at the Drive Encryption logon screen: NOTE: If the Windows administrator has enabled Pre-boot Security in to access the encrypted drives. Reinstalling the Drive Encryption module will also be able to activate Drive Encryption. NOTE: If you use a recovery key to log in after Drive Encryption is activated When you turn on...
... your Windows user name and type your user account is turned on the computer. Logging in at the Drive Encryption logon screen: NOTE: If the Windows administrator has enabled Pre-boot Security in to access the encrypted drives. Reinstalling the Drive Encryption module will also be able to activate Drive Encryption. NOTE: If you use a recovery key to log in after Drive Encryption is activated When you turn on...
User Guide - HP ProtectTools
Page 45
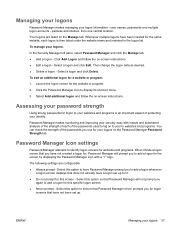
... Password Manager prompt you use for this specific logon screen. ● Never prompt - To manage your logons 37 Select a logon and click Delete. Password Manager makes monitoring and improving your logons on -screen instructions. ● Edit a logon - Select this option so that Password Manager never prompts you again to display its shortcut menu. 3. Select Add additional logon and follow the on the Password Manager Password Strength tab. The following settings are listed on -screen instructions...
... Password Manager prompt you use for this specific logon screen. ● Never prompt - To manage your logons 37 Select a logon and click Delete. Password Manager makes monitoring and improving your logons on -screen instructions. ● Edit a logon - Select this option so that Password Manager never prompts you again to display its shortcut menu. 3. Select Add additional logon and follow the on the Password Manager Password Strength tab. The following settings are listed on -screen instructions...

User Guide - HP ProtectTools
Page 52
... devices: ● USB devices for all non-Device Administrators ● All removable media (floppy disks, personal music players, pen drives, etc.) for all non-Device Administrators ● All DVD/CD-ROM drives for all non-Device Administrators ● All serial and parallel ports for all non-Device Administrators 44 Chapter 9 Device Access Manager for HP ProtectTools has the following classes of group membership NOTE: Device Access Manager uses Windows Local Users and Groups to start the background service. Device Access Manager...
... devices: ● USB devices for all non-Device Administrators ● All removable media (floppy disks, personal music players, pen drives, etc.) for all non-Device Administrators ● All DVD/CD-ROM drives for all non-Device Administrators ● All serial and parallel ports for all non-Device Administrators 44 Chapter 9 Device Access Manager for HP ProtectTools has the following classes of group membership NOTE: Device Access Manager uses Windows Local Users and Groups to start the background service. Device Access Manager...


