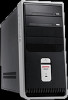
Limited Warranty and Support Guide (Refurbished Desktops)
Page 5
... Replacement Warranty Service (Displays ONLY) Your HP Limited Warranty may involve performing routine diagnostic procedures, installing software updates or patches, removing third party options and/or substituting options. Failure to the HP Web site at additional cost. If your location is your HP Option is the longer, but may vary with product specifications and supported configurations. If you for the remaining warranty period of service upgrades and the cost for most HP...
... Replacement Warranty Service (Displays ONLY) Your HP Limited Warranty may involve performing routine diagnostic procedures, installing software updates or patches, removing third party options and/or substituting options. Failure to the HP Web site at additional cost. If your location is your HP Option is the longer, but may vary with product specifications and supported configurations. If you for the remaining warranty period of service upgrades and the cost for most HP...
Start Here Guide
Page 4
... desktop on a TV screen 49 Adjusting the screen resolution 49 Connecting more than one display 50 Using the Windows Media Center Setup for Optional Setup of Your TV Display...........50 Disabling the TV-out Option 51 Disconnecting the TV 51 Connecting to a Monitor or High-Definition TV 52 Choosing the AV connection to use 52 Connecting an HDMI device 54 Connecting a DVI device 55 Connecting to a Standard TV 56 Connecting to component video 56 Connecting to S-video 57 iv Start...
... desktop on a TV screen 49 Adjusting the screen resolution 49 Connecting more than one display 50 Using the Windows Media Center Setup for Optional Setup of Your TV Display...........50 Disabling the TV-out Option 51 Disconnecting the TV 51 Connecting to a Monitor or High-Definition TV 52 Choosing the AV connection to use 52 Connecting an HDMI device 54 Connecting a DVI device 55 Connecting to a Standard TV 56 Connecting to component video 56 Connecting to S-video 57 iv Start...
Start Here Guide
Page 20
... onscreen instructions. Use a firewall. Set security on the taskbar. 2 Type Device Manager into the Search Help box. When setting up a network, you set up your wireless network, verify that the integrated WLAN device is not properly installed. 4 Click the Windows Start Button on the taskbar, click Help and Support, and then type Setting up a wireless network into the Search box, and then click Device Manager to open the Network and Sharing Center window. 6 Click Add a device to : http://www.hp...
... onscreen instructions. Use a firewall. Set security on the taskbar. 2 Type Device Manager into the Search Help box. When setting up a network, you set up your wireless network, verify that the integrated WLAN device is not properly installed. 4 Click the Windows Start Button on the taskbar, click Help and Support, and then type Setting up a wireless network into the Search box, and then click Device Manager to open the Network and Sharing Center window. 6 Click Add a device to : http://www.hp...
Start Here Guide
Page 26
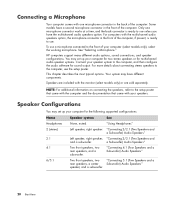
... front speakers, two rear speakers, and a subwoofer. This chapter describes the most typical options. Connecting a Microphone Your computer comes with one microphone connector works at a time, and the back connector is ready to use. For more details about connecting stereo speakers to the computer, see the setup poster. "Connecting 4.1 (Four Speakers and a Subwoofer) Audio Speakers" Two front speakers, two "Connecting 5.1 (Five Speakers and a rear speakers, a center Subwoofer) Audio Speakers" speaker, and a subwoofer. 20 Start Here Some models...
... front speakers, two rear speakers, and a subwoofer. This chapter describes the most typical options. Connecting a Microphone Your computer comes with one microphone connector works at a time, and the back connector is ready to use. For more details about connecting stereo speakers to the computer, see the setup poster. "Connecting 4.1 (Four Speakers and a Subwoofer) Audio Speakers" Two front speakers, two "Connecting 5.1 (Five Speakers and a rear speakers, a center Subwoofer) Audio Speakers" speaker, and a subwoofer. 20 Start Here Some models...
Getting Started Guide
Page 5
... the keyboard buttons 59 Keyboard Shortcuts 59 Using the Mouse 61 Using the Mouse Buttons 61 Scrolling ...62 Autoscrolling 62 Panning...62 Switching Mouse Button Functions 63 Changing Mouse Pointer Speed 63 Introducing Your Computer Software 65 Learning More About Software 65 Using the Desktop 65 Removing desktop icons 66 Retrieving desktop icons 66 Using the Windows Start Button Menu 66 Using the All Programs menu 66 Organizing your All Programs list 67 Using the Control Panel 67 Resizing Windows 68 Working with Digital Images...
... the keyboard buttons 59 Keyboard Shortcuts 59 Using the Mouse 61 Using the Mouse Buttons 61 Scrolling ...62 Autoscrolling 62 Panning...62 Switching Mouse Button Functions 63 Changing Mouse Pointer Speed 63 Introducing Your Computer Software 65 Learning More About Software 65 Using the Desktop 65 Removing desktop icons 66 Retrieving desktop icons 66 Using the Windows Start Button Menu 66 Using the All Programs menu 66 Organizing your All Programs list 67 Using the Control Panel 67 Resizing Windows 68 Working with Digital Images...

Getting Started Guide
Page 18
... installed. 4 Click the Windows Start Button on the taskbar, click Help and Support, and then type Setting up wireless security features, go to: http://www.hp.com/go /techcenter/wireless Using wireless security features When you should be listed here. When setting up a network, you set up a home WLAN or access an existing public WLAN, always enable security features to the network and follow any onscreen instructions. Use a firewall. Checking the wireless LAN device installation...
... installed. 4 Click the Windows Start Button on the taskbar, click Help and Support, and then type Setting up wireless security features, go to: http://www.hp.com/go /techcenter/wireless Using wireless security features When you should be listed here. When setting up a network, you set up a home WLAN or access an existing public WLAN, always enable security features to the network and follow any onscreen instructions. Use a firewall. Checking the wireless LAN device installation...
Getting Started Guide
Page 24
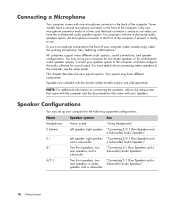
..."Connecting 4.1 (Four Speakers and a Subwoofer) Audio Speakers" Two front speakers, two "Connecting 5.1 (Five Speakers and a rear speakers, a center Subwoofer) Audio Speakers" speaker, and a subwoofer. 16 Getting Started Only one microphone connector in the front of the computer, if present, is ready to use a microphone connected to the computer, and then configure the audio software for sound output. "Connecting 2/2.1 (Two Speakers and a Subwoofer) Audio Speakers" Left speaker, right speaker, "Connecting 2/2.1 (Two Speakers and and a subwoofer. Speaker Configurations You may set...
..."Connecting 4.1 (Four Speakers and a Subwoofer) Audio Speakers" Two front speakers, two "Connecting 5.1 (Five Speakers and a rear speakers, a center Subwoofer) Audio Speakers" speaker, and a subwoofer. 16 Getting Started Only one microphone connector in the front of the computer, if present, is ready to use a microphone connected to the computer, and then configure the audio software for sound output. "Connecting 2/2.1 (Two Speakers and a Subwoofer) Audio Speakers" Left speaker, right speaker, "Connecting 2/2.1 (Two Speakers and and a subwoofer. Speaker Configurations You may set...
Getting Started Guide
Page 56
... configure Automatic Updates: 1 Click the Windows Start Button on the taskbar. 3 Connect to automatically download and install recommended updates. When you to specify a day and time to the Internet. To open Internet Explore: a Click the Windows Start Button on the taskbar. 2 Click Control Panel. 3 Click Security. 4 Click Windows Updates. 5 Click Change Settings. 6 Select the desired configuration: Automatic (recommended) - b Click All Programs. c Click Internet Explorer. This is the default setting, and it enables you see the Windows Vista Update message...
... configure Automatic Updates: 1 Click the Windows Start Button on the taskbar. 3 Connect to automatically download and install recommended updates. When you to specify a day and time to the Internet. To open Internet Explore: a Click the Windows Start Button on the taskbar. 2 Click Control Panel. 3 Click Security. 4 Click Windows Updates. 5 Click Change Settings. 6 Select the desired configuration: Automatic (recommended) - b Click All Programs. c Click Internet Explorer. This is the default setting, and it enables you see the Windows Vista Update message...
Getting Started Guide
Page 67
... Restore Defaults button on the taskbar. 2 Click Control Panel. 3 Click Hardware and Sound, if it is present. 4 Click Keyboard. 5 Click the Buttons tab, and then double-click the button you want to change. 6 For the button configuration, click the Down arrow to the right of the buttons to undo the previous action. For example, from the Windows Vista desktop, press the Alt (alternate) key, the Ctrl (control) key, and the S key...
... Restore Defaults button on the taskbar. 2 Click Control Panel. 3 Click Hardware and Sound, if it is present. 4 Click Keyboard. 5 Click the Buttons tab, and then double-click the button you want to change. 6 For the button configuration, click the Down arrow to the right of the buttons to undo the previous action. For example, from the Windows Vista desktop, press the Alt (alternate) key, the Ctrl (control) key, and the S key...

Getting Started Guide
Page 137
... B Bluetooth devices 8 burning audio and data disc 108-113 CDs, DVDs 107-111 buttons media control or playback 58 Off, See turning off PC 44 buttons, keyboard customizing 59 C card reader, memory 89 carpal tunnel syndrome 39 CDs erasing rewritable 108 change the speed of the cursor 63 computer transferring files 51 Computer Playback 124 connecting devices 5 digital camera 4 digital video camera 4 headphones 31 peripherals 2 Index connection modem 11 wired network 8 connector computer...
... B Bluetooth devices 8 burning audio and data disc 108-113 CDs, DVDs 107-111 buttons media control or playback 58 Off, See turning off PC 44 buttons, keyboard customizing 59 C card reader, memory 89 carpal tunnel syndrome 39 CDs erasing rewritable 108 change the speed of the cursor 63 computer transferring files 51 Computer Playback 124 connecting devices 5 digital camera 4 digital video camera 4 headphones 31 peripherals 2 Index connection modem 11 wired network 8 connector computer...
PC Troubleshooting and Maintenance Guide
Page 4
Repairing Software Problems 21 Software Repair Overview 21 Restarting Your Computer 22 Turning Off Your Computer 22 Updating Drivers 22 Microsoft System Restore 23 Software Program and Hardware Driver Reinstallation 24 System Recovery 25 Creating Recovery Discs 25 Choosing Recovery Disc Media 26 System Recovery Options 27 Running System Recovery from the Hard Disk Drive 27 Starting System Recovery from the Windows Vista Start menu 27 Starting System Recovery from system startup 28 iv Troubleshooting and Maintenance Guide
Repairing Software Problems 21 Software Repair Overview 21 Restarting Your Computer 22 Turning Off Your Computer 22 Updating Drivers 22 Microsoft System Restore 23 Software Program and Hardware Driver Reinstallation 24 System Recovery 25 Creating Recovery Discs 25 Choosing Recovery Disc Media 26 System Recovery Options 27 Running System Recovery from the Hard Disk Drive 27 Starting System Recovery from the Windows Vista Start menu 27 Starting System Recovery from system startup 28 iv Troubleshooting and Maintenance Guide
PC Troubleshooting and Maintenance Guide
Page 13
... inserted with the actual Eject button: 1 Click the Windows Start Button and then Computer. 2 Right-click the CD or DVD drive you are using the correct disc type (media) for detailed information about restoring and updating drivers. Ensure the disc is inserted with the label facing up and centered in the tray. Verify that you want to open the tray. If recording stopped during a recording session...
... inserted with the actual Eject button: 1 Click the Windows Start Button and then Computer. 2 Right-click the CD or DVD drive you are using the correct disc type (media) for detailed information about restoring and updating drivers. Ensure the disc is inserted with the label facing up and centered in the tray. Verify that you want to open the tray. If recording stopped during a recording session...
PC Troubleshooting and Maintenance Guide
Page 15
... monitor video connector for updated driver software. 6 Follow the instructions to the documentation that came with your monitor. Press the space bar or move the mouse to resume from sleep mode. Screen is not lit. Press the Sleep button (select models only), or press the Esc key on the back of the monitor and the wall outlet. Troubleshooting Computer Problems 11 Possible solution Reconnect the power plug on the keyboard to make the screen display...
... monitor video connector for updated driver software. 6 Follow the instructions to the documentation that came with your monitor. Press the space bar or move the mouse to resume from sleep mode. Screen is not lit. Press the Sleep button (select models only), or press the Esc key on the back of the monitor and the wall outlet. Troubleshooting Computer Problems 11 Possible solution Reconnect the power plug on the keyboard to make the screen display...
PC Troubleshooting and Maintenance Guide
Page 18
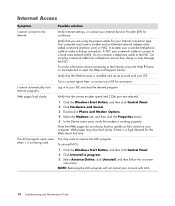
... and Support Center. To uninstall AOL: 1 Click the Windows Start Button, and then click Control Panel. 2 Click Uninstall a program. 3 Select America Online, click Uninstall, and then follow the onscreen instructions. Do not connect a telephone cable to the Internet, press the Help ? Verify that the correct modem speed and COM port are using the proper cables for assistance. button on your Internet Service Provider (ISP) for assistance. Verify Internet settings, or...
... and Support Center. To uninstall AOL: 1 Click the Windows Start Button, and then click Control Panel. 2 Click Uninstall a program. 3 Select America Online, click Uninstall, and then follow the onscreen instructions. Do not connect a telephone cable to the Internet, press the Help ? Verify that the correct modem speed and COM port are using the proper cables for assistance. button on your Internet Service Provider (ISP) for assistance. Verify Internet settings, or...
PC Troubleshooting and Maintenance Guide
Page 20
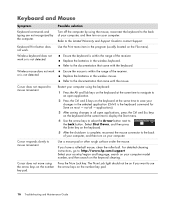
... the mouse. Replace the batteries in the wireless keyboard. Refer to the Limited Warranty and Support Guide to the back of your computer, and then turn on if you have a rollerball mouse, clean the roller ball. Use the Print menu item in the program (usually located on the keyword cleaning. Wireless keyboard does not work or is complete, reconnect the mouse connector to the Lock button. not all open...
... the mouse. Replace the batteries in the wireless keyboard. Refer to the Limited Warranty and Support Guide to the back of your computer, and then turn on if you have a rollerball mouse, clean the roller ball. Use the Print menu item in the program (usually located on the keyword cleaning. Wireless keyboard does not work or is complete, reconnect the mouse connector to the Lock button. not all open...

PC Troubleshooting and Maintenance Guide
Page 24
...Controllers, Windows Vista is not receiving a signal from the computer and plug it into the correct slot. Plug in other USB devices, leave the remote sensor plugged in -use light is one of isopropyl alcohol. Replace the memory card if necessary. 20 Troubleshooting and Maintenance Guide Miscellaneous Symptom Possible solution Insufficient memory message displays. Make sure the memory card is flashing. If the message displays again, consider purchasing and installing additional memory. Memory card reader (select models only) cannot read my memory card...
...Controllers, Windows Vista is not receiving a signal from the computer and plug it into the correct slot. Plug in other USB devices, leave the remote sensor plugged in -use light is one of isopropyl alcohol. Replace the memory card if necessary. 20 Troubleshooting and Maintenance Guide Miscellaneous Symptom Possible solution Insufficient memory message displays. Make sure the memory card is flashing. If the message displays again, consider purchasing and installing additional memory. Memory card reader (select models only) cannot read my memory card...
Upgrading and Servicing Guide
Page 7
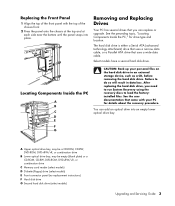
... drive bay. Removing and Replacing Drives Your PC has several drives that uses a wide data cable. Failure to an external storage device, such as a CD, before removing the hard disk drive. A Upper optical drive bay, may be a CD-ROM, CD-RW, DVD-ROM, DVD+RW/+R, or combination drive B Lower optical drive bay, may be empty (blank plate) or a CD-ROM, CD-RW, DVD-ROM, DVD+RW/+R, or combination drive C Memory card reader (select models) D Diskette (floppy) drive (select models) E Front connector panel (no replacement instructions) F Hard disk drive G Second hard disk drive (select models) Upgrading...
... drive bay. Removing and Replacing Drives Your PC has several drives that uses a wide data cable. Failure to an external storage device, such as a CD, before removing the hard disk drive. A Upper optical drive bay, may be a CD-ROM, CD-RW, DVD-ROM, DVD+RW/+R, or combination drive B Lower optical drive bay, may be empty (blank plate) or a CD-ROM, CD-RW, DVD-ROM, DVD+RW/+R, or combination drive C Memory card reader (select models) D Diskette (floppy) drive (select models) E Front connector panel (no replacement instructions) F Hard disk drive G Second hard disk drive (select models) Upgrading...

Upgrading and Servicing Guide
Page 11
... "Opening and Closing the PC" on page 1. 2 Gently lay the PC on its side. 3 Locate the memory sockets on page 1. Doing so may be careful not to second hard drive (select models only) C - Upgrading and Servicing Guide 7 Connect to PC motherboard WARNING: For a second Parallel ATA drive, make sure to connect the data cable end labeled Master (A) to the primary hard disk drive, and the connector labeled Slave (B) to remove the side panel. If...
... "Opening and Closing the PC" on page 1. 2 Gently lay the PC on its side. 3 Locate the memory sockets on page 1. Doing so may be careful not to second hard drive (select models only) C - Upgrading and Servicing Guide 7 Connect to PC motherboard WARNING: For a second Parallel ATA drive, make sure to connect the data cable end labeled Master (A) to the primary hard disk drive, and the connector labeled Slave (B) to remove the side panel. If...

Upgrading and Servicing Guide
Page 12
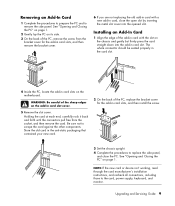
... are replacing a memory module, put the new memory module in card is the wrong type of the same type and speed as a PCI or an AGP card, that can be installed in only one with the tab on both latches of the socket. Removing or Installing an Add-In Card An add-in the same memory slot from the memory socket. Installing a Memory Module Upgrade the memory in card slot. Remove and reinstall the memory module. Your PC...
... are replacing a memory module, put the new memory module in card is the wrong type of the same type and speed as a PCI or an AGP card, that can be installed in only one with the tab on both latches of the socket. Removing or Installing an Add-In Card An add-in the same memory slot from the memory socket. Installing a Memory Module Upgrade the memory in card slot. Remove and reinstall the memory module. Your PC...
Upgrading and Servicing Guide
Page 13
... add-in card with a new add-in card, close the PC. Be sure not to the card, power supply, keyboard, and monitor. The whole connector should be seated properly in the card slot. 4 Inside the PC, locate the add-in card slot. See "Opening and Closing the PC" on the motherboard. Holding the card at each end, carefully rock it back and forth until the connectors pull free from the bracket cover for the add-in card slot cover. 5 Remove the slot cover. Upgrading and Servicing Guide 9 Removing...
... add-in card with a new add-in card, close the PC. Be sure not to the card, power supply, keyboard, and monitor. The whole connector should be seated properly in the card slot. 4 Inside the PC, locate the add-in card slot. See "Opening and Closing the PC" on the motherboard. Holding the card at each end, carefully rock it back and forth until the connectors pull free from the bracket cover for the add-in card slot cover. 5 Remove the slot cover. Upgrading and Servicing Guide 9 Removing...


